Blog
Companion app for iOS 2024.5: Let me Assist you 🍎
 Bruno Pantaleão
Hey, this is Bruno. It has been a great few months since I joined Nabu Casa to work full-time on the Home Assistant iOS app, again a big thanks to our Home Assistant Cloud subscribers for making this possible. Today, I would like to recap what has been introduced since the last blog post for version 2024.1 and discuss more about how Assist is being integrated into the Apple ecosystem - along with a number of other improvements to the app.
Music Assistant 2.0: Your Music, Your Players
 Marcel van der Veldt
Today, exactly five years ago, I, Marcel, started working on Music Assistant. What began as a quick script, to sync my playlists so I could switch between streaming providers, grew into a beast on its own.
Music Assistant is what I’d like to call a “music library manager” – it gives you full control of playing YOUR music on your players. Just like Home Assistant centralizes all your devices and services to work together, Music Assistant does the same with your music sources and smart audio-playing devices.
To just play with Music Assistant without reading what it is (yes, we know you!):

Z-Wave is not dead
 Paulus Schoutsen
 Art by Clelia Rella
TL;DR: Z-Wave is alive and well, partly due to a strong community that is building new open-source resources. To thrive well into the future, it must take further steps to open its technology.
Last week, Dominic, Uwe, and I (Paulus) attended the Z-Wave Alliance member meeting in Austin, Texas. It was the first meeting since we became a member and we came with a mission: tell Alliance members about the work done by the open-source community for Z-Wave and find new avenues for collaboration.
Three of us attended, each representing different facets of Z-Wave within the Open Home Foundation: Dominic is the founder and maintainer of Z-Wave JS, which powers the Z-Wave integration in Home Assistant. Uwe leads the development of the Home Assistant Z-Wave stick that we’re working on, and I was there to enable collaborations with other Z-Wave members. Big thanks to Home Assistant Cloud subscribers – thanks to you we can do this work full-time at Nabu Casa.
A little background on Z-Wave
To use Z-Wave in Home Assistant, our users buy a Z-Wave certified USB stick and combine it with Z-Wave certified devices. Home Assistant then connects to the stick using Z-Wave JS, developed by Dominic, and we’re off to the races. Z-Wave JS was developed completely outside of the Z-Wave Alliance, and is based on the published version of the Z-Wave specification.
Z-Wave wasn’t always this open - Z-Wave used to be owned by a single company, which was later acquired by Silicon Labs. SiLabs decided it was time for change and turned the Z-Wave Alliance into a Standards Development Organization (SDO) that is controlled by its members and a standard that is open.
As it stands, there are still parts of Z-Wave that are not open yet, including the firmware that is running on Z-Wave sticks. I might have mentioned a couple of times, including in my keynote, that we should open up more. It is a good thing to let everyone help fix bugs, improve code quality, and improve diagnostics.
Read on →2024.5: Just a little bit smaller
 Franck Nijhof
Home Assistant Core 2024.5! 🎉
The last two releases were massive! With our new drag ’n drop dashboards and the tools to organize your Home Assistant instance, it is hard to top those releases… 😅
So, this release is just a tiny bit smaller than those two, but still epic! 🤘
My personal favorite is the new features added to the data tables, which many of you requested since the last update. But the ability to change the names of the devices shown on the energy dashboard is a close second!
Oh! We’ve held our State of the Open Home 2024 live stream! In case you’ve missed it, I would definitely recommend watching it back. There are tons of cool things and spoilers in there!
But more importantly, it launched the Open Home Foundation, which now governs our beloved Home Assistant project! ❤️ Read more in the State of the Open Home 2024 blog post.
Anyway, I will not hold you any longer. Enjoy the release!
../Frenck
Read on →Thinking Bigger: State of the Open Home 2024
 Gordon Cameron
We recently held our State of the Open Home 2024 live stream, where we revealed how we are thinking even bigger about securing the future of the smart home. During this stream we launched the Open Home Foundation, a new non-profit organization created to fight for the fundamental principles of the smart home — privacy, choice, and sustainability — focused on serving everyone that lives in one. To learn more about the Open Home Foundation read the full announcement.
The stream includes a deep dive into the evolution of Home Assistant and how it has now reached an estimated 1 million installations. There were other substantial updates on voice and hardware, including teasing our upcoming Z-Wave and voice assistant hardware. The first panel discussion featured the founders of Open Home Foundation collaborating projects WLED, Zigbee2MQTT, Rhasspy, and Z-Wave JS. A second panel gave a comprehensive overview of the state of open standards, featuring key open-source developers working on Zigbee, Z-Wave, Matter, and Bluetooth. The stream caps off with a look into the future of the open home, including the announcement of a roadmap full of exciting new features.
2024.4: Organize all the things!
Home Assistant Core 2024.4! 🌱 🌻
Are you ready for another massive release? This release addresses the most requested feature in Home Assistant history: grouping automations! 🎉
But why stop there?
This release brings excellent new features to our user interface that house not one, not two, but three! new ways to organize your Home Assistant setup! The best part is that it is not just for automations, but for everything! 🤯
Perfect timing: spring is here! Time to spring clean your Home Assistant setup by adding some organization to your configuration! 🧹
Enjoy the release! 🌞
../Frenck
Read on →And the winners of our voice assistant community contest are 🥁 ...
 Jean-Loïc Pouffier
2023 was the Year of the Voice. It was a yearly goal to let users control Home Assistant in their own language. We organized a contest to celebrate what our voice assistants could enable with the community. The contest entries have been all amazing, the work produced outstanding. Personally, I learnt so much just reviewing all the entries, I learnt that our community is so creative and relentless. My personal project list grew quite a lot as I want to implement half of the entries at home! Today is the day we announce the winners!
Read on →2024.3: Drag 'n Drop it like it's hot! 🎉
Home Assistant Core 2024.3! 🎉
Yes, you read the title right! I’m super stoked about this one. It has been talked about for ages… I promise it is real:
Drag ’n drop for dashboards is finally here! 🎉
A first experimental version of the section dashboard that supports drag ’n drop. A tremendous step forward and an even bigger milestone for Home Assistant!
But don’t be blinded by these Dungeons ’n Dragons; there is a lot more!
New intents for Assist (I can finally tell my vacuum to start cleaning!), using script inputs/fields from the dashboard, and a new energy graph for individual devices. And that is just the tip of the iceberg!
Enjoy the release!
../Frenck
PS: A big thanks and shoutout to @bramkragten & @balloob for organizing and running the beta and everyone who helped out making these release notes happen during my absence this beta. 🥰
Read on →A Home-Approved Dashboard chapter 1: Drag-and-drop, Sections view, and a new grid system design!
 Madelena Mak
Wow! At long last!! The stars have aligned, and our experimental drag-and-drop feature for dashboards is finally here! 🥲
Home Assistant strives to be the best smart home platform, and a smart home allows its residents to automate, control, observe, and anticipate the comfort, security, and various conveniences of their home. Besides voice assistants, dashboards are also a great way to help users do just that!
Therefore, we have been working hard to make customization and organization of dashboards as easy and intuitive as possible, and to create a default dashboard that will be more useful, user-friendly, and relevant right out of the box. Matthias and I teamed up in April last year to tackle this problem together, and we called this series of improvements over our current dashboard “Project Grace”, named after the influential and brilliant late Admiral Grace Hopper.
After months of user research and ideation to ensure that our design is “home-approved” - to be easy and intuitive to use for you, your family, your guests, your roommates, and more - we are happy to share the first fruit of our success in the upcoming release 2024.3, with the help of Paul and of course the wonderful frontend team. We hope that these features will help you take the dream dashboard for you and your home from idea to reality much faster and much more easily.
For those of you who are curious about the features and the design thinking behind them, read on and check out our special livestream last week. You can also try out our updated demo and get involved by joining the Home Assistant User Testing Group! And last of all, thank you for supporting our efforts by subscribing to Home Assistant Cloud!
Enjoy!
~ Madelena 🥳
Read on →Raspberry Pi 5 support and more in Home Assistant OS release 12 & Supervisor update
 Stefan Agner
TL;DR: Home Assistant OS 12 adds support for Raspberry Pi 5 and ODROID-M1S boards, with the Linux kernel updated to 6.6. Additionally, backups have become faster, and add-ons can now signal when they should not be auto-updated.
Raspberry Pi 5
With the release of Home Assistant OS 12, we officially announce Raspberry Pi 5 support! Many Home Assistant OS users have extensively tested the preview releases during the last few months, and after some initial hiccups with the Raspberry Pi 5-specific update mechanism, things are stable and solid today. As a third of all Home Assistant users currently use a Raspberry Pi board as their dedicated Home Assistant system, we are sure this support will make many users very happy!
Compared to other Raspberry Pi boards, HAOS does not use U-Boot as an extra bootloader. Instead, the Raspberry Pi’s built-in “tryboot” functionality is used to automatically fall back to a previous release in case of an update failure. This new update mechanism integration required us to have a longer testing phase.
In our testing, the higher CPU clock of the Raspberry Pi 5 (up to 2.4GHz) makes Home Assistant feel noticeably snappier compared to previous Raspberry Pi boards. Additionally, a Raspberry Pi HAT that provides NVMe SSD support allows you to extend your Raspberry Pi with fast, reliable, and cost-effective storage. We do recommend using an SD card as the boot medium and using the data disk feature to move most of the Home Assistant installation onto the NVMe. This is easy to set up and guarantees a reliable boot.
ODROID-M1S
The Raspberry Pi 5 is not the only new board that is supported with this release. We are happy to announce that the family of supported ODROID devices from the Korean manufacturer Hardkernel has become bigger thanks to a community contribution from Tim Lunn (darkxst), who implemented board support for the ODROID-M1S. The ODROID-M1S is the newest single-board computer from Hardkernel, which is similar to the already supported ODROID-M1, which was added in Home Assistant OS 10. This new board offers a slimmer form factor, 4 or 8 GB of RAM on board, and an embedded 64 GB eMMC storage. Home Assistant OS can be booted either from an SD card or the system can be flashed to the eMMC card using the procedure described in the documentation. While the board also has an NVMe slot for a solid-state drive, it is not supported as a boot device. However, just like on the Raspberry Pi 5, it can still be used as the data disk.
Just like its larger brother, the ODROID-M1S is powered by a quad-core ARM Cortex-A55, but while ODROID-M1 has (very slightly) beefier Rockchip RK3568 SoC, this board sports the RK3566. Some of our more curious readers may notice this is the same processor that is found on our Home Assistant Green! While there are some similarities between those two boards, Home Assistant Green can offer you a seamless out-of-box experience, allowing you to set up your smart home in a matter of minutes. But Home Assistant is also about the freedom of choice, so if you are looking for a more DIY approach, ODROID-M1S might be the right choice for you.
Linux 6.6
Home Assistant OS 12 now comes with Linux kernel 6.6! This is good news for those who want to run their Home Assistant on newer hardware that lacked support in the previous 6.1 kernel. This version update also allows us to extend the list of supported Wi-Fi and Bluetooth cards, including ones you may find in new mini-PCs, a popular platform for Home Assistant OS. Those who run their installations on a Raspberry Pi (including the CM4 in Home Assistant Yellow) may notice their kernel version still starts with 6.1. This is because we are not using the upstream kernel but the downstream one maintained by the Raspberry Pi developers. But this kernel was also updated to the latest stable version, which we hope will resolve some sporadic bugs.
Home Assistant OS sticks to the LTS (long-term support) kernels, which are usually released once per year - just like Buildroot, the base system we use for Home Assistant OS. This time, we are slightly ahead of schedule, because usually the kernel update is done alongside the bump of the Buildroot version. But don’t worry, the Buildroot update is coming soon as well, and we expect to include its update in one of the next minor Home Assistant OS releases coming in the following weeks. This will conclude this year’s spring cleaning of Home Assistant OS, and we will be ready to focus on new features and improvements again!
Faster Backups
Home Assistant Supervisor and Core’s built-in backup functionality has become much faster. Thanks to contributions from bdraco, the backup feature gained faster compression speeds due to a library named isal, which provides optimized low-level functions for compression and decompression. More importantly, the backup feature now avoids intermediate copies, making it faster on slower storage media especially. If you used uncompressed backups before because the backup used to be too slow for you, now is the time to give compressed backups a try again! 😀
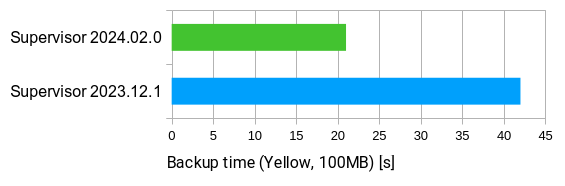
Home Assistant OS users’ backup functionality is part of Supervisor. You’ll have received the improvements incrementally over the releases of the past few weeks. At the time of writing, your installation should run on Home Assistant Supervisor 2024.02.0 with all these improvements built in.
Safer add-on auto-updates
Last, but not least, the Supervisor features an auto-update flag for add-ons. However, depending on the nature of an update to the add-on, the new version might need user intervention or have breaking changes. Add-on developers now have the option to prevent auto-updates to such versions. Users of the auto-update feature might see an update notification despite auto-updates being enabled. This means that the author of the add-on decided that this particular update should not be auto-updated and instead be manually approved by the user.
Note: We generally don’t recommend auto-updates for add-ons, as even safe updates might interfere with regular operation. For example, during the automatic update of an add-on like Z-Wave JS, your Z-Wave devices would unexpectedly become unavailable for a short time. The better approach for such add-ons is to plan some time to maintain your Home Assistant system every once in a while and update your add-ons in a batch.