Configuration.yaml
While you can configure most of Home Assistant from the user interface, for some integrations, you need to edit the configuration.yaml file.
This file contains integrationsIntegrations connect and integrate Home Assistant with your devices, services, and more. [Learn more] to be loaded along with their configurations. Throughout the documentation, you will find snippets that you can add to your configuration file to enable specific functionality.
 Example of a configuration.yaml file, accessed using the File editor app on a Home Assistant Operating System installation.
Editing configuration.yaml
How you edit your configuration.yaml file depends on your editor preferences and the installation type you used to set up Home Assistant. Follow these steps:
- Set up file access and prepare an editor.
- Find the configuration directory.
-
Edit the
configuration.yamlfile. - Save your changes and reload the configuration to apply the changes.
To set up file access and prepare an editor
Before you can edit a file, you need to know how to access files in Home Assistant and setup an editor. File access depends on your installation type. If you use Home Assistant Operating SystemHome Assistant OS, the Home Assistant Operating System, is an embedded, minimalistic, operating system designed to run the Home Assistant ecosystem on single board computers (like the Raspberry Pi) or Virtual Machines. It includes Home Assistant Core, the Home Assistant Supervisor, and supports apps. Home Assistant Supervisor keeps it up to date, removing the need for you to manage an operating system. Home Assistant Operating System is the recommended installation type for most users., you can use editor apps, for example. If you use Home Assistant ContainerHome Assistant Container is a standalone container-based installation of Home Assistant Core. Any OCI compatible runtime can be used, but the documentation focus is on Docker. [Learn more], apps are not available.
To set up file access on the Home Assistant Operating System, follow these steps:
- If you are unsure which option to choose, install the file editor app.
- Alternatively, use the Studio Code Server app. This editor offers live syntax checking and auto-fill of various Home Assistant entities. But it looks more complex than the file editor.
- If you prefer to use a file editor on your computer, use the Samba app.
To find the configuration directory
-
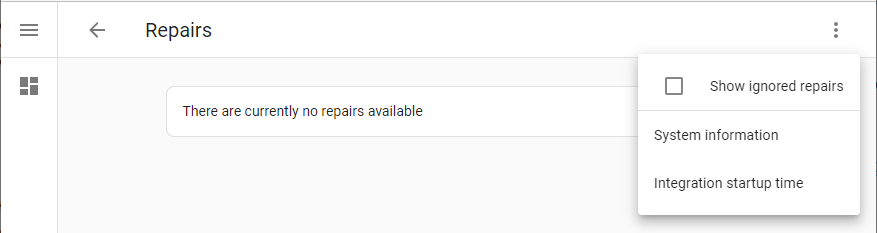
To look up the path to your configuration directory, go to Settings > System > Repairs.
- Select the three dots menu and select System information.
-
Find out the location of the Configuration directory.
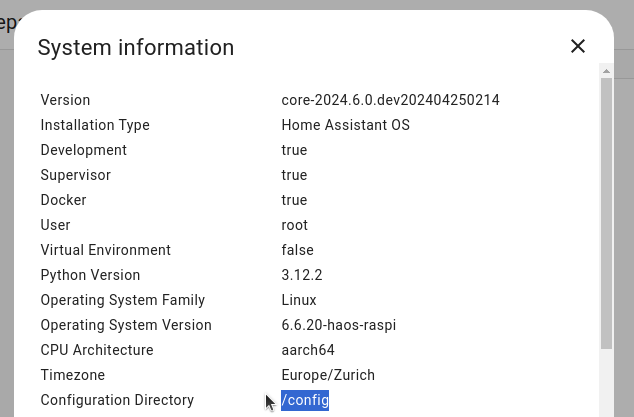
- Unless you changed the file structure, the default is as follows: -
-
Home Assistant Operating SystemHome Assistant OS, the Home Assistant Operating System, is an embedded, minimalistic, operating system designed to run the Home Assistant ecosystem on single board computers (like the Raspberry Pi) or Virtual Machines. It includes Home Assistant Core, the Home Assistant Supervisor, and supports apps. Home Assistant Supervisor keeps it up to date, removing the need for you to manage an operating system. Home Assistant Operating System is the recommended installation type for most users.: the
configuration.yamlis in the/configfolder of the installation. -
Home Assistant ContainerHome Assistant Container is a standalone container-based installation of Home Assistant Core. Any OCI compatible runtime can be used, but the documentation focus is on Docker. [Learn more]: the
configuration.yamlis in the config folder that you mounted in your container.
-
Home Assistant Operating SystemHome Assistant OS, the Home Assistant Operating System, is an embedded, minimalistic, operating system designed to run the Home Assistant ecosystem on single board computers (like the Raspberry Pi) or Virtual Machines. It includes Home Assistant Core, the Home Assistant Supervisor, and supports apps. Home Assistant Supervisor keeps it up to date, removing the need for you to manage an operating system. Home Assistant Operating System is the recommended installation type for most users.: the
- Unless you changed the file structure, the default is as follows: -
To edit the configuration file
Once you have located the config folder, you can edit your configuration.yaml file. How you edit the file depends on the editor you set up in step 1:
-
If you are using the File editor app: Open the app, navigate to the
/configfolder in the file browser on the left, and select theconfiguration.yamlfile to open it in the editor. -
If you are using the Studio Code Server app: Open the app, use the file explorer on the left to navigate to the
configuration.yamlfile, and select it to open in the editor. -
If you are using Samba to access files: Navigate to the shared folder on your computer, locate the
configuration.yamlfile, and open it with your favorite text editor like Notepad++ or Visual Studio Code.
If you have watched any videos about setting up Home Assistant using configuration.yaml (particularly ones that are old), you might notice your default configuration file is much smaller than what the videos show. Don’t be concerned, you haven’t done anything wrong. Many items in the default configuration files shown in those old videos are now included in the default_config: line that you see in your configuration file. Refer to the default config integration for more information on what’s included in that line.
Validating the configuration
After changing configuration or automation files, you can check if the configuration is valid. A configuration check is also applied automatically when you reload the configuration or when you restart Home Assistant.
The method for running a configuration check depends on your installation type. Check the common tasks for your installation type:
Reloading the configuration to apply changes
For configuration changes to become effective, the configuration must be reloaded. Most integrations in Home Assistant (that do not interact with devicesA device is a model representing a physical or logical unit that contains entities. or servicesThe term “service” in Home Assistant is used in the sense of an information
service. For example, the municipal waste management service that provides
entities for organic, paper, and packaging waste. In terms of functionality,
the information service is like a device. It is called service to avoid
confusion, as it does not come with a piece of hardware.) can reload changes made to their configuration in configuration.yaml without needing to restart Home Assistant.
-
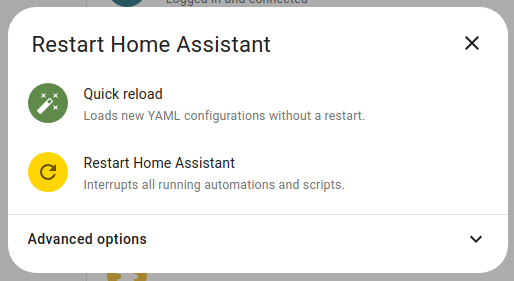
Under Settings, select the three dots menu (top right)
, select Restart Home Assistant > Quick reload. 
-
If you find that your changes were not applied, you need to restart.
- Select Restart Home Assistant.
- Note: This interrupts automations and scripts.
Troubleshooting the configuration
If you run into trouble while configuring Home Assistant, refer to the configuration troubleshooting page.