Developer tools
The dashboard contains a section called Developer tools.
 Screenshot of Home Assistant's developer tools.
| Section | Description |
|---|---|
| YAML | Lets you validate the configuration and trigger a reload or restart |
| States | Sets the representation of an entity |
| Actions | Performs actions from integrations |
| Template | Renders templates |
| Events | Fires events |
| Statistics | Shows a list of long-term statistic entities |
| Assist | Lets you see how Home Assistant Assist processes a sentence |
What can I do with Developer tools?
The Developer tools is meant for all (not just for the developers) to quickly try out things - like performing actions, updating states, raising events, and publishing messages in MQTT). It is also a necessary tool for those who write custom automations and scripts by hand. The following describes each of the sections in detail.
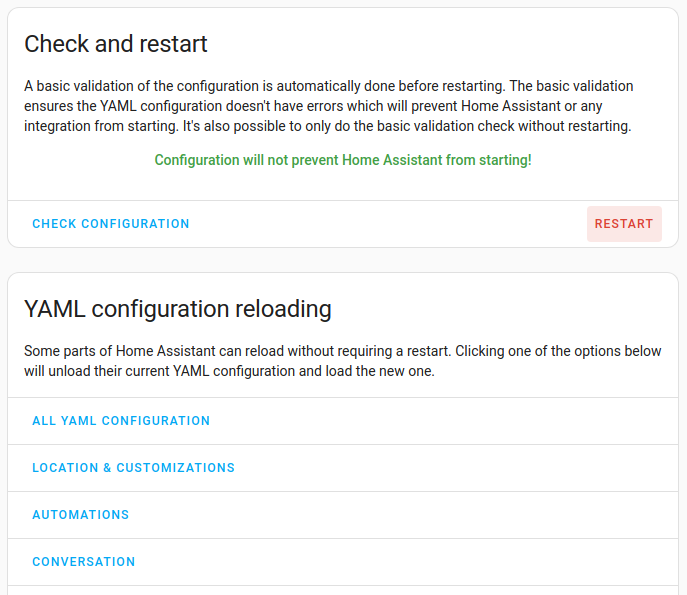
YAML tab
The YAML tab provides buttons to trigger a check of configuration files and to reload the configuration. Reloading is needed to apply changes that you’ve made to the configuration.
It is almost the same as the option under Settings > three dots
Reloading the YAML configuration
For configuration changes to become effective, the configuration must be reloaded. Most integrations in Home Assistant (that do not interact with devicesA device is a model representing a physical or logical unit that contains entities. or servicesThe term “service” in Home Assistant is used in the sense of an information
service. For example, the municipal waste management service that provides
entities for organic, paper, and packaging waste. In terms of functionality,
the information service is like a device. It is called service to avoid
confusion, as it does not come with a piece of hardware.) can reload changes made to their configuration in configuration.yamlThe configuration.yaml file is the main configuration file for Home Assistant. It lists the integrations to be loaded and their specific configurations. In some cases, the configuration needs to be edited manually directly in the configuration.yaml file. Most integrations can be configured in the UI. [Learn more] without needing to restart Home Assistant.
-
Go to Developer tools > YAML and scroll down to the YAML configuration reloading section (alternatively, hit “c” anywhere in the UI and search for “reload”).
- You are presented with a list of integrations, such as Automations or Conversation.
-
Depending on what you find in the list, you can proceed with either reloading or you need to restart Home Assistant:
- If the integration is listed, select it to reload the settings.
- For example, if you’ve changed the General settings, you can select Location & customizations to apply those changes.
- If the integration is not listed, you need to Restart Home Assistant for changes to take effect.
- If the integration is listed, select it to reload the settings.
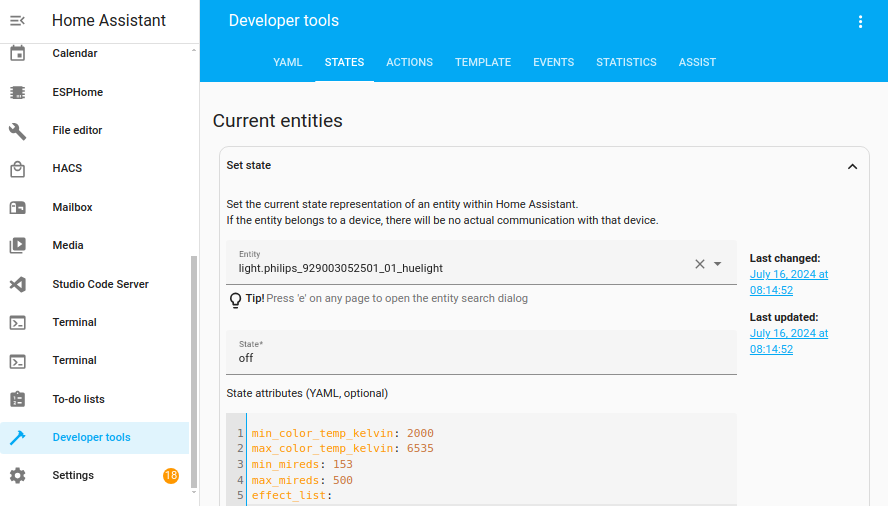
States tab
This section shows all the available entities, their corresponding state and the attribute values. The state and the attribute information is what Home Assistant sees at run time. To update the entity with a new state, or a new attribute value, select the entity, scroll to the top, and modify the values, and select the SET STATE button.
Note that this is the state representation of a device within Home Assistant. That means, it is what Home Assistant sees, and it does not communicate with the actual device in any manner. The updated information can still be used to trigger events, and state changes. To communicate with the actual device, it is recommended to perform actions in the Actions section above, instead of updating state.
For example, changing the light.bedroom state from off to on does not turn on the light. If there is an automation that triggers on the state change of the light.bedroom, it will be triggered – even though the actual bulb has not turned on. Also, when the bulb state changes – the state information will be overridden (the refresh icon can be used to retrieve the latest information that Home Assistant has). In other words, the changes that are made through the States section are temporary, and are recommended to use for testing purposes only.
The table containing all entities can be filtered for each column. The used search is a wildcard search meaning that if you input “office” in the entity column filter, every entity whose ID matches “*office*” will be shown. You can also add your own wildcards in the search input (such as “office*light”). The attribute filter supports separate filters for attribute names and values, separated by a colon “:”. So the filter “location:3” will result in the table showing all entities that have an attribute name that contains “location” and whose attribute value contains “3”.
Actions tab
This section is used to perform actions that are available in Home Assistant.
The list of actions in the Actions dropdown are automatically populated based on the integrations that are found in the configuration, automation and script files. If a desired action does not exist, it means either the integration is not configured properly or not defined in the configuration, automation or script files.
When an action is selected, and if that action requires an entity_id to be passed, the Entity dropdown will automatically be populated with corresponding entities.
An action may also require additional input to be passed. It is commonly referred to as “action data”. The action data is accepted in YAML format, and it may be optional depending on the action.
When an entity is selected from the Entity dropdown, it automatically populates action data with the corresponding entity_id. The action data YAML can then be modified to pass additional [optional] parameters. The following is an illustration on how to perform a light.turn_on action.
To turn on a light bulb, use the following steps:
- Select
light.turn_onfrom the Action dropdown. - Select the entity (typically the light bulb) from the Entity dropdown (if no entity_id is selected, it turns on ALL lights)
- If an entity is selected, the action data is populated with basic YAML that will be passed to the action. Additional data can also be passed by updating the YAML as below.
entity_id: light.bedroom
brightness: 255
rgb_color: [255, 0, 0]
Template editor tab
The template editor provides a way to quickly test templates prior to placing them into automations and scripts. A code editor is on the left side and your real-time output is displayed in the preview on the right side.
By default, this will contain sample code that illustrates how templates can be written and tested. This sample code can be removed and replaced with your own. You can restore the default example by pressing the Reset to Demo Template button beneath the code editor.
For more information about Jinja2, visit Jinja2 documentation, and also read templating document here.
Events tab
In the Events section, you can either fire an event on the event bus or subscribe to an event type in order to view the event data JSON.
Fire an event
To fire an event, simply type the name of the event, and pass the event data in JSON format.
For example, to fire a custom event, enter the event_type as event_light_state_changed and the event data JSON as
state: on
If there is an automation that handles that event, it will be automatically triggered. See below:
- alias: "Capture Event"
  triggers:
    - trigger: event
      event_type: event_light_state_changed
  actions:
    - action: notify.notify
      data:
        message: "Light is turned {{ trigger.event.data.state }}"
Subscribe to an event
To subscribe to an event, enter the event type under Listen to events and select Start listening. Some events types are listed in the Events section under Active listeners. You can usually find information about event types for a particular integration in its documentation. You can then examine the event data JSON to find the correct parameters for your automations.
For example, subscribing to the event type shelly.click of the Shelly integration, returns event data JSON similar to the following on a button press.
Event 0 fired 9:53 AM:
{
    "event_type": "shelly.click",
    "data": {
        "device_id": "e09c64a22553484d804353ef97f6fcd6",
        "device": "shellybutton1-A4C12A45174",
        "channel": 1,
        "click_type": "single"
    },
    "origin": "LOCAL",
    "time_fired": "2021-04-28T08:53:12.755729+00:00",
    "context": {
        "id": "e0f379706563aaa0c2c1fda5174b5a0e",
        "parent_id": null,
        "user_id": null
    }
}
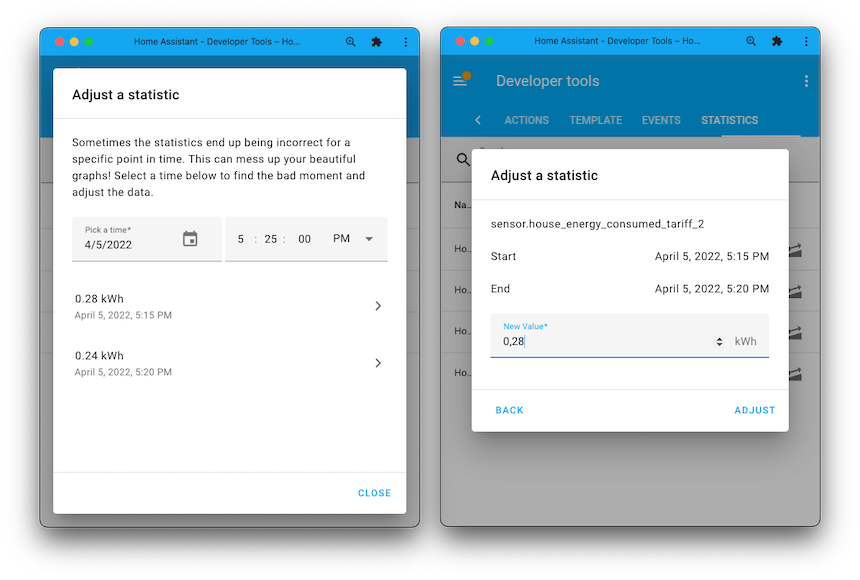
Statistics tab
The Statistics tab shows a list of long-term statistic entities. If the long term statistics is not working for an entity, a Fix issue link is shown. Select it to view a description of the issue. There might also be an option to fix the issue.

Another use of the statistics developer tool is to correct any measurements. Select the icon. Use date & time to search for the incorrect data point and adjust the value.
Assist tab
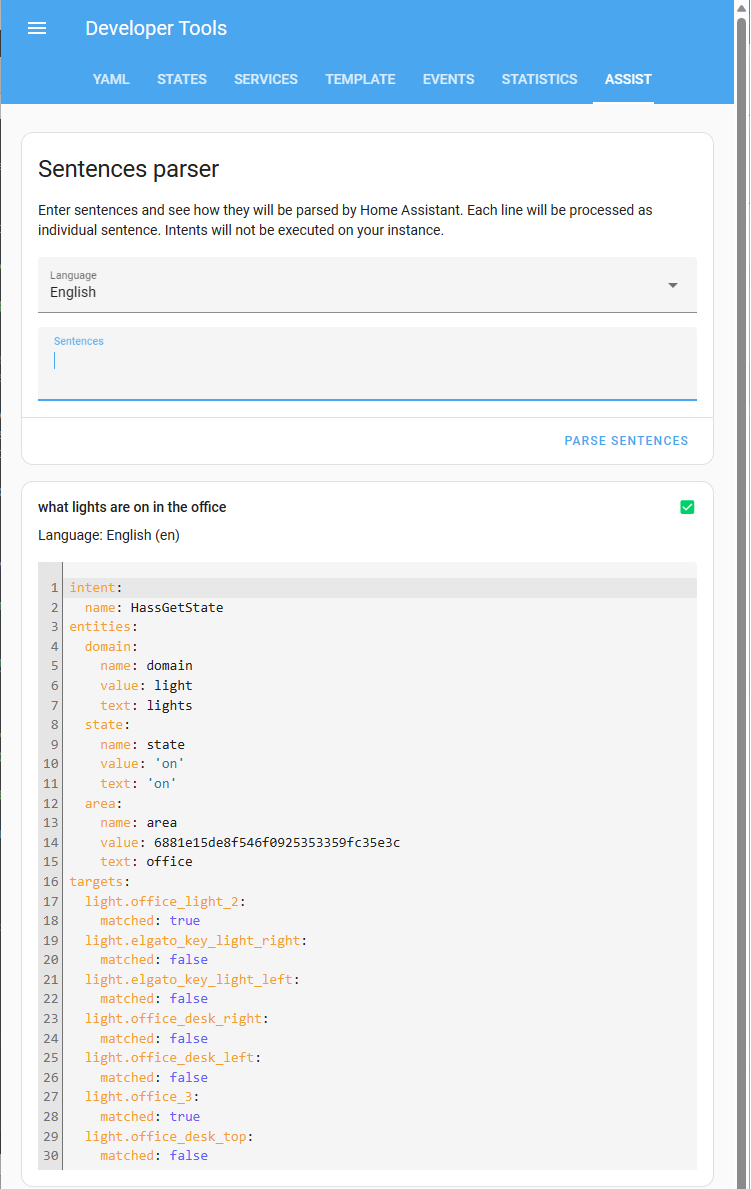
The Assist tab lets you see how Home Assistant’s Assist processes a sentence.
If no matching intent is found, then Assist is unable to interpret the sentence. If a matching intent was found, information is provided on the action that will be performed on which entities. The example below shows how the following sentence was parsed: what lights are on in the office.
- Assist found a matching intent: HassGetState.
- It found entities matching the domain: lights.
- The lights have the state on.
- The lights are in the area office.
- The targets are the narrowed-down entities in scope.