Common tasks - Home Assistant Operating System
This section will provide guides to some common tasks and information which you will need in order to run, maintain, and edit your Home Assistant OS system. For further details on any particular subject, make sure to refer to the documentation for specific apps (formerly known as add-ons) or topics listed here.
Configuring access to files
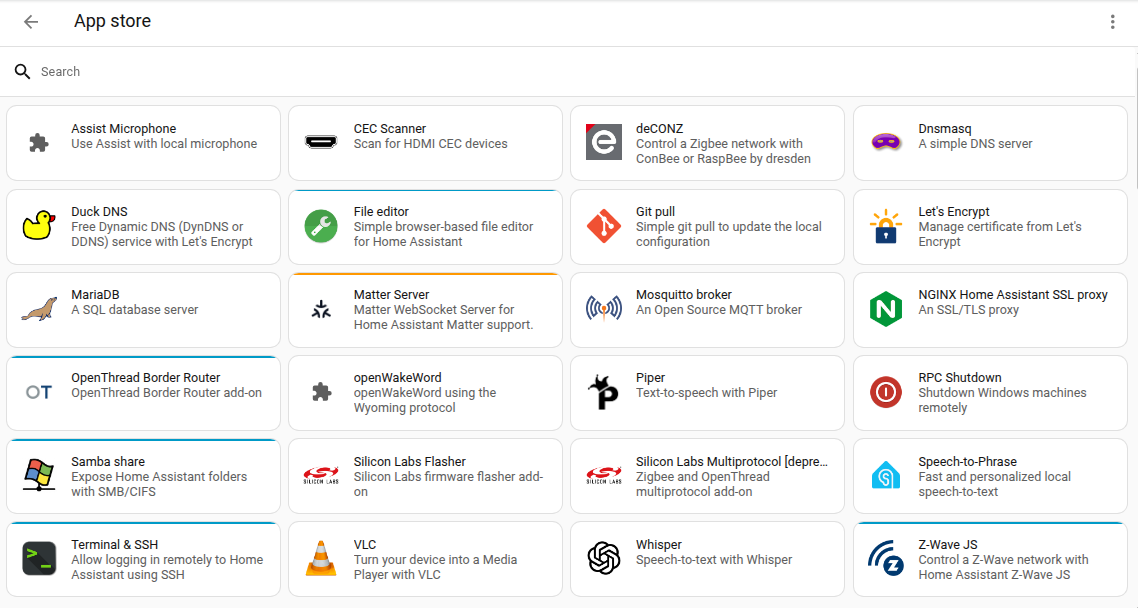
Your Home Assistant Operating server includes two repositories by default: The official core app repository, and the community app repository. All of the apps mentioned here can be installed by navigating to the app store using Settings > Apps > Install app in the UI.
One of the first things to take care of after installing Home Assistant OS is to provide yourself access to files. There are several apps commonly used for this, and most users employ a mix of various apps. Default directories on the host are mapped to the apps so that they can be accessed by the services any particular app might provide. On the host system these directories exist on the /data partition at /mnt/data/supervisor/.
Using any of the apps listed below, the following directories are made available for access:
addonsbackupconfigmediasharessl
Installing and using the Samba app
The Samba app allows you to share the directories on Home Assistant with other systems on your network. After installing the app, you can then also edit files using the editor of your preference from your client computer. This app can be installed from the app store’s official repository.
To install the app, follow these steps:
- Go to Settings > Apps > Samba share and select Install.
- On the Configuration tab, define Username and Password, store them in a safe place, and save your changes.
- You can specify any username and password.
- They are not related to the login credentials you use to log in to Home Assistant or to log in to the computer from which you are accessing the files.
- The app won’t start if username and password are not defined.
- For further configuration information, refer to the Documentation tab.
- To start the app, on the Information tab, select Start.
To access the Home Assistant directories from the other device, follow these steps:
-
Go to Settings > System > Network and take note of the Host name.
- Alternatively, you can look up the host name or IP address of your Home Assistant on your router.
-
How you connect from another device to Home Assistant depends on your system. Use one of the following options:
-
On Windows: Open File Explorer and in the address bar, enter the IP address or hostname with two backslashes as
\\your.ha.ip.addressor\\hostname.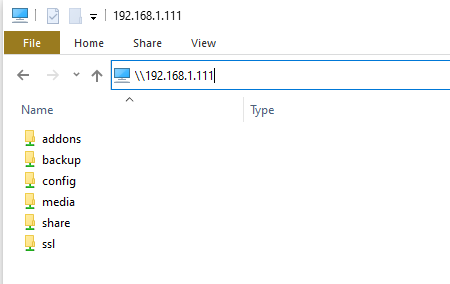 Screenshot of File Explorer displaying the navigation to a file share using an IP address
-
On OS X: Open Finder and select Go > Connect to Server… and enter the IP address or hostname as
smb://your.ha.ip.addressorsmb://hostname. -
On Ubuntu: Open Files and in the address bar, enter the IP address or hostname as
smb://your.ha.ip.addressorsmb://hostname.
-
-
Enter the credentials you entered in the Samba app configuration.
- You also have the option of having the credentials stored so that you do not need to enter them again.
-
Done! You now have access to the directories which you can then mount as a drive or pin to Quick Access.
Installing and using the Visual Studio Code (VSC) app
The Studio Code Server app provides access through a feature-packed web-based version of the Visual Studio Code editor. It currently only supports AMD64 and aarch64/ARM64 machines. The app also provides access to the Home Assistant Command Line Interface (CLI) using VSC’s built-in terminal, which allows for checking logs, stopping, and starting Home Assistant and apps, creating/restoring backups, and more. (See Home Assistant via Command Line for further info).
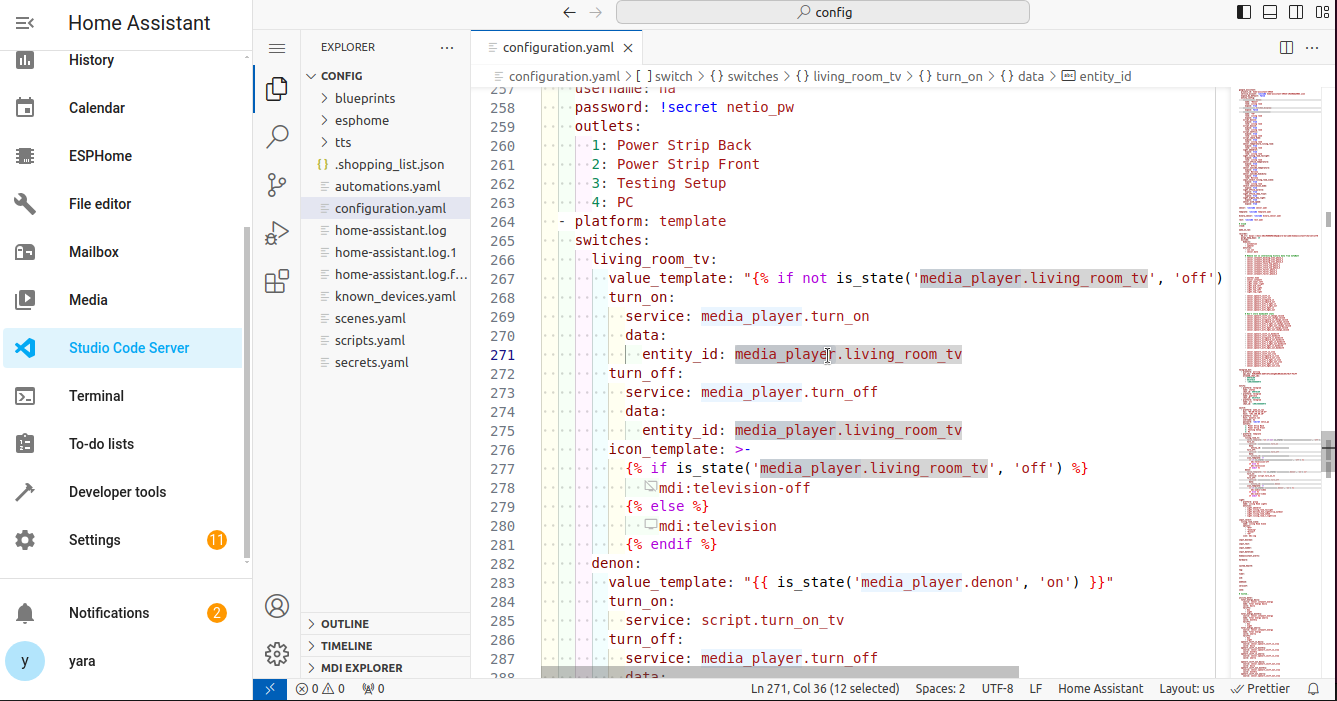 Example of a configuration.yaml file, accessed using the Studio Code Server app on a Home Assistant Operating System installation.
To install and use the Studio Code Server in Home Assistant, follow these steps:
- To install the app, go to Settings > Apps > Studio Code Server and install the app.
- Once you have the app installed, if you want, select the Show in sidebar option. Then, select Start.
- For information on configuration settings, open the Documentation tab.
- To start browsing, on the Info tab, select Open Web UI.
Installing and using the File Editor app
The File Editor app is a web-based file system browser and text editor. It is a more basic and light weight alternative to Visual Studio Code. YAML files are automatically checked for syntax errors while editing.
 Example of a configuration.yaml file, accessed using the File editor app on a Home Assistant Operating System installation.
To install and use the File Editor in Home Assistant, follow these steps:
- To install the app, go to Settings > Apps and select Install app.
- Search for File editor, select it and then select Install.
- Once you have the app installed, you can edit files within your
/configdirectory.
- Once you have the app installed, you can edit files within your
- If you want to be able to access directories outside the
/configdirectory, you need to disable an option in the app configuration.- Go to the app under Settings > Apps > File editor.
- Open the Configuration tab.
- In the configuration settings, disable the Enforce basepath option.
- Note: The Enforce basepath option is intended to protect you from inadvertently making changes to settings files.
- For information on other configuration settings, open the Documentation tab.
- To confirm your changes, select Save.
- To start browsing, on the Info tab, select Open Web UI.
Installing and using the SSH app
If you want to use the Home Assistant command line or an SSH client, you can do this through the Terminal & SSH app.
The Terminal & SSH app provides the following functionalities:
- It provides a web terminal that you can access from the Home Assistant user interface.
- It allows you to use the Home Assistant Command Line Interface (CLI) which provides custom commands for checking logs, stopping and starting Home Assistant and apps, creating/restoring backups, and more.
- For a list of command line commands, refer to Home Assistant via Command Line.
- It allows connecting to your system using an SSH client.
- It also includes common tools like nano and vi editors.
- The Terminal & SSH app does not provide access to the underlying host file system.
To get started with the Terminal & SSH app, follow these steps:
- To install the app, go to the app store under Settings > Apps and install the Terminal & SSH app.
- To use the web terminal, start the app, then select Open Web UI.
- You can now start typing your commands.
- If you want to access from an ssh client, you need to enter credentials:
- Open the Configuration page.
- Enter a password or authorized Keys.
- Then save and start the app.
Backup
To learn how to back up the system or how to restore a system from a backup, refer to the backup documentation under common tasks.
Alternative: Creating a backup using the Home Assistant Command Line Interface
In general, to create or restore from a backup, follow the steps described under common tasks. However, If you have the Home Assistant Operating SystemHome Assistant OS, the Home Assistant Operating System, is an embedded, minimalistic, operating system designed to run the Home Assistant ecosystem on single board computers (like the Raspberry Pi) or Virtual Machines. It includes Home Assistant Core, the Home Assistant Supervisor, and supports apps. Home Assistant Supervisor keeps it up to date, removing the need for you to manage an operating system. Home Assistant Operating System is the recommended installation type for most users. installed, you can also create a backup from the command line. Follow these steps:
-
ha backups list- lists backups and their slugnames -
ha backups restore slugname- restores a specific backup -
ha backups new --name nameofbackup- create a backup
For additional information about command line usage, use the ha help command or refer to the Home Assistant Command Line documentation.
Updating Home Assistant
If you have the Home Assistant Operating SystemHome Assistant OS, the Home Assistant Operating System, is an embedded, minimalistic, operating system designed to run the Home Assistant ecosystem on single board computers (like the Raspberry Pi) or Virtual Machines. It includes Home Assistant Core, the Home Assistant Supervisor, and supports apps. Home Assistant Supervisor keeps it up to date, removing the need for you to manage an operating system. Home Assistant Operating System is the recommended installation type for most users. installed, you receive update notifications from different components:
- Home Assistant Operating SystemHome Assistant OS, the Home Assistant Operating System, is an embedded, minimalistic, operating system designed to run the Home Assistant ecosystem on single board computers (like the Raspberry Pi) or Virtual Machines. It includes Home Assistant Core, the Home Assistant Supervisor, and supports apps. Home Assistant Supervisor keeps it up to date, removing the need for you to manage an operating system. Home Assistant Operating System is the recommended installation type for most users.
- Home Assistant SupervisorThe Home Assistant Supervisor is a program that manages a Home Assistant installation, taking care of installing and updating Home Assistant, apps, itself, and, if used, updating the Home Assistant Operating System.
- Home Assistant CoreHome Assistant Core is the Python program at the heart of Home Assistant. It is part of all installation types. It can be installed standalone (without Home Assistant Supervisor) as a container using Docker (this is typically referred to as the Home Assistant Container installation type). For development, Core can also be run using a Virtual Environment (previously referred as the Home Assistant Core installation type). For production setup, the Home Assistant Core installation type is deprecated.
- AppsApps are additional standalone third-party software packages that can be installed on Home Assistant OS. [Learn more], if you have any installed
Each of these components needs to be updated separately.
Updating the Home Assistant Operating System
Updates of the Home Assistant Operating SystemHome Assistant OS, the Home Assistant Operating System, is an embedded, minimalistic, operating system designed to run the Home Assistant ecosystem on single board computers (like the Raspberry Pi) or Virtual Machines. It includes Home Assistant Core, the Home Assistant Supervisor, and supports apps. Home Assistant Supervisor keeps it up to date, removing the need for you to manage an operating system. Home Assistant Operating System is the recommended installation type for most users. are independent of other updates. They do not trigger repair issues and are usually backward-compatible.
Prerequisites
-
Backup your installation.
- Make sure the backup is stored on a backup location outside of the device where Home Assistant is installed.
- For example, if Home Assistant is installed on Home Assistant Green, make sure it is stored on Home Assistant Cloud or another location.
- So that you can restore from that backup in case there is an issue with the system.
- Make sure the backup is stored on a backup location outside of the device where Home Assistant is installed.
To update the Home Assistant Operating System
- Open the Settings panel.
- On the top you will be presented with an update notification.
- Troubleshooting: If you do not see that notification:
- In the top right corner, select the three dots
menu and select Check for updates. - Go to System > Updates.
- Select the update notification.
- Select the cogwheel
, then set Visible to active.
- In the top right corner, select the three dots
- Troubleshooting: If you do not see that notification:
- Open the notification for the component you want to update.
- If you want to update the system first (recommended), enable the backup toggle.
- Select Update.
- Check if there are any repair issues and check the logs to see if there are any issues with your configuration that need to be addressed.
ha os update
This updates to the latest version. If you want to update to a specific version instead, use ha os update --version 15.2.
Changing the boot slot used during the update
About boot slots used during the update
The Home Assistant Operating SystemHome Assistant OS, the Home Assistant Operating System, is an embedded, minimalistic, operating system designed to run the Home Assistant ecosystem on single board computers (like the Raspberry Pi) or Virtual Machines. It includes Home Assistant Core, the Home Assistant Supervisor, and supports apps. Home Assistant Supervisor keeps it up to date, removing the need for you to manage an operating system. Home Assistant Operating System is the recommended installation type for most users. uses two boot slots. On first installation, boot slot A is used. After that, on each Operating System update, the other boot slot is updated and reboot is triggered. On that reboot, the system boots from the other boot slot (A ➝ B ➝ A,…). When booting fails, the system automatically uses the previous boot slot, so that it boots from the last working operating system.
Changing the boot slot used
You can manually define that the previous boot slot is used. This can be useful in cases where the system boots but something still seems wrong. For example, when the device is no longer correctly detected or you see another issue that might be related to the latest update of the operating system.
-
To check which boot slot is currently in use and what OS versions are installed in the individual slots, in the Home Assistant command line, enter the following command:
ha os info -
To change the boot slot, enter the following command:
- This will boot into the other (previous) OS version.
ha os boot-slot other
Alternatively, if the Operating Systems runs on a platform that uses the GRUB bootloader, a boot menu is presented early in the boot. The alternative boot slot can be selected here, marking it active for future boots if the following boot attempt is successful.
Updating Home Assistant Core
Prerequisites
-
Back up your installation and store the backup and the backup emergency kit somewhere safe.
- This ensures that you can restore your installation from backup if needed.
- Check the release notes for backward-incompatible changes on Home Assistant release notes. Be sure to check all release notes between the version you are running and the one you are upgrading to. Use the search function in your browser (
CTRL + f/CMD + f) and search for Backward-incompatible changes.
To update Home Assistant Core
To update Home Assistant Core, choose one of the following options.
- Open your Home Assistant UI.
- Go to the Settings panel.
- On the top you will be presented with an update notification.
- Troubleshooting: If you do not see that notification:
- In the top right corner, select the three dots
menu and select Check for updates. - Go to System > Updates.
- Select the update notification.
- Select the cogwheel
, then set Visible to active.
- In the top right corner, select the three dots
- Open the notification for the component you want to update.
- If you want to backup the system first (recommended), enable the backup toggle.
- Select Update.
- After the update completed, check if there are any repair issues and check the logs to see if there are any issues with your configuration that need to be addressed.
ha core update --backup
The --backup flag here ensures that you have a partial backup of your current setup in case you need to downgrade.
Network storage
You can configure both Network File System (NFS) and Samba/Windows (CIFS) targets to be used within Home Assistant and apps. To list all your currently connected network storages, go to Settings > System > Storage in the UI.
You need to update to Home Assistant Operating System 10.2 before you can use this feature.

Add a new network storage
- Go to Settings > System > Storage in the UI.
- Select Add network storage.
- Fill out all the information for your network storage.
- Select Connect.

Network storage configuration
Here, you select how the target should be used. See usage types below
The username to use when connecting to the storage server. Use User Principal Name for domain accounts. For example: [email protected].
1 Options prefixed with [NFS] are only available for NFS targets.
2 Options prefixed with [CIFS] are only available for CIFS targets.
3 For the CIFS option, only version 2.1+ is supported.
Usage types
This will become a target. You can use it when creating an automatic or manual backup. The first storage you add of this type becomes your new default target. If you want to change the default target, check out the documentation below.
A new directory with the name you gave your network storage will be created under /media. This directory can be accessed by Home Assistant and apps.
Change default local backup location
By default, the first network storage of type Backup that you add is used as your local default backup location.
If you want to change the local network storage that is used to store your backups, follow these steps:
- Go to Settings > System > Backups.
- Select Settings and history.
- In the top-right corner, select the three dots
menu and select Change default action location. - Select your preferred network location and save your changes.
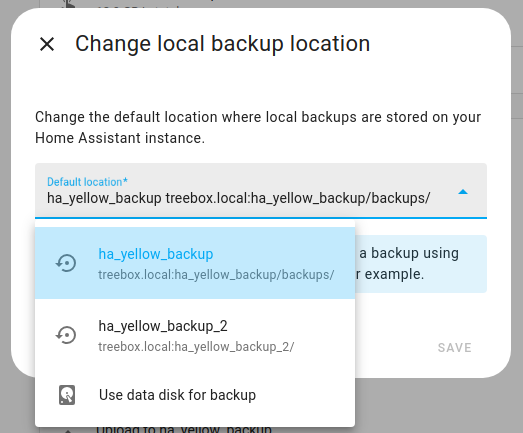
- Troubleshooting: Don’t see your external storage location? This list contains only the network storage targets you have added of type Backup.
Lost Password and password reset
Please refer to the I’m locked out! documentation page.
Installing a third-party app repository
Home Assistant allows anyone to create an app repository to share their own apps with the community.
Home Assistant cannot guarantee the quality or security of third-party apps. Use at your own risk.
To add an app repository, follow these steps:
- Copy the URL of the repository.
-
The URL is the git repository clone URL (on GitHub, use the Code button and copy the HTTPS URL).
-
This documentation uses an example app repository. It is not practically useful but follows the same steps.
-
If you are interested in app development, refer to our Home Assistant app development documentation.
https://github.com/home-assistant/hassio-addons-example
-
- Go to Settings > Apps and select Install app.
- In the top-right corner, select the three dots
menu, and select Repositories. - Add the URL of the repository and select Add.
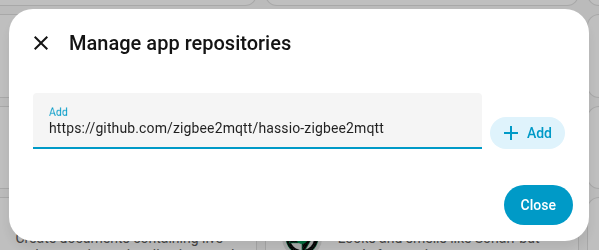
- Result: A new card for the third-party repository will appear.
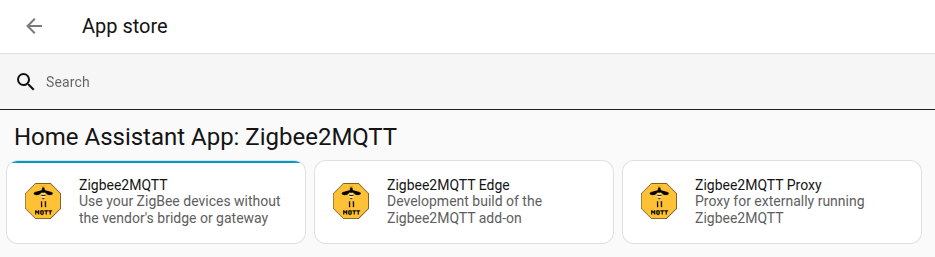
- Result: A new card for the third-party repository will appear.
Troubleshooting: Repository is not showing up
If you have added an app repository, but it’s not showing up, make sure to refresh your browser. If it still doesn’t show up, the app repository may contain invalid configuration data.
- Go to Settings > System > Logs and select Supervisor in the top right corner to get the Supervisor log.
- It should tell you what went wrong.
- Report this information to the app repository author.
Configuration check
After changing configuration or automation files, check if the configuration is valid before restarting Home Assistant Core.
Running a configuration check from the UI
- Go to Settings > Developer tools > YAML and in the Configuration validation section, select the Check configuration button.
- This is to make sure there are no syntax errors before restarting Home Assistant.
- It checks for valid YAMLYAML is a human-readable data serialization language. It is used to store and transmit data in a structured format. In Home Assistant, YAML is used for configuration, for example in the
configuration.yamlorautomations.yamlfiles. [Learn more] and valid config structures.
- If you need to do a more comprehensive configuration check, run the check from the CLI.
Running a configuration check from the CLI
Use the following command to check if the configuration is valid. The command line configuration check validates the YAMLYAML is a human-readable data serialization language. It is used to store and transmit data in a structured format. In Home Assistant, YAML is used for configuration, for example in the configuration.yaml or automations.yaml files. [Learn more] files and checks for valid config structures, as well as some other elements.
ha core check
Home Assistant versions
To see which version your system is running, go to Settings > About.
Feature preview
If you want to preview upcoming features, you can enable preview under Settings > System > Labs.
Labs allows you to preview selected features that are stable but are still being fine-tuned. Preview is different from installing a beta or development version, which are used for development and testing.
For more information, refer to the Labs documentation.
Running a beta version
If you would like to test next release before anyone else, you can install the beta version.
- In Home Assistant, go to System > Updates.
- In the top-right corner, select the three dots
menu. - Select Join beta.
- Go to the Configuration panel.
- Install the update that is presented to you.
- Troubleshooting: If you do not see that notification:
- In the top right corner, select the three dots
menu and select Check for updates. - Go to System > Updates.
- Select the update notification.
- Select the cogwheel
, then set Visible to active.
- In the top right corner, select the three dots
- Troubleshooting: If you do not see that notification:
-
Join the beta channel.
ha supervisor options --channel beta -
Reload Home Assistant Supervisor.
ha supervisor reload -
Update Home Assistant Core to the latest beta version.
ha core update --backupThe
--backupflag here ensures that you have a partial backup of your current setup in case you need to downgrade.
Running a development version
If you want to stay on the bleeding-edge Home Assistant Core development branch, you can upgrade to dev.
The dev branch is likely to be unstable. Potential consequences include loss of data and instance corruption.
-
Join the dev channel.
ha supervisor options --channel dev -
Reload the Home Assistant SupervisorThe Home Assistant Supervisor is a program that manages a Home Assistant installation, taking care of installing and updating Home Assistant, apps, itself, and, if used, updating the Home Assistant Operating System..
ha supervisor reload -
Update Home Assistant CoreHome Assistant Core is the Python program at the heart of Home Assistant. It is part of all installation types. It can be installed standalone (without Home Assistant Supervisor) as a container using Docker (this is typically referred to as the Home Assistant Container installation type). For development, Core can also be run using a Virtual Environment (previously referred as the Home Assistant Core installation type). For production setup, the Home Assistant Core installation type is deprecated. to the latest dev version.
ha core update --backupThe
--backupflag here ensures that you have a partial backup of your current setup in case you need to downgrade.
Running a specific version
To upgrade to a specific version, you can use the command line (CLI). The example below shows how to upgrade to 2026.7.4. To learn how to get started with the command line in Home Assistant, refer to the SSH app setup instructions.
ha core update --version 2026.7.4 --backup
The --backup flag here ensures that you have a partial backup of your current setup in case you need to downgrade later.
To downgrade your installation, do a partial restore of a backup instead.
Using external data disk
Home Assistant Operating SystemHome Assistant OS, the Home Assistant Operating System, is an embedded, minimalistic, operating system designed to run the Home Assistant ecosystem on single board computers (like the Raspberry Pi) or Virtual Machines. It includes Home Assistant Core, the Home Assistant Supervisor, and supports apps. Home Assistant Supervisor keeps it up to date, removing the need for you to manage an operating system. Home Assistant Operating System is the recommended installation type for most users. supports storing data on a secondary storage medium. For example, this can be a second internal SSD or HDD, or a USB-attached SSD or HDD. This data disk contains not only user data but also most of the Home Assistant software, including Home Assistant CoreHome Assistant Core is the Python program at the heart of Home Assistant. It is part of all installation types. It can be installed standalone (without Home Assistant Supervisor) as a container using Docker (this is typically referred to as the Home Assistant Container installation type). For development, Core can also be run using a Virtual Environment (previously referred as the Home Assistant Core installation type). For production setup, the Home Assistant Core installation type is deprecated. and Apps. This means a fast data disk will make the system much faster overall.

The data disk feature can be used on an existing installation without losing data: The system will move existing data to the external data disk automatically. However, it is recommended to create and download a full Backup before proceeding!
All data on the target disk will be overwritten!
The storage capacity of the external data disk must be larger than the storage capacity of the existing (boot) disk.
If you have been using a data disk previously with Home Assistant Operating SystemHome Assistant OS, the Home Assistant Operating System, is an embedded, minimalistic, operating system designed to run the Home Assistant ecosystem on single board computers (like the Raspberry Pi) or Virtual Machines. It includes Home Assistant Core, the Home Assistant Supervisor, and supports apps. Home Assistant Supervisor keeps it up to date, removing the need for you to manage an operating system. Home Assistant Operating System is the recommended installation type for most users., you need to use your host computer to delete all partitions before using it as a data disk again.
Using UI to move the data partition
- Connect the data disk to your system.
- Go to Settings > System > Storage in the UI.
- Select Move data disk.
- Select the data disk from the list of available devices.
- Select Move.
- Depending on the amount of data, this may take a while.
Using CLI to move the data partition
To see the current data disk use:
$ ha os info
...
data_disk: /dev/mmcblk1p4
...
To get a list of potential targets which can be used by datadisk:
ha os datadisk list
To initiate the move to the new data disk use the move command:
ha os datadisk move /dev/sdx
The system will prepare the data disk and immediately reboot. The reboot will take 10 minutes or more depending on the speed of the new data disk; please be patient!
Using an USB attached SSD can draw quite some power. For instance on Raspberry Pi 3 the official Raspberry Pi power supply (PSU) only provides 2.5A which can be too tight. Use a more powerful power supply if you experience issues. Alternatively use a powered USB hub. Connect the Hub to one of the USB slots of your Raspberry Pi, and connect the SSD to the Hub. In this setup the power supply of the Hub will power the attached device(s).
Migrating an external data disk to another system
This section shows how to move an external data disk from one system to another. This can be an option if the following elements apply to your use case:
- You already have a functioning Home Assistant instance (system 1) that is using an external data disk.
- You have another, new, Home Assistant instance (system 2).
- You now want to use the data disk of system 1 on system 2 instead.
The aim is to migrate the data from system 1 to system 2. One way to do this is by restoring a backup. The other way is to move the data disk. This can be an interesting option if you have a large amount of data on your external disk or if your external disk has more storage capacity than your new system.
Prerequisites
- A Home Assistant instance using an external data disk (system 1)
- A Home Assistant instance to which you want to move the external data disk (system 2)
To migrate an external data disk to another system
To migrate an external data disk from one system to another, follow these steps:
- Create a backup of both systems and store these backups on another system (not strictly necessary, but recommended just in case, at least for the important data).
- Shut down system 1 and remove the data disk.
- Make sure system 2 has Home Assistant OS installed, and Home Assistant is up and running. Home Assistant is using the data disk (partition) on the boot drive, such as the SD card, at this point.
- Make sure system 2 has completed the basic onboarding steps, including the last steps where devices are discovered automatically.
- Plug the external disk into system 2 and go to the Settings > System. Select the three dots
menu, and Restart Home Assistant > Reboot system. Result: A repair issue is displayed Multiple data disks detected. - The repair issue comes up because system 2 now sees two file systems with an identical name. During a reboot, there is a name conflict with the existing data disk as it is undefined which file system should be used. This can lead to a random selection of the system you end up with. Hence you must make a decision.
- Open the repair issue and choose one of the options:
- Select Use the detected data disk instead of the current system.
- This will override the current file system of system 2 and use your external data disk instead.
- You won’t have access anymore to the current Home Assistant data. It will be marked as inactive data disk.
- If you changed your mind about using the external data disk:
- Unplug the external data disk.
- If you cannot unplug the external data disk for some reason, select Mark as inactive data disk (rename file system).
- This makes sure that there is no name conflict after rebooting.
- It also means you cannot use the file system that is stored on your external disk.
- You keep using the current file system of system 1.
- Select Use the detected data disk instead of the current system.
Home Assistant via the command line
On the SSH command line, you can use the ha command to retrieve logs, check the details of connected hardware, and more.
Home Assistant
ha core check
ha core info
ha core logs
ha core options
ha core rebuild
ha core restart
ha core restart --safe-mode
ha core start
ha core stats
ha core stop
ha core update
Supervisor
ha supervisor info
ha supervisor logs
ha supervisor reload
ha supervisor update
Host
ha host reboot
ha host shutdown
ha host update
Hardware
ha hardware info
ha hardware audio
Usage examples
To update Home Assistant to a specific version, use the command:
ha core update --version x.y.z
Replace x.y.z with the desired version like --version 2026.7.4
You can get a better description of the CLI capabilities by typing ha help:
The Home Assistant CLI is a small and simple command line utility that allows
you to control and configure different aspects of Home Assistant

Usage:
  ha [command]

Available Commands:
  addons         Install, update, remove and configure Home Assistant apps
  audio          Audio device handling.
  authentication Authentication for Home Assistant users.
  backups        Create, restore and remove backups
  banner         Prints the CLI Home Assistant banner along with some useful information
  cli            Get information, update or configure the Home Assistant cli backend
  core           Provides control of the Home Assistant Core
  dns            Get information, update or configure the Home Assistant DNS server
  docker         Docker backend specific for info and OCI configuration
  hardware       Provides hardware information about your system
  help           Help about any command
  host           Control the host/system that Home Assistant is running on
  info           Provides a general Home Assistant information overview
  jobs           Get information and manage running jobs
  multicast      Get information, update or configure the Home Assistant Multicast
  network        Network specific for updating, info and configuration imports
  observer       Get information, update or configure the Home Assistant observer
  os             Operating System specific for updating, info and configuration imports
  resolution     Resolution center of Supervisor, show issues and suggest solutions
  supervisor     Monitor, control and configure the Home Assistant Supervisor

Flags:
      --api-token string   Home Assistant Supervisor API token
      --config string      Optional config file (default is $HOME/.homeassistant.yaml)
      --endpoint string    Endpoint for Home Assistant Supervisor (default is 'supervisor')
  -h, --help               help for ha
      --log-level string   Log level (defaults to Warn)
      --no-progress        Disable the progress spinner
      --raw-json           Output raw JSON from the API

Use "ha [command] --help" for more information about a command.
Console access
You can also access the Home Assistant Operating SystemHome Assistant OS, the Home Assistant Operating System, is an embedded, minimalistic, operating system designed to run the Home Assistant ecosystem on single board computers (like the Raspberry Pi) or Virtual Machines. It includes Home Assistant Core, the Home Assistant Supervisor, and supports apps. Home Assistant Supervisor keeps it up to date, removing the need for you to manage an operating system. Home Assistant Operating System is the recommended installation type for most users. via a directly connected keyboard and monitor, the console.
Wiping the data disk from the command line
In Home Assistant Operating SystemHome Assistant OS, the Home Assistant Operating System, is an embedded, minimalistic, operating system designed to run the Home Assistant ecosystem on single board computers (like the Raspberry Pi) or Virtual Machines. It includes Home Assistant Core, the Home Assistant Supervisor, and supports apps. Home Assistant Supervisor keeps it up to date, removing the need for you to manage an operating system. Home Assistant Operating System is the recommended installation type for most users., the ha os datadisk wipe command wipes the data disk. The command deletes all user data as well as Home Assistant Core, Supervisor, and any installed apps.
The command ha os datadisk wipe marks the data partition (either internal on the eMMC or the SD card, or on an external attached data disk) as to be cleared on the next reboot. The command automatically reboots the system. Upon reboot, the data is cleared. Then the system continues to boot and reinstalls the latest version of all Home Assistant components.
The ha os datadisk wipe command can only be run from the local terminal. Connect a display and keyboard and use the terminal.
Note, some systems have a reset button you can use to clear the data disk, instead of using the command line:
-
If you have a Home Assistant Yellow with a Raspberry Pi Compute Module 5, use the command line steps described above.
-
If you have a Home Assistant Yellow with a Raspberry Pi Compute Module 4, there is a red hardware button to wipe the data disk. Follow the procedure on resetting the Home Assistant Yellow.
-
If you have a Home Assistant Green, there is a black hardware button to wipe the data disk. Follow the procedure on resetting the Home Assistant Green.
Listing all users from the command line
In Home Assistant Operating SystemHome Assistant OS, the Home Assistant Operating System, is an embedded, minimalistic, operating system designed to run the Home Assistant ecosystem on single board computers (like the Raspberry Pi) or Virtual Machines. It includes Home Assistant Core, the Home Assistant Supervisor, and supports apps. Home Assistant Supervisor keeps it up to date, removing the need for you to manage an operating system. Home Assistant Operating System is the recommended installation type for most users., the ha auth list command lists all users that are registered on your Home Assistant.
The ha auth list command can only be run from the local terminal. Connect a display and keyboard and use the terminal.
Enable duplicate log file
By default, Home Assistant Core logs are sent to the Systemd Journal, which can be read using the ha core logs command. If you need logs to also be written to a file (/config/home-assistant.log), you can enable the duplicated log file option using the command line:
ha core options --duplicate-log-file=true
ha core rebuild
ha core restart
To disable it:
ha core options --duplicate-log-file=false
ha core rebuild
ha core restart