Customizing entities
After adding a new device, you might find the automatically assigned entity ID too technical and the entity lacking a friendly name. You can personalize these elements to better fit your naming conventions or modify other attributes like the icon.
To change entity attributes, follow these steps:
-
Go to Settings > Devices & services > Entities and select the entity from the list.
-
In the top-right corner, select the
cog icon. 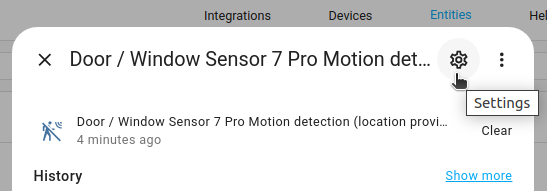
-
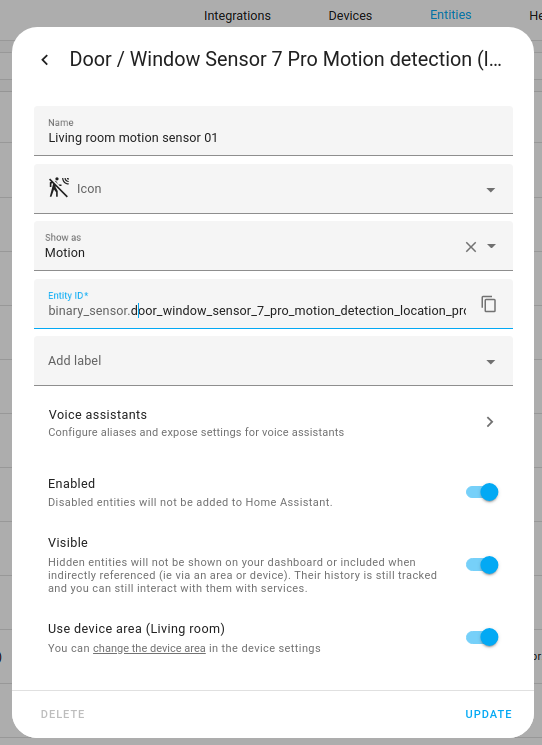
Enter or edit the attributes:
-
For example, the entity ID here could be shortened to
binary_sensor.lumi_sensor_aq2_opening.- You can use lowercase letters, numbers, and underscores.
- The ID must not start or end with an underscore.
- To undo the change and revert the ID to the default, select the
icon. - To revert all the entity IDs for a device, on the device page, select the three dots
menu, then select Recreate entity IDs. - Result: This resets the entity ID and applies the current default naming convention.
- The terms used to generate the entity ID depend on a few factors. Prioritization is as follows:
- If you changed the name of the entity, the entity name will be used.
- The entity ID suggested by the integration (just a few integrations do this).
- The default name in the user language, if using Latin script.
- If something other than Latin script is used, the entity ID is based on the English default name. This is because entity IDs must use lowercase letters, numbers, and underscores.
- The terms used to generate the entity ID depend on a few factors. Prioritization is as follows:
-
Enter or edit the entity name.
- In this example, this would change “Opening”.
-
If needed, from the Shown as menu, you can select a different device class.
-
If you like, add a label.
-
-
To apply the changes, select Update.
-
If you changed the entity ID and use this entity in automations or scripts, update the entity ID there as well.
- Changing only the entity name does not affect your automations or scripts because they refer to the entity ID.
- Go to Settings > Automations & scenes, open the respective tab, and find your automation or script.
Customizing an entity in YAML
If your entity is not supported, or you could not customize what you need via the user interface, you need to edit the settings in your configuration.yamlThe configuration.yaml file is the main configuration file for Home Assistant. It lists the integrations to be loaded and their specific configurations. In some cases, the configuration needs to be edited manually directly in the configuration.yaml file. Most integrations can be configured in the UI. [Learn more] file. For a detailed description of the entity configuration variables and device class information, refer to the Home Assistant Core integration documentation.