2026.5: We're on the same frequency now 📡
 Franck Nijhof
Home Assistant 2026.5! 🎉
What a few weeks it has been! Earlier this month, we hosted State of the Open Home 2026 live in Utrecht, the Netherlands. A big chunk of that day was dedicated to something we deeply care about: building in the open, and how we’re going to take that even further from here on out. 💙
Building in the open isn’t just about source code on GitHub. It’s about doing the planning, the decision-making, and the prioritizing out where everyone can see it, follow along, and join in. And “joining in” doesn’t mean you have to write a single line of code or even consider yourself technical. Sharing how you use Home Assistant, telling us what frustrates you, what you wish existed, voting on ideas, helping a fellow user on the forums or Discord, translating, writing documentation, or simply leaving a thoughtful comment on a roadmap item: it all counts, and it all shapes where this project goes next. 🤝
A great first step in that direction also went live this month: our roadmap is now public. You can go browse it, see what we’re working on, what’s next, and (most importantly) comment on it, share your thoughts, and help shape it. We talked about all of this, and a lot more, on stage. So if you weren’t able to join us live, please go watch the recording. It is genuinely worth your time, and it’s the best invitation I can give you to come build the Open Home with us. 🗺️
Now, on to this release. My personal favorite this month is maybe a bit unexpected, considering it sits all the way at the end of this post: the completely reworked templating documentation. I know, I know, “documentation” doesn’t exactly scream headline feature. But hear me out: making Home Assistant more approachable is one of our biggest missions this year, and darn good documentation is a big part of that. We’ve expanded our documentation team and are investing heavily in this, and the new templating docs are the very first taste of what’s to come. I’m really proud of where this is heading. 📚
That said, I’d be lying if I said I wasn’t also super stoked about radio frequency (RF) support landing this release. Just like last month’s infrared (IR) release, this brings a massive category of devices into Home Assistant natively: blinds, garage doors, ceiling fans, RF outlets, doorbells… you name it. Sure, there have always been clever workarounds and custom integrations to bridge some of these, but having it built right into the platform changes the game completely. There is so much cool stuff going on around this, and we’re only getting started. 📡
And there’s plenty more: a new Maintenance dashboard for your batteries, serial ports proxied over the network with ESPHome, new tile card features for media players, durations for purpose-specific automation triggers and conditions, redesigned more-info dialogs for vacuums and lawn mowers, autocomplete in the code editors, and 12 new integrations! 🚀
Enjoy the release!
../Frenck
- Radio frequency joins infrared as a first-class citizen
- Serial ports over the network with ESPHome
- More from your built-in dashboards
- More for the dashboards you build yourself
- Purpose-specific automation triggers & conditions
- Integrations
- Other noteworthy changes
- Need help? Join the community
- Backward-incompatible changes
- Patch releases
- All changes
A huge thank you to all the contributors who made this release possible! And a special shout-out to @piitaya who helped write the release notes this release. Also, @RaHehl, @balloob, @Tommatheussen, and @mib1185 for putting effort into improving its contents. Thanks to them, these release notes are in great shape. ❤️
Radio frequency joins infrared as a first-class citizen
Last release, we welcomed infrared as a first-class citizen of Home Assistant, opening the door to all those TVs, air conditioners, and other appliances still controlled by their little IR remote. This release continues that story with another old-school protocol: radio frequency (RF). 📡
Think about all the RF-controlled devices already living in your home: motorized blinds and curtains, garage door openers, ceiling fans, wireless wall switches, RF outlets, doorbells, and yes, those holiday string lights. Most of them haven’t had a great way into your smart home, because they don’t speak Wi-Fi, Bluetooth, Zigbee, Z-Wave, or Matter. They speak RF, and only RF. There have always been workarounds and custom integrations to bridge some of them, but with this release, Home Assistant speaks RF natively.
Meet the Radio frequency platform
The new Radio frequency integration follows the exact same pattern as last release’s infrared platform. It’s an entity type that represents an RF transmitter, like an ESPHome-powered device with a sub-GHz transmitter attached. You don’t set it up directly. Instead, other integrations use it to send RF commands on your behalf, and you simply pick which transmitter they should use.
Two transmitter integrations support this from day one:
- ESPHome, so any ESPHome device with a compatible sub-GHz transmitter can act as your home’s RF bridge. Most modules cover all common sub-GHz bands (315, 433, 868, and 915 MHz), so a single transmitter can talk to a wide range of devices. For DIY, we recommend the inexpensive CC1101 module (around $10), which you wire up to an ESP32 yourself. There’s a step-by-step guide on how to build one in the ESPHome documentation.
- Broadlink, so any Broadlink RM4 Pro you may already own can be reused as an RF transmitter for the new integrations. The RM4 Pro is the only model in the RM4 line with RF support, and it’s limited to the 433 MHz band.
On the other side, device-specific integrations use the platform to actually do something useful. Two are shipping in this release:
- Honeywell String Lights, to turn your RF remote-controlled Honeywell string lights on and off from Home Assistant, with all the automation magic that brings. 🎄
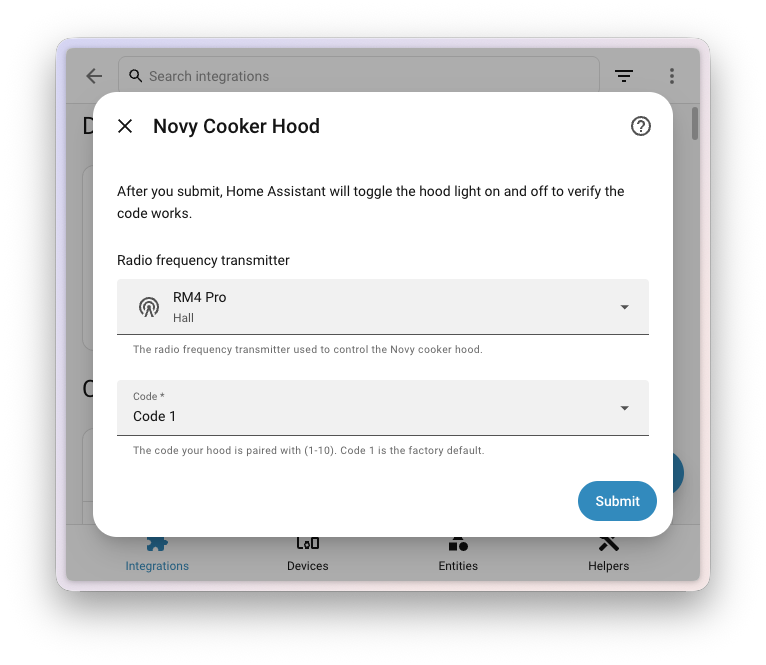
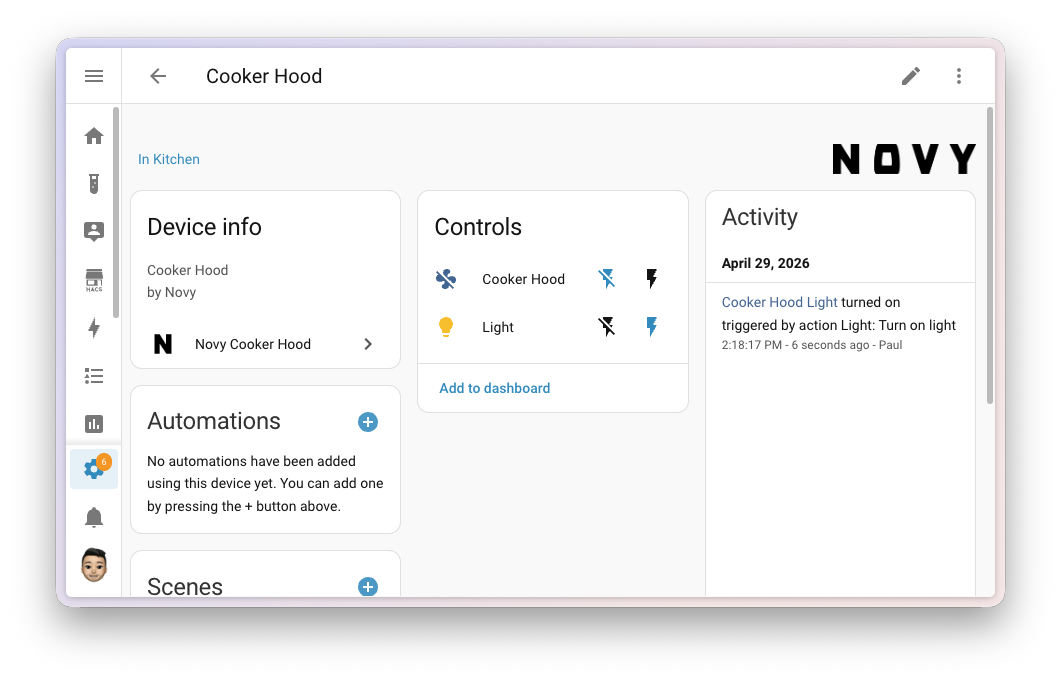
- Novy Cooker Hood, to control the light and the extractor fan on your Novy cooker hood. These are typically ceiling-mounted, so an RF remote (and now Home Assistant) is the only practical way to reach them. 💨
Why this is a big deal
Like infrared, this is about more than a single new feature. A large chunk of perfectly good RF-controlled hardware out there has no smart home story at all. By giving Home Assistant a standard way to talk to RF devices, every new consumer integration built on top instantly works with every transmitter integration. Add a new ESPHome RF proxy somewhere in the house, and your blinds, your fan, and your string lights all just work. ✨
This is a great fit with the values of the Open Home Foundation, and especially sustainability. 🌱 Instead of throwing out a working motorized blind because it’s “dumb”, you can integrate it. Instead of replacing your RF outlets with new Wi-Fi ones, you can keep using them. It’s another way to extend the life of devices you already own, and to reduce electronic waste. ♻️
A sneak peek at what’s coming
You may have caught a glimpse of where this is heading at the State of the Open Home 2026. Nabu Casa is a commercial partner of the Open Home Foundation, running Home Assistant Cloud and producing devices like the Home Assistant Green and the Home Assistant Voice Preview Edition. They’ve been working on a new device, currently going by the codename Project Blast, that brings infrared and radio frequency capabilities together in a single, polished package. The new Radio frequency platform in this release is part of the foundation that makes products like that possible. Stay tuned. 👀
If this tickles your interest, watch Carl from Nabu Casa explain what’s coming in this segment of the State of the Open Home 2026. 📺
We’re excited to see where the community takes this. The Radio frequency platform is designed to grow: more transmitter integrations, more device integrations, and more protocols over time.
This work is part of an Open Home Foundation roadmap opportunity to make radio frequency a first-class citizen of Home Assistant. Mission accomplished. 🎉
Serial ports over the network with ESPHome
We have a bit of a theme going on. Last release, infrared became a first-class citizen of Home Assistant. This release, radio frequency joined the party. And now, there’s another way you can put an ESPHome device somewhere in your home and let Home Assistant talk to things through it: serial ports. 🔌
If you’ve ever set up a Bluetooth proxy, the idea will feel familiar. Plenty of smart home gear talks over a serial connection, like energy meters with a P1 port, or that classic Denon receiver with the new Denon RS-232 integration shipping in this release. Until now, the device producing those serial signals had to be physically plugged into the same machine running Home Assistant, or wired up over a long, unwieldy cable. Not anymore. ✨
With the new serial proxy support in ESPHome, any serial port plugged into (or built into) an ESPHome device can now be exposed over your network and used by Home Assistant as if it were sitting right next to it. Drop an ESP somewhere convenient, plug your serial device into it, and Home Assistant takes care of the rest. 🪄
Where this comes in handy
This is great news if you’ve ever struggled to put a serial-connected device exactly where you wanted it. A few practical examples:
- Connect to receivers, projectors, or other AV gear over RS-232 from anywhere on your network.
- Read your smart meter’s P1 port from the meter cabinet, even if your Home Assistant server lives upstairs in a closet. ⚡
Like our existing Bluetooth, infrared, and radio frequency proxies, this is also a sustainability win. ♻️ Instead of replacing perfectly good serial-only equipment with newer Wi-Fi versions, you can keep using what you already have. That energy meter, that older AV receiver, that industrial sensor: they all just work, over the network. 🌱
Under the hood
Behind the scenes, this release rewires Home Assistant’s serial-port handling top to bottom to make serial proxies a natural part of the system. Some highlights for the curious:
- All of Home Assistant has been migrated to a modern, async-first serial driver called serialx, replacing the older
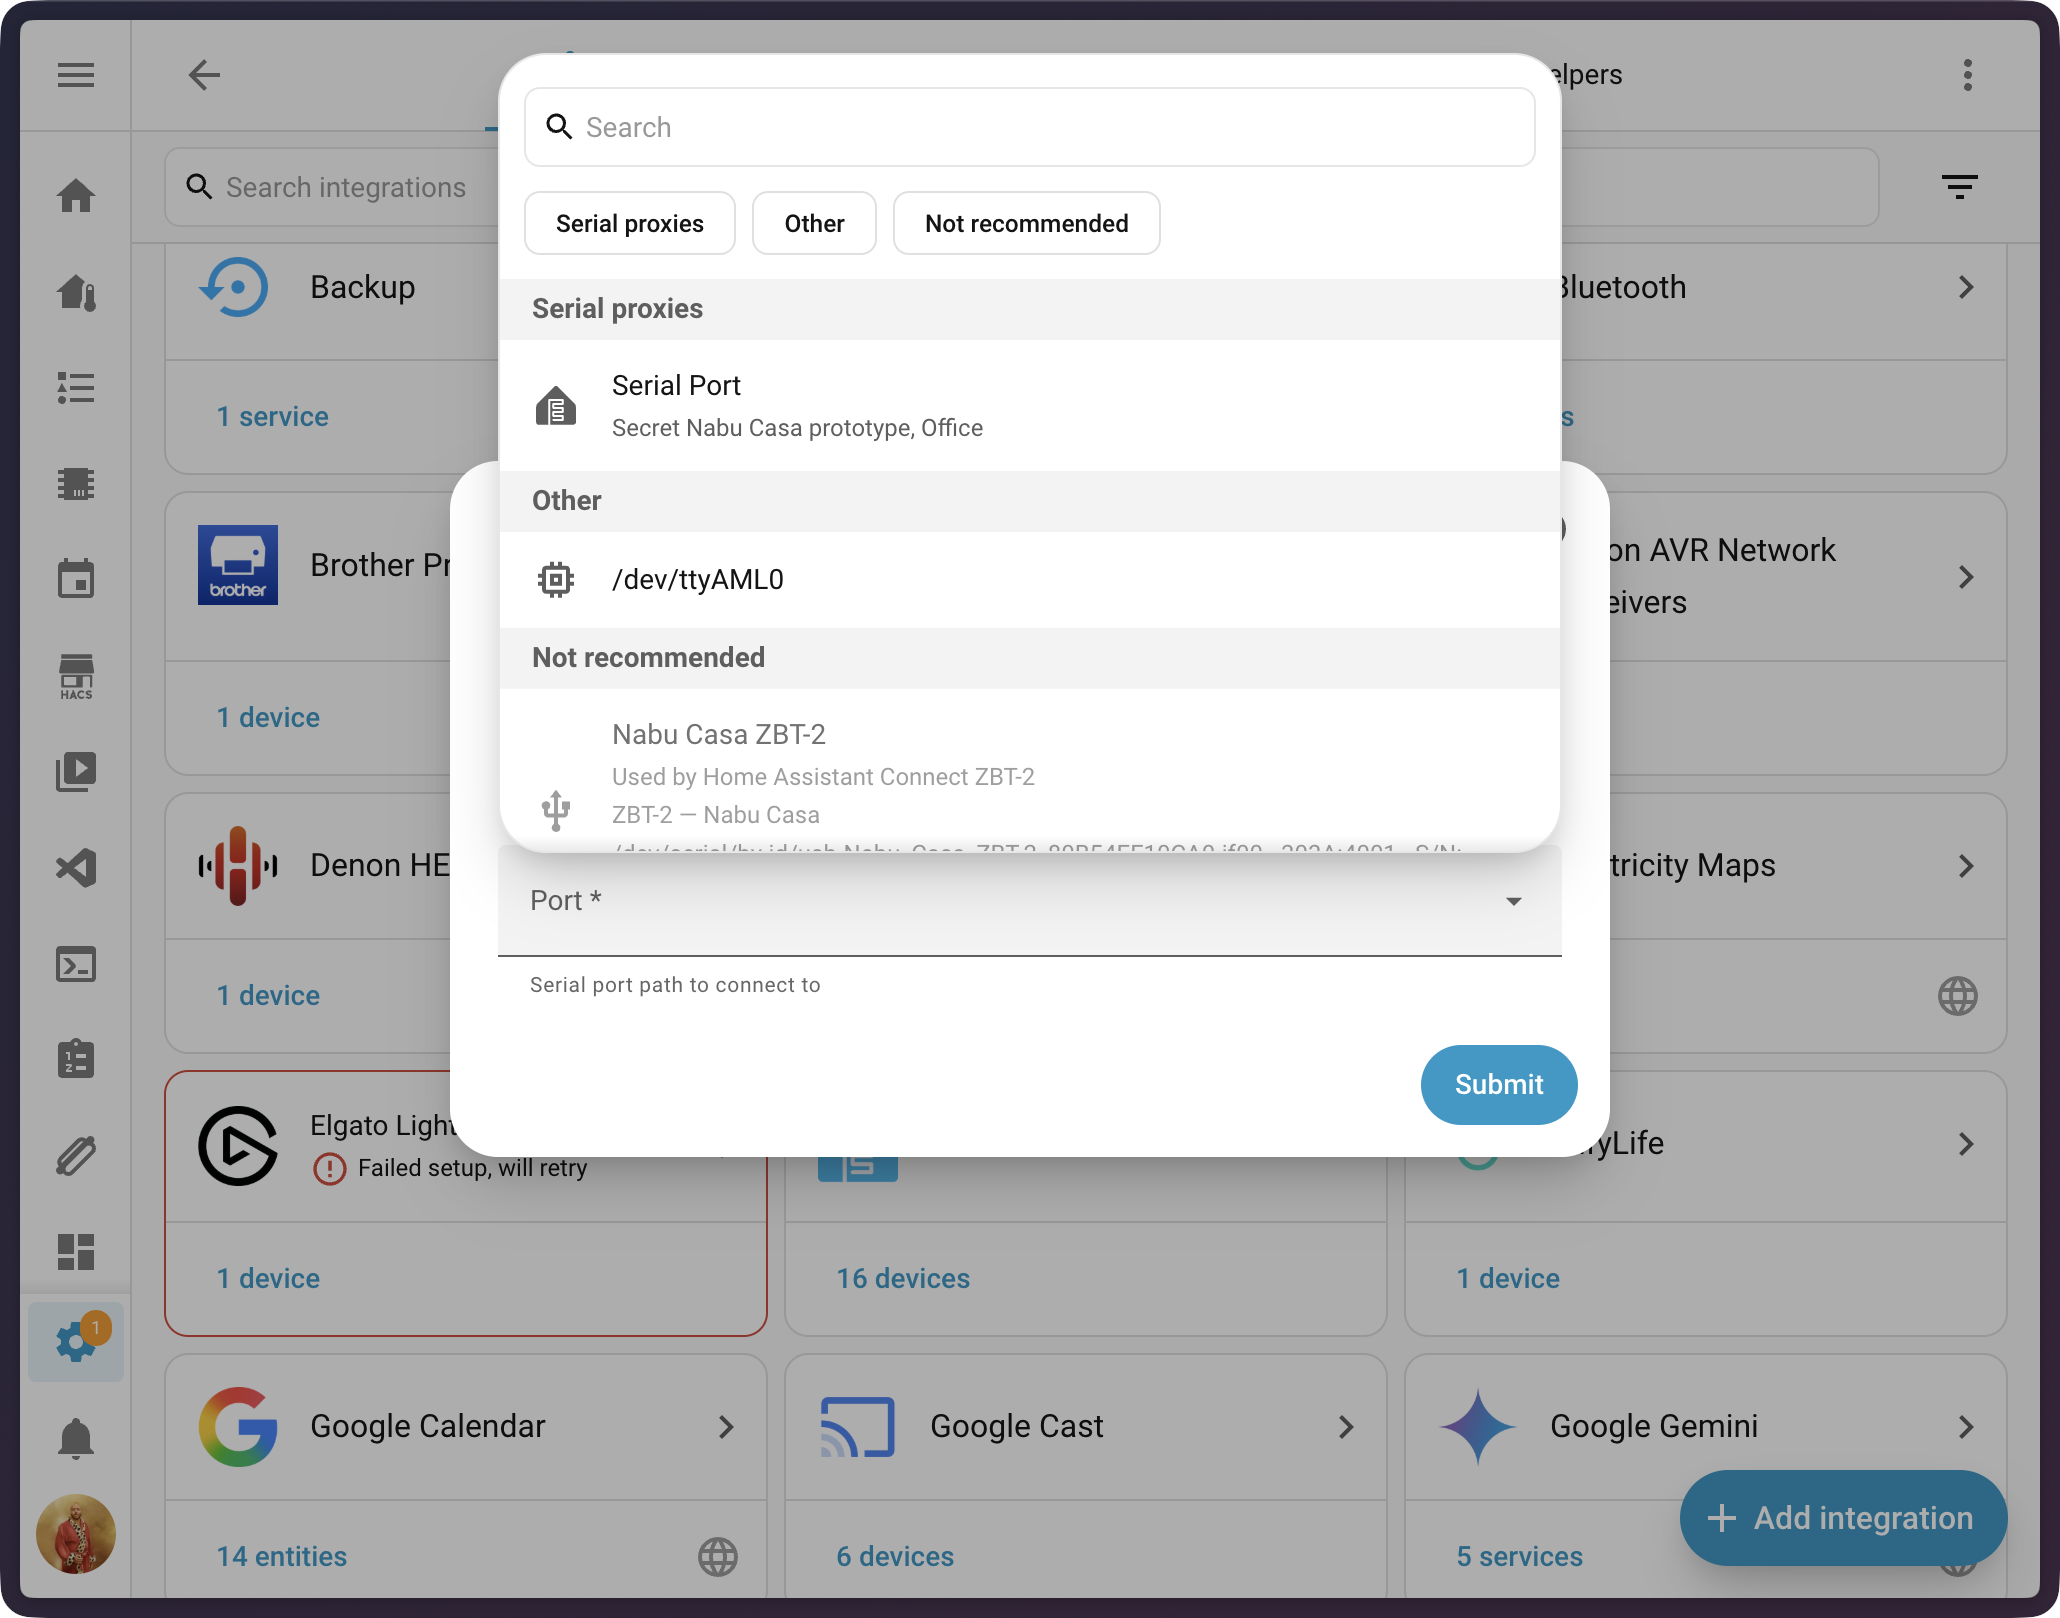
pyseriallibrary that Home Assistant has used for years. It’s designed for the way Home Assistant works today and adds support for new connection types, including ESPHome serial proxies, transparently. - Integrations that need a serial port now get a new, polished serial port selector in the UI. It lists local USB serial ports and remote ESPHome serial proxies side by side, with friendly names. The list even updates live, so a USB device you plug in while the dropdown is open shows up right away.
- Common integrations that talk over serial pick up serial proxies for free. The new Denon RS-232 integration uses it from day one, and the existing Russound RIO integration has been migrated to serialx as well, so it can now talk to your multi-room audio gear over an ESPHome serial proxy too.
If you’re an integration developer (or maintain a custom component) talking over serial, head over to the migrating from pyserial to serialx developer blog post to read all about how to take advantage of this. 🛠️
A first step, not the finish line
Let’s be upfront about one thing: getting a serial proxy up and running today is not a one-tap experience yet. To use this in your home, you’ll need to build your own ESPHome device with the serial_proxy component configured for the UART your serial device is wired to. That means writing an ESPHome YAML configuration, flashing the firmware, and connecting the hardware. It’s very doable, but it is on the technical side. 🤓
We think that’s okay, because this release is the foundational milestone that makes everything else possible. The plumbing is now in place across Home Assistant, ESPHome, and the integrations that need it. From here, we (and the broader community) can build on top of this with friendlier setup flows, ready-made hardware, and pre-built ESPHome configurations. Just like Bluetooth and infrared proxies before it, the experience will get more approachable release after release. 🚀
This work is part of an Open Home Foundation roadmap opportunity to make serial proxying a first-class citizen of Home Assistant. Another roadmap milestone, checked off the list. ✅
More from your built-in dashboards
Over the past few releases, Home Assistant has been quietly growing a family of built-in dashboards that you don’t have to build yourself. It started with the Home dashboard back in 2025.9, and grew with dedicated Lights, Climate, and Security dashboards in 2025.11. This release adds a new one and upgrades an existing one. 🏠
Stay on top of your batteries with the new Maintenance dashboard
Keeping your smart home running smoothly is a side of home automation that doesn’t always get the spotlight. We’ve all been there: that motion sensor in the hallway that suddenly stops triggering the lights one evening, only to discover days later that its battery had died. 🪫 Wouldn’t it be nice to spot that before it becomes a problem? The new built-in Maintenance dashboard gives questions like that a home of their own. 🧰
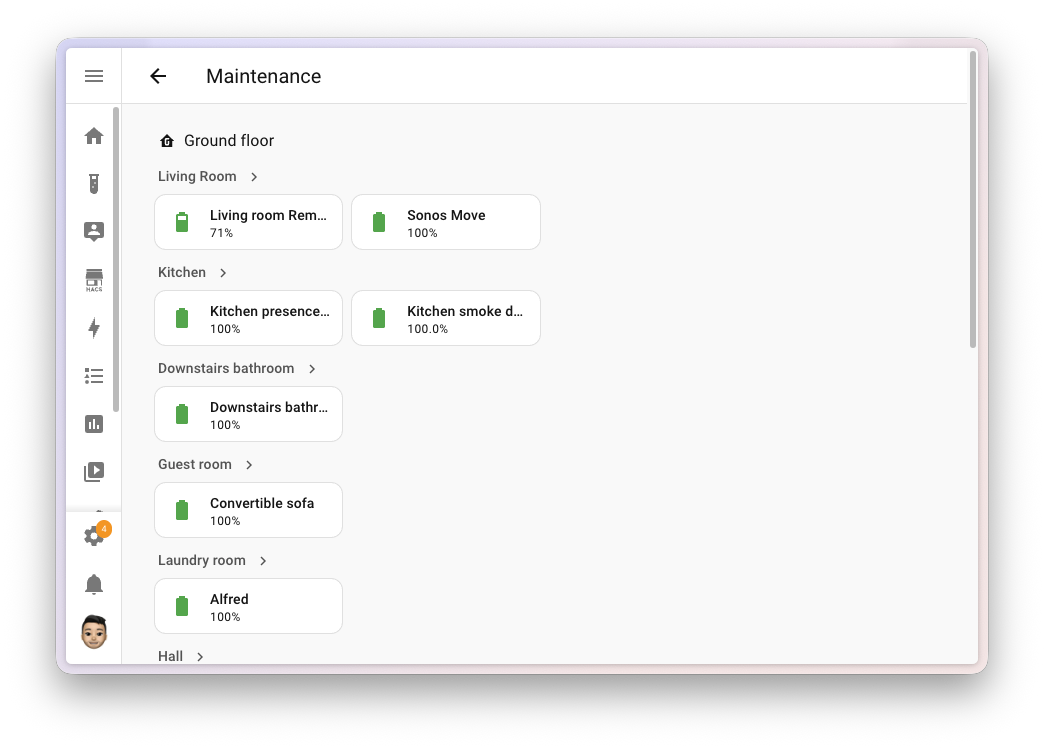
The dashboard focuses on what is probably the most-requested view of all: your batteries. It automatically discovers every battery entityAn entity represents a sensor, actor, or function in Home Assistant. Entities are used to monitor physical properties or to control other entities. An entity is usually part of a device or a service. [Learn more] in your home and lays them out grouped by area, with low ones highlighted so you can spot the ones that need swapping at a glance. No more digging through entity lists or building your own dashboard for it. 🔋
This is a community contribution from @Brookke, who built it from the ground up. Big thanks for adding such a useful new dashboard to Home Assistant! 👏
Are you a developer? Each one of these built-in dashboards is powered by a dashboard strategy: a piece of code that generates a complete dashboard on the fly, tailored to your home. Starting with this release, you can register your own custom dashboard strategies from a custom integration or frontend module, and share them with the community.
Imagine a strategy that builds the perfect dashboard for your plants, your 3D printers, your home lab, or your aquarium, automatically, for anyone who installs it. We can’t wait to see what you create. 🌱
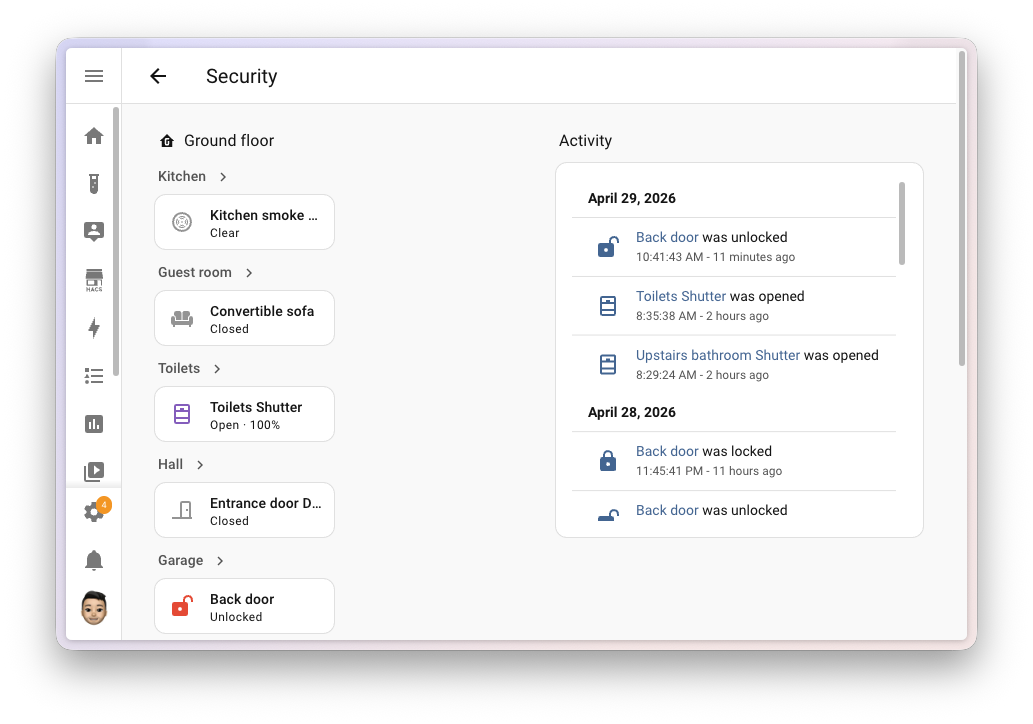
Activity log on the Security dashboard
The built-in Security dashboard also gets a nice upgrade this release: a new Activity sidebar that shows you a live, 24-hour log of everything happening with your security-related entities. Cameras, locks, alarm panels, motorized covers, door and window sensors, and the comings and goings of the people in your home, all in one place. 🔓
It’s a quiet upgrade you’ll feel every day: at a glance, you can see if a door was opened, if someone arrived home, or if the front camera spotted motion, without having to dig through the logbook or build a dashboard for it yourself. The sidebar appears automatically on wider screens whenever the Logbook integration is enabled (it is, by default).
More for the dashboards you build yourself
Building your own dashboard is one of the most rewarding parts of Home Assistant. The best part: you can build the entire thing right in the UI, by dragging and dropping cards into place. You don’t need to be technical, you don’t need to know YAML, and you don’t need to touch a single line of code to make something that looks great and works exactly the way you want.
Of course, the dashboards you craft yourself get plenty of love this release too. A new card for one-tap shortcuts and fresh tile card features for your media players. 🎨
Introducing the shortcut card
Dashboards are the front door to your smart home, and sometimes the most useful thing you can put on them isn’t an entity, but a quick way to get somewhere. Jump to your energy dashboard. Open the camera view. Launch Assist. Open the manual in a new tab. The new shortcut card makes building those one-tap launchers a breeze. ⚡
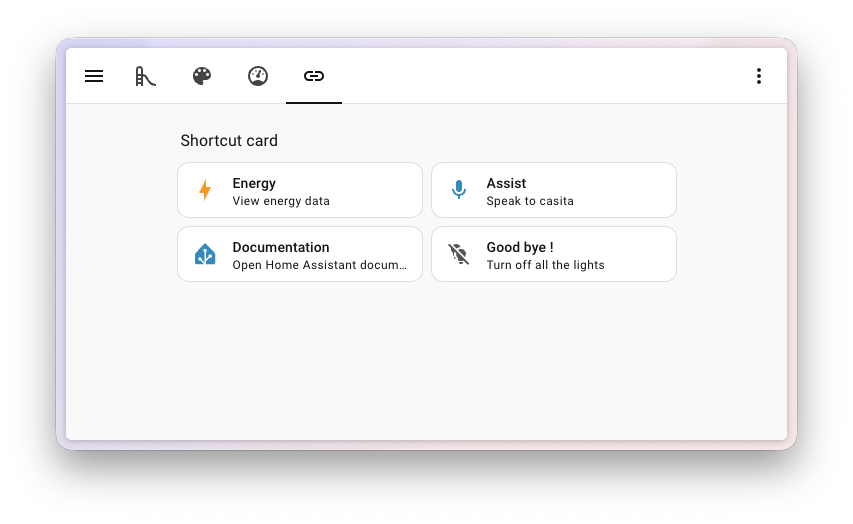
It looks and feels like a tile card, but instead of representing an entity, it triggers an action when you select it. You can pick from:
- Navigate to another dashboard, view, area, or device page.
- Open a URL in a new tab, perfect for linking out to your router, NAS, or documentation.
- Launch Assist, so your voice assistant is always one tap away.
- Perform an action, like turning off all the lights when you head out the door. 🌙
The card is smart about defaults: pick a navigation target and it picks up the title, icon, and color of that destination automatically. Pick Launch Assist and it suggests a microphone icon. You can override any of it, of course; set your own label, description, icon, and color, and pick between a horizontal or vertical layout.
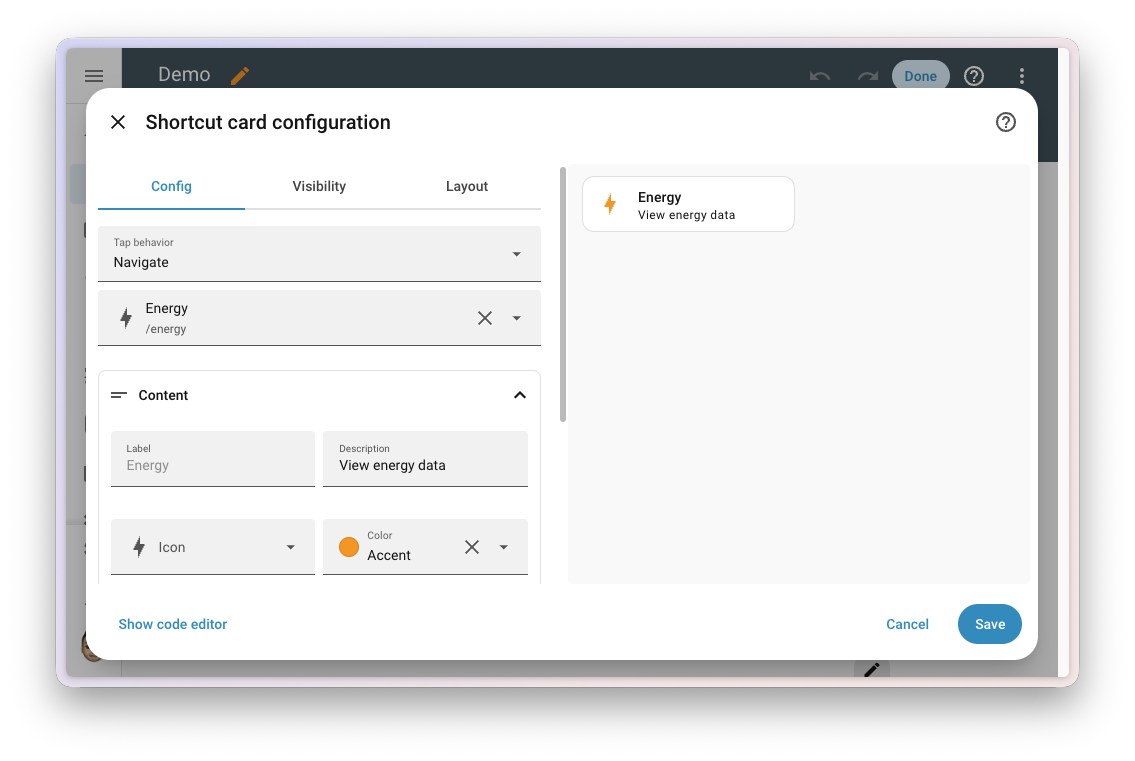
The shortcut also comes as a badge, so you can drop the same one-tap actions into the badge row at the top of any view. Same options, same smart defaults, just in a more compact form.
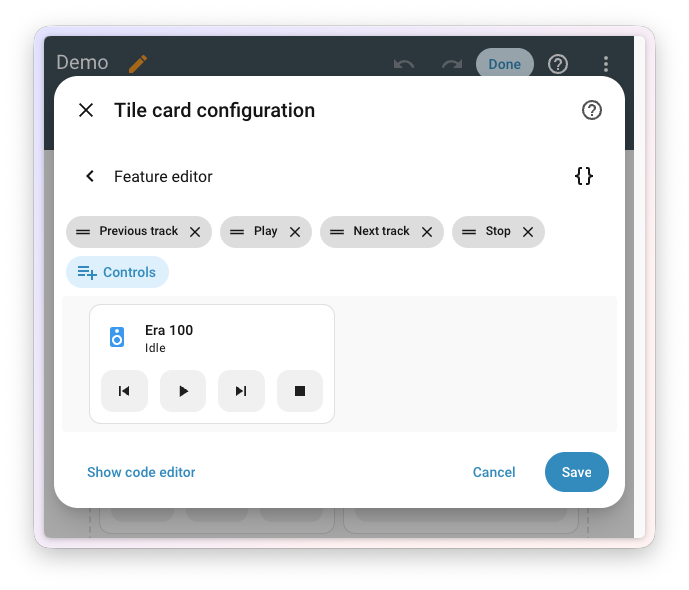
New tile card features for media players
The tile card is one of the most flexible building blocks in Home Assistant dashboards, and this release expands what it can do for media players. Two new card features and a more flexible playback feature give you a lot more choice in how your media player tiles look and behave. 🎶
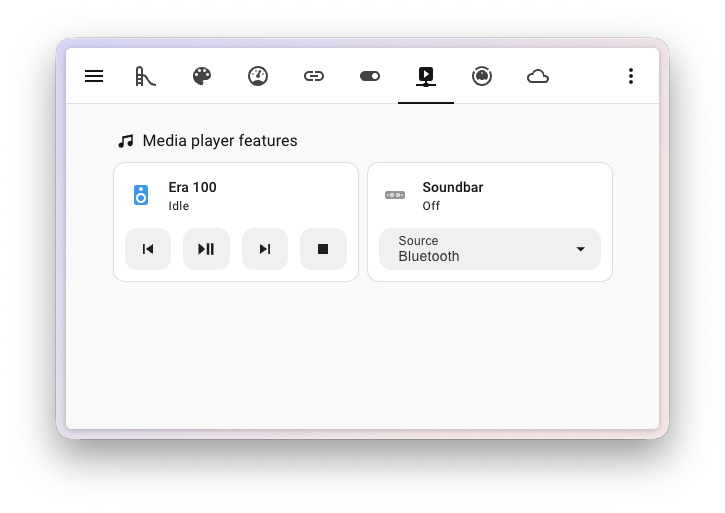
The first new feature is select source: a dropdown right on the tile that lets you switch the input or source on your media player. HDMI 1, the Spotify input on your receiver, that one obscure radio station you actually like; it’s all one tap away. The second is select sound mode, with the same dropdown experience for picking modes like Movie, Music, or Night on receivers and AV gear that support it.
And the existing playback card feature got a long-requested upgrade: you can now pick exactly which buttons appear and in what order. Mix and match from on/off, play, pause, play/pause, stop, previous track, and next track to build a remote that fits your media player perfectly. No more turn-on button on a TV that doesn’t need one, no more missing the next-track button on your speaker. 🎚️
Purpose-specific automation triggers & conditions
The journey to make automationAutomations in Home Assistant allow you to automatically respond to things that happen in and around your home. [Learn more] building feel natural continues. Ever since Home Assistant 2025.12 introduced purpose-specific triggers and conditions, every release has chipped away at the gap between how you describe your home in your head (“when a light turns on”, “if the climate is heating”) and what you actually had to type into an automation. Last release added a whole batch of cross-domain triggers and conditions. This release adds something the entire community has been asking for: time. ⏱️
Automations that finally understand “for a while”
Reading back the feedback we’ve received in the months this has been in Home Assistant Labs, one request stood out above all others: durations. Almost every “when motion is detected” automation in the wild secretly wishes it could say “when motion has not been detected for the last 5 minutes”. And almost every “if a door is open” condition really wants to be “if a door has been open for at least 10 minutes”. 🚪
Now they can. On the trigger side, a new for field has landed across a wide range of state-based purpose-specific triggers, from motion and occupancy to doors, windows, lights, switches, climate, covers, and many more. Pick a trigger, set how long the situation has to hold, and you’re done. No more wrestling with template helpers or YAML for: keys hidden in code views to express something this fundamental.
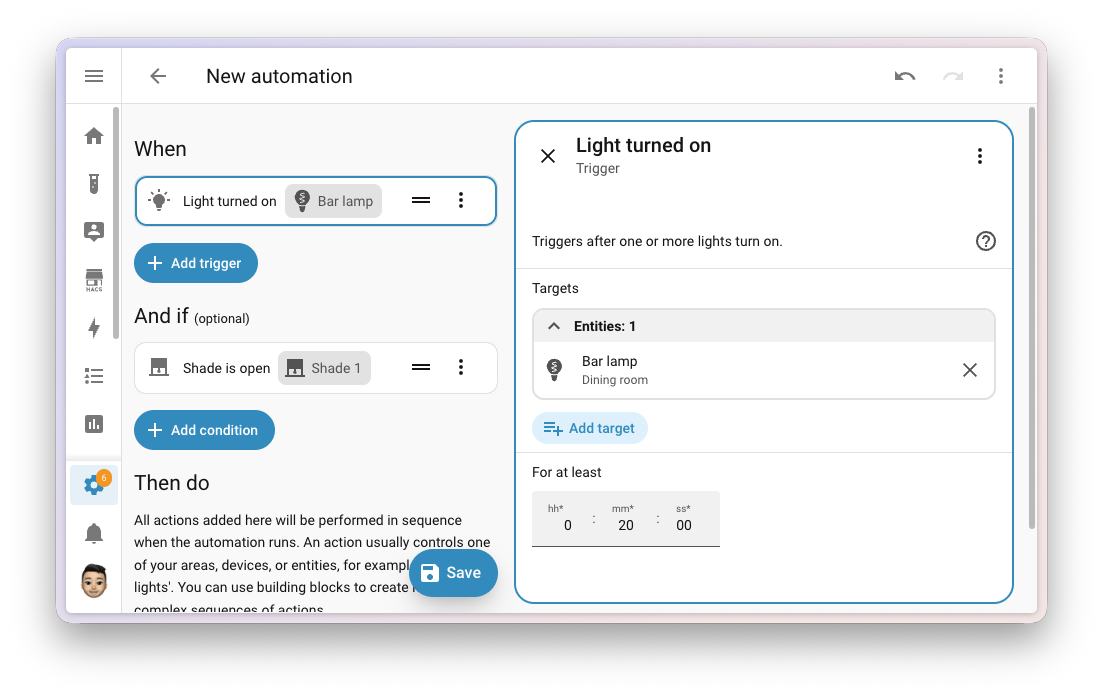
On the condition side, duration is now available across the entire family of entity conditions in Labs. Whether you’re checking on motion, a door, a light, a switch, a climate, a media player, or anything else, you can now ask for the state to have held for a given amount of time before the condition is considered true. Same story: no template helpers, no YAML detour.

A few examples of what this unlocks:
- “When the front door has been open for more than 2 minutes” → close-the-door reminder. 🔔
- “When motion has not been detected in the office for 15 minutes” → turn off the lights. 💡
- “If the bedroom window has been closed for at least an hour” → only then start the air purifier. 🌬️
- “When a garage door has been open for more than 30 minutes after sunset” → send a notification. 🌙
It’s a small-looking addition with an outsized impact: a whole category of “almost possible” automations just became easy to put together.
A few more triggers and conditions to play with
Beyond the new sense of time, this release sprinkles a few more handy purpose-specific building blocks across your house.
If you keep an eye on updates waiting to be installed, two new conditionsConditions are an optional part of an automation that will prevent an action from firing if they are not met. [Learn more], is available and is not available, let an automation branch on whether something is pending, without templating the answer yourself.
Your media players got chatty: triggers fire when something starts playing, pauses, turns on, or turns off, and now also when a player is muted or unmuted, when its volume changes, or when the volume crosses a threshold you set. Conditions follow the same beat with is muted, is unmuted, and a numeric volume check. Perfect fuel for “dim the lights when the movie starts”, “pause the music when the doorbell rings”, or “only send the loud TTSTTS (text-to-speech) allows Home Assistant to talk to you. [Learn more] announcement if the speaker is below 30%”. 🎬🔇
Your remotes picked up matching is on and is off conditions, finishing what last release’s triggers started. And your to-do lists can now answer two questions an automation might have: are all items completed, or are there still incomplete items on the list? Great for end-of-day check-ins or those “did I forget to feed the cat” moments. 🐱
Your timers got a whole lifecycle of new triggersA trigger is a set of values or conditions of a platform that are defined to cause an automation to run. [Learn more]: started, paused, restarted, cancelled, and finished. So that 20-minute “tea is ready” timer can now actually tell your kitchen lights to flash, and your “kids screen time” timer can announce when it’s running, paused, or up. There’s also a new time remaining trigger that fires when a running timer reaches a remaining duration you pick: think a gentle “five minutes left” warning before the screen time timer runs out. ⏲️
And finally, a new doorbell rang trigger. Doorbell event entities now speak a shared language, so a single trigger lights up regardless of which brand sits at your front door. 🔔
Changes to existing triggers and conditions
As some of the very first, we’ve added purpose-specific triggers and conditions for Person entities and Device Tracker entities separately. More recently, we’ve decided we want to go for a more ergonomic cross-domain approach. Thus, the triggers entered_home and left_home and also the conditions is_home and is_not_home got removed from the Person and Device Tracker. They will get successors in one of the upcoming releases.
Try it out!
Purpose-specific triggers and conditions are still a preview feature in Home Assistant Labs, but with each release the rough edges get smoother, and we’re closing in on having it feature complete. If you haven’t given it a spin yet, head over to Settings > System > Labs, switch it on, and let us know what you think. Your feedback is genuinely shaping where this lands; building in the open at work. 💚
Integrations
Thanks to our community for keeping pace with the new integrationsIntegrations connect and integrate Home Assistant with your devices, services, and more. [Learn more] and improvements to existing ones! You’re all awesome 🥰
New integrations
We welcome the following new integrations in this release:
-
Denon RS-232, added by @balloob
Control your Denon receiver locally over its RS-232 serial port. Connect your receiver using a serial cable or a USB-to-serial adapter for push-based state updates, without depending on the network or the cloud. -
Duco, added by @ronaldvdmeer — launching at 🏆 platinum quality
Monitor and control your Duco demand-controlled ventilation system locally from Home Assistant. Track CO₂, humidity, and other sensor data, and adjust ventilation, all over your local network. -
EARN-E P1 Meter, added by @Miggets7
Connect your EARN-E energy monitor to Home Assistant for real-time insights into your smart meter’s energy and gas data. The device pushes its readings over your local network, so no cloud or polling is involved. -
Eurotronic Comet Blue, added by @rikroe
Integrate your Eurotronic Comet Blue (and similar) Bluetooth radiator thermostats with Home Assistant. Read thermostat status and adjust temperatures locally, without a hub or cloud connection. Compatible thermostats include Sygonix HT100 BT, Xavax Hama, and Lidl Silvercrest RT2000BT. -
Fumis, added by @frenck — launching at 🏆 platinum quality
Bring your Fumis-based pellet stove into Home Assistant through the Fumis online service. Monitor your room temperature, set a comfortable target temperature, and turn your stove on or off. Pellet stoves, pellet boilers, and hybrid wood and pellet stoves equipped with a Fumis WiRCU Wi-Fi module are sold under many different brands, including Austroflamm, Eco Spar, HAAS+SOHN, and Heta. -
Honeywell String Lights, added by @balloob
Control your Honeywell radio frequency (RF) remote-controlled string lights from Home Assistant. Uses the new Radio frequency entity platform, so you’ll need a compatible sub-GHz RF transmitter (for example, an ESPHome device) to send commands. -
Kiosker, added by @Claeysson
Monitor your Kiosker web kiosks running on iPad or iPhone from Home Assistant. Kiosker turns your iOS device into a powerful, easy-to-use web kiosk, perfect for dashboards on the wall. -
Novy Cooker Hood, added by @piitaya
Control the light and the extractor fan on your Novy cooker hood from Home Assistant. Novy hoods are typically ceiling-mounted, with no buttons within reach, so an RF remote (and now Home Assistant) is the only practical way to control them. Uses the new Radio frequency entity platform, so you’ll need a compatible sub-GHz RF transmitter (for example, a Broadlink RM4 Pro or an ESPHome device) to send commands. -
OMIE, added by @luuuis — launching at 🥈 silver quality
Bring Iberian Peninsula day-ahead electricity spot prices from OMIE into Home Assistant. Sensors expose the current and next-hour prices for both Spain and Portugal, perfect for smarter automations around when to run your dishwasher, charge your EV, or heat your water. -
Radio frequency, added by @balloob
A new entity type that represents a sub-GHz radio frequency (RF) transmitter, like an ESPHome device with a CC1101 module attached. You don’t set this integration up directly; instead, other integrations use it to send RF commands to devices such as remote outlets, garage doors, and string lights. The new Honeywell String Lights and Novy Cooker Hood integrations are the first to make use of it. Read more about it in the Radio frequency joins infrared as a first-class citizen section above. -
Teleinfo, added by @esciara — launching at 🥈 silver quality
Read electricity consumption data from French Linky smart meters and older electronic meters using the Télé-Information Client (TIC) protocol. Connect a Teleinfo USB adapter to your meter’s TIC output to monitor real-time energy indexes, apparent power, instantaneous current, and tariff information, all locally. -
Victron GX, added by @tomer-w — launching at 🏆 platinum quality
Connect your Victron Energy GX devices, like the Cerbo GX, Venus GX, and Color Control GX, to Home Assistant over MQTT. Get real-time monitoring and control of your Victron system, including inverters, solar chargers, battery systems, grid meters, and EV chargers.
Noteworthy improvements to existing integrations
It is not just new integrationsIntegrations connect and integrate Home Assistant with your devices, services, and more. [Learn more] that have been added; existing ones are also being constantly improved. Here are some of the noteworthy changes to existing integrations:
- MQTT picked up three new platforms this release: time, datetime, and date entities, giving you even more building blocks for your MQTT-based devices and automations. Thanks, @jbouwh!
- Matter added support for Matter radon sensors, so radon-monitoring devices that speak Matter now show up natively in Home Assistant. Thanks, @dnicoara!
- ESPHome water heater entities now support away mode, matching what physical and smart water heaters in your home offer. Thanks, @tronikos!
- Shelly added tilt and rotation binary sensors for the Shelly Cury, and the Shelly Wall Display now exposes a media player entity for built-in audio playback. Thanks, @bieniu!
- Sonos got two new switches for TV Autoplay and Ungroup on Autoplay, giving you fine-grained control over how home theater speakers behave when the TV turns on. Thanks, @arsenicks!
- Apple TV now supports keyboard text input services, so you can send text to your Apple TV right from Home Assistant. No more hunting for letters on the on-screen keyboard. Thanks, @kroehre!
- Music Assistant received a big batch of player options: number, text, switch, and select entities are now exposed for everything Music Assistant players make configurable. On top of that, sound mode support has landed too. Thanks, @fmunkes!
- Roborock owners with a Q10 S5+ now get dedicated sensor and select entities for their vacuum, and Q7 vacuums gained cleaning route control. Thanks, @lboue and @Lash-L!
- WLED now supports per-segment freezing, letting you pause effects on individual LED segments. Thanks, @tgechev!
- Broadlink can now act as an infrared emitter on the new infrared platform that landed last release, so your Broadlink RM-series devices can be reused as native IR transmitters for other integrations. Thanks, @YuvalWS!
- Home Connect added microwaves to the related appliance types for several sensors, expanding coverage of supported devices. Thanks, @Diegorro98!
- OpenAI Conversation added support for OpenAI’s new GPT-5.5 conversation model and the gpt-image-2 image generation model, which is now the recommended default for image generation. Thanks, @Shulyaka!
- SMLIGHT SLZB devices now expose an infrared platform, so they can be used as IR transmitters with the new infrared entity platform. Thanks, @tl-sl!
- SwitchBot Air Purifier devices gained fan speed percentage control and a button to toggle the built-in light sensor. Thanks, @zerzhang!
- Tado now uses a dynamic update interval, automatically adjusting how often it polls based on activity to give you fresher data when something is happening. Thanks, @erwindouna!
- SolarEdge got a whole set of new battery storage sensors. There are aggregate sensors for the total daily charge and discharge energy across your batteries, and per-battery sensors for daily charge and discharge energy, state of charge, and current power. All new sensors are disabled by default, so you can enable just the ones you need. Thanks, @it-rec!
-
HTML5 Push Notifications got a major upgrade: a new event platform, a new
html5.send_messageentity action, and the integration is now correctly classified as a notification service. Thanks, @tr4nt0r! - Anthropic added support for Anthropic’s new Claude Opus 4.7 model. Thanks, @Shulyaka!
- Immich media source now exposes your favorite collection, making it easy to pull starred photos straight into your dashboards. Thanks, @mib1185!
- Transmission gained an event entity for torrent events, perfect for triggering automations when downloads finish. Thanks, @andrew-codechimp!
- Portainer continues its rapid expansion: new buttons for pruning volumes, killing containers, recreating containers, and full volume management. Thanks, @erwindouna!
- LG Netcast got a new action to send remote control commands, letting you script TV navigation and input. Thanks, @mithomas!
- Subaru vehicles that support remote start now have a dedicated start/stop button entity. Thanks, @masterkoppa!
- London Underground expanded beyond the tube: it now reports status for the Trams and the IFS Cloud Cable Car as well. Thanks, @prpr19xx!
- UniFi Access picked up several improvements: a select entity for temporary door lock rules, UA-HUB-Door support, entry/exit direction on access events, automatic console discovery via UniFi Discovery, and a warning when a UniFi Protect API key is used during setup. Thanks, @imhotep and @RaHehl!
- UniFi Protect is turning into your alarm hub: it gains an alarm control panel, UniFi PoE Siren / UniFi SuperLink Siren sirens, and switches for the new UniFi SuperLink Relay — a device that reaches up to 2 km over LoRa. All of these new features require UniFi Protect 7.1 or later. Thanks to Ubiquiti for the public API improvements, and to @RaHehl for bringing it all to Home Assistant!
- WaterFurnace geothermal systems now expose a climate entity, alongside new energy statistics so you can track your system’s energy use over time. Thanks, @masterkoppa!
- OpenDisplay Flex e-paper devices now expose new diagnostic sensors driven by passive Bluetooth Low Energy advertisements: a battery percentage and battery voltage sensor for battery- and solar-powered devices, and a chip temperature sensor. Thanks, @g4bri3lDev!
- Satel Integra now supports encrypted connections, keeping your alarm panel communications secure over the network. Thanks, @Tommatheussen!
Integration quality scale achievements
One thing we are incredibly proud of in Home Assistant is our integration quality scale. This scale helps us and our contributors to ensure integrations are of high quality, maintainable, and provide the best possible user experience.
This release, we celebrate several integrationsIntegrations connect and integrate Home Assistant with your devices, services, and more. [Learn more] that have improved their quality scale:
-
6 integrations reached platinum 🏆
- Elgato, thanks to @frenck
- freshR, thanks to @SierraNL
- Google Weather, thanks to @tronikos
- Liebherr, thanks to @mettolen
- Twente Milieu, thanks to @frenck
- UniFi Access, thanks to @imhotep and @RaHehl
-
2 integrations reached gold 🥇
- FRITZ!Box Tools, thanks to @AaronDavidSchneider, @chemelli74, and @mib1185
- Samsung Smart TV, thanks to @chemelli74 and @epenet
-
3 integrations reached silver 🥈
- Anthropic, thanks to @Shulyaka
- Huum, thanks to @frwickst and @vincentwolsink
- UniFi Network, thanks to @RaHehl and @Kane610
-
2 integrations reached bronze 🥉
- iAquaLink, thanks to @flz
- WaterFurnace, thanks to @sdague and @masterkoppa
This is a huge achievement for these integrations and their maintainers. The effort and dedication required to reach these quality levels is significant, as it involves extensive testing, documentation, error handling, and often complete rewrites of parts of the integration.
A big thank you to all the contributors involved! 👏
Now available to set up from the UI
While most integrationsIntegrations connect and integrate Home Assistant with your devices, services, and more. [Learn more] can be set up directly from the Home Assistant user interface, some were only available using YAML configuration. We keep moving more integrations to the UI, making them more accessible for everyone to set up and use.
The following integrations are now available via the Home Assistant UI:
- PJLink, done by @jtjart
- Pico TTS, done by @rrooggiieerr
Farewell to the following
The following integrationIntegrations connect and integrate Home Assistant with your devices, services, and more. [Learn more] is also no longer available as of this release:
- LANnouncer has been removed. The companion Android app is no longer available, which made the integration impossible to install or use. It was deprecated in Home Assistant 2025.10 and is now removed. If you were still using it, you’ll need to look for an alternative notification integration.
Other noteworthy changes
There are many more improvements in this release; here are some of the other noteworthy changes:
- Mobile app notifications are now entities. The Mobile app integration now exposes a notificationYou can use notifications to send messages, pictures, and more, to devices. [Learn more] entity for each of your devices, on top of the existing notify actions. That means you can group your phones and tablets together using the regular group helper right from the user interface, and send a single notification to all of them at once. No YAML, no scripting, no scrolling through a list of targets. Thanks, @tr4nt0r! 📱
- A search bar on the integration detail page. Integrations with a lot of devices and entries (think Z-Wave, Zigbee, or your sprawling pile of ESPHome devices) now have a search bar at the top, matching across entry titles, device names, manufacturers, models, and areas. 🔍
- Dashboard visibility conditions can now refer to the card’s own entity. State and numeric state visibility conditions get a new Current entity option that automatically follows whichever entity the card is bound to. No more re-typing entity IDs, and your card stays reusable.
- Dashboard visibility conditions now support attributes. State and numeric state visibility conditions on cards can now check an entity attribute instead of just the state, catching up with their automation counterparts.
- Reload your shell commands without restarting. A new reload action lets you re-read your Shell command YAML configuration on the fly. One less reason to restart Home Assistant. Thanks, @potelux!
-
Template vacuums learned about rooms. Vacuums you build with the Template integration can now expose their segments (rooms) and a
clean_segmentaction, plugging straight into the new Clean by area view. 🧹 Thanks, @gustavakerstrom! - More unit love for sensors. Frequency sensors now support millihertz (mHz) through gigahertz (GHz) with automatic conversion between them, and electric current sensors gained microamperes (µA). Thanks, @32u-nd, @Lamarqe, and @Phunkafizer!
A modern more-info dialog for vacuums and lawn mowers
When you tap on an entity in your dashboard, the more-info dialog that pops up is one of the most-used surfaces in Home Assistant. This release, two of them get a fresh new look: vacuums and lawn mowers. 🧹🌱
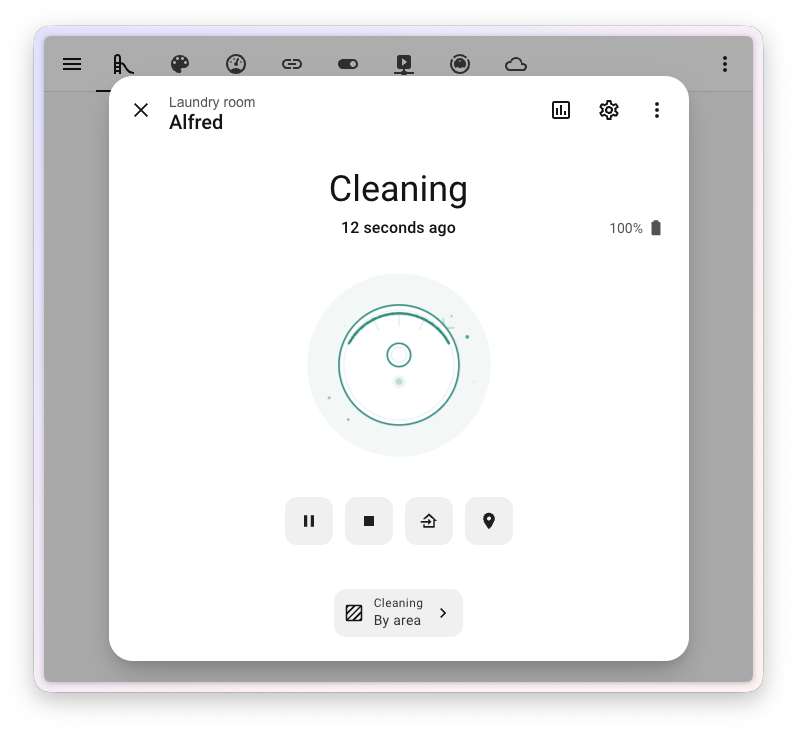
The redesigned vacuum dialog leads with a friendly new illustration of your vacuum that comes to life with state-driven animations: it spins while cleaning, glides home while returning, sits quietly when docked, and shakes when something’s wrong. Battery moved up into the header where you can spot it at a glance, and the action buttons (start, pause, return to dock) are now lined up in a single, consistent row.
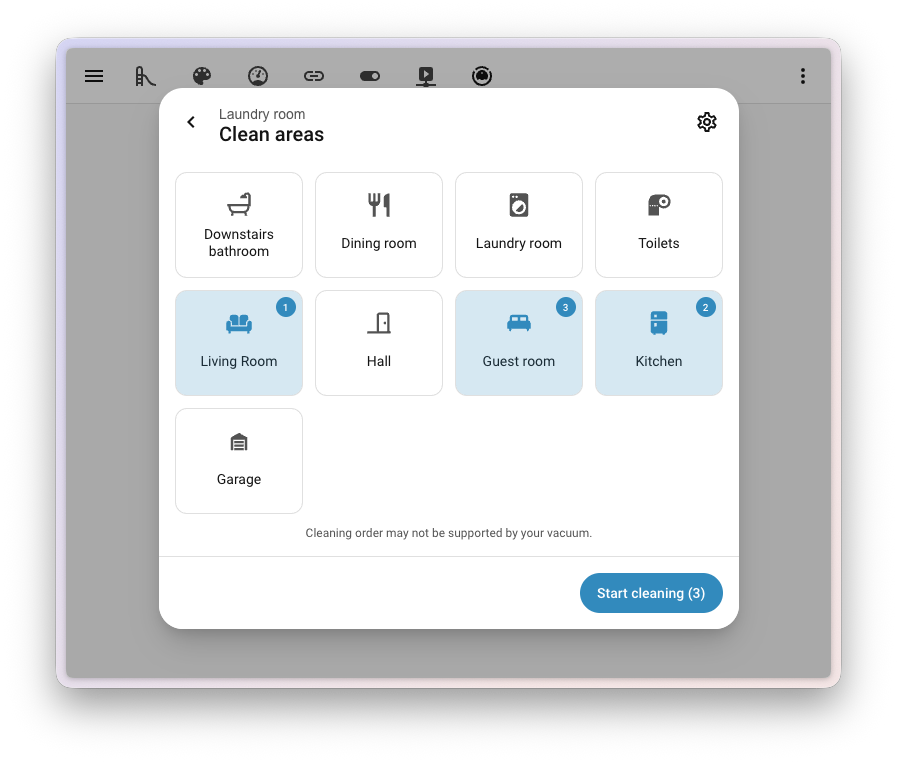
The biggest functional addition is a brand new Clean by area view. Many modern robot vacuums let you ask them to clean a specific room, but until now, there was no built-in way to do that from the dialog. You can now map your Home Assistant areasAn area in Home Assistant is a logical grouping of devices and entities that are meant to match areas (or rooms) in the physical world: your home. For example, the living room area groups devices and entities in your living room. [Learn more] to the rooms your vacuum knows about, and start a cleaning job for one or more areas right from the dialog. If you haven’t set up a mapping yet, the dialog walks you through it with a friendly empty state.
Lawn mowers got the same love. The redesigned lawn mower dialog brings the same fresh illustration with state-driven animations (mowing, returning, docked, error), the same battery-in-the-header layout, and the same unified action button row. Whether your robot is busy on the carpet or busy on the lawn, the experience now feels the same.

This work delivers on two Open Home Foundation roadmap opportunities: refined more info screen for vacuum cleaners and refining the more info screen for lawn mowers. Two roadmap items, one redesign. ✅
New styling for toggles
Toggles across Home Assistant got a small but lovely makeover this release. Every toggle in the app has been updated with a fresh new design. 🎨
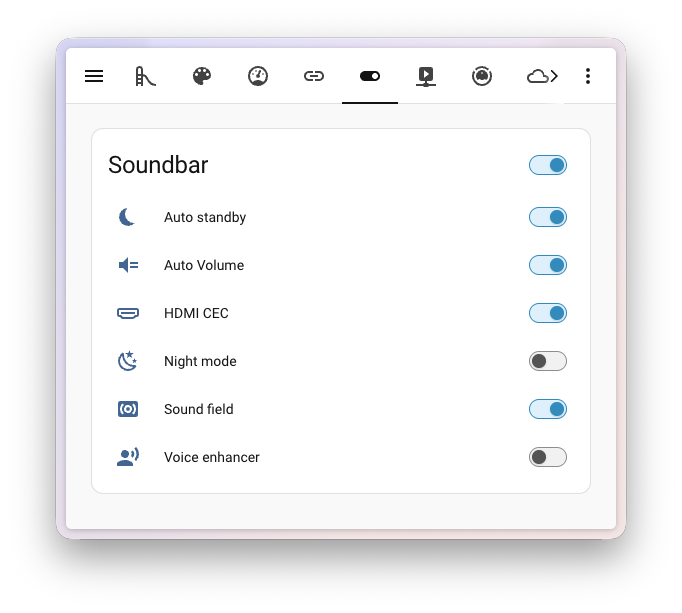 The refreshed toggles on an entities card.
It’s not just a fresh coat of paint either: the new toggle is fully keyboard-friendly. Tab to it, then use the arrow keys to flip it on or off without ever touching the mouse. Small change, big quality-of-life upgrade. ⌨️
The templating documentation you’ve always wanted
First, the most important thing to say up front: you do not need to write code or touch a single template to use Home Assistant. Everything from setting up your devices, to building automations and crafting beautiful dashboards, can be done entirely through the user interface, and it gets better every release. If the interface does what you need, you’re done. 💚
That said, templating is one of the most powerful corners of Home Assistant for the people who do want to go a step further: dynamic notifications that read the actual temperature, automations that decide based on a calculation across several entities, template entities whose value is computed from other entities. And it has long been one of the most intimidating corners too. So we shipped a top-to-bottom rework of the templating documentation, with one goal: if you have ever felt that templates were “not for you”, we want to change that. 📚✨
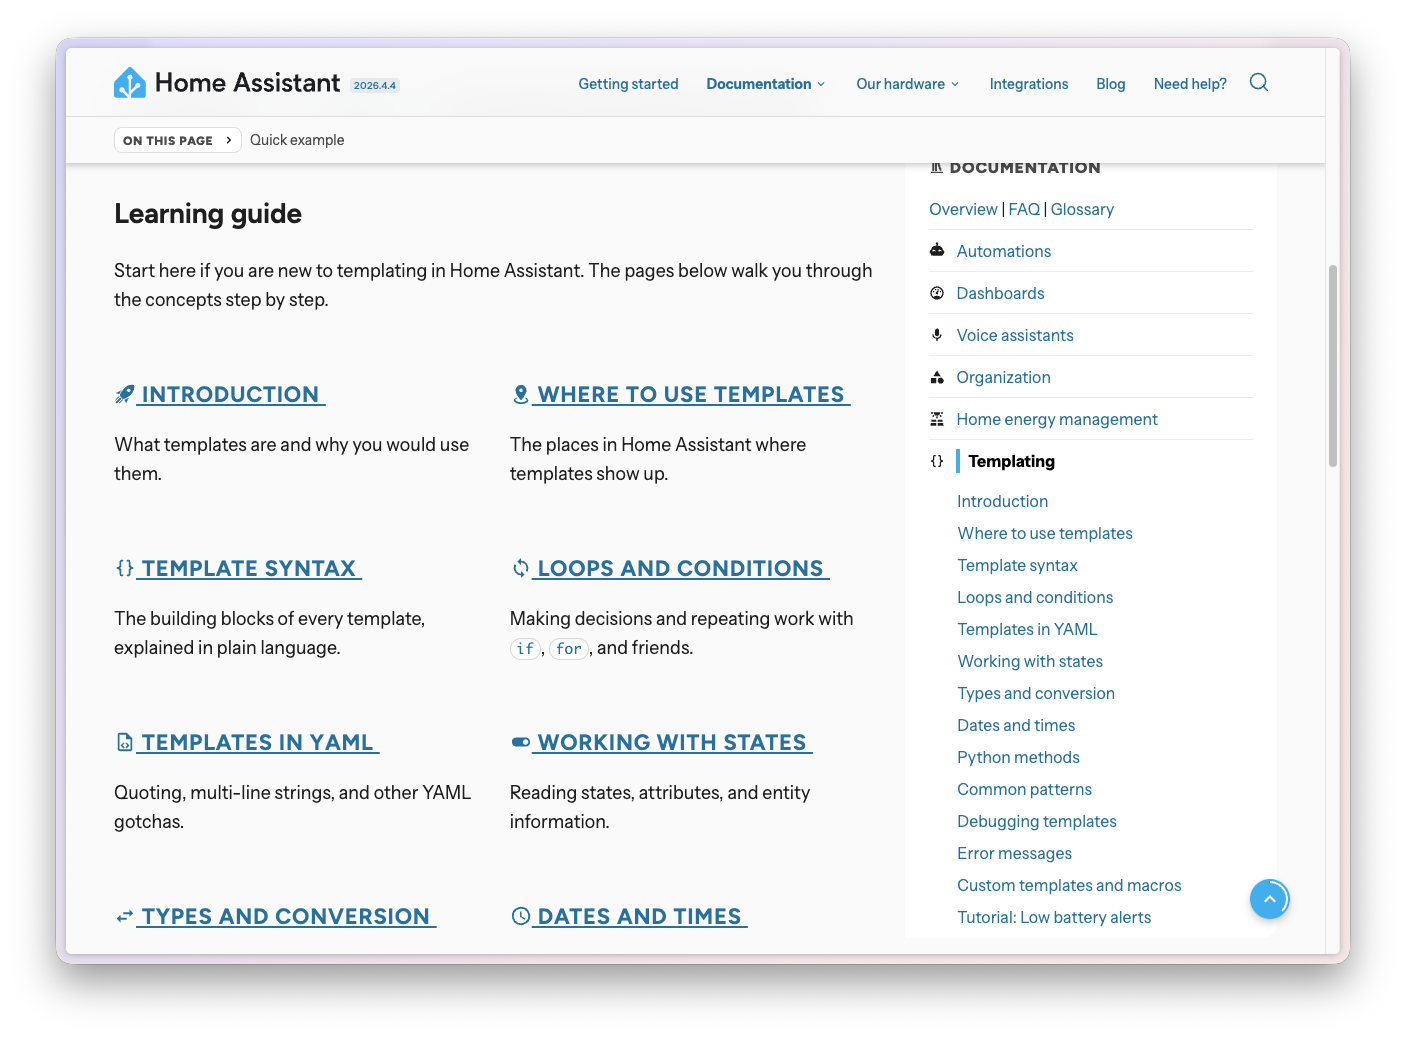
If you decide to learn templating, we are now confident we have everything in place to take you all the way:
- 14 brand new learning pages walk you through templating step by step, from what is a template? and where to use templates, through syntax, loops and conditions, working with states, types and conversion, dates and times, common patterns, and debugging, all the way to writing your own custom templates and macros.
- Two full tutorials build something real you can use: a daily low-battery notification, and an average home temperature sensor you can drop straight onto your dashboard.
- Every one of the 200+ “template functions”A template function is called by name with parentheses, like states(“sensor.temperature”) or now(). It takes input values as arguments and returns a result. [Learn more], “filters”A template filter transforms a value using the pipe (|) operator. It takes the value on the left and returns a modified result. For example, states(“sensor.temperature”) | float converts the state to a number. [Learn more], and “tests”A template test checks a condition using the “is” keyword and returns true or false. For example, value is number checks if a value is a number. [Learn more] has its own page, with a plain-language intro, parameters, examples that show the exact output they produce, common gotchas, and links to related functions. All searchable through a single template functions reference that lists them all.
- A dedicated error messages page lists common template errors verbatim, so when something breaks late at night you can paste the error into a search engine and land somewhere that actually helps.
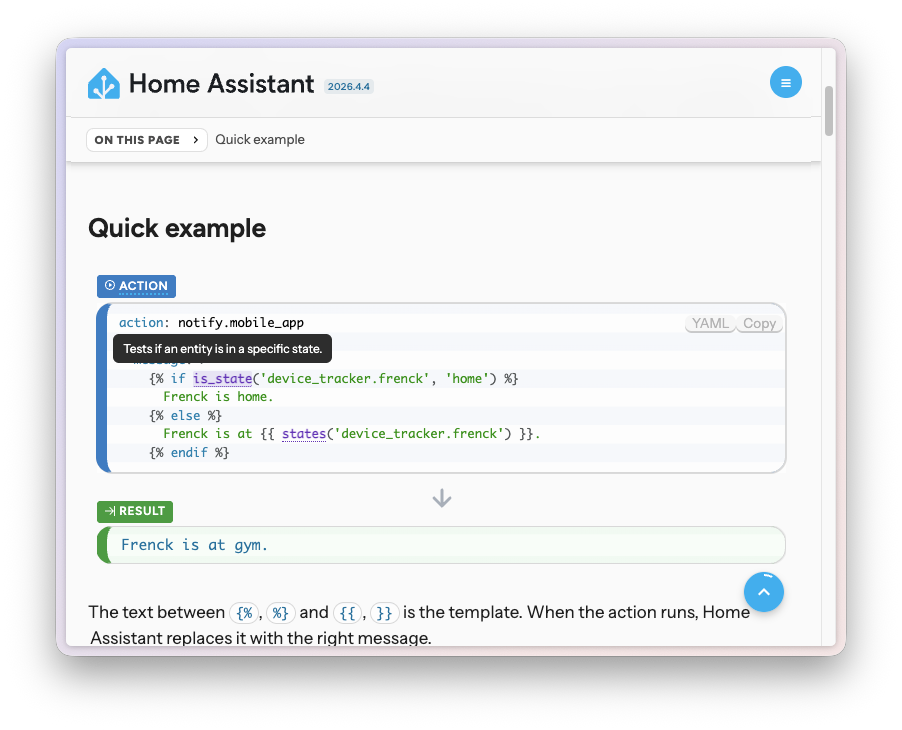
There’s a quality-of-life upgrade across the entire website too: templates in code blocks are now interactive. Hover over a function name to see its description, select it to jump to the reference page, hover over a parameter for a quick reminder of what it does. Examples render with the input on top and the actual output right below, so you never have to guess what a template will produce.
Skip it, skim it, or master it. Either way, we’ve got your back. And this is just the beginning: we’ve expanded our documentation team and are investing heavily in making all of our documentation more approachable. So expect more reworks, more tutorials, and more friendly-but-thorough guides in releases to come. 💪
Smarter code editors with autocomplete
The rework didn’t stop at the documentation. While building it, it became painfully clear that even with great docs, writing a template still meant flipping back and forth between tabs. So the code editors you find throughout Home Assistant, the ones you use to write a template or fine-tune an automation, got a serious upgrade this release too. They now offer rich, context-aware autocomplete for both YAML and Jinja2 templates. ✨
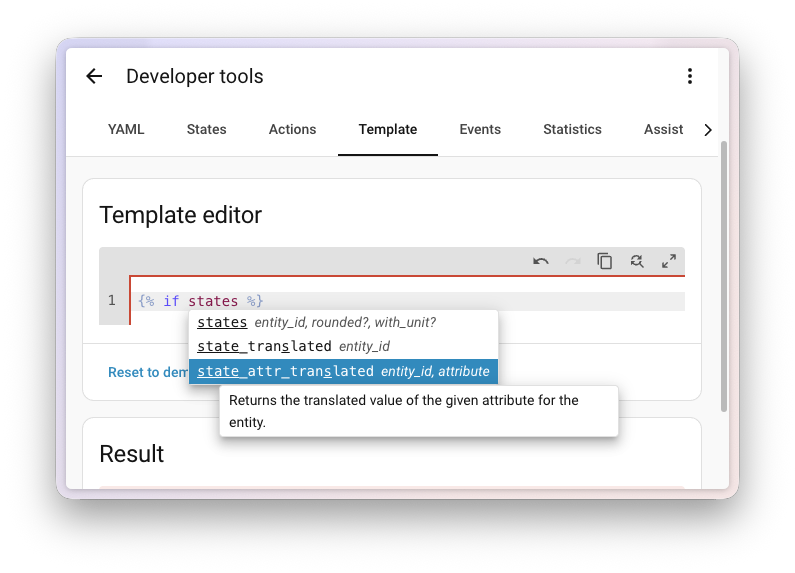
Start typing inside a {{ ... }} or {% ... %} block, and the editor now suggests Home Assistant’s template functions, filters, tests, and globals. Each suggestion comes with a short signature, a description, and tab-stops for the arguments, so you can fly through writing a template without keeping the template documentation open in another tab.
It gets even better inside the string arguments of those functions. The editor knows what kind of ID a function expects and offers matching suggestions:
-
Entity IDs for functions like
states(),is_state(), andstate_attr(), including thestates["..."]shorthand. -
Device IDs for
device_entities(),device_name(), anddevice_attr(), showing the device’s friendly name with the raw ID as the inserted value. -
Area IDs for
area_entities(),area_devices(), andarea_name(). -
Floor IDs for
floor_areas(),floor_entities(), andfloor_name(). -
Label IDs for
label_areas(),label_devices(), andlabel_entities().
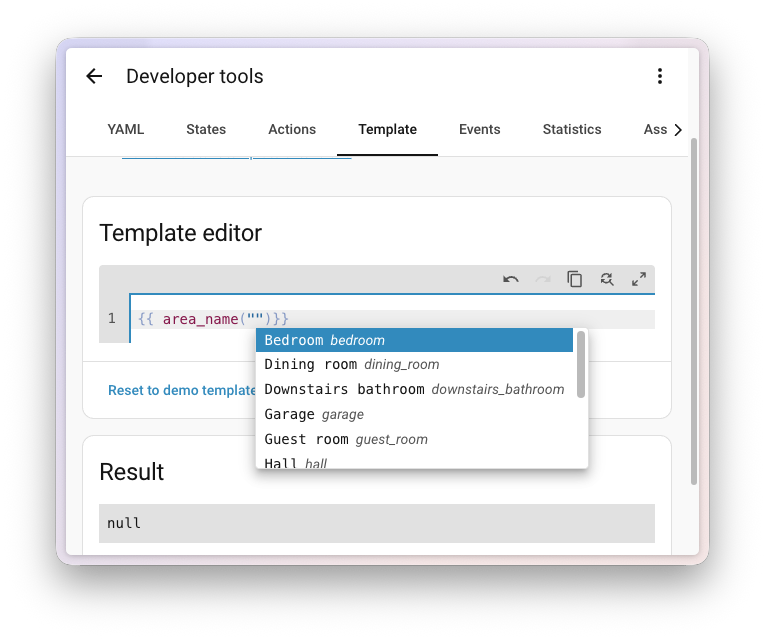
No more copy-pasting entity IDs from the developer tools, and no more typos sneaking into your templates. Less friction, fewer mistakes. 🎯
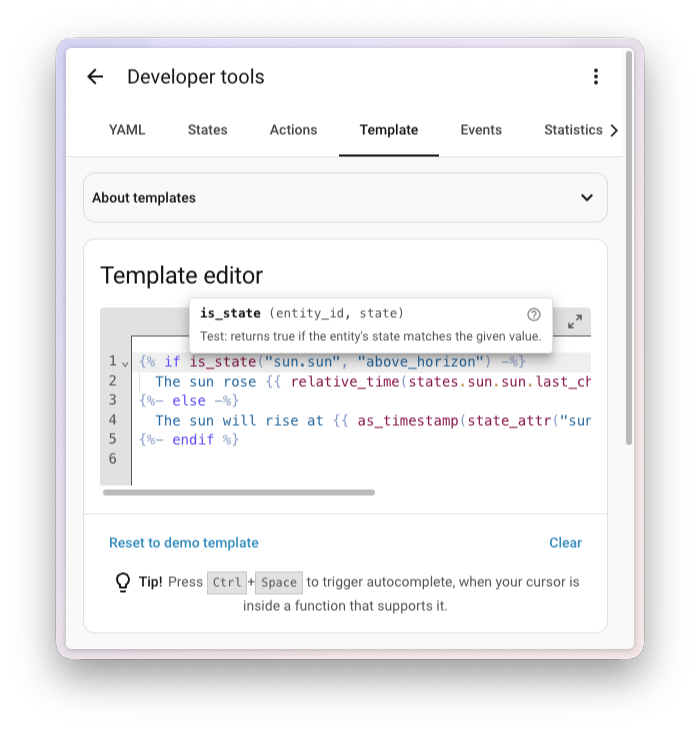
And it’s not just autocomplete. Hover over anything in your template and the editor has something useful to say. Functions, filters, and tests get a small tooltip with their signature, what they do, and a direct link to the full documentation page. Entity IDs and attributes show their current value right where you’re typing, so you instantly see whether your template is reading what you think it is. 🔍
Need help? Join the community
Home Assistant has a great community of users who are all more than willing to help each other out. So, join us!
Our very active Discord chat server is an excellent place to be, and don’t forget to join our amazing forums.
Found a bug or issue? Please report it in our issue tracker to get it fixed! Or check our help page for guidance on more places you can go.
Are you more into email? Sign up for the Open Home Foundation Newsletter to get the latest news about features, things happening in our community, and other projects that support the Open Home straight into your inbox.
Backward-incompatible changes
We do our best to avoid making changes to existing functionality that might unexpectedly impact your Home Assistant installation. Unfortunately, sometimes it is inevitable.
We always make sure to document these changes to make the transition as easy as possible for you. This release has the following backward-incompatible changes:
Purpose-specific triggers and conditions
When we first introduced purpose-specific triggers and conditions, we added separate ones for Person entities and Device Tracker entities. Since then, we’ve decided to take a more ergonomic, cross-domain approach instead.
As a result, the entered home and left home triggers, and the is home and is not home conditions, have been removed from Person and Device Tracker. Replacements that work across both will land in an upcoming release.
If you have automations that use these triggers or conditions on a person or device tracker, switch them back to a regular state trigger or state condition (for example, state changed to home) until the cross-domain replacements arrive.
(@emontnemery - #168406)
Gardena Bluetooth
The “finish watering” value in the Gardena Bluetooth integration has been moved from a binary sensor to a regular sensor that exposes the timestamp of when watering is expected to finish. This makes the value far more useful in dashboards and automations.
If you have automations, scripts, or dashboards that reference the previous binary sensor entity, update them to use the new sensor entity instead.
pilight
The pilight integration has been disabled because the underlying pilight library relies on setuptools.pkg_resources, which is no longer available in setuptools 82.0.0 and later.
If the library is updated to remove the setuptools.pkg_resources dependency, or replaced with a maintained alternative that does so, the integration can be activated again. Community contributions to make this happen are very welcome.
Ring
The Ring doorbell event entity now emits the standardized ring event type instead of the legacy ding. This change aligns Ring with the new doorbell event standard, so the entity can be used seamlessly with the new purpose-specific automation triggers and conditions.
If you have automations that listen for the ding event type from your Ring doorbell, update them to use ring instead.
Supervisor
Previously, all actions registered by the Supervisor integration (such as hassio.addon_start, hassio.backup_partial, and hassio.host_reboot) only logged an error on failure, and your script or automation would continue running regardless of whether the action succeeded.
These actions now properly raise on failure, which means your automation or script will stop unless continue_on_error is set to true. If you rely on the previous behavior, add continue_on_error: true to those action steps.
Webhook
The local_only option on webhooks must now be a proper boolean (true or false). Previously, other truthy values like 1 or "yes" were silently accepted. This brings the option in line with the rest of Home Assistant.
If you have webhooks configured in YAML with non-boolean local_only values, update them to use true or false.
If you are a custom integration developer and want to learn about changes and new features available for your integration: Be sure to follow our developer blog. The following changes are the most notable for this release:
- Deprecation of legacy device tracker platform API
- Entity IDs with mismatched domains are deprecated
- Frontend component updates in 2026.5
- Frontend context groups, new context decorators and deprecated contexts
- Migrating app builds to Docker BuildKit
- New radio frequency entity platform for RF device integrations
- Registering custom dashboard strategies
- Serious about serial: migrating from pyserial to serialx
- Standard event type for doorbell event entities
Patch releases
We will also release patch releases for Home Assistant 2026.5 in May. These patch releases only contain bug fixes. Our goal is to release a patch release once a week, aiming for Friday.
2026.5.1 - May 8
- Added wfsens as a occupancy source in wiz (@th3spis - #166799)
- Fix WiZ Light config flow timeout by properly closing UDP connections (@robwasripped - #168456)
- Fix IntelliFire setup recovery (@jeeftor - #169739)
- Fix hassio auth IndexError on Supervisor Unix socket requests (@agners - #169911)
- Update gardena ble to 2.8.1 (@elupus - #169914)
- Bump serialx to 1.7.1 (@puddly - #169928)
- Bump holidays to 0.96 (@gjohansson-ST - #169939)
- Add support for options to todo triggers (@emontnemery - #169947)
- Bump pyTibber to 0.37.5 (@Danielhiversen - #169981)
- Bump python-duco-client to 0.4.0 (@ronaldvdmeer - #169776)
- Bump python-duco-client to 0.4.1 (@ronaldvdmeer - #169991)
- Proper handling of malformed data during FRITZ!Box Tools setup (@mib1185 - #170030)
- Fix websocket certificate verification Bump axis to v70 (@Kane610 - #170038)
- Fix
is_closedstate for DynamicGarageDoor in Overkiz (@iMicknl - #170052) - Fix tilt controls for TiltOnlyVenetianBlind in Overkiz (@iMicknl - #170055)
- Fix cover controls for UpDownBioclimaticPergola in Overkiz (@iMicknl - #170058)
- Bump pyOverkiz to 1.20.3 (@iMicknl - #170060)
- Bump deebot-client to 18.3.0 (@edenhaus - #170066)
- Set
is_closedstate toNonewhen a cover state returns “unknown” in Overkiz (@iMicknl - #170081) - Fix sensors getting wrong unit from MeasuredValueType attribute in Overkiz (@iMicknl - #170088)
- Fix Z-Wave discovery crash with unknown node firmware version (@TheJulianJES - #170090)
- Bump ZHA to 1.3.1 (@TheJulianJES - #170095)
- Bump python-bsblan to 5.2.1 (@liudger - #170100)
- Bump blebox_uniapi to v2.5.3 (@bkobus-bbx - #170115)
- Fix is_closed state for DynamicGate covers in Overkiz (@iMicknl - #170130)
- Fix tilt support for UpDownVenetianBlind (rts:VenetianBlindRTSComponent) in Overkiz (@iMicknl - #170047)
2026.5.2 - May 15
- Fix ValueError for non-numeric value in LG ThinQ (@LG-ThinQ-Integration - #166300)
- Only use SmartThings switch for light if it should (@r2xj - #166424)
- Fix non unique_id for Comelit (@chemelli74 - #169756)
- Migrate ZBT-1 and ZBT-2 to use serial number for unique_id (@puddly - #169879)
- Update afsapi to 1.0.1 (@wlcrs - #170073)
- Fix local API incorrectly marking devices as unavailable in Overkiz (@iMicknl - #170118)
- Fix homematicip_cloud config entry setup crash after migration to 2026.5.0 (@lackas - #170156)
- homematicip_cloud: fix HmIP-FLC lock state polarity (@lackas - #170159)
- Set serial port description from
description, notproduct(@puddly - #170160) - Reinit API on stale session for Vodafone Station (@chemelli74 - #170190)
- Fix MQTT device discovery not using shared QoS and encoding options (@jbouwh - #170195)
- Fix entities refresh for UptimeRobot (@chemelli74 - #170217)
- Add target flow level and mode end time sensors to Duco integration (@ronaldvdmeer - #169298)
- Add system health platform for Duco integration (@ronaldvdmeer - #169517)
- Add API version to Duco diagnostics for support triage (@ronaldvdmeer - #169802)
- Bump python-duco-client to 0.4.2 (@ronaldvdmeer - #170027)
- Bump python-duco-client to 0.5.0 (@ronaldvdmeer - #170065)
- Handle empty BSB-LAN heating circuits (@liudger - #170249)
- Fix: Do not forget segments from state when a new config arrives (@Hypfer - #170265)
- Bump imgw-pib to 2.1.2 (@bieniu - #170274)
- iaqualink: set system specific polling interval (@flz - #170279)
- Bump renault-api to 0.5.8 (@thargy - #170309)
- Fix hassio.backup_partial AttributeError when folders are specified (@agners - #170312)
- Fix Shelly media player availability (@bieniu - #170319)
- Cancel previous Debouncer timer handle in _schedule_timer (@raman325 - #170339)
- Bump axis to v71 (@Kane610 - #170347)
- Fix duplicate doorbell events when entity becomes unavailable (@jbouwh - #170354)
- Bump serialx to 1.7.2 (@PBrunot - #170272)
- Bump serialx to 1.7.3 (@puddly - #170368)
- Bump pyintesishome to 1.8.7 (@jnimmo - #170382)
- Apply unit_of_measurement to energy combined power sensor (@MindFreeze - #170404)
- Bump pymiele version to 0.6.2 (@astrandb - #170419)
- Bump aioesphomeapi to 44.24.1 (@bdraco - #170428)
- Fix fractional setpoints in Matter climate not rounded (@TheJulianJES - #170442)
- Fix influxdb reconfigure for v1 configuration (@RobBie1221 - #170448)
- Bump aioharmony to 1.0.3 (@bdraco - #170459)
- Increase WebDAV client timeout from 10 to 30 seconds (@Croydon - #170476)
- Fix MQTT settings in device subentry device settings are not recalled when reconfiguring the device (@jbouwh - #170484)
- Add missing optional category strings in workday (@gjohansson-ST - #170505)
- Update frontend to 20260429.4 (@bramkragten - #170567)
- Migrate Duco to python-duco-connectivity and remove temperature sensors (@ronaldvdmeer - #170237)
- Bump python-duco-connectivity to 0.4.0 (@ronaldvdmeer - #170661)
2026.5.3 - May 19
- Bump qbittorrent-api to 2026.5.1 (@lumatijev - #170181)
- Improve iaqualink 429 handling (@flz - #170231)
- Fix Apple TV keyboard focus binary_sensor missing on cold start (@kroehre - #170360)
- Add tilt controls for UpDownSheerScreen in Overkiz (@dankarization - #170563)
- Fix blebox light temperature scaling (@bkobus-bbx - #170573)
- Fix ValueError when turning on blebox light with brightness set to 0 (@bkobus-bbx - #170769)
- Bump aiodns to 4.0.3 (@bdraco - #170865)
- Populate uid and recurrence_id in CalDAV calendar events (@frenck - #170910)
- Fix is_closed state for SlidingDiscreteGateWithPedestrianPosition covers in Overkiz (@iMicknl - #170913)
- Disable USB discovery for teleinfo (@puddly - #170933)
- Fix utility meter next_reset shifting forward on entity rename (@frenck - #170957)
- Use correct state_class for utility meters with device classes that don’t support total_increasing (@frenck - #170962)
- Reduce GoodWe connect retries to avoid blocking startup (@frenck - #170964)
- Fix is_closed state for DiscretePositionableGarageDoor in Overkiz (@iMicknl - #170981)
- Fix controls for OpenCloseGate4T (rts:GateOpenerRTS4TComponent) in Overkiz (@iMicknl - #170987)
- Prevent Google Assistant entity sync from blocking startup (@frenck - #170991)
- Load template extensions by class to prevent import deadlock (@frenck - #170995)
- Use asyncio.get_running_loop() in emulated_hue UPnP responder (@frenck - #171000)
- Fix Netatmo valve KeyError when hvac_action state is unavailable in Overkiz (@frenck - #171004)
- Fix time trigger crash when using entity_id dict format without offset (@frenck - #171006)
- Fix threshold preview crash when hysteresis is not provided (@frenck - #171009)
- Fix Growatt mix device IndexError when chart data is empty (@frenck - #171012)
- Fix SleepIQ timer units: seconds should be minutes for core climate and foot warmer (@frenck - #171013)
- Fix Control4 climate crash when humidity is ‘Undefined’ (@frenck - #171015)
- Fix manual alarm panel crash on restore with invalid state (@frenck - #171016)
- Handle Daikin connection errors gracefully in coordinator (@frenck - #171017)
- Fix shorthand template conditions in choose blocks crashing all automations (@frenck - #171018)
- Add additional overrides to cover entity in Overkiz (@iMicknl - #171019)
- Fix Verisure alarm crash when cloud rejects arm/disarm command (@frenck - #171024)
- Add stop command to Overkiz pergola horizontal awning covers (@frenck - #171034)
- Fix WeatherFlow websocket crash when data payload is None (@frenck - #171037)
- Bump pyIntesishome to 1.8.8 (@jnimmo - #171041)
- Return media_content_id as string in forked_daapd (@frenck - #171059)
- Bump aioimmich to 0.14.1 (@mib1185 - #171138)
- Fix controls for UpDownGarageDoor4T and additional 4T covers in Overkiz (@iMicknl - #171144)
- Fix ZHA config entries using a URI without a port (@puddly - #171164)
- Fix is_closed state and position for DynamicPergola covers in Overkiz (@iMicknl - #170983)
- Fix tilt and position support for VenetianBlind covers in Overkiz (@iMicknl - #170974)
2026.5.4 - May 22
- Apply web search citation stripping for GPT-5.x models in OpenAI conversation (@frenck - #170956)
- Bump aiolyric to 2.1.0 (@yonib05 - #171007)
- Bump python-roborock to 5.12.0 (@Lash-L - #171112)
- Add missing Miele Dishwasher codes (@astrandb - #171175)
- Bump aiolyric to 2.1.1, Update OAuth URL for lyric (@timmo001 - #171181)
- Fix ZHA blocking minor version downgrades (@TheJulianJES - #171319)
- Bump aiodns to 4.0.4 (@bdraco - #171420)
- Bump renault-api to 0.5.9 (@epenet - #171428)
- Fix SmartThings crash when timestamp attribute is None (@frenck - #171467)
- Fix habitica ignoring zero values for interval and streak (@frenck - #171468)
- Fix PowerView cover crash when shade position is unavailable (@frenck - #171471)
- Fix Wyoming satellite crash when TTS is not configured (@frenck - #171513)
- Fix string ref for tedee (@zweckj - #171548)
- Fix
media_image_hashand validate the MIME type in the Shelly media player (@bieniu - #171585) - Fix update error message key in solarlog (@dontinelli - #171611)
- Bump wled to 0.23.0 and remove backoff exception (@mik-laj - #171622)
- Bump renault-api to 0.5.10 (@epenet - #171692)
- Fix exception translation placeholder mismatches in comelit (@chemelli74 - #171748)
- Add missing exception translation keys in alexa_devices (@chemelli74 - #171749)
- Fix ZBT-2 hardware page crash when entry data is missing VID (@frenck - #171828)
- Fix Lutron Caseta battery sensor crash on unsupported devices (@frenck - #171829)
- Fix invalid MDI icon references (@frenck - #171831)
- Register Insteon modem device before platform setup (@frenck - #171839)
- Fix OpenHome config flow crash when UDN is a list (@frenck - #171841)
- Fix Hue device trigger crash for devices removed from bridge (@frenck - #171844)
- Fix dead link in System Bridge service action (@tr4nt0r - #171855)
All changes
Of course, there is a lot more in this release. You can find a list of all changes made here: Full changelog for Home Assistant Core 2026.5.