Matter
The Matter integrationIntegrations connect and integrate Home Assistant with your devices, services, and more. [Learn more] allows you to control Matter devices on your local Wi-Fi or ThreadThread is a low-power mesh networking standard that is specifically designed for smart home applications. It is a protocol that defines how devices communicate. [Learn more] network.
For communicating with Matter devices, the Home Assistant integration runs its own “Matter controller” as add-on. This Matter Server add-on runs the controller software as a separate process and connects your Matter network (called Fabric in technical terms) and Home Assistant. The Home Assistant Matter integration connects to this server via a WebSocket connection.
Introduction - What is Matter?
Matter is a new smart home connectivity standard for home automation products and IoT (Internet of Things) devices, see its Wikipedia article
The initial version 1.0 release of Matter was published in October of 2022. Matter is still in the process of being adopted in the smart home market. It has gotten much publicity because of its promise of interoperability across all ecosystems. The largest tech companies like Google, Apple and Amazon teamed up to develop this new smart home connectivity standard under the roof of the CSA (Connectivity Standards Alliance
Matter products run locally and always allow local control, with device control done without the need for any internet connection or cloud services. From a technical perspective, you can use a Matter-compatible device with Home Assistant without connecting to a vendor-specific cloud. However, some vendors may require you to set up an account before you can enable Matter support for some products, (especially for commercial manufacturer’s own branded gateways/bridges/hubs/controllers sold as appliances).
Unlike other common radio-based protocols for IoT, (like Zigbee, Z-Wave, and Bluetooth), the Matter standard specification itself does not contain its own proprietary radio protocol or network transport protocol, but instead, it is a service control protocol that runs on top of the existing network infrastructure at the application level, with all Matter devices communicating using standard IP-based (IPv6) communication over your existing local area network (i.e. LAN networks like Wi-Fi and Ethernet)
Home Assistant is a so-called “controller” in a Matter ecosystem, meaning that it can control Matter-based devices. Other examples of Matter controllers are the Google Nest products, Apple HomePod speakers, Samsung SmartThings Station, and some newer Amazon Echo devices.
What does Thread have to do with Matter?
ThreadThread is a low-power mesh networking standard that is specifically designed for smart home applications. It is a protocol that defines how devices communicate. [Learn more] is a low power radio mesh networking technology. Much like Zigbee, but with the key difference that it is IP-addressable, making it a suitable transport protocol option for Matter.
The figure below illustrates the landscape of MatterMatter is an open-source standard that defines how to control smart home devices on a Wi-Fi or Thread network. [Learn more], ThreadThread is a low-power mesh networking standard that is specifically designed for smart home applications. It is a protocol that defines how devices communicate. [Learn more], and Border routers. The Thread border router forwards traffic from the devices in the Thread network to devices outside that network.
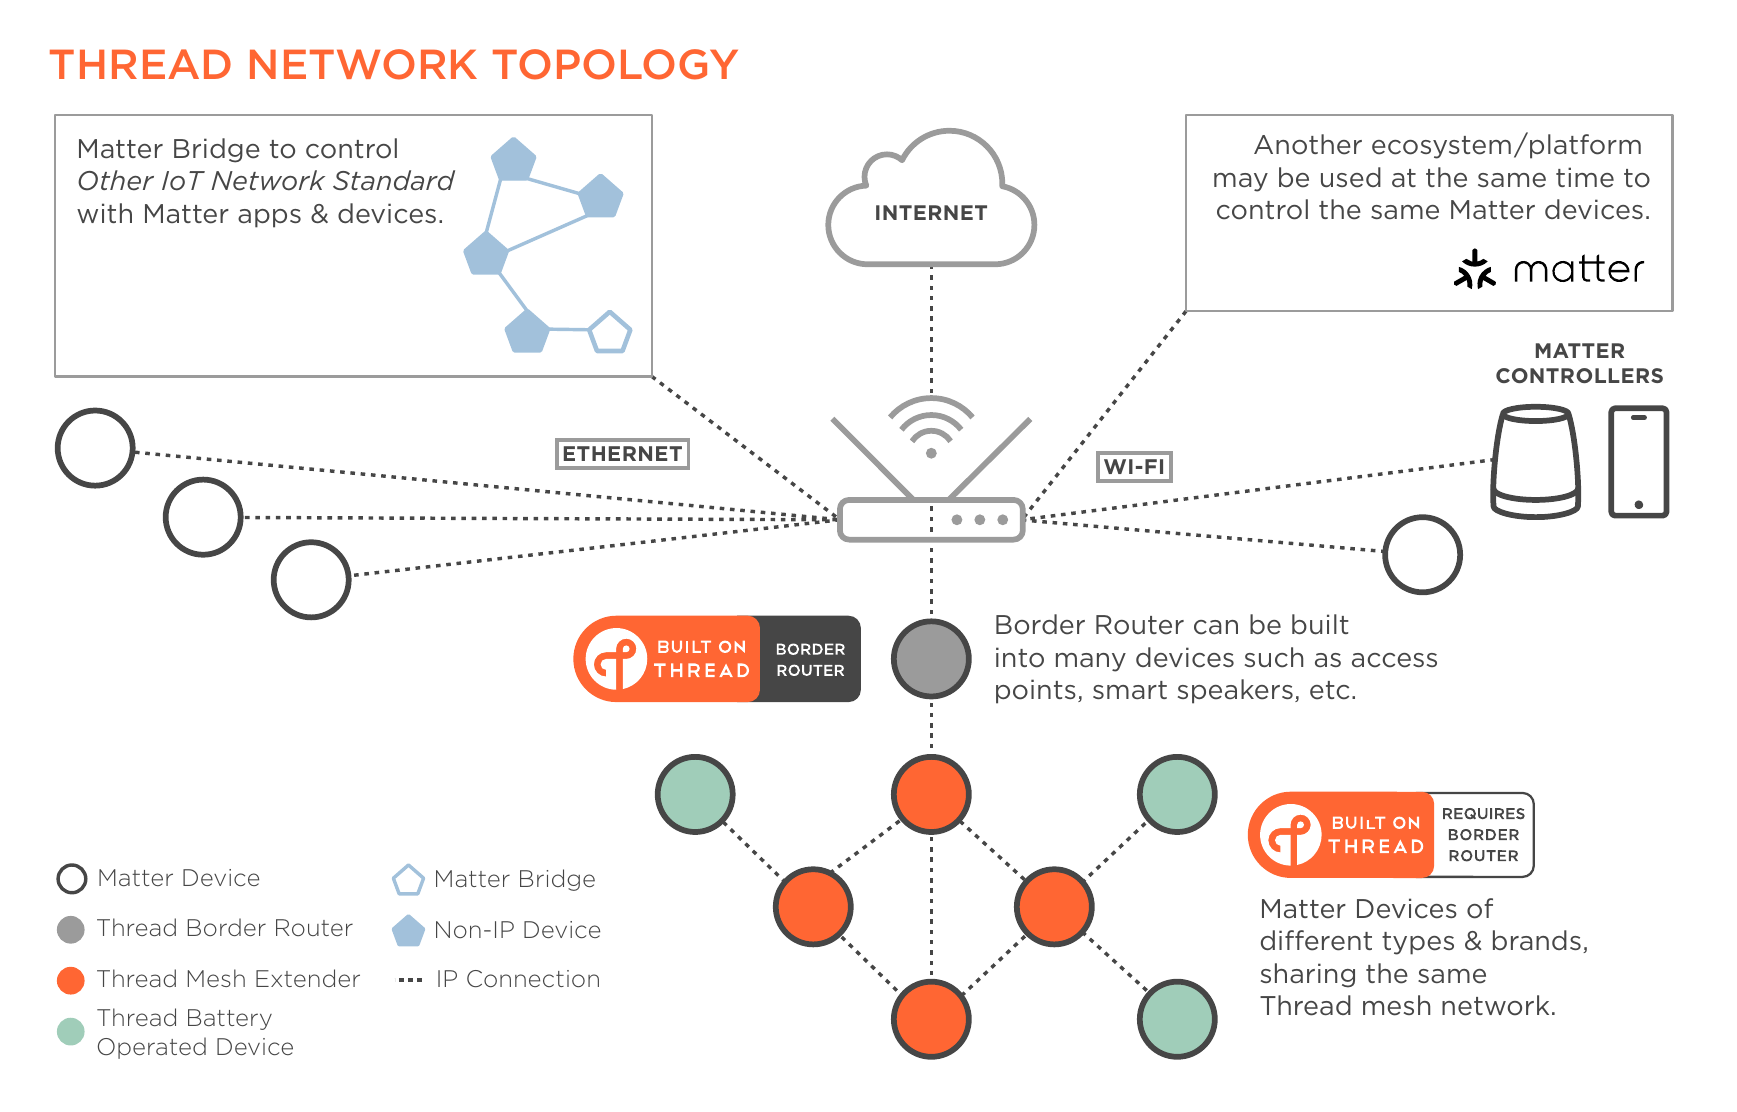
Image taken from the Thread Smart Home Fact Sheet
For more information about Thread, refer to the Thread documentation.
Thread devices don’t necessarily support Matter
Many devices on the market use ThreadThread is a low-power mesh networking standard that is specifically designed for smart home applications. It is a protocol that defines how devices communicate. [Learn more] for radio communication and Matter as a control protocol. But this is not guaranteed. Some Thread-based devices support Apple HomeKit or another vendor-specific communication protocol. There are also a few cases where you need to apply for a (beta) firmware update on the device to enable Matter as a communication protocol.
Don’t assume Matter support when you see a Thread logo on a device. Always look for the Matter logo itself (on either Wi-Fi/Ethernet-based devices or ThreadThread is a low-power mesh networking standard that is specifically designed for smart home applications. It is a protocol that defines how devices communicate. [Learn more]) or any other confirmation by the manufacturer that the device supports Matter.
Bluetooth used during commissioning
Most (if not all) Matter-compliant devices have a Bluetooth chip onboard to ease commissioningIn the context of Matter devices, commissioning is the process of adding a device to a Matter controller. It is the equivalent of pairing a device in Zigbee or Z-Wave. [Learn more]. Bluetooth is not used to control but to pair a device after unboxing or after factory resetting. The Home Assistant controller uses the Home Assistant Companion app for commissioningIn the context of Matter devices, commissioning is the process of adding a device to a Matter controller. It is the equivalent of pairing a device in Zigbee or Z-Wave. [Learn more]. During commissioning, you need to bring your phone close to the device. The controller then sends your network credentials to your device over Bluetooth. Once that is done, the device communicates over its native interface: Wi-Fi or Thread.
Although your Home Assistant server might have a Bluetooth adapter on board that the controller can use to commissionIn the context of Matter devices, commissioning is the process of adding a device to a Matter controller. It is the equivalent of pairing a device in Zigbee or Z-Wave. [Learn more] devices, Home Assistant does not utilize that adapter. Mainly to prevent issues with the built-in Bluetooth integration but also because it is easier to bring your mobile devices close to the Matter device than bringing the device near your server.
Multi fabric: join to multiple controllers
One of the great features of Matter is the so-called Multi Fabric feature: you can join the same device to multiple controllers. For example, simultaneously add it to Google Home, Apple Home, and Home Assistant. The standard describes that each device should be able to at least support 5 different fabrics simultaneously.
For devices where Home Assistant provides a native integration (with local API), Matter may not be the best option. Matter, being a universal standard, might not have the nitty-gritty features that come with a product-specific protocol. A good example is Philips Hue: the communication over Matter only provides the basic controls over lights, while the official Hue integration brings all Hue unique features like (dynamic) scenes, entertainment mode, etc.
Supported installation types
It is recommended to run the Matter add-on on Home Assistant OS. This is currently the only supported option. Other installation types are without support and at your own risk.
If you run Home Assistant in a container, you can run a Docker image of the Matter server
Adding a Matter device to Home Assistant
Each Matter network is called a fabric. Each home automation controller that controls Matter devices has its own “fabric”. You can add devices directly to the fabric of your Home Assistant instance, or share them from another fabric (for example from Google or Apple) to Home Assistant’s fabric. We’re going to explore all these options below.
Note: The section below mentions third-party Thread border routers such as the Nest Hub (2nd Gen) or the HomePod Mini. This doesn’t mean you have to add your devices to these ecosystems. Home Assistant only uses them to access the Thread radio network. The communication between the Home Assistant Matter controller and your Matter devices is encrypted. The Thread border router passes the data along. It cannot read its content.
Prerequisites
Make sure you have all these components ready before trying to add a Matter device to Home Assistant.
Prepare Home Assistant
- Make sure you have the latest version of Home Assistant installed.
- In Home Assistant, have the Matter integration installed.
- Go to Settings > Devices & services.
- Add the Matter integration.
- When prompted to Select the connection method:
- If you run Home Assistant OS in a regular setup: select Submit.
- This will install the official Matter server add-on.
- Note that the official Matter server add-on is not supported on 32-bit platforms.
- If you are already running the Matter server in another add-on, in or a custom container:
- Deselect the checkbox, then select Submit.
- In the next step, provide the URL to your Matter server.
- If you run Home Assistant OS in a regular setup: select Submit.
Check logos on the device
- On the device packaging, check for both the Matter logo and for either the Wi-Fi or the ThreadThread is a low-power mesh networking standard that is specifically designed for smart home applications. It is a protocol that defines how devices communicate. [Learn more] logo.
- Check if the QR code or the numeric setup code is on the device.
- If you reset your device you’ll need the QR code or numeric setup code to commissionIn the context of Matter devices, commissioning is the process of adding a device to a Matter controller. It is the equivalent of pairing a device in Zigbee or Z-Wave. [Learn more] that device again! Without this information, commissioning won’t be possible.
- If the QR code or the numeric setup code is only in accompanied documentation, it is a good practice to snap a picture of the QR code and/or numeric setup code as a backup, ideally along with the device for reference, and store it in a safe place.
Prepare Android or iPhone
- Have either an Android or iPhone ready and Bluetooth enabled. For information why Bluetooth is required, refer to the section on Bluetooth used during commissioning:
-
Android:
- At a minimum, have Android version 8.1. Recommended is version 12 or higher.
- Have the latest version of the Home Assistant Companion app, installed from the Play Store (full version).
- If you are using ThreadThread is a low-power mesh networking standard that is specifically designed for smart home applications. It is a protocol that defines how devices communicate. [Learn more]: Make sure there is a Thread border router device (Nest Hub (2nd Gen) or Nest Wi-Fi Pro or Home Assistant with the OpenThread Border Router add-on) present in your home network.
- If you are using OpenThread (for Connect ZBT-1, ZBT-2, or SkyConnect) as border router, make sure you followed the steps in the Thread documentation.
-
iPhone
- Have the iOS version 16 or higher
- Have the latest version of the Home Assistant Companion app installed.
- If you are using ThreadThread is a low-power mesh networking standard that is specifically designed for smart home applications. It is a protocol that defines how devices communicate. [Learn more]: Make sure there is a Thread border router device (HomePod Mini or V2, Apple TV 4K or Home Assistant with the OpenThread Border Router add-on) present in your home network.
- If you are using OpenThread (for Connect ZBT-1, ZBT-2, or SkyConnect) as border router, make sure you followed the steps in the Thread documentation.
-
Android:
- Make sure the phone is in close range of the border router and your device.
- If you are adding a Wi-Fi-based Matter device: Matter devices often use the 2.4 GHz frequency for Wi-Fi. For this reason, make sure your phone is in the same 2.4 GHz network where you want to operate your devices.
To add a new device using the iOS Companion app
This guide describes how to add a new device. This will use the Bluetooth connection of your phone to add the device.
- Open The Home Assistant app on your phone.
- Go to Settings > Devices & services.
- On the Devices tab, select the Add device button, and select Add Matter device.
- In the dialog, select No, it’s new..
- Scan the QR-code of the Matter device with your phone camera or select More options… to manually enter the Commission code.
- Select Add to Home Assistant.
- This starts the commissioning process which may take a few minutes.
- If you’re adding a test board or beta device, you might get a prompt about an Uncertified Accessory. In this dialog, select Add Anyway.
- If prompted, enter a custom Accessory Name.
- You can type whatever you like here.
- This is an internal reference for iOS. It won’t be visible in Home Assistant.
- After entering a name, select Continue.
- Once the process is complete, select Done.
- You are now redirected to the device page within Home Assistant. It is ready for use.
To add a new device using the Android Companion app
This guide describes how to add a new device. This will use the Bluetooth connection of your phone to add the device.
- Open The Home Assistant app on your phone.
- Power up the device by plugging it in or add a battery. Most devices will now go into pairing mode.
- For some devices, you need to enable a pairing mode (like you do with Z-Wave or Zigbee device).
- The instructions on how to set the device in pairing mode can usually be found in the device documentation.
- For some devices, at this point, your phone shows a pop-up, prompting you to Scan the QR code.
- Scan the QR code.
- When prompted to Choose an app, make sure to select Home Assistant.
- Once the process is complete, select Done, then select Add device.
- If you did not see a pop-up, go to Settings > Devices & services.
- On the Devices tab, select the Add device button, and select Add Matter device.
- In the dialog, select No, it’s new..
- Scan the QR-code of the Matter device with your phone camera or select Setup without QR-code to manually enter the commission code.
- This starts the commissioning process which may take a few minutes.
- If you’re adding a test board (e.g. ESP32 running the example apps) and commissioning fails, you might need to take some actions in the Google Developer console, have a look at any instructions for your test device.
- Once the process is complete, select Done.
- To view the device details, go to Settings > Devices & Services and select the Matter integration.
- By default, the device gets a factory specified name. To rename it, on the device page, select the pencil
to edit and rename the device. 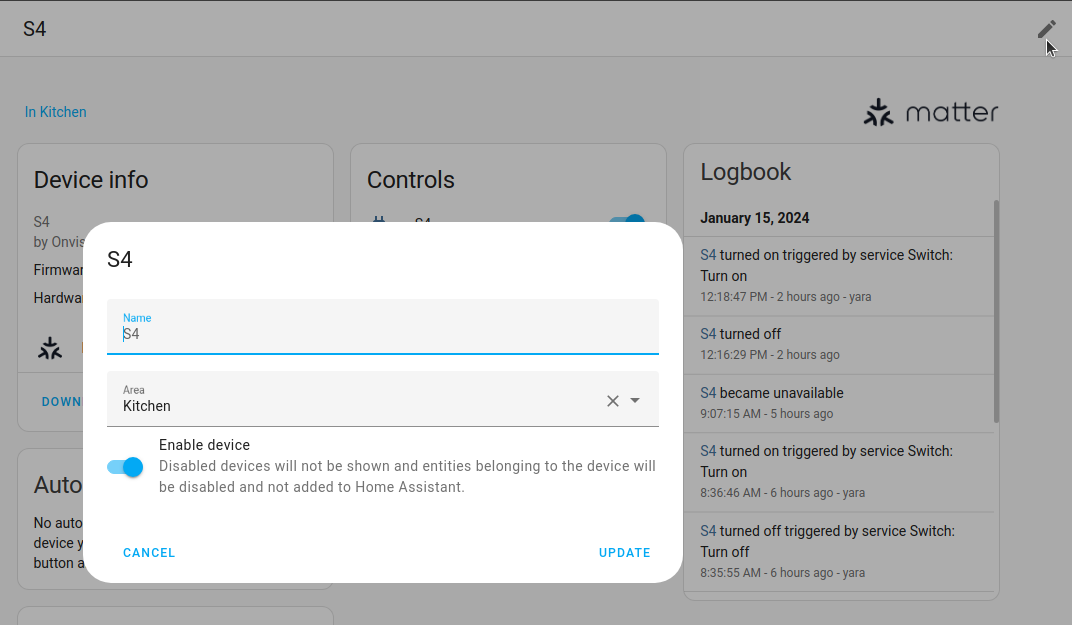
- Your device is now ready to use.
 Screencast showing how to add a new Matter device to Home Assistant.
Troubleshooting the installation
Check these steps if you are experiencing issues when trying to add a Matter device using the Home Assistant Companion app on your Android phone.
Symptom
While trying to add the Matter device, I get an error stating that Matter is currently unavailable.
Remedy
This could mean that not all required Matter modules that are needed by the Home Assistant Companion App have been downloaded yet. Try the following steps:
- Wait up to 24 hours for the Google Play Services to download the necessary Matter modules.
- Make sure the requirements listed in the prerequisites are met. This includes meeting the minimum system requirements:
-
Android:
- Minimum version is 8.1. Recommended is version 12 or higher.
- More issues have been reported by people using older Android versions.
- Use a regular, Google-account Android setup. No alternative Android versions.
- Make sure the Google Play Services are all up to date.
- Minimum version is 8.1. Recommended is version 12 or higher.
-
iPhone:
- Have the iOS version 16 or higher
-
Android:
- Home Assistant Companion app:
- Make sure you installed the (full) version, downloaded from the Play Store.
- Make sure it is the latest version.
- If you only just installed or updated the Home Assistant Companion app:
- Wait.
- It can take a while before the required components are installed in the background.
- Try again after 1 hour to ensure the installation is complete.
- Verify your device meets all requirements to support Matter:
- On your Android device, go to Settings > Google > Devices & Sharing.
- There should be an entry there for Matter devices.
- On your Android device, go to Settings > Google > Devices & Sharing.
- Reinstalling the Home Assistant Companion app.
- Try (re-)installing the Google Home app. Technically, this is not required, but it might trigger another installation attempt of the Matter modules.
- Refer to this Troubleshooting Guide from Google
.
Sharing a device from another platform with Home Assistant
Use one of these methods if your Matter device was added to Apple Home or Google Home and you want to control it from both Apple or Google Home and Home Assistant.
Prerequisites
- Latest version of the Home Assistant Companion App installed.
- Have the Matter device integrated to Apple Home or Google Home respectively
- In Home Assistant, have the Matter integration installed.
- Go to Settings > Devices & services.
- Add the Matter integration.
- When prompted to Select the connection method:
- If you run Home Assistant OS in a regular setup: select Submit.
- This will install the official Matter server add-on.
- If you are running the Matter server in a custom container (not recommended):
- Deselect the checkbox, then select Submit.
- In the next step, provide the URL to your Matter server.
- If you run Home Assistant OS in a regular setup: select Submit.
To share a device from another Matter controller (like Apple or Google Home)
To allow Home Assistant to control the Matter device that has already been added to another Matter controller, like Google Home, follow these steps:
- Open the Home Assistant app on your phone.
- Go to Settings > Devices & services.
- On the Devices tab, select the Add device button and select Add Matter device.
- In the dialog, select Yes, it’s already in use, then select which controller it is already connected to. For example, Google Home.
- Follow the instructions given in the dialog.
- Troubleshooting: If Home Assistant fails to add the device, check if you have the Matter integration installed and the latest version of the Companion app.
- Once the device has been added to Home Assistant, you see a notification Your device has been added.
- When the process finishes, you’re redirected to the device page in Home Assistant.
- You can now control your device from within Home Assistant, as well as from Google Home.
 Screencast showing how to share a Matter device from Apple Home.
Using a Matter bridge
For some ecosystems, you can add some of their non-Matter devices into Home Assistant via a Matter bridge. Examples of Matter bridges are the SwitchBot Hub 2, Aqara Hub M2, Ikea Dirigera, or the Philips Hue Bridge. Using a bridge allows you to keep controlling these devices via their native App, while having them available in Home Assistant at the same time. The Aqara Hub, for example, uses a cloud-based integration. By bridging it into Home Assistant via Matter (instead of using their cloud-based integration), you can make it use local communication.
Home Assistant, as a Matter controller, only supports control of Matter devices. Home Assistant is not a bridge itself and it cannot turn existing devices within Home Assistant into Matter compatible devices.
How to add a Matter bridge to Home Assistant
How you add a bridge to Home Assistant depends on the device. Check the documentation of that device for the specific steps. In case of SwitchBot Hub 2, for example, you need to enable the Matter-paring mode within the app. It then gives you a pairing code and tells you to set the actual device into pairing mode. You can then add that bridge device to Home Assistant as a Matter device. There is no guarantee that all the devices from that ecosystem can be used in Home Assistant. SwitchBot Hub 2 V1.5, for example, allows you to use curtain, lock, and blind via Matter, but not light.
When not to use a bridge
In some cases, bridging devices into Home Assistant via Matter might not bring you benefits. So far, The Philips Hue bridge, for example, supports Matter. But Matter only support a limited set of features. The native Home Assistant integration of Philips Hue comes with a wide variety of features. It also runs locally. You would not gain anything by adding your Philipps Hue devices to Home Assistant via Matter bridging. On the contrary, you would lose some of the features.
Sharing a device across platforms
Follow these steps if you have added a Matter device to Home Assistant and you want to make it available in an other platform, such as Google Home or Apple Home.
- Go to Settings > Devices & services and on the Matter integration card, select Devices.
- From the list of devices, select the device you want to share.
- Select Share device, then in the dialog, select Share device again.
- There is no need to press a hardware button on the device to set it to commissioning mode.
- To join the device to the other platform, in their app, scan the QR code or enter the sharing code.
- Follow the instructions in their app. Once the process is complete, you can see that the device is shared in Home Assistant:
- Next to the Share device button, select the three dots
menu, then Manage fabrics. - In the list there, the new platform should be listed.
- For example, if you shared it with Google Home, it lists Google LLC.
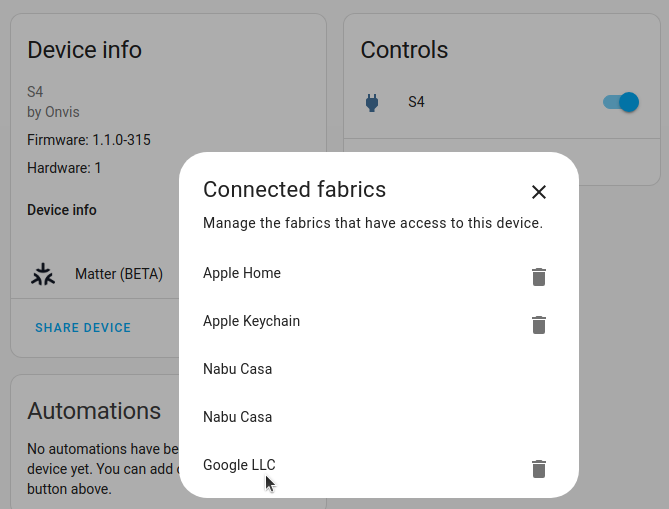
- Next to the Share device button, select the three dots
Removing a device from a Matter controller
Follow these steps if you want to remove a device from a particular Matter controller.
- Go to Settings > Devices & services and on the Matter integration card, select Devices.
- From the list of devices, select the device you want to remove from a controller.
- In the Device info section, next to Share device, select the three dots
menu. Then, select Manage fabrics. - From the list, remove the controller of interest.
- If you want to remove Apple Home, also remove the Apple Keychain entry.
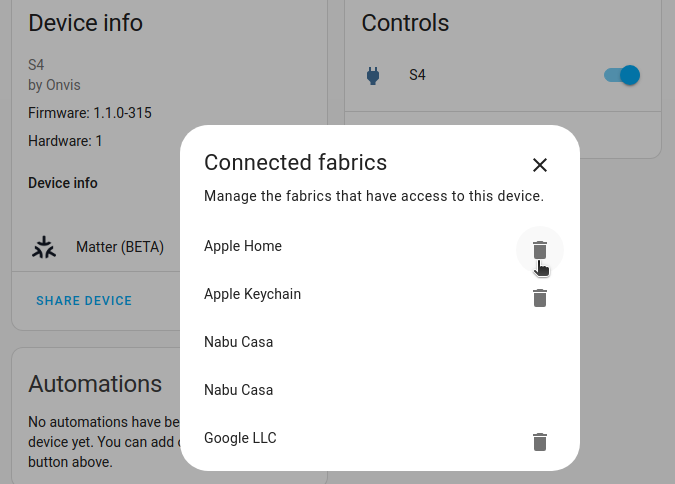
- If you want to remove Apple Home, also remove the Apple Keychain entry.
- If you want to remove the device from Home Assistant itself, select the three dots
menu and select Delete.
About Matter device information
The device information section provides some diagnostic information of a device.
- To view the device details, go to Settings > Devices & services and on the Matter integration card, select Devices.
- From the list of devices, select the device you want to look at.

This section provides a bit more information on some of the categories:
Network type: Shows which network type the device belongs to. For example, Thread or Wi-Fi.
Device type: There are 4 device types:
- End device: End device that always keeps its radio on. Typically these devices are not battery-powered.
- Sleepy end device: non-routing end device. Normally sleeping, wakes on occasion to check for messages. Typically battery-powered.
- Routing end device: End device that always keeps its radio on and can route traffic for other, routing and non-routing end devices.
- Bridge
Network name: Name of the network the device joined when it was commissioned.
IP addresses: Typically more than one IPv6 address is shown: link local, unique local, and global unicast. In some cases a device also supports IPv4. In that case there will also be listed an IPv4 address here.
Matter OTA device updates
The Matter protocol supports OTA (Over-the-Air) software updates. But the OTA software update is an optional feature for Matter devices, so not all Matter devices implement it. Home Assistant creates an update entity for every Matter device which does support Matter updates.
The CSA operates a Distributed Compliance Ledger (DCL) which provides metadata for firmware updates. By default, the Matter update entities check the DCL every 12 hours for updates. If you want to force an update check, use the homeassistant.update_entity action, with the update entity as the target. Currently, Eve and Nanoleaf are using the DCL to provide updates. It is expected that in future, more and more firmware updates become available through the DCL.
 Notification of an OTA update for a Matter device
The Home Assistant Matter updates currently do not work for Thread devices on a Thread network with (any) Apple border routers. Typically you’ll see “Target node did not process the update file” error instead. The Apple border routers do not forward the necessary mDNS packets which allow to discover the update provider on Home Assistant end. The Apple Home ecosystem might offer updates from their end as an alternative (e.g. for Eve devices).
Actions
The Matter integration has the following actions:
matter.water_heater_boost
Action matter.water_heater_boost
Enables water heater boost for a specific duration.
| Data attribute | Optional | Description |
|---|---|---|
duration |
No | Boost duration in seconds |
emergency_boost |
Yes | Whether to enable emergency boost mode |
temporary_setpoint |
Yes | Temporary setpoint temperature in Celsius during the boost period |
Automate on a button press
You have a device that takes button presses as inputs (such as a Tuo Smart Button, VTM31SN dimmer by Inovelli, or the Matter Pushbutton Module by Innovation Matters) and now want to trigger an automation based on that button press. To learn how to create an automation triggered by a button press, refer to this tutorial.
Experiment with Matter using a ESP32 dev board
You do not yet have any Matter-compatible hardware but you do like to try it out or maybe create your own DIY Matter device? We have prepared a page for you
NOTE for Android users: You need to follow the instructions at the bottom of the page to add the test device to the Google developer console, otherwise commissioningIn the context of Matter devices, commissioning is the process of adding a device to a Matter controller. It is the equivalent of pairing a device in Zigbee or Z-Wave. [Learn more] will fail. iOS users will not have this issue but they will get a prompt during commissioningIn the context of Matter devices, commissioning is the process of adding a device to a Matter controller. It is the equivalent of pairing a device in Zigbee or Z-Wave. [Learn more] asking if you trust the development device.
- Make sure you use Google Chrome or Microsoft Edge browser.
- Open https://nabucasa.github.io/matter-example-apps/
- Attach the ESP32 device using a USB cable.
- Select the radio button next to the example you like to set up, in case of an M5 Stamp, click Lighting app for M5STAMP C3.
- Select Connect.
- In the popup dialog that appears, choose the correct serial device. This will usually be something like “cu-usbserial” or alike.
- Click Install Matter Lighting app example and let it install the firmware on the device. This will take a few minutes.
- Once the device is flashed with the Matter firmware, connect to the device again but this time choose Logs & console.
- You are presented with a console interface where you see live logging of events. This is an interactive shell where you can type commands. For a list of all commands, type matter help and press enter.
- To add the device, we need the QR code. In the console, type in
matter onboardingcodes bleand copy/paste the URL into your browser. - Use the QR code to add the device using one of the above instructions on your phone, e.g. using the Home Assistant Companion app.
Troubleshooting
General recommendations
-
Using Thread-based Matter devices in Home Assistant requires Home Assistant OS version 10 and above. Home Assistant OS with the Matter Server add-on is the supported path for using Matter with Home Assistant. Running Matter Server as a standalone Docker container is unsupported, but we provide documentation
including a description of the host and networking requirements. -
To use ThreadThread is a low-power mesh networking standard that is specifically designed for smart home applications. It is a protocol that defines how devices communicate. [Learn more] devices you will need a ThreadThread is a low-power mesh networking standard that is specifically designed for smart home applications. It is a protocol that defines how devices communicate. [Learn more] network with at least one Thread border router in your network nearby the ThreadThread is a low-power mesh networking standard that is specifically designed for smart home applications. It is a protocol that defines how devices communicate. [Learn more] device(s). Apple users, for example, need the Apple TV 4K or the HomePod Mini, while Google users need a Nest Hub (2nd Gen). Use the Thread integration in Home Assistant to diagnose your ThreadThread is a low-power mesh networking standard that is specifically designed for smart home applications. It is a protocol that defines how devices communicate. [Learn more] network(s).
-
Start simple and work from there, keep your network simple and add for example an ESP32 test device. Once that works, move on to the next step or more devices.
-
Realize that you are an early adopter, both on the hardware side and on the software (controller) side so you may run into compatibility issues or features that are still missing. Report any issues you may find and help out others if you find a workaround or tested a device.
-
Make sure IPv6 (multicast) traffic travels freely from your network to the Home Assistant host. There is no requirement to have an IPv6-enabled internet connection or DHCPv6 server. However, IPv6 support has to be enabled on Home Assistant. Go to Settings > System > Network, and make sure IPv6 is set to Automatic or static, depending on your network setup. If you’re unsure, use Automatic.
-
For more detailed information on network configuration, refer to the README of the Matter server repository
.
I do not see the button Commission using the Companion app
The Commission using the Companion app button only exists in the Home Assistant Companion App. It is not available in the browser.
Remedy
If you don’t see the button in the Companion app:
-
Make sure the requirements listed in the prerequisites are met.
-
This includes meeting the minimum system requirements:
-
Android:
- Minimum version is 8.1. Recommended is version 12 or higher.
- More issues have been reported by people using older Android versions.
- Use a regular, Google-account Android setup. No alternative Android versions.
- Make sure the Google Play Services are all up to date.
- Minimum version is 8.1. Recommended is version 12 or higher.
-
iPhone:
- Have the iOS version 16 or higher
-
Android:
When trying to commission using Android, I get an error “Matter is unavailable”
Refer to the steps under Troubleshooting the installation.
Android: stuck at “Checking network connectivity”
Symptom
You are trying to commissionIn the context of Matter devices, commissioning is the process of adding a device to a Matter controller. It is the equivalent of pairing a device in Zigbee or Z-Wave. [Learn more] a Matter device using an Android phone. During that process, you see the “Checking network connectivity” message and never get past that.
Remedy
-
Make sure the requirements listed in the prerequisites are met.
-
This includes meeting the minimum system requirements for Android:
- Minimum version is 8.1. Recommended is version 12 or higher.
- More issues have been reported by people using older Android versions.
- Use a regular, Google-account Android setup. No alternative Android versions.
- Make sure the Google Play Services are all up to date.
- Minimum version is 8.1. Recommended is version 12 or higher.
-
If you are adding a ThreadThread is a low-power mesh networking standard that is specifically designed for smart home applications. It is a protocol that defines how devices communicate. [Learn more]-based Matter device, make sure the phone is in close range of the border router and your device.
-
If you are adding a Wi-Fi-based Matter device:
- Matter devices often use the 2.4 GHz frequency for Wi-Fi.
- Make sure your phone is in the same 2.4 GHz network where you want to operate your devices.
Error “this device requires a border router”
Symptom
While trying to add a Matter device with your Home Assistant Companion app, you get the error “this device requires a border router”.
Cause
To add a Matter device which is based on the ThreadThread is a low-power mesh networking standard that is specifically designed for smart home applications. It is a protocol that defines how devices communicate. [Learn more] radio protocol, you need a Thread border routerA Thread border router forwards data packets between your local network and the Thread network. This enables smart home devices within a Thread network to communicate with IPv6-capable devices in your local network. A Thread border router is connected to your network either via Wi-Fi or Ethernet and uses its radio frequency (RF) radio to communicate with the Thread mesh network. In case of Matter, the data that is forwarded is encrypted. Examples of Thread border routers are the Nest Hub (2nd gen), the HomePod mini, and the Home Assistant Connect ZBT-2 together with the OpenThread Border Router add-on. [Learn more] near the device and your phone needs to know the credentials of your (newly created) Thread network.
Remedy
Set up a Thread border routerA Thread border router forwards data packets between your local network and the Thread network. This enables smart home devices within a Thread network to communicate with IPv6-capable devices in your local network. A Thread border router is connected to your network either via Wi-Fi or Ethernet and uses its radio frequency (RF) radio to communicate with the Thread mesh network. In case of Matter, the data that is forwarded is encrypted. Examples of Thread border routers are the Nest Hub (2nd gen), the HomePod mini, and the Home Assistant Connect ZBT-2 together with the OpenThread Border Router add-on. [Learn more] and synchronize the credentials from Home Assistant to your Android device:
- Follow the steps on Turning Home Assistant into a Thread border router.
- Make sure to Sync the Thread credentials as described in step 3.
Error “Target node did not process the update file”
Symptom
You are trying to update a Matter over Thread device via Home Assistant and see the error “Target node did not process the update file”.
Cause
Over-the-air (OTA) updates of Matter devices from Home Assistant are not supported with an Apple Thread border routerA Thread border router forwards data packets between your local network and the Thread network. This enables smart home devices within a Thread network to communicate with IPv6-capable devices in your local network. A Thread border router is connected to your network either via Wi-Fi or Ethernet and uses its radio frequency (RF) radio to communicate with the Thread mesh network. In case of Matter, the data that is forwarded is encrypted. Examples of Thread border routers are the Nest Hub (2nd gen), the HomePod mini, and the Home Assistant Connect ZBT-2 together with the OpenThread Border Router add-on. [Learn more].
Remedy
-
If you only have a Thread border routerA Thread border router forwards data packets between your local network and the Thread network. This enables smart home devices within a Thread network to communicate with IPv6-capable devices in your local network. A Thread border router is connected to your network either via Wi-Fi or Ethernet and uses its radio frequency (RF) radio to communicate with the Thread mesh network. In case of Matter, the data that is forwarded is encrypted. Examples of Thread border routers are the Nest Hub (2nd gen), the HomePod mini, and the Home Assistant Connect ZBT-2 together with the OpenThread Border Router add-on. [Learn more] from Apple, you cannot update the device from Home Assistant.
- If you want to be able to use OTA updates on these devices, you could add another border router, for example by turning Home Assistant into a Thread border router.
-
If you have a mixture of Apple and other Thread border routersA Thread border router forwards data packets between your local network and the Thread network. This enables smart home devices within a Thread network to communicate with IPv6-capable devices in your local network. A Thread border router is connected to your network either via Wi-Fi or Ethernet and uses its radio frequency (RF) radio to communicate with the Thread mesh network. In case of Matter, the data that is forwarded is encrypted. Examples of Thread border routers are the Nest Hub (2nd gen), the HomePod mini, and the Home Assistant Connect ZBT-2 together with the OpenThread Border Router add-on. [Learn more] such as the Home Assistant OpenThread border router, follow these steps:
- Power down all the Apple Thread border routersA Thread border router forwards data packets between your local network and the Thread network. This enables smart home devices within a Thread network to communicate with IPv6-capable devices in your local network. A Thread border router is connected to your network either via Wi-Fi or Ethernet and uses its radio frequency (RF) radio to communicate with the Thread mesh network. In case of Matter, the data that is forwarded is encrypted. Examples of Thread border routers are the Nest Hub (2nd gen), the HomePod mini, and the Home Assistant Connect ZBT-2 together with the OpenThread Border Router add-on. [Learn more].
- Wait at least 30 minutes.
- Try again to update the devices from Home Assistant.
Unable to commission devices, it keeps giving errors or stops working randomly
Symptom
The initial commissioningIn the context of Matter devices, commissioning is the process of adding a device to a Matter controller. It is the equivalent of pairing a device in Zigbee or Z-Wave. [Learn more] keeps failing, you experience issues with discovering devices, or devices become unavailable randomly.
Cause
- The Matter protocol relies on (local) IPv6 and mDNS (multicast traffic) traveling freely in your network.
- Matter is designed for regular residential network setups and may not integrate well with enterprise networking solutions like VLANs, Multicast filtering, and (malfunctioning) IGMP snooping.
Remedy
- Make sure that Matter devices that use Wi-Fi (including Thread border routerA Thread border router forwards data packets between your local network and the Thread network. This enables smart home devices within a Thread network to communicate with IPv6-capable devices in your local network. A Thread border router is connected to your network either via Wi-Fi or Ethernet and uses its radio frequency (RF) radio to communicate with the Thread mesh network. In case of Matter, the data that is forwarded is encrypted. Examples of Thread border routers are the Nest Hub (2nd gen), the HomePod mini, and the Home Assistant Connect ZBT-2 together with the OpenThread Border Router add-on. [Learn more]) are on the same VLANs/VLAN as Home Assistant.
- Make sure that Matter devices that only use ThreadThread is a low-power mesh networking standard that is specifically designed for smart home applications. It is a protocol that defines how devices communicate. [Learn more] are joined to Thread networks for which there is at least one Thread border routerA Thread border router forwards data packets between your local network and the Thread network. This enables smart home devices within a Thread network to communicate with IPv6-capable devices in your local network. A Thread border router is connected to your network either via Wi-Fi or Ethernet and uses its radio frequency (RF) radio to communicate with the Thread mesh network. In case of Matter, the data that is forwarded is encrypted. Examples of Thread border routers are the Nest Hub (2nd gen), the HomePod mini, and the Home Assistant Connect ZBT-2 together with the OpenThread Border Router add-on. [Learn more] connected to the Home Assistant LAN.
- Investigate your network topology.
- For instance, a setting on your router or Wi-Fi access point to “optimize” multicast traffic can harm the (discovery) traffic from Matter devices. Keep this in mind when you experience issues trying to add or control Matter devices.
- To avoid issues, try to keep your network topology as simple and flat as possible.