Blog
0.48: Snips.ai, Shiftr.io and a massive History query speed up
It’s time for a great new release!
We’ve started the process of upgrading our frontend technology. If you notice something not working that did work before, please open an issue
Pascal<config>/www directory.
Z-Wave will, as announced in the last release, be defaulting to generate the new entity ids. More info in the blog post. You can still opt-in for the old style.
zwave:
  new_entity_ids: false
Big speed up in querying the history
Thanks to the work by @cmsimike
Snips.ai component
Snips has contributed a component to integrate with their Snips.ai local voice assistant. This will allow you to hook a speaker and a microphone into your Raspberry Pi and make your own local Amazon Echo quickly. See the docs for further instructions.
Also a shoutout to @michaelarnauts
Release 0.48.1 - July 5
- Fix arlo sensors. (@bergemalm
- #8333 ) (sensor.arlo docs) - API POST no longer marks the number zero as invalid (@azogue
- #8324 ) (api docs) - Fix Snips json schema (@adrienball
- #8317 ) (snips docs) - Fix pathlib resolve (@pvizeli
- #8311 ) - Fix harmony (@balloob
- #8302 ) (remote.harmony docs) - Fix Arlo startup crash (fixes #8288) (@fabaff
- #8290 ) (camera.arlo docs) - Temporary fix for the client_id generation (fixes #8315) (@fabaff
- #8336 ) (mqtt docs)
New Platforms
- Add initial support for Shiftr.io (@fabaff
- #7974 ) (shiftr docs) (new-platform) - Upnp properties (@dgomes
- #8067 ) (upnp docs) (sensor.upnp docs) (new-platform) - Add support for Insteon FanLinc fan (@jawilson
- #6959 ) (insteon_local docs) (fan.insteon_local docs) (new-platform) - add knx cover support (@tiktok7
- #7997 ) (knx docs) (cover.knx docs) (new-platform) - Add I2c BME280 temperature, humidity and pressure sensor for Raspberry Pi (@azogue
- #7989 ) (sensor.bme280 docs) (new-platform) - Add I2c HTU21D temperature and humidity sensor for Raspberry Pi (@azogue
- #8049 ) (sensor.htu21d docs) (new-platform) - Add new BH1750 light level sensor (@azogue
- #8050 ) (sensor.bh1750 docs) (new-platform) - Rfxtrx binary sensor (@ypollart
- #6794 ) (rfxtrx docs) (binary_sensor.rfxtrx docs) (new-platform) - Add ClickSend notify service. (@omarusman
- #8135 ) (notify.clicksend docs) (new-platform) - Add device tracker for Linksys Smart Wifi devices (@mortenlj
- #8144 ) (device_tracker.linksys_smart docs) (new-platform) - Openhardwaremonitor (@depl0y
- #8056 ) (sensor.openhardwaremonitor docs) (new-platform) - WIP: Verisure app api (@persandstrom
- #7394 ) (verisure docs) (alarm_control_panel.verisure docs) (binary_sensor.verisure docs) (sensor.verisure docs) (switch.verisure docs) (new-platform) - telegram_bot platform to only send messages (@azogue
- #8186 ) (new-platform) - Comfoconnect fan component (@michaelarnauts
- #8073 ) (comfoconnect docs) (fan.comfoconnect docs) (sensor.comfoconnect docs) (new-platform) - Implement templates for covers (@PhracturedBlue
- #8100 ) (cover.template docs) (new-platform) - Snips ASR and NLU component (@michaelfester
- #8156 ) (snips docs) (new-platform)
If you need help…
…don’t hesitate to use our very active forums or join us for a little chat
Reporting Issues
Experiencing issues introduced by this release? Please report them in our issue tracker
[Update: fixed] A frank and serious warning about X
Update June 21: Senic has removed our name from their materials and have issued an apology
Update June 28: Removed the brand name from the title to reduce the search ranking.
Original post:
Read on →0.47: Python Scripts, Sesame Smart Lock, Gitter, Onvif cameras
In this release a ton of new stuff! And who doesn’t like new stuff? This release we’re passing the 700 integrations for Home Assistant. As of today we’re 1369 days old, which means that roughly every two days a new integration gets added!
Python Scripts
The biggest change is a new type of script component: Python scripts. This new component will allow you to write scripts to manipulate Home Assistant: call services, set states and fire events. Each Python script is made available as a service. Head over to the docs to see how to get started.
Updater
The updater has received a new opt-in option to let us know which components you use. This will allow us to focus development efforts on the components that are popular.
updater:
  include_used_components: true
And as a reminder. We will never share gathered data in a manner that can be used to identify anyone. We do plan on making aggregate data public soon. This will include total number of users and which hardware/software platform people use to run Home Assistant.
Z-Wave
Z-Wave is also getting a big update in this release. The confusing entity_ids will be on their way out. There is a zwave blog post that gives more detail, but the upgrade steps will be as follows:
- Run Home Assistant as normal and the old IDs will still be used.
- The new entity IDs will be shown in the more-info dialog for each entity. Check to make sure none of them will have conflicts once the new names are applied.
- Rename entities using the ui card as described in the blog post to avoid conflicts. Restart Home Assistant to observe the changes.
- Update all places mentioning IDs (groups, automation, customization, etc.) in configuration.yaml.
- Add
new_entity_ids: trueto your zwave config. - Restart Home Assistant to run with new IDs.
- The old entity IDs will be available in the more info dialog to trace down any remaining errors.
Monkey Patching Python 3.6
Some people have noticed that running Home Assistant under Python 3.6 can lead to segfaults. It seems to be related to the earlier segfault issuesPyObject_GC_Del()
Since Python 3.6, the Task and Future classes have been moved to C. This gives a nice speed boost but also prevents us from monkey patching the Task class to avoid the segfault. Ben Bangert
Both monkey patches are now active by default starting version 0.47 to avoid our users experiencing segfaults. This comes at a cost of not being able to benefit from all optimizations that were introduced in Python 3.6.
To run without the monkey patch, start Home Assistant with HASS_NO_MONKEY=1 hass. We will further investigate this issue and try to fix it in a future version of Python.
Release 0.47.1 - June 21
- Fix Vera lights issue #8098 (@tsvi
- #8101 ) (light.vera docs) - Fix Dyson async_add_job (@CharlesBlonde
- #8113 ) (fan.dyson docs) (sensor.dyson docs) - Update InfluxDB to handle datetime objects and multiple decimal points (@philhawthorne
- #8080 ) (influxdb docs) - Fixed iTach command parsing with empty data (@alanfischer
- #8104 ) (remote.itach docs) - Allow iteration in python_script (@balloob
- #8134 ) (python_script docs)
New platforms
- Added a Taps Aff binary sensor (@bazwilliams
- #7880 ) (binary_sensor.tapsaff docs) (new-platform) - lock.sesame: New lock platform for Sesame smart locks (@trisk
- #7873 ) (lock.sesame docs) (new-platform) - Etherscan.io sensor (@nkgilley
- #7855 ) (sensor.etherscan docs) (new-platform) - blockchain.info sensor (@nkgilley
- #7856 ) (sensor.blockchain docs) (new-platform) - Add Radarr sensor (@tboyce021
- #7318 ) (sensor.radarr docs) (new-platform) - Added buienradar sensor and weather (@mjj4791
- #7592 ) (sensor.buienradar docs) (weather.buienradar docs) (new-platform) - Add support for Vanderbilt SPC alarm panels and attached sensors (@mbrrg
- #7663 ) (spc docs) (alarm_control_panel.spc docs) (binary_sensor.spc docs) (new-platform) - Add raspihats switch (@florincosta
- #7665 ) (switch.raspihats docs) (new-platform) - Add juicenet platform (@jesserockz
- #7668 ) (juicenet docs) (sensor.juicenet docs) (new-platform) - add ripple sensor (@nkgilley
- #7935 ) (sensor.ripple docs) (new-platform) - New component: Python Script (@balloob
- #7950 ) (python_script docs) (new-platform) - Nadtcp component (@mwsluis
- #7955 ) (media_player.nadtcp docs) (new-platform) - Add Gitter.im sensor (@fabaff
- #7998 ) (sensor.gitter docs) (new-platform) - Update mailgun (@happyleavesaoc
- #7984 ) (mailgun docs) (notify.mailgun docs) (breaking change) (new-platform) - Add Flexit AC climate platform (@Sabesto
- #7871 ) (climate.flexit docs) (new-platform)
If you need help…
…don’t hesitate to use our very active forums or join us for a little chat
Reporting Issues
Experiencing issues introduced by this release? Please report them in our issue tracker
ZWave Entity IDs
ZWave entity_ids have long been a source of frustration in Home Assistant. The first problem we faced was that depending on the order of node discovery, entity_ids could be discovered with different names on each run. To solve this we added the node id as a suffix to the entity_id. This ensured that entity_ids were generated deterministically on each run, but additional suffixes had to be added to handle edge cases where there would otherwise be a conflict. The resulting entity_ids worked, but have been difficult to work with and makes ZWave a strange exception among other Home Assistant components.
Thanks to the awesome work of @turbokongen
Now that users are able to control these names, we will be making changes to how the entity_ids are generated for ZWave entities. The ZWave entity_ids are going to switch back to using the standard entity_id generation from Home Assistant core, based on the entity names. Moving forward, if there is a conflict when generating entity_ids, a suffix will be added, and it will be the responsibility of the user to rename their nodes and values to avoid the conflict. This is the same as any other platform in Home Assistant where two devices are discovered with the same name.
With the release of 0.47, this feature will be opt-in. Setting new_entity_ids: true under zwave: in your configuration.yaml will enable the new generation. After 0.48 this feature will become opt-out. From 0.48 onward, unless you’ve declared new_entity_ids: false you will switch to the new entity_id generation. At an undecided point in the future, the old entity_id generation will be removed completely.
I’m sure all ZWave users understand that the current entity_ids aren’t easy to use. They’re annoying to type in configuration.yaml, and break if a node needs to be re-included to the network. We know that backward-incompatible changes are painful, and so we’re doing what we can to roll this change out as smoothly as possible. The end result should be a dramatic simplification of most ZWave configurations. We hope that this change will ultimately make ZWave much easier to work with, and bring ZWave configuration just a little closer to the rest of the Home Assistant platforms.
Linux Action Show special about Home Assistant
Our founder Paulus Schoutsen is interviewed by Chris Fisher for a Linux Action Show special about home automation, Hass.io and the new Home Assistant podcast
0.46: Rachio sprinklers, Netgear Arlo cameras and Z-Wave fans
It’s time for 0.46! This release does not have too many new integrations, instead it focussed on bug fixes.
New platforms
- Template light (@cribbstechnologies
- #7657 ) (light.template docs) (new-platform) - Support for GE Zwave fan controller (@armills
- #7767 ) (zwave docs) (fan.zwave docs) (new-platform) - Rachio (Sprinklers) (@Klikini
- #7600 ) (switch.rachio docs) (new-platform) - Introduced support to Netgear Arlo Cameras (@tchellomello
- #7826 ) (arlo docs) (camera.arlo docs) (sensor.arlo docs) (new-platform)
Release 0.46.1 - June 9
- Support for renaming ZWave values (@armills
- #7780 ) (zwave docs) - Dsmr5 revert (@aequitas
- #7900 ) (sensor.dsmr docs) - Fix typos in Wunderground component (Percipitation -> Precipitation) (@mje-nz
- #7901 ) (sensor.wunderground docs) - Mqtt cover: Making command topic optional and add ability to set up/down position including ability to template the value (@cribbstechnologies
- #7841 ) (cover.mqtt docs) - Media Player - OpenHome: Fixed metadata issue (@bazwilliams
- #7932 ) (media_player.openhome docs) - Sensor - MetOffice: Fix last updated date (@cyberjacob
- #7965 ) (metoffice docs) - Prevent Roku doing I/O in event loop (@balloob
- #7969 ) (media_player.roku docs)
Backward-incompatible changes
- The USPS sensor entity names have changed as there are now two. One for packages and one for mail. Config will now also use
scan_intervalinstead ofupdate_interval(@happyleavesaoc- #7655 ) (breaking change) - Automation state trigger: From/to checks will now ignore state changes that are just attribute changess (@amelchio
- #7651 ) (automation.state docs) (breaking change) - Redesign monitored variables for hp_ilo sensor.
monitored_variablesis now a list ofnameandsensor_typevalues (@Juggels- #7534 ) (sensor.hp_ilo docs) (breaking change)
sensor:
  - platform: hp_ilo
    host: IP_ADDRESS or HOSTNAME
    username: USERNAME
    password: PASSWORD
    monitored_variables:
      - name: SENSOR NAME
        sensor_type: SENSOR TYPE
- Automation - time: The
afterkeyword for time triggers (not conditions) has been deprecated in favor of theatkeyword. This resembles better what it does (old one still works, gives a warning) (@armills- #7846 ) (automation.time docs) (breaking change) - Automation - numeric_state:
aboveandbelowwill no longer trigger if it is equal. (@armills- #7857 ) (breaking change) - Broadlink switches: Entity ids will change for switches that don’t have a default name set. In this case the object_id is now used. (@abmantis
- #7845 ) (switch.broadlink docs) (breaking change) - Disallow ambiguous color descriptors in the light.turn_on schema. This means that you can no longer specify both
xy_colorandrgb_color. (@amelchio- #7765 ) (breaking change)
If you need help…
…don’t hesitate to use our very active forums or join us for a little chat
Reporting Issues
Experiencing issues introduced by this release? Please report them in our issue tracker
Home Assistant Podcast 1
The first podcast by Home Assistant Podcast
- Listen online: https://hasspodcast.io/ha001/
- Download: https://hasspodcast.io/podcast-download/13/ha001.mp3
Home Assistant 0.45: Automation editor, Z-Wave panel, OCR
Welcome to another great release of Home Assistant! While some of contributors and users are gathering at PyCon US 2017, we still managed to get a great release together!
First thing for this release is a feature that has been requested a lot: an automation editor! It’s still experimental - and many things are still in progress - but it works! You can create new automations and edit existing ones. If you start a new config, you’re all good to go. Otherwise check these instructions to get your automations ready for editing in the UI.

Check this video
As the editor is experimental, there are some limitations. These include that Chrome/Chromium is the only supported browser, we don’t support all triggers and actions and there is no support for conditions yet. But the foundation is there and so if you want to contribute to this, come help!
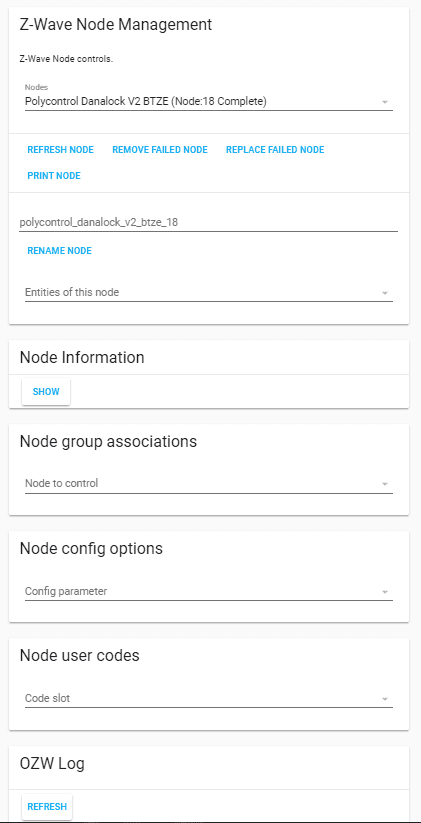
On the Z-Wave front a lot has happened. The biggest one is that we have a major extension of the Z-Wave panel thanks to @turbokongen

If you have a security key set in your Open Z-Wave options.xml, copy options.xml to your Home Assistant configuration directory. This is the only place where options will get persisted.
Next to that @armills
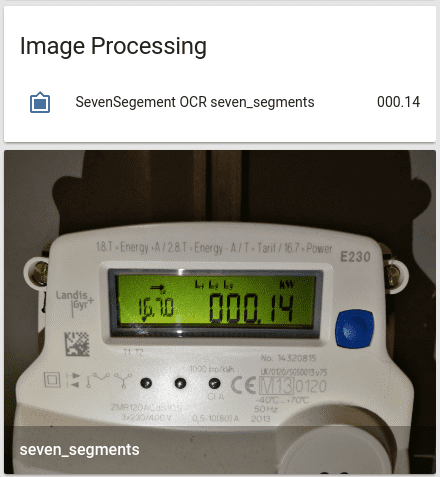
This release also contains two integrations which could help you to make non-smart devices a little smarter. The file sensor and the seven_segments OCR image processing platform. The first simply reads a plain-text file which was created by a logger or alike. The latter one extracts the value from a captured image that shows a seven-segments display.

And last, but not least, our Docker image is now based off Python 3.6. This version is faster and uses less memory than Python 3.5. Win!
If you are using our experimental Hass.io image, we made a breaking change in how the panel is served. If you have an existing installation, make sure you update your supervisor to the latest version before updating Home Assistant. If you are going to flash a new Hass.io image, make sure to only flash the new 0.8 image as linked on the installation page.
New integrations
- Add new raspihats component (@florincosta
- #7392 ) (raspihats docs) (new-platform) - Add datadog component (@nunofgs
- #7158 ) (datadog docs) (new-platform) - Add support for automation config panel (@balloob
- #7509 ) (config.automation docs) (new-platform) - Z-Wave panel API (@turbokongen
- #7456 ) (zwave docs) (zwave.api docs) (new-platform) - myStrom Buttons support (@fabaff
- #7099 ) (binary_sensor.mystrom docs) (new-platform) - Support for the PiFace Digital I/O module (@basschipper
- #7494 ) (rpi_pfio docs) (binary_sensor.rpi_pfio docs) (switch.rpi_pfio docs) (new-platform) - Add raspihats binary sensor (@florincosta
- #7508 ) (binary_sensor.raspihats docs) (new-platform) - Support lutron serena shades (@gurumitts
- #7565 ) (lutron_caseta docs) (cover.lutron_caseta docs) (new-platform) - Add Kira component to sensor and remote platforms (@stu-gott
- #7479 ) (kira docs) (remote.kira docs) (sensor.kira docs) (new-platform) - File sensor (@fabaff
- #7569 ) (sensor.file docs) (new-platform) - Seven segments OCR image processing (@fabaff
- #7632 ) (image_processing.seven_segments docs) (new-platform) - Axis component (@Kane610
- #7381 ) (axis docs) (new-platform)
Release 0.45.1 - May 22
- Fix telegram chats (@azogue
- #7689 ) (notify.telegram docs) (telegram_bot docs) - Fix playback control of web streams (@cgtobi
- #7683 ) (media_player.volumio docs) - device_tracker.ubus: Handle empty results (@tobygray
- #7673 ) (device_tracker.ubus docs) - Allow fetching hass.io panel without auth (@balloob
- #7714 ) (hassio docs)
If you need help…
…don’t hesitate to use our very active forums or join us for a little chat
Reporting Issues
Experiencing issues introduced by this release? Please report them in our issue tracker
Backward-incompatible changes
- PyPI Openzwave (@JshWright
- #7415 ) (zwave docs) (breaking change) - Remove listening to
homeassistant_startwith event automation (@balloob- #7474 ) (automation.event docs) (breaking change)
Home Assistant at PyCon US 2017
In just 12 hours PyCon US 2017 starts. This is an exciting conference because there will be a bunch of Home Assistant developers and users there being able to meet in person.
Just like last year, we’ll be hosting a Home Assistant Open SpaceWe haven’t reserved a slot yet but will do so tomorrow. We’ll update this post and announce it on social media as we know time and location. First open-space will be Friday at 4pm in room B112.
We will also be taken part in the development sprintsExact location inside the conference center to be announced. We are sitting in room A108.
On a final note, the Home Assistant community is very very active so don’t take it personal if we don’t remember your name, issue or contribution.
Home Assistant on an Orange Pi Zero
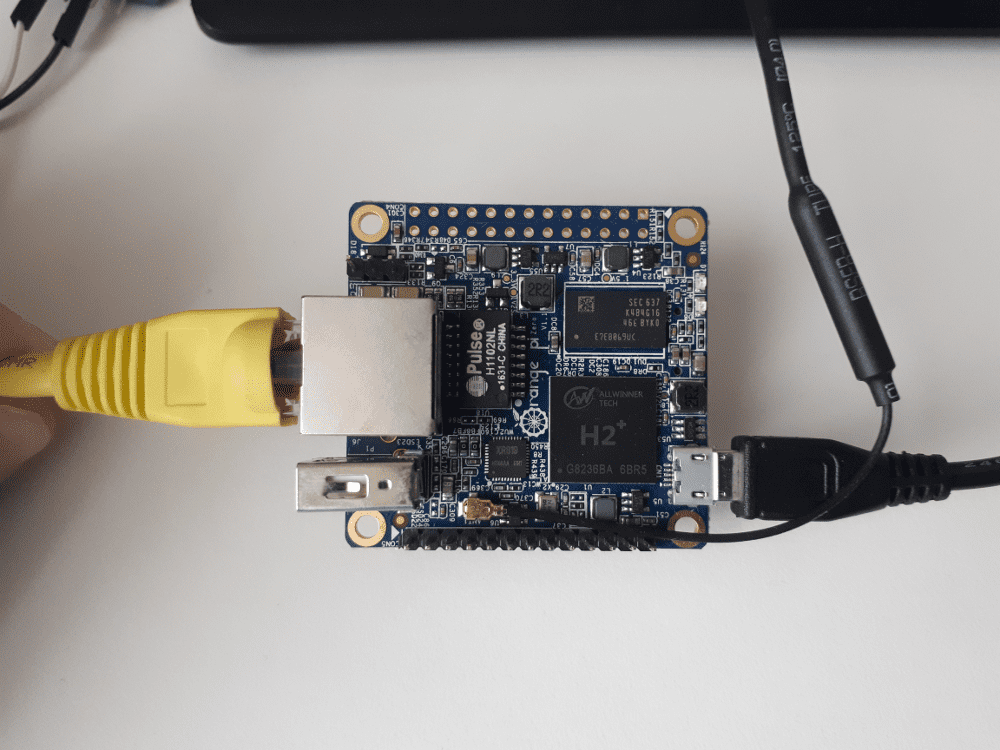
This blog post is about the setup of Home Assistant on an Orange Pi Zero


