Automation editor
The automation editor lets you create and edit automations directly from the Home Assistant user interface, without writing any YAML. The editor walks you through choosing a trigger, optional conditions, and the actions to run.
This tutorial uses the Random sensor because it generates data (by default, values between 0 and 20). This enables us to walk through the example, even if you do not have any actual sensors connected yet. You could use any other sensor that outputs a numeric value.
-
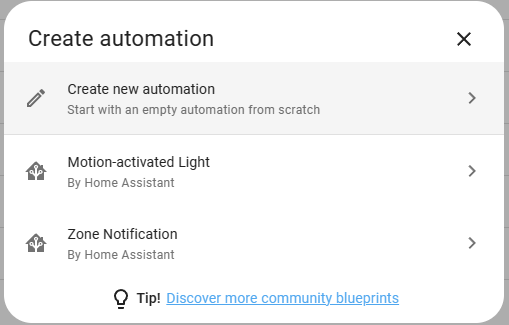
Go to Settings > Automations & scenes and in the lower right corner, select the Create automation button.
-
Select Create new automation.
-
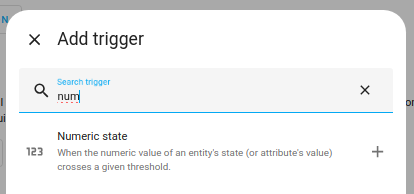
Select Add trigger, and in the Search trigger field, type “num”.
- Select Numeric state.
-
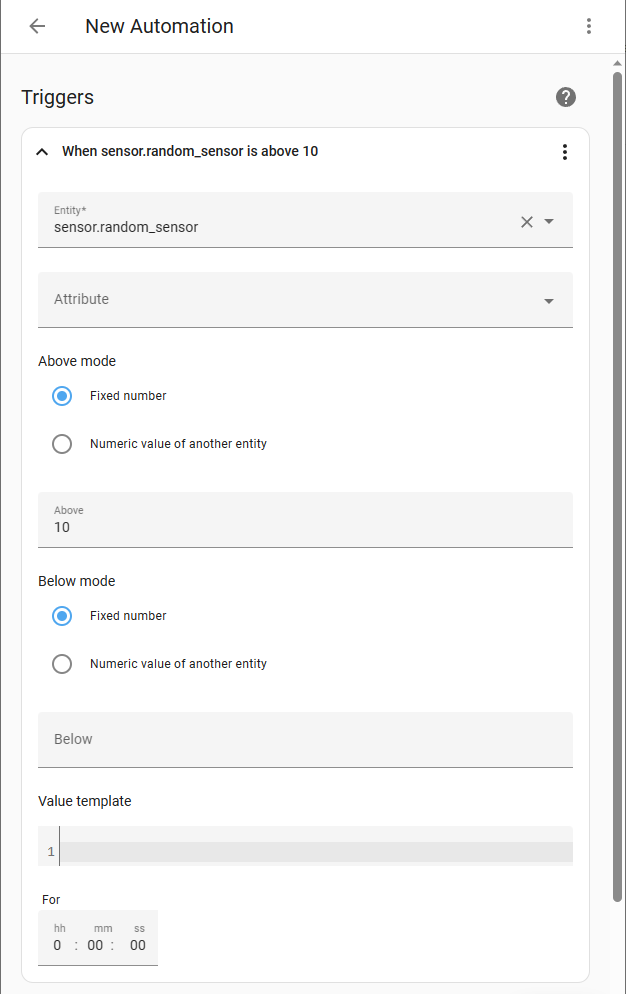
Enter the trigger conditions:
- Define the sensor: Under Entity, enter “sensor.random_sensor”.
- If the sensor value is above 10, we want the automation to trigger.
- In the Above field, enter “10”.
-
Define the action that should happen:
-
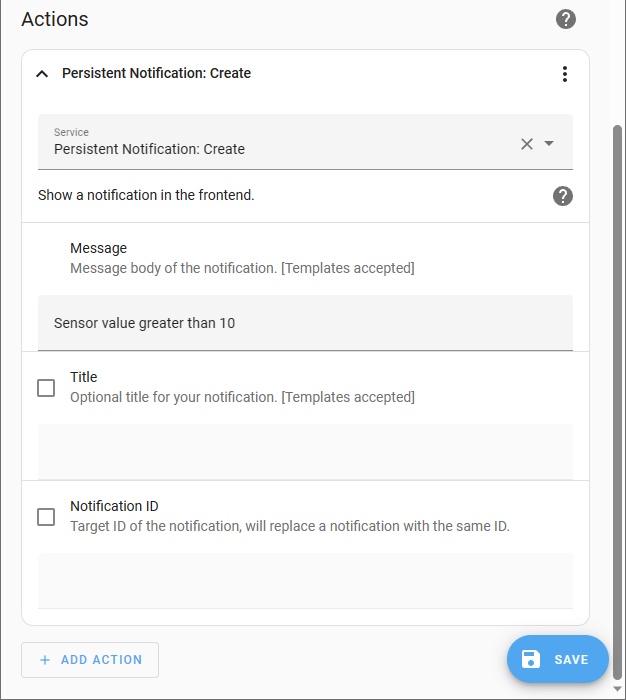
In the Then do section, select Add action.

-
-
We want to create a persistent notification.
- Enter “No” and select Notifications: send a persistent notification.
-
As the message, we want a simple text that is shown as part of the notification.
message: Sensor value greater than 10 -
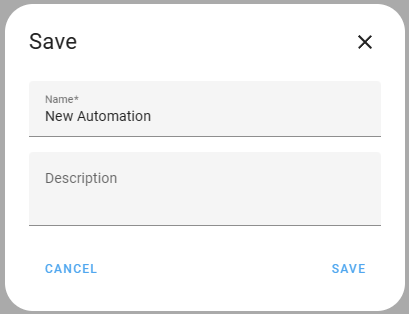
Select Save, give your automation a meaningful name, and Save again.
- Result: Automations created or edited via the user interface are activated immediately after saving the automation.
- To learn more about automations, read the documentation for Automating Home Assistant.
Checking the targeted entities of an automation
After creating an automation and adding a trigger, condition, or action that targets a floor, area, device, or label, you can see how many entities are included, as well as their name, state, and other details.
To check the number of targeted entities of a trigger, condition, or action:
- Go to Settings > Automations & scenes.
- Open an existing automation, or select Create automation > Create new automation.
- Add a trigger, condition, or action with a floor, area, device, or label as a target, and then select Save.
- Result: The number of entities appears in parentheses in the trigger, condition, or action row.
To see which entities are targeted and check their details:
- Go to Settings > Automations & scenes.
- Open an existing automation, or select Create automation > Create new automation.
- Add a trigger, condition, or action with a floor, area, device, or label as a target, and then select Save.
- In the trigger, condition, or action row, select the target with the entities you want to check.
- Result: The Target details dialog opens, where you can see a list with the name and state of the entities, grouped by parent target.
- From the entities list, select an entity to check its details.
- Result: A dialog opens with more information about the entity.
If a trigger, condition, or action has a single entity as the target, instead of a floor, area, device, or label, select it from the row to open the entity details dialog.
Adding notes to an automation
You can add notes to a trigger, condition, or action in an automation. Use notes to explain why a step exists, or to include additional context.
To add a note to a trigger, condition, or action:
- Go to Settings > Automations & scenes.
- Open an existing automation, or select Create automation > Create new automation.
- Add a trigger, condition, or action to your automation.
- On the right side of the trigger, condition, or action row, select the three dots
menu and then select Add note. - In the Add note dialog, enter the text of your note and select Submit.
- Result: You can read your note by hovering over or selecting the
button.
- Result: You can read your note by hovering over or selecting the
Editing notes in an automation
If you want to change a note on a trigger, condition, or action:
- Select the trigger, condition, or action row where your note is.
- In the Note section of the trigger, condition, or action dialog, select Edit.
- Enter the new text or change the existing one and select Submit.
Troubleshooting missing automations
When you’re creating automations using the GUI and they don’t appear in the UI, make sure that you add back automation: !include automations.yaml from the default configuration to your configuration.yamlThe configuration.yaml file is the main configuration file for Home Assistant. It lists the integrations to be loaded and their specific configurations. In some cases, the configuration needs to be edited manually directly in the configuration.yaml file. Most integrations can be configured in the UI. [Learn more].