Blog
When will there be an official Home Assistant for Android app???
1 year, 11 months and 17 days ago or 716 days ago, I announced Home Assistant Companion for iOS on this blog. Ever since then, at least once a week, sometimes far more often, I am asked a question that I haven’t been able to truly answer until today. It’s a question that has gotten on my nerves almost every time I’ve seen it. I could understand why people were wanting an official Android app to mirror the functionality of the iOS app. But I never thought of myself as the person to best deliver on that idea.
Recently, these requests have reached a ear shattering volume and I had enough. It had been almost 2 years and no official app had materialized. It was time for me to act. So I bought a Pixel 3 and re-immersed myself in Android, not having used it for more than a few minutes since my Nexus 5. It’s changed a lot, for the better in my mind, since that time. I knew I could do this. I did it once before. It will require learning a new language, Kotlin, but I learned Swift to build the iOS app and that worked out well.
So here I am, announcing to you, that the official Home Assistant Companion for Android will soon be under development.
I’m going to try to duplicate the timeline of the iOS app as much as possible, although with less time between releases to start. The 1.0 will feature three core features:
- A location engine to rival the iOS app. This means location updates while out and about as well as region monitoring.
- Push notifications that aim to be just as powerful as iOS. Actions and sounds will be added to start and eventually I hope to add embedded content like camera streams and maps. No more need for HTML5 notifications.
- A full screen view for the beautiful web UI that Paulus and co have built. That’s right, no native UI, at least for now.
Long term, I hope to provide a similar feature set on Android as on iOS. That means Android Wear support, sensors and widgets.
If you’re an iOS user reading this, don’t fret. Here’s the current timeline I’m working on:
- April 1, 2019: Announce the Android app
- No later than April 31st, 2019: Release iOS 2.0 to the App Store
- Early to mid summer, 2019: Release first beta of the Android app
- Mid to late summer, 2019: Release 1.0 of the Android app to the Play Store
- Late summer to mid fall, 2019: Adopt new features in iOS 13 into the iOS app, version 2.5.
I’ve already laid the groundwork in Home Assistant itself by implementing the utterly fantastic mobile_app component which provides a very secure and featureful integration system for mobile apps.
Now, i’d like to take a moment to address the elephant in the room: What about the other Android apps that have cropped up to fill the void left without having an official app for so long? The answer is, nothing. Authors of third party apps can continue to build their app and provide innovative features that blend phone and Home Assistant. They will be able to leverage the foundation that was put in place for them: the mobile app component. These apps are part of our ecosystem and we don’t intend to push them out, but embrace them. The better apps they can offer, the more choice our users have and the better it is for the Home Assistant ecosystem.
You might be wondering why we are choosing to do this now, other than the previously mentioned constant questions. Recently, we’ve seen a worrying uptick in the number of apps making poor integration choices or outright horrifying security choices. Furthermore, Home Assistant will always remain free and your privacy is a key part of our mission. Because of that key ideal, we don’t like seeing ads in Home Assistant mobile apps as they have been previously shown to not care about your privacy and in some cases be downright dangerous. We wanted to provide a full featured solution that was open source and cared about your privacy.
So that’s it. The app that 74.15 % of you have been waiting for. Coming soon to a Play Store near you. You’ll be hearing and seeing progress on it very soon via this blog, Twitter, Facebook, Discord, and more.
Finally, I’m going to make a public plug for my Patreon which will hopefully soon enable me to spend 100% of my time on Home Assistant for the rest of 2019. That means full time on iOS, Android and more fun. Thanks in advance for your ongoing support.
0.90: Remote UI, Streams, User Groups
 Paulus Schoutsen
It’s time for Home Assistant 0.90 and it’s just wow. This release is so packed with cool stuff that it’s difficult to even know where to start, so let’s just jump in.
The first big feature is that Home Assistant Cloud now supports remote control. This allows you to check in on your home while away from home. Get a notification that motion was detected? Now you can easily check what happened and take action while away. It works end-to-end encrypted. Only thing needed to get started is to enable it. That’s it.
For more information on how it works, check out the documentation or listen to the latest episode of the Home Assistant Podcast.
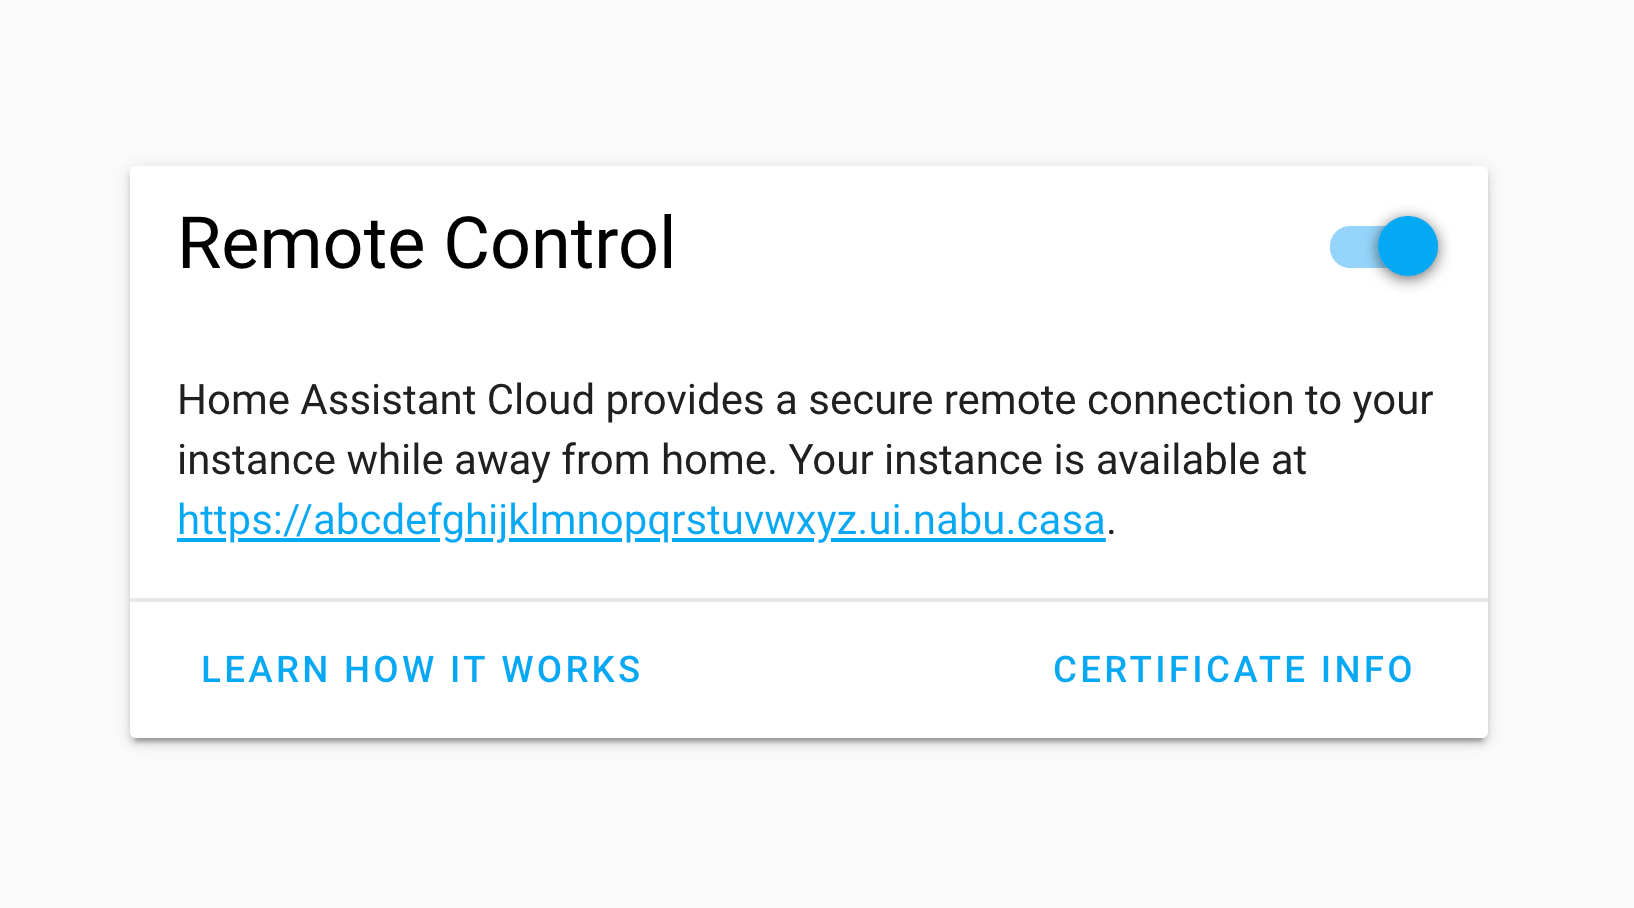 Screenshot of the Remote UI preference.
Camera streams for everyone
With this release we’re getting serious about cameras. @hunterjm has worked months on this and it’s finally ready for the first reveal. With the stream component, we will be able to forward streams from cameras in your house and repackage it into formats that your display devices understand. Previously, streaming cameras was limited to 2 frames per second and only in the frontend. For the first version we focused on the HLS format, which is supported by modern browsers and Chromecast. Each camera integration will need to be individually updated, for the first version we have only added support for the generic camera integration.
So what is possible now? You can start streaming your frontdoor feed on your TV when the doorbell rings or you can install a camera in the nursery and turn your Google Home Hub into a babymonitor.
To get started, add stream: to your configuration.yaml, configure the generic camera and start using the new camera.play_stream service.
Stream any camera on any device.
— Paulus Schoutsen (@balloob) February 28, 2019
New feature by @hunterjm coming soon to a @home_assistant near you. pic.twitter.com/At9wUkcZZJ
User Groups
This has been a long time in the making, and has been worked on for a long time: you can now put users in groups to prevent them from being able to configure things from the UI. Users in the new “users” group will not see links to the configuration panel or to the developer tools. This is currently a UI feature, not a security feature. We’re working on making this a security feature by limiting access at API level too.
Smarter SmartThings
If you use Home Assistant Cloud, setting up SmartThings will now automatically leverage Cloudhooks. This means that you will not need to expose your instance to the internet to start using SmartThings. Yay for easy set up and thanks @andrewsayre! SmartThings support has also been added for 3 axis sensors and air conditioners.
Area love
This release also adds some more love to areas. Thanks to @Swamp-Ig, areas will now be included as room hints when you sync Home Assistant with Google Assistant. This should make setting up a breeze.
Areas can now also be used as targets in services. Just specify area_id instead of entity_id in your scripts or automations.
We’ve also made areas a part of the set up flow for integrations. When you add an integration, we will check which devices are added and ask you to configure them right away. That way you won’t forget.
VSCode extension
In case you missed it, earlier this week Kees Schollaart released the first version of his Home Assistant extension for the free text editor VSCode. It will connect to your instance and will provide you with entity ID autocompletion while editing your config!
This weekend I built a @code extension for @home_assistant! It connects with your Home Assistant host and will provide auto-completion for your entity_id's! Check it out in the Marketplace: https://t.co/21PxCqWrlQ Ideas/feedback more than welcome! Thanks for helping @balloob! pic.twitter.com/la9SPr5Rjw
— Kees Schollaart (@keesschollaart) March 17, 2019
New Platforms
- Live Streams Component (@hunterjm - #21473) (camera docs) (stream docs) (new-platform)
- Add support for homekit controller sensors (@cpopp - #21535) (homekit_controller docs) (new-platform)
- Add SmartThingsAccelCluster to ZHA binary_sensor (@roblandry - #21609) (zha docs) (new-platform)
- Xfinity Gateway device_tracker platform (@cisasteelersfan - #21026) (device_tracker docs) (new-platform)
- Add Time of Flight Sensor using VL53L1X (@josemotta - #21230) (tof docs) (new-platform)
- Adding enigma2 media player (@fbradyirl - #21271) (media_player.enigma2 docs) (new-platform)
- Add support for Cisco Mobility Express (@fbradyirl - #21531) (cisco_mobility_express docs) (new-platform)
- Add ClearPass Policy Manger device tracker (@zemerick1 - #21673) (device_tracker docs) (new-platform)
- Add Weather Sensors to Homematic IP (@SukramJ - #21887) (homematicip_cloud docs) (new-platform)
Release 0.90.1 - March 21
- Fix ZHA force polled entities. (@Adminiuga - #22222)
- Bump total-connect-client to 0.25, fixing issue with Total Connect (@kkr16 - #22230)
- Stream fixes (@hunterjm - #22238) (stream docs)
- Allow on/off on tado climate component. (@michaelarnauts - #22242) (tado docs)
- Fix validate webhook requirements (@andrewsayre - #22248) (smartthings docs)
- Update Hass-NabuCasa 0.9 (@pvizeli - #22258) (cloud docs)
Release 0.90.2 - March 26
- Fix ps4 no creds with additional device (@ktnrg45 - #22300)
- Prefer TCP for RTSP streams (@hunterjm - #22338)
- Update hass-nabucasa & fix state (@pvizeli - #22385)
- Enable hass.io panel without ping (@pvizeli - #22388)
- reset unsub to None on timeout (@hunterjm - #22404)
- Bump pyotgw to 0.4b2 (@mvn23 - #21973)
- Fix opentherm_gw blocks HA startup when gateway unreachable. (@mvn23 - #22106)
- Fix TypeError in current_temperature if no temperature is known. (@mvn23 - #22112)
- Improve opentherm gw startup (@mvn23 - #22121)
If you need help…
…don’t hesitate to use our very active forums or join us for a little chat. The release notes have comments enabled but it’s preferred if you use the former communication channels. Thanks.
Reporting Issues
Experiencing issues introduced by this release? Please report them in our issue tracker. Make sure to fill in all fields of the issue template.
Read on →0.89: Nissan Leaf, PlayStation 4, Point alarm control, Owlet baby monitor
It’s time for release 0.89. It’s another great new release with some cool new features, bug fixes and improvements. The first cool new feature is that yet another car is integrated into Home Assistant: the Nissan Leaf. Both deConz and SmartThings integrations keep expanding to cover more devices.
This release introduces a new mobile app component. @robbiet480, who also works on the iOS app, has taken the best parts of the Home Assistant iOS app component and turned it into a standardized API that any mobile app can build upon. This will allow any mobile apps to integrate with Home Assistant with a great user experience. If you are a mobile app developer, please check the updated app integration docs. We will be fine tuning the API in upcoming releases. Feedback is welcome.
Noteworthy backward-incompatible changes
Custom Components file structure change: A significant change in how the “under the hood” of Home Assistant works has led to forcing platforms to be resolved based off the component path, if it exists.
Today, if you want, you can override the Hue light platform, but not the other parts of the Hue integration. If a future update evolves the Hue component, removing or changing internal methods that the custom platform relied upon, the custom platform will start failing (like this report).
To avoid this, we’re going to no longer allow custom components to be partial overlays (just a platform). Instead, if you want to override a built-in platform, you will need to override the whole component.
This is enforced by first resolving the platform as a component, and if it exists, limiting the lookup path to the component path.
Example: if I look up the hue component, and it is provided by a custom component, then all platform lookups will also be looked up in the custom component dir. The same works the other way around, if a user would only try to override hue/light.py but not hue/__init__.py, the custom platform will be ignored.
Paulus has written some detailed information about this change on the developers’ blog, if you’d like more information. The Great Migration by Paulus
Existing SmartThings configuration entries will be removed, including the SmartApp/Automation from the SmartThings app. Home Assistant will prompt you to configure the integration again or it can be invoked from the integrations page. The configuration process is the same as before. To prepare, have your personal access token and a mobile device with the SmartThings Classic App handy. This will not affect the naming of devices or entities and is a one-time inconvenience. The implementation switches over to the SmartApp access token to synchronize subscriptions during setup of the config entry, which cannot be done using the personal access token.
New Platforms
- Météo-France platform for the weather component (@victorcerutti - #18404) (sensor.meteo_france docs) (weather.meteo_france docs) (new-platform)
- Point alarm control (@fredrike - #20972) (point docs) (new-platform)
- Nissan Leaf Integration (Carwings / NissanConnect EV) (@filcole - #19786) (device_tracker docs) (nissan_leaf docs) (binary_sensor.nissan_leaf docs) (sensor.nissan_leaf docs) (switch.nissan_leaf docs) (new-platform)
- Rewrite of Toon component (@frenck - #21186) (toon docs) (breaking change) (new-platform)
- Times of The Day Binary Sensor (@kstaniek - #20068) (binary_sensor.tod docs) (new-platform)
- Add switch platform for Danfoss Air and additional sensors. (@JonasPed - #21046) (danfoss_air docs) (new-platform)
- Owlet baby monitor component (@oblogic7 - #21108) (new-platform)
- deCONZ thermostat support (@Kane610 - #20586) (deconz docs) (new-platform)
- Added device tracker support for Ubee Router (@mzdrale - #19586) (device_tracker docs) (new-platform)
- Add LCN cover platform (@alengwenus - #20288) (lcn docs) (cover.lcn docs) (new-platform)
- Add initial support for Sony SDCP projector control (@alistairg - #20269) (switch.sony_projector docs) (new-platform)
- Add SmartThings Cover platform and add cover device classes (@andrewsayre - #21192) (cover docs) (smartthings docs) (breaking change) (new-platform)
- Add SmartThings Scene platform (@andrewsayre - #21405) (smartthings docs) (new-platform)
- Reddit Sensor (@ljmerza - #21344) (sensor.reddit docs) (new-platform)
- mobile_app component (@robbiet480 - #21475) (mobile_app docs) (beta fix) (new-platform)
- Add component media player.ps4 (@ktnrg45 - #21074) (ps4 docs)
Release 0.89.1 - March 8
- Upgrade blinkpy==0.13.1 (Fixes #21559) (@fronzbot - #21578) (blink docs)
- Fix Name of Homematic IP accesspoint in devices, if name is configured (@SukramJ - #21617) (homematicip_cloud docs)
- Fix group-switch availability for Homematic IP (@SukramJ - #21640) (homematicip_cloud docs)
- automated commit 07/03/2019 10:47:38 (@ljmerza - #21749) (sensor.google_travel_time docs)
- Fix botvac connected maps call as it is not a supported model (@dshokouhi - #21752) (neato docs)
- Fix colorlog import error (@awarecan - #21754)
- Fix script load module issue (@awarecan - #21763)
- Bump PyXiaomiGateway version to 0.12.2 (Closes: #21731) (@syssi - #21764) (xiaomi_aqara docs)
- adds missing SUPPORT_VOLUME_SET flag to webos media_player (@dthulke - #21766) (webostv docs)
- Updated to newest pyeconet (@w1ll1am23 - #21772) (water_heater docs)
Release 0.89.2 - March 12
- Update dependencies to receive data on webhook callbacks (@andrewsayre - #21838) (smartthings docs)
- Override http.trusted_networks by auth_provider.trusted_networks (@awarecan - #21844) (http docs)
- Fix botvac when no map exists (@dshokouhi - #21877) (neato docs)
- Fixes issues #21821 and #21819 (@kstaniek - #21911) (binary_sensor.tod docs)
If you need help…
…don’t hesitate to use our very active forums or join us for a little chat. The release notes have comments enabled but it’s preferred if you use the former communication channels. Thanks.
Reporting Issues
Experiencing issues introduced by this release? Please report them in our issue tracker. Make sure to fill in all fields of the issue template.
Read on →0.88: Persons, Command line auth and event subscriptions

Release 0.88 has landed. It’s been a busy two weeks with a ton of cool stuff and improvements.
This release introduces a new person component thanks to @MartinHjelmare. With this component, Home Assistant can be set up to track the people in your home. Each person can be linked to a user and multiple device tracker entities. This release does basic device tracker state merging, which will be evolved in the future. Device trackers merging their own states will be phased out in favor of persons. You can configure persons via the config panel. To get started, add the person component to your configuration.yaml file: person:. If you want to automatically stay up to date with the latest default Home Assistant components, you can now also add default_config: to your config.
This release also extends the event dev tool to include an event debugger. It allows you to listen to core events and get them printend to the screen. This makes it easy to find the event data that your remote is sending out.

We also have a new command line auth provider. This will allow you to use a shell script to validate users logging in to the system. This gives a lot of flexibility. For example, you can now authenticate against LDAP. More info in the documentation.
@andrewsayre has been working hard on extending the SmartThings support. This release brings sensors and climate devices into the mix. Awesome!
Noteworthy backward-incompatible changes
We have tightened config validation, so expect a couple of new warnings. Platform configuration will no longer allow to contain keys that are not supported. This should help with finding typos in your current and future YAML configs. This will currently fallback to a warning and will become a full error in the future.
Note for Lovelace custom card developers: if you relied on the availability of <paper-button> in your code, you will have to update it to <mwc-button> to get a similar component.
Note for custom component developers: We are moving to a new file structure. More information on our dev blog.
New Platforms
- Split googlehome to a component with device tracker platform (@ludeeus - #19971) (device_tracker docs) ([googlehome docs]) (breaking change) (new-platform)
- Support for new velux api, added cover.velux (@Julius2342 - #18738) (velux docs) (cover.velux docs) (breaking change) (new-feature) (new-platform)
- Add huawei_lte notify component (@scop - #19544) (notify docs) (new-platform)
- Split out speedtest into a component and a sensor platform (@rohankapoorcom - #20527) (speedtestdotnet docs) (sensor.speedtest docs) (sensor.speedtestdotnet docs) (breaking change) (new-platform)
- Add google home alarm sensor (@eliseomartelli - #20709) ([googlehome docs]) (new-platform)
- Added command_line auth provider that validates credentials by calling a command (@efficiosoft - #19985) (new-feature) (new-platform)
- GitHub Sensor (@timmo001 - #19561) (sensor.github docs) (new-platform)
- Fix binary sensor in Ambient PWS (@bachya - #20801) (ambient_station docs) (new-platform)
- XS1 component (@markusressel - #19115) (xs1 docs) (climate.xs1 docs) (sensor.xs1 docs) (switch.xs1 docs) (new-platform)
- Add person component (@MartinHjelmare - #20290) (person docs) (new-platform)
- Add default_config component (@balloob - #20799) (default_config docs) (script docs) (new-platform)
- Add SmartThings Sensor platform (@andrewsayre - #20848) (smartthings docs) (new-platform)
- CoolMasterNet Climate platform (@OnFreund - #20787) (climate.coolmaster docs) (new-platform)
- Add Google pubsub component (@timvancann - #20049) (google_pubsub docs) (new-platform)
- Ebusd integration (@CrazYoshi - #19607) (ebusd docs) (sensor.ebusd docs) (new-platform)
- Add SmartThings Climate platform (@andrewsayre - #20963) (smartthings docs) (new-platform)
- Add Rejseplanen danish public transport sensor component (@tomatpasser - #19885) (sensor.rejseplanen docs) (new-platform)
- Norway air quality (@Danielhiversen - #20683) (new-platform)
- Add Lock capability to SmartThings platform (@bendews - #20977) (smartthings docs) (new-platform)
New Features
- Support for new velux api, added cover.velux (@Julius2342 - #18738) (velux docs) (cover.velux docs) (breaking change) (new-feature) (new-platform)
- Added HomeKit fan speed based on speed_list (@nd-net - #19767) (homekit docs) (new-feature)
- Added command_line auth provider that validates credentials by calling a command (@efficiosoft - #19985) (new-feature) (new-platform)
- Added more language options (@VirtualL - #20890) (sensor.darksky docs) (new-feature)
- add fan support for spider thermostats (@peternijssen - #20897) (spider docs) (new-feature)
- Add quirks info to ZHA device (@dmulcahey - #20923) (zha docs) (new-feature)
- Added IDs and enabled workarounds for Yale YRD220, YRL220, YRD120 (@mw-white - #20929) (zwave docs) (new-feature)
Release 0.88.1 - February 21
- Fix ZHA bugs (@dmulcahey - #21246) (zha docs)
- Add missing configuration option to plex (@elupus - #21264) (media_player.plex docs)
- Add missing configation option (@elupus - #21265) (sensor.imap_email_content docs)
- Add SamsungTV Mac validation (@balloob - #21268) (media_player.samsungtv docs)
- update services.yaml (@dmulcahey - #21276)
- Fix unhandled exception in Ambient PWS config entry (@bachya - #21278) (ambient_station docs)
- Fix yeelight config validation (@balloob - #21295) (light.yeelight docs)
Release 0.88.2 - February 27
- Make sure that device trackers is always a list during creation (@balloob - #21193) (person docs)
- Allow custom_effect to be absent from Flux configuration (@conleydg - #21317) (light.flux_led docs)
- Fix person update on create (@MartinHjelmare - #21355) (person docs)
- Scene validator fix (@yosilevy - #21362) (scene docs)
- Improve tolerance of SmartThings Climate platform (@andrewsayre - #21383) (smartthings docs)
- Bump PyXiaomiGateway version to 0.11.2 (@syssi - #21453) (xiaomi_aqara docs)
If you need help…
…don’t hesitate to use our very active forums or join us for a little chat. The release notes have comments enabled but it’s preferred if you use the former communication channels. Thanks.
Reporting Issues
Experiencing issues introduced by this release? Please report them in our issue tracker. Make sure to fill in all fields of the issue template.
Read on →hass-cli 0.5: Area, Device Registry and event CLI
With Home Assistant 0.87 out we got Areas and Device Registry UI thus
it is time to do a release of hass-cli that allows you to operate on these in a terminal.
This release adds the following features:
- Area
list,create,delete, andrename - Device
listandassign - Event
watch
To get it run:
$ pip3 install homeassistant-cli
And once you have configured some of the new things you can like:
Create an area:
$ hass-cli area create Attic
-  id: 1
   type: result
   success: true
   result:
      area_id: 83977bdb16524579a856560925a791a7
      name: Attic
List all your areas:
$ hass-cli area list
ID                                NAME
295afc88012341ecb897cd12d3fbc6b4  Bathroom
9e08d89203804d5db995c3d0d5dbd91b  Winter Garden
8816ee92b7b84f54bbb30a68b877e739  Office
e6ebd3e6f6e04b63a0e4a109b4748584  Kitchen
f7f5412a9f47436da669a537e0c0c10f  Livingroom
bc98c209249f452f8d074e8384780e15  Hallway
83977bdb16524579a856560925a791a7  Attic
List devices matching a pattern:
$ hass-cli device list "Kitchen.*Light*"
ID                                NAME                      MODEL                    MANUFACTURER    AREA
f9cad07069c74d519fbe84811c91f1fb  Kitchen Light 2           LCT003                   Philips         e6ebd3e6f6e04b63a0e4a109b4748584
d02ec64623ae4407a80b903cbc061511  Kitchen Light 3           LCT003                   Philips         e6ebd3e6f6e04b63a0e4a109b4748584
820c9e511fce42ea92b228c18710aa56  Kitchen Light 1           LCT003                   Philips         e6ebd3e6f6e04b63a0e4a109b4748584
417dd42c0c764765aa29580d77b8b7ad  Kitchen Light 5           LCT003                   Philips         e6ebd3e6f6e04b63a0e4a109b4748584
Like with entity list you can filter and pipe results to get interesting things.
How about a inventory count?
$ hass-cli --no-headers --columns manufacturer,model device list | sort | uniq -c | sort -nr
10 IKEA of Sweden      TRADFRI bulb GU10 WS 400lm
 8 Philips             SML001
 7 LUMI                lumi.sensor_magnet.aq2
 6 Sonos               Play:1
 6 Philips             LTW012
 6 Philips             LCT003
 6 Philips             Hue color spot
 6 Philips             Hue ambiance candle
 5 Philips             LWG001
 5 Philips             LCT012
 5 Philips             Hue color candle
 5 IKEA of Sweden      TRADFRI bulb E14 W op/ch 400lm
 4 Sonos               One
 4 Philips             RWL021
 4 Philips             Hue color lamp
 4 IKEA of Sweden      TRADFRI remote control
 3 Philips             Hue lightstrip plus
 3 OSRAM               Color temperature light
 3 LUMI                lumi.vibration.aq1
 3 IKEA of Sweden      TRADFRI transformer 30W
 ....
And then my favorite feature, assign of area to a device:
$ hass-cli device assign Kitchen "Kitchen Light 2"
or even more powerful, bulk-assign to any entity matching a certain pattern:
$ hass-cli device assign --match "Kitchen" Kitchen
  Successfully assigned 'Kitchen' to 'Kitchen'
  Successfully assigned 'Kitchen' to 'Kitchen table left'
  Successfully assigned 'Kitchen' to 'Kitchen table right'
  Successfully assigned 'Kitchen' to 'Kitchen left middle at window'
  Successfully assigned 'Kitchen' to 'Kitchen front right at fridge'
  Successfully assigned 'Kitchen' to 'Kitchen left back at hub'
  Successfully assigned 'Kitchen' to 'Kitchen left back at bar'
  Successfully assigned 'Kitchen' to 'Kitchen right back at sink'
  Successfully assigned 'Kitchen' to 'Kitchen right middle at oven'
  Successfully assigned 'Kitchen' to 'Kitchen Light 2'
  Successfully assigned 'Kitchen' to 'Kitchen Light 3'
  ....
And finally as a little bonus feature you can now watch the event bus from the CLI:
All events:
$ hass-cli event watch
or specific events:
$ hass-cli event watch call_service
At the moment the output is raw JSON, that will improve in a future release.
The full change list including bugfixes from community is as follows:
What’s Changed
New features:
Bug fixes:
- fix(entity): honor –columns in entity get 67397a1 @maxandersen
- Fix result reporting from service calls 14fc952 @maxandersen
- Remove pyaml and move to ruamel only for yaml df9f8c2 @maxandersen
Minor fixes:
- fix: release 0.5.0 version 200a099 @maxandersen
- fix: be pep440 complant 98320f8 @maxandersen
- fix: fix lint errors eca26fa @maxandersen
- fix: fix lint errors ffd2369 @maxandersen
- enable deploy of git timestamped build 4b27a65 @maxandersen
- Merge branch ‘master’ into dev caaf7b1 @maxandersen
- add docker reference d3b64e8 @maxandersen
- docs: add docs for area, device and event watch ee4f74a @maxandersen
- Make dockerfile build from source + entrypoint b7f8764 @maxandersen
- Fix lint issue 8bb0c9e @fabaff
- Fix lint issues 58fdc83 @fabaff
- fix bad typing 499b544 @maxandersen
- fix editor formatting 86d9bf8 @maxandersen
- Fix version 3765a03 @maxandersen
- Fix version marker edbe4bf @maxandersen
Have fun!
0.87: SmartThings, Areas and Entity Registry UI.
Today we’re releasing Home Assistant 0.87, our third release of the year. Besides a bunch of bugs squashing and performance improvements, we got some cool new features too.
Let’s start with the big one: we now support SmartThings. Via a custom app that can be installed inside SmartThings, you can now push the state of each device in SmartThings, as soon as it changes, to Home Assistant. No more fiddling with MQTT bridges or other solutions. Big shoutout to @andrewsayre for making this possible. Have a look at the SmartThings docs to get started.
New in this release is a new area feature thanks to @Kane610. Areas will allow users to organize their devices by their physical area, like kitchen or living room. This will unlock a whole new range of possible new features (of which none are implemented yet). With this release, users will just be able to manage areas in the configuration panel and place devices in areas via the integration page. In the future, we’re planning to add area based user permissions and a Lovelace area card. If you can’t wait to start leveraging areas today, @thomasloven has created a custom Lovelace card that can leverage areas.
This release also includes a UI to manage the entity registry. The entity registry contains all entities with unique IDs that Home Assistant has ever seen. It will allow users to quickly rename entities, change entity IDs or have Home Assistant forget entities that are no longer active.
We didn’t forget about the frontend in this release. In the last release we introduced Lovelace, so for this release we focused on bug squashing, performance improvements and usability. The YAML editor is now rendered using a full editor including line numbers thanks to @bramkragten. There is also a new system health component that will help users diagnose problems from the “info” developer tool. See changelog for the frontend.
In this release we have also upgraded the Material Design Icons to 3.3.92, which renames some icons. Make sure to check their changelog.
If you prefer a podcast over release notes, check out the Hass Podcast in which Phil and Rohan discuss each new Home Assistant release and keep a tap on what’s happening in the home automation space.
New Platforms
- Add a Zoneminder availability sensor (@rohankapoorcom - #20184) (zoneminder docs) (new-platform)
- Add platform image_processing.qrcode (@zhujisheng - #20215) (image_processing.qrcode docs) (new-platform)
- Add LCN switch platform (@alengwenus - #20267) (lcn docs) (switch.lcn docs) (new-platform)
- Add EverLights light component (@joncar - #19817) (light.everlights docs) (new-platform)
- Add device tracker support for EE Brightbox 2 router (@krygal - #19611) (device_tracker docs) (new-platform)
- HomematicIP add cover FROLL and BROLL devices (@mxworm - #19794) (homematicip_cloud docs) (new-platform)
- Add Danfoss Air HRV support (@JonasPed - #20138) (danfoss_air docs) (binary_sensor.danfoss_air docs) (sensor.danfoss_air docs) (new-platform)
- Utility meter (@dgomes - #19718) (utility_meter docs) (new-platform)
- Add Co2signal sensor (@danielsjf - #19204) (sensor.co2signal docs) (new-platform)
- Add nilu air_quality platform (@hfurubotten - #19674) (air_pollutants docs) (new-platform)
- Add Iliad Italy (Mobile Telephony Provider) Sensor (@eliseomartelli - #19645) (new-platform)
- Add support for HomeKit motion sensor devices (@Jc2k - #20555) (homekit_controller docs) (new-platform)
- Add an Integration sensor (@dgomes - #19703) (sensor.integration docs) (new-platform)
- Add Synology SRM device tracker (@aerialls - #20320) (device_tracker docs) (new-platform)
- Add Recollect Waste (@stealthhacker - #20121) (sensor.recollect_waste docs) (new-platform)
- New Transmission component (@MatteGary - #19230) (transmission docs) (sensor.transmission docs) (breaking change) (new-platform)
- Add support for FRITZ DECT 100 (temp sensor) (@choss - #20308) (fritzbox docs) (sensor.fritzbox docs) (new-platform)
- RFC: Add system health component (@balloob - #20436) (system_health docs) (new-platform)
- Add sensor platform for Rova Garbage Collection (@GidoHakvoort - #18868) (sensor.rova docs) (new-platform)
- Add SmartThings component and switch platform (@andrewsayre - #20148) (smartthings docs) (switch.smartthings docs) (new-platform)
- Fix cloud webhook body (@pvizeli - #20739) (cloud docs) (beta fix) (new-platform)
Release 0.87.1 - February 9
- Fix waze_travel_time component ERROR on startup (@VirtualL - #20316) (sensor.waze_travel_time docs)
- Add Transmission component ‘scan_interval’ option (@jonudewux - #20575) (transmission docs)
- Fix homekit_controller non-standard hk characteristics (@Jc2k - #20824) (homekit_controller docs)
- Fix STATE_UNLOCKED for verisure (@Danielhiversen - #20858) (verisure docs)
- Use text= instead of body= for creating web responses (@balloob - #20879)
- Upgrade zm-py to 0.3.3 (@mnoorenberghe - #20886) (zoneminder docs)
New Features
- Add yeelight start_flow service and ability to declare custom effects (@zewelor - #20107) (light.yeelight docs) (new-feature)
If you need help…
…don’t hesitate to use our very active forums or join us for a little chat. The release notes have comments enabled but it’s preferred if you use the former communication channels. Thanks.
Reporting Issues
Experiencing issues introduced by this release? Please report them in our issue tracker. Make sure to fill in all fields of the issue template.
Read on →Introducing Home Assistant CLI aka. hass-cli
When I started using Home Assistant (HA) I was missing a way to interact with HA via a command line (CLI). A CLI allows you to utilize the power of auto-completion, scripting and direct access.
Thus I started working on Home Assistant CLI, a project that was initially started by Fabian Affolter.
The great thing about hass-cli is that it uses the exact same API’s as the other UI’s and integration uses thus it makes a great complement to the Home Assistant family of tools.
Last week we released version 0.4, which provides majority of the features I was looking for to do from a CLI.
Feature highlights:
- Get configuration info (
hass-cli config) - List, get, edit and delete state for entities (
hass-cli entity’) - Query history with relative time (‘hass-cli entity history’)
- List and run services (
hass-cli services) - Execute templates locally and remotely (
hass-cli template) - Control over columns, sorting, etc. (
hass-cli --columns attr1,attr2 --sort-by attr3) - Shell completion for most commands and arguments (
hass-cli completion zsh) - Get logs (
hass-cli system log) - Run discovery (
hass-cli discover) - Show map for zone (
hass-cli map) - Call raw api directly (
hass-cli raw) - … and more
Usage
For the basic intro to hass-cli see the docs at github.
Installation
Install latest homeassistant-cli by pip:
$ pip3 install homeassistant-cli
or if upgrade use:
$ pip3 install --upgrade homeassistant-cli
or if you like an isolated install you can use pipsi
$ pipsi install --python python3 homeassistant-cli
or if you are adventurous you can build it from source at.
Changes since 0.1-0.3
The first thing is that the commands have been cleaned up to be more logcial/explicit.
$ hass-cli
...
...
Commands:
completion  Output shell completion code for the specified shell (bash or...
config      Get configuration from a Home Assistant instance.
discover    Discovery for the local network.
entity      Get info and operate on entities from Home Assistant.
event       Interact with events.
info        Get basic info from Home Assistant.
map         Print the current location on a map.
raw         Call the raw API (advanced).
service     Call and work with services.
system      System details and operations for Home Assistant.
template    Render templates on server or locally.
Rather than using generic terms (eg. get, list), the commands are now explicit and have further sub-commands.
The biggest change is that most operations, by default now use “table” mode. i.e., instead of getting a yaml or json dump you get a more concise view:
$ hass-cli entity list winter
ENTITY                           DESCRIPTION                STATE
timer.timer_winter_garden                                   idle
group.winter_garden_lights       Winter Garden Lights       off
group.winter_garden_motionview   winter garden              off
light.winter_garden_light_2      Winter Garden Light 2      off
light.winter_garden_light_5      Winter Garden Light 5      off
light.winter_garden_light_1      Winter Garden Light 1      off
light.winter_garden_light_3      Winter Garden Light 3      off
light.winter_garden_light_4      Winter Garden Light 4      off
media_player.winter_garden       Winter Garden              paused
sensor.lightlevel_winter_garden  Winter Garden Motion       1.0
sensor.temperature_winter_garden Winter Garden Temperature  5.0
On top of better tables you can also use --sort-by to sort by an attribute and you can use --columns to control which attributes to show.
You can combine it all and do history querying with things like:
$ hass-cli --sort-by last_changed entity history \
  --since 50m  light.kitchen_light_1 binary_sensor.presence_kitchen
ENTITY                          DESCRIPTION      STATE
binary_sensor.presence_kitchen  Kitchen Motion   off
light.kitchen_light_1           Kitchen Light 1  on
binary_sensor.presence_kitchen  Kitchen Motion   on
binary_sensor.presence_kitchen  Kitchen Motion   off
light.kitchen_light_1           Kitchen Light 1  off
If you still want to get all the glory details you can use -o yaml to get the full details.
Frequently Asked Questions
A few frequent asked questions we’ve seen the last months are as follows:
Why would anyone use this ?
This is not removing or trying to compete with existing ways to access Home
Assistant - this is a complementary way to access Home Assistant. If you like to
use CLI’s and its power of auto-completion you’ll find hass-cli to be awesome;
if not and you prefer the browser UI you just continue using it. We still use it
for normal interactions, but when we want to be fast or script things hass-cli
is great.
Why not just use the REST API’s directly via curl or similar ?
You can most definitely use curl or similar to access REST API directly - it’s
basically what hass-cli does behind the scenes. hass-cli give though a few
advantages. Firstly that you do not need to remember the exact commands,
hass-cli have contextual help and auto completion to make it super easy to
type out. Finally over time as hass-cli will get support for utilizing the
more extensive websocket API’s hass-cli will be more consistent and simpler to
use than using “raw” access via curl.
Does this only work with HTTPS and hass.io ?
No, it works with any Home Assistant that has REST API exposed - something
that is done by default. In short - if you can access Home Assistant with your
browser and see the UI hass-cli can communicate and control it too.
Thus http, https, hass.io, non-hass.io, etc. are all supported by hass-cli
Do I need to install Home Assistant to use this ?
No, hass-cli does not require Home Assistant installed on the computer you
want to run it on. It should run on any install with Python 3.5 or higher on all
major operating systems.
Does this work with client-generated certificates ?
It should, but we have not yet been able to verify it. If you would like to help
us try it run with --cert <certificate.pem> and let us know if it works on
issue #66.
Next steps
Personally the next feature I would like to add is more specific support for system control commands (like refreshing groups, restarting, etc.) but also for accessing hass.io add-ons. Also having an easy way to hook into the event bus (via websocket) to see what is happening live.
What would you like to see ?
Feedback
If you have questions for feedback you can put a comment on this blog, use the hass-cli forum thread or open issues or pull-requests at github.
Have fun!
[Update: we are wrong] Nest locks users out of their own data
Update 1 (Jan 24): We got some reports from people that they are still able to create accounts and generate the right keys. We just verified and this is the case. So for now you can still access your data, which is good. We’re still puzzled on the response to our tweet. And thanks to Reddit user /u/lefos123 for pointing out that they announced this updated link on Nov 2018.
Although it’s still working, we’re still scared about the future of the Nest API.
Some sad news for users with a Nest product: Nest is no longer accepting new developer accounts. This means that if you bought a Nest thermostat, you are no longer able to access YOUR data.
New Home Assistant users will not be able to integrate their Nest products. Home Assistant users that have already integrated Home Assistant with Nest are not affected.
We hope that Nest will implement a new program or add support for locally controlling the Nest thermostat, if they do, we will update this post. Until then, we can no longer recommend buying or using any Nest product.
We're currently restructuring our developer program and are no longer accepting new developers to the program or performing client integration reviews for existing developers until the new program is implemented. Stay tuned for further details and announcements.
— Nest (@nest) January 16, 2019
0.86: New Lovelace UI and Zigbee Management Panel!
Today we’re releasing Home Assistant 0.86. And oh wow, this is an amazing release. First awesome thing: the Lovelace user interface, which we’ve been working on for the last 8 months, is now the default in Home Assistant. We have a lot to talk about, so we created a separate blog post just for the Lovelace release here.
Next up, we’ve updated the Home Assistant demo. It’s snappier, it’s snazzier, and best of all: it contains four fully functional Lovelace user interfaces that you can play with! Change the states or go in config mode and add, edit or re-organize the cards. We’ve set it up in such a way now that the demo will be automatically updated with the latest release of Home Assistant, so it will always feature the latest things.
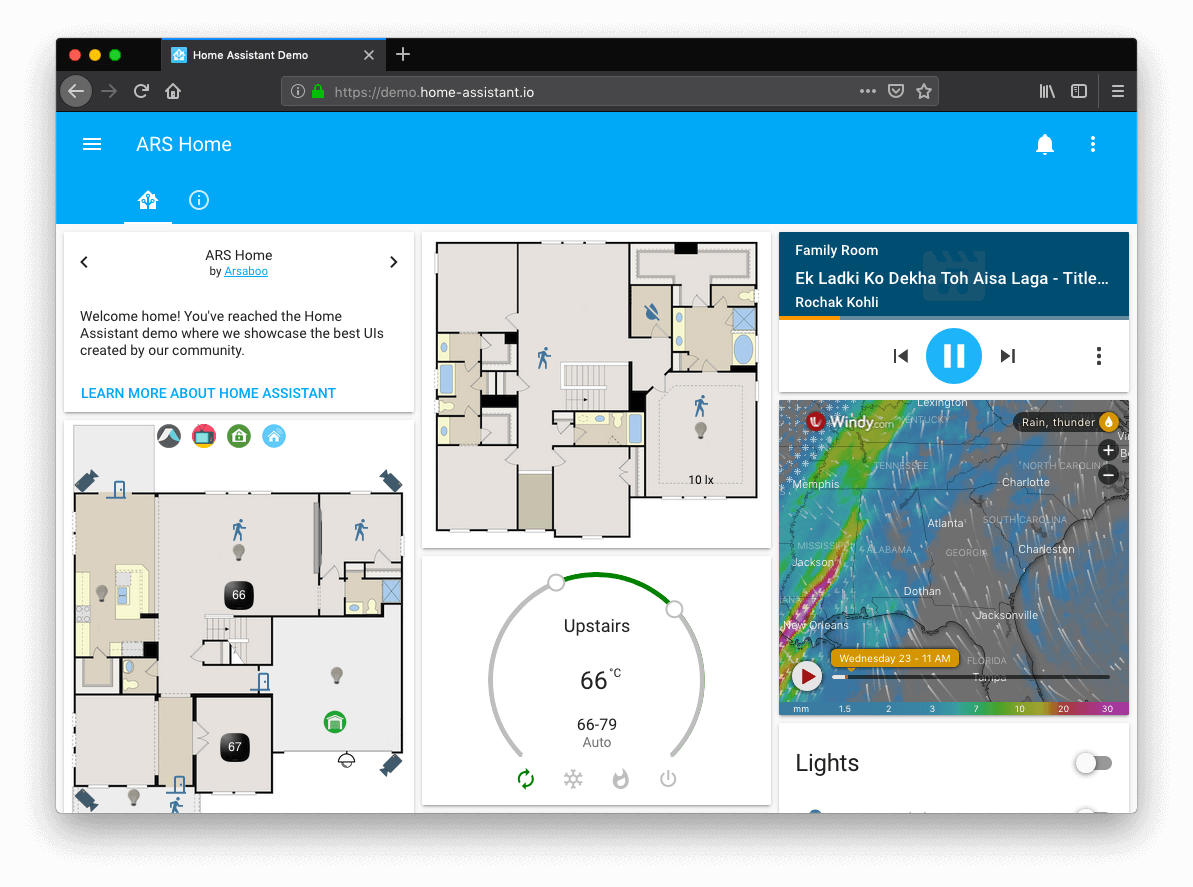 Screenshot of Lovelace in the new demo.
Zigbee management panel
This release includes a brand new Zigbee management panel to manage your Zigbee network thanks to the hard work by @dmulcahey with the help of @Adminiuga and @damarco. The new panel makes it easy to:
- Issue Permit and Remove operations
- Reconfigure Node, which will rebind and reconfigure the reporting for a device. Which can help solve issues.
- Reading and setting cluster attributes. This is useful for viewing and setting things such as device sensitivity levels.
- View and issue cluster commands. Note on this feature: support for commands with arguments is coming soon.
The Zigbee team is also planning a bunch of cool things for 2019. Direct device binding (directly pairing remotes to lights) is already in development and they are planning support for group management as well. Targeted and broadcast joins are also right around the corner (we’re waiting for a new Zigpy release). Exciting times for Zigbee users!
 Screenshot of the Zigbee management panel.
Noteworthy backward-incompatible changes
Update: the entity ID one was too harsh, it’s now a warning.
This release also includes two noteworthy backward-incompatible changes. One is a follow-up on the slugify breaking change from last release. We did not update the validation check for config options that need to be valid slugs. This means that some of your config values might be invalid. Keep an eye at the console as we have a new message to tell you which ones are wrong.
The following things are not allowed in entity IDs:
- No capital letters
- No leading or ending underscores
- No double underscores
This issue also impacts the entity registry, which could contain in some cases invalid entity IDs. Expect entity IDs to change if they contained a double underscore (which becomes 1) or if they started/ended in an underscore (which will be removed).
Another noteworthy breaking change (sorry!), is that the automation time trigger has been split into two: time and time_pattern. If you had a time trigger containing the keys hours, minutes or seconds, update the platform from time to time_pattern.
New Platforms
- Support for Homekit controller/alarm control panel (@adrum - #19612) (homekit_controller docs) (alarm_control_panel.homekit_controller docs) (new-platform)
- Add support for HomeKit Controller Locks (@adrum - #19867) (homekit_controller docs) (lock.homekit_controller docs) (new-platform)
- Add support for HomeKit Controller covers (@adrum - #19866) (homekit_controller docs) (cover.homekit_controller docs) (new-platform)
- Add Roku hub and remote (@soberstadt - #17548) (roku docs) (media_player.roku docs) (remote.roku docs) (breaking change) (new-platform)
- Add emulated_roku component (@mindigmarton - #17596) (emulated_roku docs)
Release 0.86.1 - January 23
- Hotfix for blink initialization failure. Fixes #20335 (@fronzbot - #20351) (blink docs)
- [FIX] Time reporting incorrect in sensor.gtt (@eliseomartelli - #20362)
- Fix error when API doesn’t return a forecast. (@dgomes - #20365)
- Fix restore state crashing invalid entity ID (@balloob - #20367)
- Calling save before load would crash Lovelace storage (@balloob - #20368)
Release 0.86.2 - January 24
- Philips Hue - Remove unnessesary warning (@starkillerOG - #20394) (hue docs)
- history allowed to load states with invalid entity IDs (@balloob - #20399)
Release 0.86.3 - January 26
- Philips Hue, include debug message for color gamut (@starkillerOG - #20455) (hue docs)
- Warn instead of break for old slugs/entity ids (@balloob - #20478)
Release 0.86.4 - January 28
- Bumps aioasuswrt (@kennedyshead - #20432) (asuswrt docs)
- Add check to validate gamut (@starkillerOG - #20518)
- fix #20387 devices without model/protocol (@fredrike - #20530) (tellduslive docs)
If you need help…
…don’t hesitate to use our very active forums or join us for a little chat. The release notes have comments enabled but it’s preferred if you use the former communication channels. Thanks.
Reporting Issues
Experiencing issues introduced by this release? Please report them in our issue tracker. Make sure to fill in all fields of the issue template.
Read on →Lovelace UI released!
Today we’re happy to announce that our new Lovelace UI, which has been in beta for the last 8 months, is becoming the new default interface of Home Assistant 0.86. With Lovelace we’re taking a new approach to building user interfaces for Home Assistant. We’re no longer storing the look and feel of your UI in your configuration.yaml, requiring restarts for changes. With Lovelace we’re keeping the UI concerns in the UI1, unlocking a whole new set of features:
- 24 cards to place and configure as you like.
- UI Editor. A configuration UI to manage your Lovelace UI including live preview when editing cards.
- Fast. Using a static config allows us to build up the UI once.
- Customizable.
- Cards have numerous options to configure how your data is presented.
- Themes; even at a per card basis.
- Ability to override names and icons of entities.
- Custom Cards from our amazing community are fully supported.
In case you’re reading this and want to give it a try right now: we’ve updated the Home Assistant demo. It now features multiple Lovelace configuration examples. The demo is fully interactive, including the configuration UI (accessible via the menu in the top right). You can also access it by updating to Home Assistant 0.86.
For a deep dive into all the new features, check out the latest episode of the Home Assistant podcast, featuring an interview with Zack Arnett from the Lovelace team.
For an overview of all the different features, check out the Lovelace documentation.
1: If you prefer to write your Dashboard config in YAML, Home Assistant also includes an optional YAML mode.
Migrating to Lovelace
You have to do… nothing! If not configured, Lovelace will use the same algorithm to built-up the UI as the old UI did.
History
With Lovelace we’ve built a foundation that not only provides a lean and sleek interface, but will also allow us to add many new exciting features in the future. The main difference with the old UI is that we no longer store any UI concerns in the state machine.
When Home Assistant was started, I came up with an algorithm that would automatically organize the available entities in badges, cards and tabs; and then show that on the screen. Users demanded more influence; so over time, we’ve added a bunch of components and features of the backend whose main or sole purpose were to influence how the algorithm in the UI shows and organizes entities.
As this kept growing, I realized that we were on the wrong path. It was impossible to get an algorithm that would fulfill all needs and the backend shouldn’t be aware of anything in the frontend. It should just deliver the entities and the frontend should figure out how to display things together with the user.
At the same time as this was happening, we also had some discussions about the development of the frontend. Users wanted more control on what is shown, when it’s shown and how it’s shown. Eventually, @andrey-git came up with Custom UI for the old interface. This allowed users to do whatever they wanted. However, it was limited to power users.
Lovelace was built from the start to tackle these problems. The initial version completely dropped the algorithm and required users to add each card to their configuration. We went from a fully automatic UI to nothing. We launched it under the nomer “experimental UI” and it quickly gained traction. People loved the control and the ability to inject custom cards or entity rows at will.
The enthusiasm was great among our power users, however by switching away from an automatic UI, we were no longer beginner-friendly. A new user would open Home Assistant and they would see a blank, unconfigured UI. We realized that this had to be solved if we were to make Lovelace the default.
To solve this, we re-introduced our automatic algorithm. However, this time the algorithm generates a Lovelace configuration. If a user doesn’t like the automatic configuration, they can take control and configure it to their liking. When you take control, the automatic generated configuration will no longer be updated by Home Assistant, allowing the user to change each detail.
To make configuring your UI as easy as possible, Lovelace UI allows (custom) cards to include a config editor. This way the user will be able to quickly edit a card while a live preview shows how the changes look. If a card does not include an editor (yet), the user will be presented with a text editor in the browser.
Because of the ease to customize and share customizations, we’ve already seen a big community get created around Lovelace. They are very active in the #lovelace channel on our chat, and work is shared on ShareTheLove.io and the Lovelace section on Awesome HA.
Credits
Lovelace UI has been 8 months in the making and it has been a big undertaking. We’ve worked hard and are proud of being able to ship this first version. Lovelace UI would not have been possible without the following current and former members of the Lovelace team:
- @balloob / Paulus Schoutsen
- @bramkragten / Bram Kragten
- @c727
- @ciotlosm / Marius Ciotloș
- @iantrich / Ian Richardson
- @jeradM / Jerad Meisner
- @thomasloven / Thomas Lovén
- @zsarnett / Zack Arnett
I also want to thank the community for adopting this so eagerly, building a ton of helpful tooling and examples and helping one another to create beautiful UIs for their homes.
Old UI
The transition to Lovelace should be painless for most users. If you are encountering issues, please let us know. For the time being, you will be able to still change back to the old user interface on a per-device basis by going to the info developer tool and following the instructions.