ESP32-S3-BOX voice assistant
This tutorial will guide you to turn an ESP32-S3-BOX, ESP32-S3-BOX-3(B), or an ESP32-S3-BOX-Lite into a Home Assistant voice assistant. Note, the term ESP32-S3-BOX may be used to refer to any of the 3 product variants.
Prerequisites
- Home Assistant 2023.12 or later, installed with the Home Assistant Operating System. If you do not have Home Assistant installed yet, refer to the installation page for instructions.
- Home Assistant Cloud or a manually configured Assist Pipeline
- The password to your 2.4 GHz Wi-Fi network
- Chrome or Edge browser on a desktop (not Android/iOS)
- One of the Espressif ESP32-S3-BOX variants:
- ESP32-S3-BOX-3B
- ESP32-S3-BOX-3, ESP32-S3-BOX, or ESP32-S3-BOX-Lite (not currently on the market)
- USB-C cable to connect the ESP32-S3-BOX
- This procedure assumes that this is the first time you are installing ESPHome firmware on the device. If you have previously completed this tutorial and now want to install the latest software version, follow the steps on updating the software on the S3-BOX.
Installing the software onto the ESP32-S3-BOX
Before you can use this device with Home Assistant, you need to install a bit of software on it.
-
These steps apply both to the ESP32-S3-BOX-3 and the ESP32-S3-BOX-3B. Make sure this page is opened in a Chromium-based browser on a desktop. The software installation does not work with a tablet or phone.
-
Select the Connect button below to display a list of available USB devices. Do not connect the ESP32-S3-BOX-3 yet. We want to see the list of available USB devices first, so that it is easier to recognize the ESP device afterward.
-
If your browser does not support web serial, you will see a warning message indicating this instead of a button.
-
To customize the configuration: The configuration files are available on GitHub:
-
-
To connect the ESP32-S3-BOX-3 to your computer, follow these steps:
- In the pop-up window, view the available ports.
- Plug the USB-C cable into the box directly, not into the docking station (not into the blue part) and connect it to your computer.
- Troubleshooting: If your ESP32-S3-BOX-3 does not appear in the list of devices presented by your browser, you need to manually invoke “flash mode”:
- Hold the “boot” button (left side upper button) as you tap the “reset” button (left side lower button).
- After a few seconds, the ESP32-S3-BOX-3 should appear in the list of USB devices presented by your browser.
- Follow the steps until step 3. After selecting the Next button, on the S3-Box-3, tap the “Reset” button again.
- Then, select the blue Connect button again, select the USB device and follow the prompts to configure the Wi-Fi.
- In the pop-up window, there should now appear a new entry. Select this USB serial port and select Connect.
-
Select Install Voice Assistant, then Install.
- Once the installation is complete, select Next.
- Add the ESP32-S3-BOX-3 to your Wi-Fi:
- When prompted, select your network from the list and enter the credentials to your 2.4 GHz Wi-Fi network.
- Select Connect.
- The ESP32-S3-BOX-3 now joined your network. Select Add to Home Assistant.
-
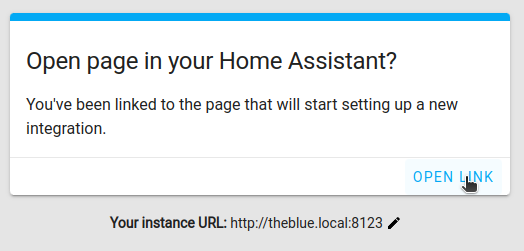
This opens the My link to Home Assistant.
- If you have not used My Home Assistant before, you will need to configure it. If your Home Assistant URL is not accessible on
http://homeassistant.local:8123, replace it with the URL to your Home Assistant instance. - Open the link.
- If you have not used My Home Assistant before, you will need to configure it. If your Home Assistant URL is not accessible on
-
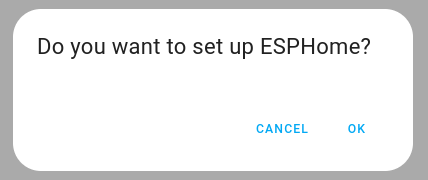
Select OK.
-
To add the newly discovered device, select the ESP32-S3-BOX-3 from the list.
- Add your ESP32-S3-BOX-3 to a room and select Finish.
-
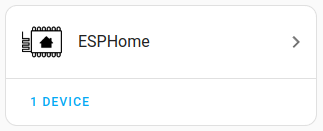
You should now see the ESPHome integration.
-
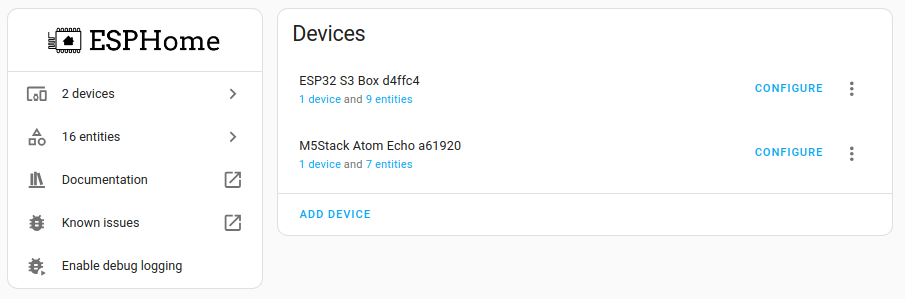
Select the ESPHome integration. Under Devices, you should see the ESP32-S3-BOX listed.
- Your ESP32-S3-BOX is connected to Home Assistant over Wi-Fi. You can now move it to any place in your home with a USB power supply.
-
Make sure this page is opened in a Chromium-based browser on a desktop. The software installation does not work with a tablet or phone.
-
If your browser does not support web serial, you will see a warning message indicating this instead of a button.
-
To customize the configuration: The configuration files are available on GitHub:
-
-
To connect the ESP32-S3-BOX to your computer, follow these steps:
- In the pop-up window, view the available ports.
- Plug the USB-C cable into the ESP32-S3-BOX and connect it to your computer.
-
Select Install Voice Assistant, then Install.
- Once the installation is complete, select Next.
- Add the ESP32-S3-BOX to your Wi-Fi:
- When prompted, select your network from the list and enter the credentials to your 2.4 GHz Wi-Fi network.
- Select Connect.
- The ESP32-S3-BOX now joined your network. Select Add to Home Assistant.
-
This opens the My link to Home Assistant.
- If you have not used My Home Assistant before, you will need to configure it. If your Home Assistant URL is not accessible on
http://homeassistant.local:8123, replace it with the URL to your Home Assistant instance. - Open the link.
- If you have not used My Home Assistant before, you will need to configure it. If your Home Assistant URL is not accessible on
-
Select OK.
-
To add the newly discovered device, select the ESP32-S3-BOX from the list.
- Add your ESP32-S3-BOX to a room and select Finish.
-
You should now see the ESPHome integration.
-
Select the ESPHome integration. Under Devices, you should see the ESP32-S3-BOX listed.
- Your ESP32-S3-BOX is connected to Home Assistant over Wi-Fi. You can now move it to any place in your home with a USB power supply.
-
Make sure this page is opened in a Chromium-based browser on a desktop. The software installation does not work with a tablet or phone.
-
If your browser does not support web serial, you will see a warning message indicating this instead of a button.
-
To customize the configuration: The configuration files are available on GitHub:
-
-
To connect the ESP32-S3-BOX-Lite to your computer, follow these steps:
- In the pop-up window, view the available ports.
- Plug the USB-C cable into the ESP32-S3-BOX-Lite and connect it to your computer.
-
Select Install Voice Assistant, then Install.
- Once the installation is complete, select Next.
- Add the ESP32-S3-BOX-Lite to your Wi-Fi:
- When prompted, select your network from the list and enter the credentials to your 2.4 GHz Wi-Fi network.
- Select Connect.
- The ESP32-S3-BOX-Lite now joined your network. Select Add to Home Assistant.
-
This opens the My link to Home Assistant.
- If you have not used My Home Assistant before, you will need to configure it. If your Home Assistant URL is not accessible on
http://homeassistant.local:8123, replace it with the URL to your Home Assistant instance. - Open the link.
- If you have not used My Home Assistant before, you will need to configure it. If your Home Assistant URL is not accessible on
-
Select OK.
-
To add the newly discovered device, select the ESP32-S3-BOX-Lite from the list.
- Add your ESP32-S3-BOX-Lite to a room and select Finish.
-
You should now see the ESPHome integration.
-
Select the ESPHome integration. Under Devices, you should see the ESP32-S3-BOX-Lite listed.
- Your ESP32-S3-BOX-Lite is connected to Home Assistant over Wi-Fi. You can now move it to any place in your home with a USB power supply.
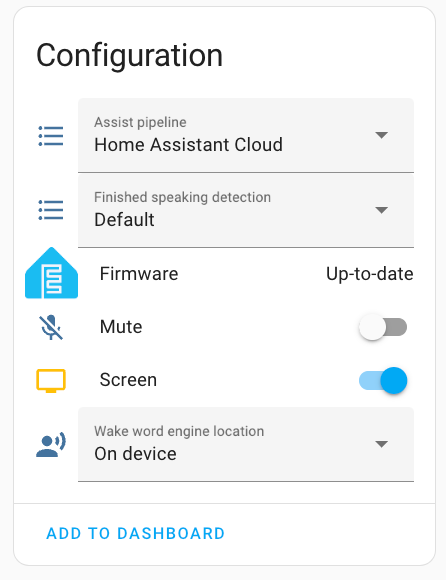
Checking wake word settings
-
Make sure your assistant has wake word enabled, using “OK Nabu”.
-
Under Devices, on the ESP32-S3-BOX* entry, select Device to open the device page.
-
Check the device settings:
-
If you want, you can process the wake word on the ESP32-S3 device, rather than on your Home Assistant server. (The server is the device where Home Assistant is installed, for example on Home Assistant Green):
-
Under Wake word engine location, select On device, if you want your wake word to be processed on the device itself, and not in Home Assistant.
- Local processing is faster.
- The wake word is now Okay Nabu.
-
-
If you chose on-device wake word, but you do not want to use Okay Nabu, you can change the on-device wake word.
- Currently, Hey Jarvis or Alexa are the supported alternatives.
- To change your wake word, follow the steps in Customizing the S3-BOX-3 with on-device wake words.
-
Congratulations! You can now voice control Home Assistant via a ESP32 device with a display. Now give some commands.
Controlling Home Assistant
- Say your wake word. For this tutorial, use “OK Nabu”.
- Say a supported voice command. For example, Turn on the light.
- Once the intent has been processed, the LED lights up in green and Home Assistant confirms the action.
- Make sure you’re using the area name exactly as you defined it in Home Assistant.
- You can also ask a question, such as
- Is the front door locked?
- Which lights are on in the living room?
- Once the intent has been processed, the LED lights up in green and Home Assistant confirms the action.
- Your command is not supported? Add your own commands using a sentence trigger.
Turning off microphone or screen
- If you do not want to Assist to listen to you for a while, you can turn off the microphone.
-
Go to Settings > Devices & services and select the ESPHome integration.
- Under ESP32-S3-BOX-3, select 1 device.
- Enable Mute.
- The screen of the ESP32-S3-BOX-3 will turn off, too.

-
- If you want to just use the wake word, but do not want to use the screen, you can turn it off.
-
Go to Settings > Devices & services and select the ESPHome integration.
- Under ESP32-S3-BOX-3, select 1 device.
- Disable Screen.

-
Updating the software on the S3-BOX
To update the software on your S3-BOX, follow the steps below that reflect your setup.
-
Option 1: You have Home Assistant 2024.7 or later, and have not manually altered your ESPHome configuration for the S3-BOX:
- Once an update is available, you will receive an update notification, just like any other update.
- To install the precompiled new firmware directly on your box, make sure the S3-BOX is connected to your network, and under ESP32 S3 BOX…Firmware, select Install.
-
Option 2: You have Home Assistant 2024.6 or older, and have not manually altered your ESPHome configuration for the S3-BOX:
- Follow steps 1-3 of the procedure on installing the software onto the S3-BOX.
- This installs the latest, precompiled firmware for your S3-BOX.
- Follow steps 1-3 of the procedure on installing the software onto the S3-BOX.
-
Option 3: You have manually changed the configuration file for your S3-BOX:
- You need to compile your own firmware. To do so, either:
- Use the ESPHome dashboard app within Home Assistant. While the easiest option, it tends to be the slowest and may fail, particularly on older systems or on systems with limited memory/CPU resources.
- Follow the steps in the ESPHome documentation and use a desktop-class system to compile and install the firmware. Initial setup is more complex, but the process is significantly faster and more reliable.
- You need to compile your own firmware. To do so, either: