Blog
Home Assistant Podcast #5
We cover off AppDaemon/HADashboard and all the fun stuff introduced in 0.49 and 0.50.
Show notes available on the Home Assistant Podcast Website
0.50: Voice control, History improvements, and Xiaomi
 Paulus Schoutsen
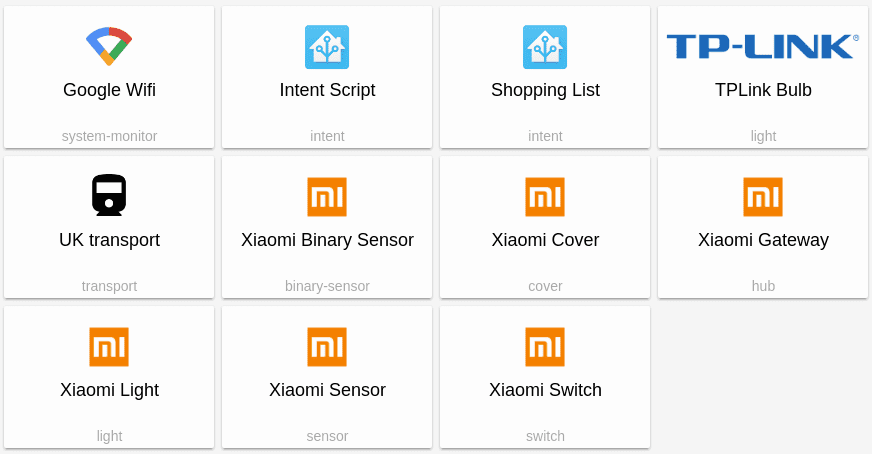
Last Wednesday we released Hass.io, an operating system to take care of all the updating hassles that come with running home automation at home and so much more. This is a major milestone for Home Assistant as it is our first step to offering a fully integrated solution using a bring your own hardware approach.
The launch has been crazy successful. The 20 minute introduction video by BRUHAutomation already has 12.5k views in just 4 days with no less than 150 comments.
Hass.io will be a great foundation for bigger and better integrated features. Stay tuned.
Adding the power of voice to integrations
But enough about Hass.io, let’s not forget about Home Assistant. This release has completely revamped the way how we deal with voice integrations. We turned Home Assistant into a platform to write voice apps, no matter where the processing of the voice happens. This can be done by Alexa, Google Assistant or in the Home Assistant user interface.
We are super excited about the new functionality and hope that it will trigger a new type of applications and systems to be built on top of Home Assistant. This release includes a shopping list to show the new functionality. As a user you can add any item to the shopping list with your voice and also ask what is on your shopping list.
# Example configuration.yaml entry
shopping_list:
To make testing these applications easier, we’ve updated the conversation component. The component will now allow sentences to be configured that hook directly into the new voice functionality. Combined with the new interface it will allow for some great interactions! Check out the developer docs for more information.
History improvements
@OverloadUT has been recently spending a lot of time on optimizing the history database queries. This release includes PR #8632, the first in a list of improvements that he is working on. This PR greatly improves requests for single entities by using an optimized query for this use case.
The performance change in some of his tests shows this change to be about 300x faster (30 seconds to 0.1 seconds!) (There is no theoretical upper limit due to the issue with multi-entity queries getting worse the longer the current recorder run has been going.)
Xiaomi integration
Yes, it has happened! After being in beta for a while, the Xiaomi support is now available to all. @danielhiversen did an amazing job and we now support sensors, switches, lights and covers.
Velbus integration
Another awesome integration is that of the Velbus home automation system which has been contributed by @thomasdelaet. It integrates their sensors, covers, fans, lights and switches.
Manual alarm with MQTT control
A new version of the manual alarm component is now available with full MQTT control thanks to @colinodell. Using this you can build your own control panel to remotely arm/disarm the alarm. For example, using a Raspberry Pi to create an alarm.
New Platforms
- Initial support for Google Wifi/OnHub (@fronzbot - #8485) (sensor.google_wifi docs) (new-platform)
- Xiaomi gw support (@danielhiversen - #8555) (xiaomi docs) (binary_sensor.xiaomi docs) (cover.xiaomi docs) (light.xiaomi docs) (sensor.xiaomi docs) (switch.xiaomi docs) (new-platform)
- Add Intent component (@balloob - #8434) (alexa docs) (intent_script docs) (shopping_list docs) (snips docs) (breaking change) (new-platform)
- Manual alarm with MQTT control (@colinodell - #8257) (alarm_control_panel.manual_mqtt docs) (new-platform)
- Add component Light TPLink (@gollo - #8643) (light.tplink docs) (new-platform)
- Velbus (@thomasdelaet - #8076) (velbus docs) (binary_sensor.velbus docs) (light.velbus docs) (new-platform)
- Add uk_transport component. (@robmarkcole - #8600) (sensor.uk_transport docs) (new-platform)
Release 0.50.2 - July 31
Straight to 0.50.2. We released 0.50 as 0.50.1 due to an upload error to PyPi.
- Fix TP-Link light brightness issue #8744. (@gollo - #8755)
- Fix typo in script error (@n8henrie - #8754)
- Fix tradfri error spam (@MartinHjelmare - #8738) (light.tradfri docs)
- Media Player - Pioneer: Suppress exception if host is not available (fixes #8684) (@fabaff - #8732) (media_player.pioneer docs)
- Telegram Bot: Retry set_webhook up to three times, reduce timeout to 5s again (@azogue - #8716) (telegram_bot.webhooks docs)
- Fixed sensor issue with Google Wifi routers in bridge mode (@fronzbot - #8710) (sensor.google_wifi docs)
- Fix alexa cards (@balloob - #8708) (alexa docs)
- Fix Kodi reconnection after websocket disconnect (@armills - #8704) (media_player.kodi docs)
- Move I/O outside of properties for light/tplink platform (@gollo - #8699) (light.tplink docs) (new-platform)
- Correctly discover GE Fan Controllers (@armills - #8682) (zwave docs)
- Fix Z-Wave barrier discovery for new API (@armills - #8706) (zwave docs) (cover.zwave docs)
If you need help…
…don’t hesitate to use our very active forums or join us for a little chat. The release notes have comments enabled but it’s preferred if you use the former communication channels. Thanks.
Reporting Issues
Experiencing issues introduced by this release? Please report them in our issue tracker. Make sure to fill in all fields of the issue template.
Read on →Talk Python interview with Paulus Schoutsen
Join Michael Kennedy at the Talk Python podcast for an hour long interview with Paulus Schoutsen, the founder of Home Assistant, as they discuss the release of Hass.io and the vision for the perfect home automation.
Visit the episode page on Talk PythonIntroducing Hass.io
TL;DR: Today we’re introducing Hass.io. Hass.io is an operating system that will take care of installing and updating Home Assistant, is managed from the Home Assistant UI, allows creating/restoring snapshots of your configuration and can easily be extended using Hass.io add-ons including Google Assistant and Let’s Encrypt.
Home Assistant is 2 months away from being 4 years old. In that time the Internet of Things has really taken off and we’ve seen many new devices and services. We saw the introduction of voice assistants like Google Home and new standards like Apple HomeKit.
Some things have been supported natively in Home Assistant, others have been integrated into Home Assistant via third party applications. All these moving parts caused our users to spend a lot of time maintaining their systems and applications instead of automating their homes.
So we decided to take a step back from day-to-day Home Assistant development and see if we could offer a solution that makes updating a breeze for our users. A solution that you can flash to your Raspberry Pi and no longer worry about. A solution that would still be local first and respect the user’s privacy.
And this is how Pascal Vizeli came up with Hass.io, an operating system based on ResinOS and Docker. Hass.io will take care of installing and updating Home Assistant, is managed from the Home Assistant UI, allows taking/restoring snapshots of your configuration and can easily be extended using Hass.io add-ons.
 Hass.io dashboard
To install add-ons, a user can browse the built-in add-on store and install, configure and update any available application. Want to turn your device into a Google Assistant or make your configuration accessible via Samba/Windows networking? Both are a couple of clicks away! (Video demo - 38s, no audio)
At launch we have included a couple of built-in add-ons like Google Assistant, Let’s Encrypt and Duck DNS. Besides our internal add-ons, it is also possible to create and share your own add-on repositories. During our beta period we’ve already seen some great add-ons being shared: Homebridge, InfluxDB, HASS Configurator and AppDaemon.
As we strongly believe in the openness of technology, we are releasing Hass.io as open source under the Apache 2.0 license. That way any user can make sure that the code that runs in their homes is secure and safe.
Some frequently asked questions are answered below in the read more section.
Hass.io has been built by Pascal Vizeli, the UI has been made by Paulus Schoutsen and BRUHAutomation made the introduction video. Big thanks to Resin.io for building ResinOS and helping us get started with it. Also a big thanks to the community for early feedback, helping out with the documentation and add-on development ❤️
Read on →Home Assistant Podcast #4
We quickly cover off a few community items including the move to Discord and Carlo talks with Phil about his use of Floorplan.
0.49: Themes 🎨, kiosk mode and Prometheus.io
WE HAVE THEMES 🎨👩🎨
Our already amazing frontend just got even more amazing thanks to @andrey-git. With the new theme support you can be in control of the primary color, accent color and a whole bunch more.
You can specify themes using new configuration options under frontend.
frontend:
  themes:
    green:
      primary-color: "#6CA518"
Once a theme is defined, use the new frontend service frontend.set_theme to activate it. More information in the docs.
 Screenshot of a green dashboard
Not all parts of the user interface are themable yet. Expect improvements in future releases.
Kiosk mode
Another great new improvement for the frontend is the addition of a kiosk mode. When the frontend is viewed in kiosk mode, the tab bar will be hidden.
To activate kiosk mode, navigate to https://hass.example.com:8123/kiosk/group.living_room_view. Note that for default_view the url is just https://hass.example.com:8123/kiosk
This feature has also been brought to you by @Andrey-git! Big shout out to him for his continuous efforts to bring Home Assistant to the next level.
New Platforms
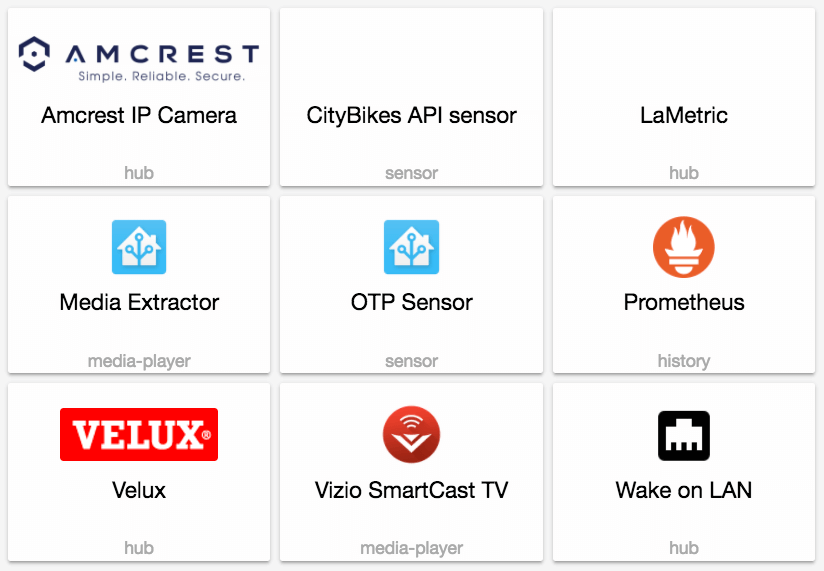
- Add london_underground (@robmarkcole - #8272) (sensor.london_underground docs) (new-platform)
- Add citybikes platform (@aronsky - #8202) (sensor.citybikes docs) (new-platform)
- Add One-Time Password sensor (OTP) (@postlund - #8332) (sensor.otp docs) (new-platform)
- Add component for xiaomi robot vacuum (switch.xiaomi_vacuum) (@rytilahti - #7913) (switch.xiaomi_vacuum docs) (new-platform)
- LaMetric platform and notify module (@open-homeautomation - #8230) (lametric docs) (notify.lametric docs) (new-platform)
- New component to connect to VELUX KLF 200 Interface (@Julius2342 - #8203) (velux docs) (scene.velux docs) (new-platform)
- New service
send_magic_packetwith new componentwake_on_lan(@azogue - #8397) (wake_on_lan docs) (new-platform) - Add support for Prometheus (@rcloran - #8211) (prometheus docs) (new-platform)
- Refactored Amcrest to use central hub component (@tchellomello - #8184) (amcrest docs) (camera.amcrest docs) (sensor.amcrest docs) (breaking change) (new-platform)
- Added media_extractor service (@minchik - #8369) (media_extractor docs) (new-platform)
- Vizio SmartCast support (@vkorn - #8260) (media_player.vizio docs) (new-platform)
Release 0.49.1 - July 24
- Fix TP-Link device tracker regression since 0.49 (@maikelwever - #8497) (device_tracker.tplink docs)
- prometheus: Convert fahrenheit to celsius (@rcloran - #8511) (prometheus docs)
- Update dlib_face_detect.py (@pvizeli - #8516) (image_processing.dlib_face_detect docs)
- Realfix for dlib (@pvizeli - #8517) (image_processing.dlib_face_detect docs)
- Attach the
chat_idfor a callback query from a chat group (fixes #8461) (@azogue - #8523) (telegram_bot docs) - Fix support for multiple Apple TVs (@postlund - #8539)
- LIFX: assume default features for unknown products (@amelchio - #8553) (light.lifx docs)
- Fix broken status update for lighting4 devices (@ypollart - #8543) (rfxtrx docs) (binary_sensor.rfxtrx docs)
- zha: Update to bellows 0.3.4 (@rcloran - #8594) (zha docs)
- Fix STATION_SCHEMA validation on longitude (@clkao - #8610) (sensor.citybikes docs)
- Bumped Amcrest version (@tchellomello - #8624) (amcrest docs)
- Check if /dev/input/by-id exists (@schaal - #8601) (keyboard_remote docs)
- Tado Fix #8606 (@filcole - #8621) (climate.tado docs)
- prometheus: Fix zwave battery level (@rcloran - #8615) (prometheus docs)
- ubus: Make multiple instances work again (@glance- - #8571) (device_tracker.ubus docs)
- Properly slugify switch.flux update service name (@jawilson - #8545) (switch.flux docs)
If you need help…
…don’t hesitate to use our very active forums or join us for a little chat. The release notes have comments enabled but it’s preferred if you use the former communication channels. Thanks.
Reporting Issues
Experiencing issues introduced by this release? Please report them in our issue tracker. Make sure to fill in all fields of the issue template.
Read on →Home Assistant Podcast #3
The third episode of the Home Assistant Podcast is out. Paulus joins to talk about some stats and the release of 0.47 and Petar tells all about his Floorplan project for Home Assistant.
Home Assistant is moving to Discord
Communities grow, things change. We understand that some people don’t like change, and that is why we are trying to make our chat transition from Gitter to Discord as smooth as possible for everyone. Join us now with just a click!
Click Read on → to find out more about why we’re moving.
0.48: Snips.ai, Shiftr.io and a massive History query speed up
It’s time for a great new release!
We’ve started the process of upgrading our frontend technology. If you notice something not working that did work before, please open an issue.
Pascal has added a new option to Home Assistant core to set a list of whitelisted folders that Home Assistant can read from. When a component allows to send files (like Telegram), it will only be allowed to send files from those directories. The only default whitelisted folder is the public <config>/www directory.
Z-Wave will, as announced in the last release, be defaulting to generate the new entity ids. More info in the blog post. You can still opt-in for the old style.
zwave:
  new_entity_ids: false
Big speed up in querying the history
Thanks to the work by @cmsimike in #8255 you’ll see a significant speed up when using the history view. In his local tests queries went from 1 minute to 90ms! ⚡️
Snips.ai component
Snips has contributed a component to integrate with their Snips.ai local voice assistant. This will allow you to hook a speaker and a microphone into your Raspberry Pi and make your own local Amazon Echo quickly. See the docs for further instructions.
Also a shoutout to @michaelarnauts for keeping an eye on our Docker build and once again reducing the file size 👍
Release 0.48.1 - July 5
- Fix arlo sensors. (@bergemalm - #8333) (sensor.arlo docs)
- API POST no longer marks the number zero as invalid (@azogue - #8324) (api docs)
- Fix Snips json schema (@adrienball - #8317) (snips docs)
- Fix pathlib resolve (@pvizeli - #8311)
- Fix harmony (@balloob - #8302) (remote.harmony docs)
- Fix Arlo startup crash (fixes #8288) (@fabaff - #8290) (camera.arlo docs)
- Temporary fix for the client_id generation (fixes #8315) (@fabaff - #8336) (mqtt docs)
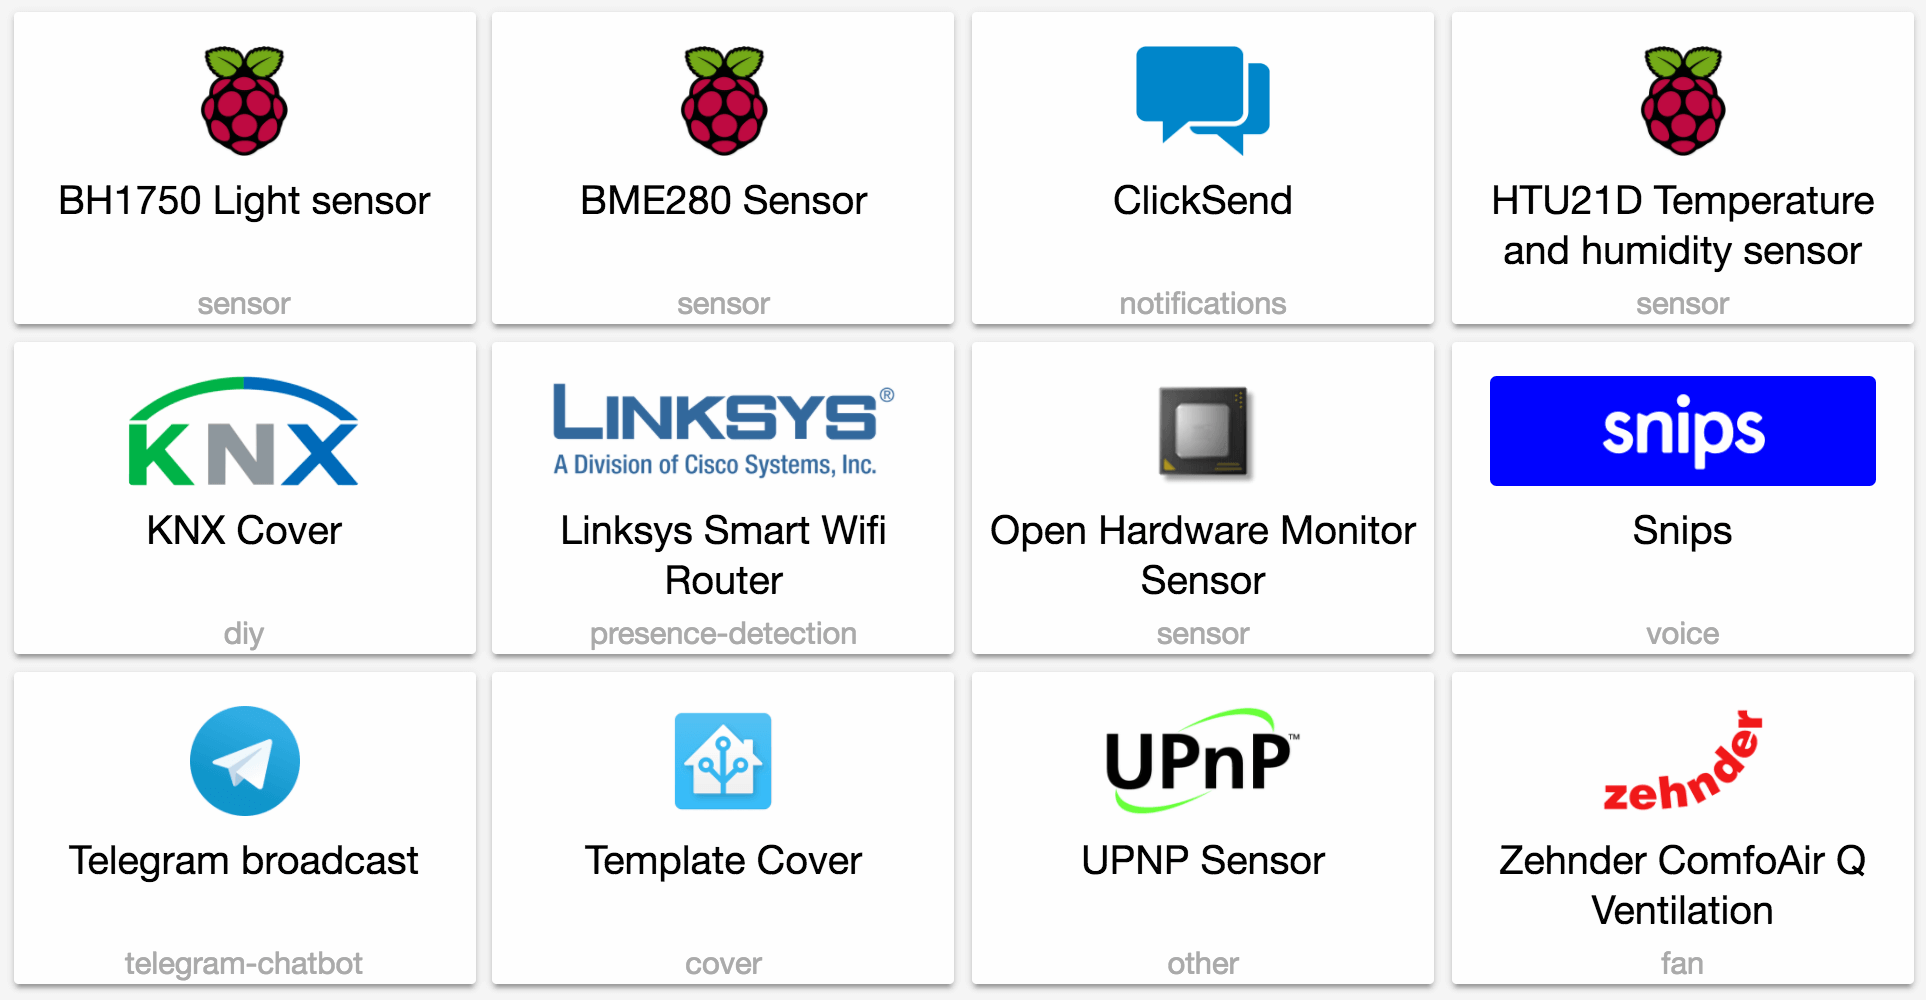
New Platforms
- Add initial support for Shiftr.io (@fabaff - #7974) (shiftr docs) (new-platform)
- Upnp properties (@dgomes - #8067) (upnp docs) (sensor.upnp docs) (new-platform)
- Add support for Insteon FanLinc fan (@jawilson - #6959) (insteon_local docs) (fan.insteon_local docs) (new-platform)
- add knx cover support (@tiktok7 - #7997) (knx docs) (cover.knx docs) (new-platform)
- Add I2c BME280 temperature, humidity and pressure sensor for Raspberry Pi (@azogue - #7989) (sensor.bme280 docs) (new-platform)
- Add I2c HTU21D temperature and humidity sensor for Raspberry Pi (@azogue - #8049) (sensor.htu21d docs) (new-platform)
- Add new BH1750 light level sensor (@azogue - #8050) (sensor.bh1750 docs) (new-platform)
- Rfxtrx binary sensor (@ypollart - #6794) (rfxtrx docs) (binary_sensor.rfxtrx docs) (new-platform)
- Add ClickSend notify service. (@omarusman - #8135) (notify.clicksend docs) (new-platform)
- Add device tracker for Linksys Smart Wifi devices (@mortenlj - #8144) (device_tracker.linksys_smart docs) (new-platform)
- Openhardwaremonitor (@depl0y - #8056) (sensor.openhardwaremonitor docs) (new-platform)
- WIP: Verisure app api (@persandstrom - #7394) (verisure docs) (alarm_control_panel.verisure docs) (binary_sensor.verisure docs) (sensor.verisure docs) (switch.verisure docs) (new-platform)
- telegram_bot platform to only send messages (@azogue - #8186) (new-platform)
- Comfoconnect fan component (@michaelarnauts - #8073) (comfoconnect docs) (fan.comfoconnect docs) (sensor.comfoconnect docs) (new-platform)
- Implement templates for covers (@PhracturedBlue - #8100) (cover.template docs) (new-platform)
- Snips ASR and NLU component (@michaelfester - #8156) (snips docs) (new-platform)
If you need help…
…don’t hesitate to use our very active forums or join us for a little chat. The release notes have comments enabled but it’s preferred if you use the former communication channels. Thanks.
Reporting Issues
Experiencing issues introduced by this release? Please report them in our issue tracker. Make sure to fill in all fields of the issue template.
Read on →[Update: fixed] A frank and serious warning about X
Update June 21: Senic has removed our name from their materials and have issued an apology. We wish them best of luck with the launch of COVI.
Update June 28: Removed the brand name from the title to reduce the search ranking.
Original post:
Read on →