ODROID
Install Home Assistant Operating System
Follow this guide if you want to get started with Home Assistant easily or if you have little to no Linux experience.
Suggested hardware
You will need a few things to get started with installing Home Assistant. The links below lead to Ameridroid. If you’re not in the US, you should be able to find these items in web stores in your country.
To get started, we suggest the ODROID-N2+, the board that powers our Home Assistant Blue, or the ODROID-M1.
If unavailable, we also recommend the ODROID-C4.
Home Assistant bundles (US market):
The bundles come with Home Assistant pre-installed.
- ODROID-N2+: 2 GB RAM / 16 GB eMMC
- ODROID-N2+: 4 GB RAM / 64 GB eMMC
- ODROID-M1: 4 GB RAM / 256 GB NVMe / 16 GB µSD or 16 GB eMMC
- ODROID-M1: 8 GB RAM / 256 GB NVMe / 16 GB µSD or 16 GB eMMC
- ODROID-M1: 8 GB RAM / 1 TB NVMe / 64 GB eMMC
Variants without pre-installed Home Assistant:
Related components:
These are affiliated links. We get commissions for purchases made through links in this post.
Write the image to your boot medium
-
Notice: This procedure will write the Home Assistant Operating SystemHome Assistant OS, the Home Assistant Operating System, is an embedded, minimalistic, operating system designed to run the Home Assistant ecosystem on single board computers (like the Raspberry Pi) or Virtual Machines. It includes Home Assistant Core, the Home Assistant Supervisor, and supports apps. Home Assistant Supervisor keeps it up to date, removing the need for you to manage an operating system. Home Assistant Operating System is the recommended installation type for most users. onto your device.
- This means you will lose all the data as well as the previously installed operating system.
- Back up your data before continuing with the next step.
-
Attach the Home Assistant boot medium (eMMC module or SD card) to your computer.
If you are using ODROID-M1, note that booting from NVMe is not supported. If you want to boot from eMMC, update the firmware before installing the image.
If you are using a Home Assistant Blue or ODROID-N2+, you can attach your device directly.
If you are using an ODROID-M1S, you need to follow this guide to boot your device into UMS mode.
-
Download and start Balena Etcher. You may need to run it with administrator privileges on Windows.
-
Download the image to your computer.
- Copy the URL for the image.
- If there are multiple links below, make sure to select the correct link for your version of ODROID.
https://github.com/home-assistant/operating-system/releases/download/17.1/haos_odroid-n2-17.1.img.xzhttps://github.com/home-assistant/operating-system/releases/download/17.1/haos_odroid-n2-17.1.img.xzhttps://github.com/home-assistant/operating-system/releases/download/17.1/haos_odroid-c2-17.1.img.xzhttps://github.com/home-assistant/operating-system/releases/download/17.1/haos_odroid-c4-17.1.img.xzhttps://github.com/home-assistant/operating-system/releases/download/17.1/haos_odroid-m1-17.1.img.xzhttps://github.com/home-assistant/operating-system/releases/download/17.1/haos_odroid-m1s-17.1.img.xz*Select and copy the URL or use the "copy" button that appears when you hover it.*- Paste the URL into your browser to start the download.
- Extract the file you just downloaded.
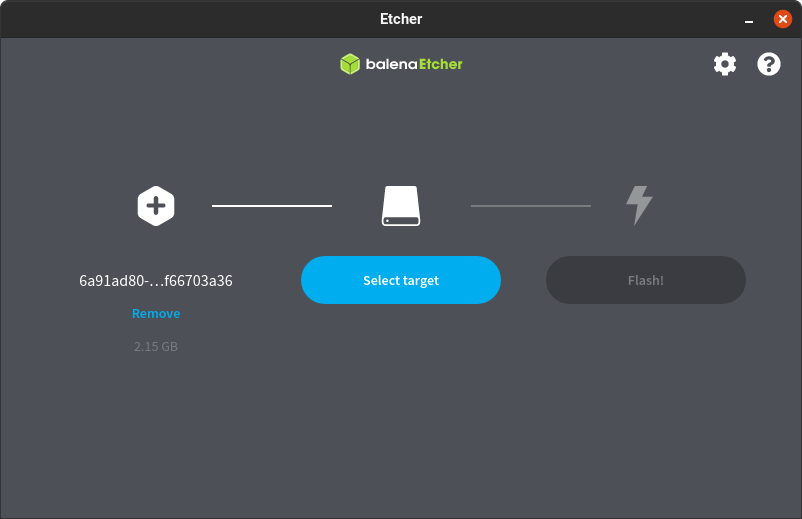
- Select Flash from file and select the image you just extracted.
- Do not use Flash from URL. It does not work on some systems.
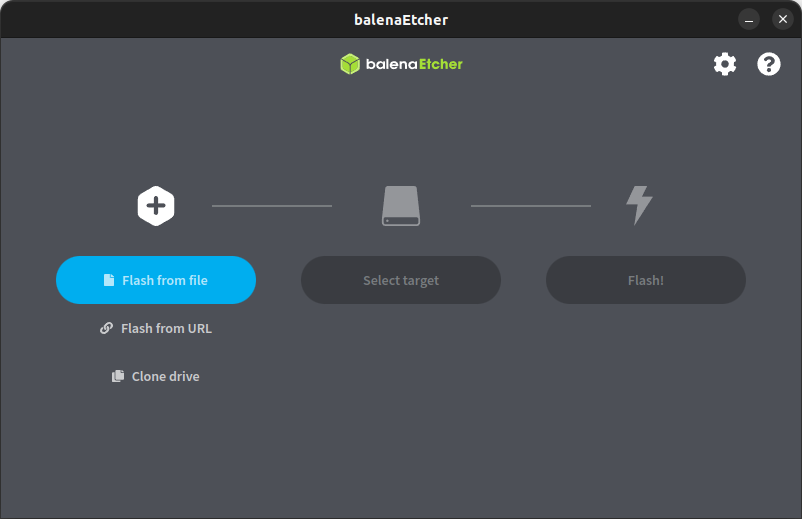
- Do not use Flash from URL. It does not work on some systems.
-
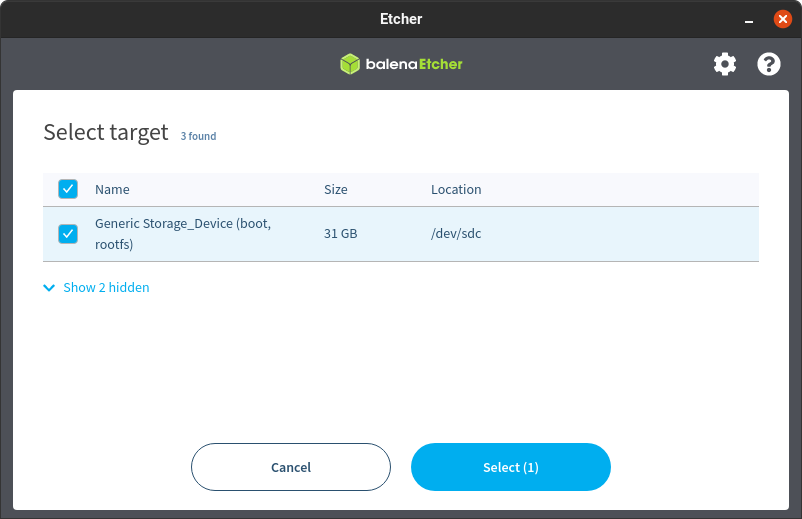
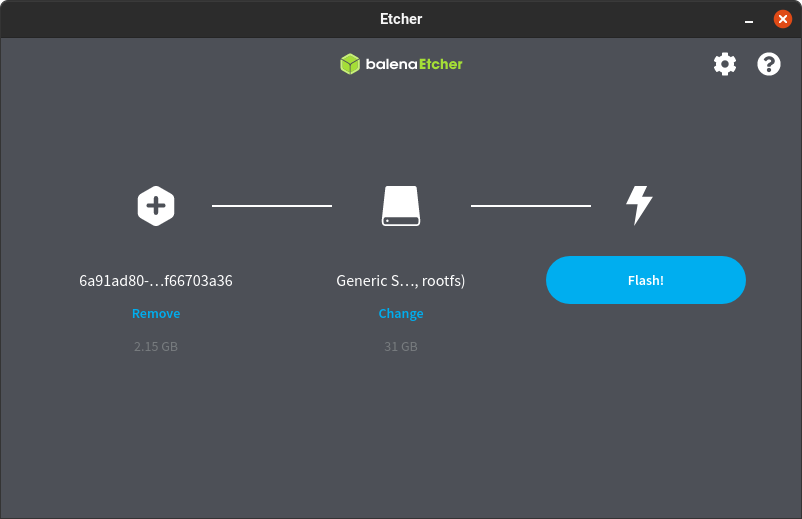
Select target.
- Select the boot medium (eMMC module or SD card) you want to use for your installation.
- Select Flash! to start writing the image.
- If the operation fails, decompress the .xz file and try again.
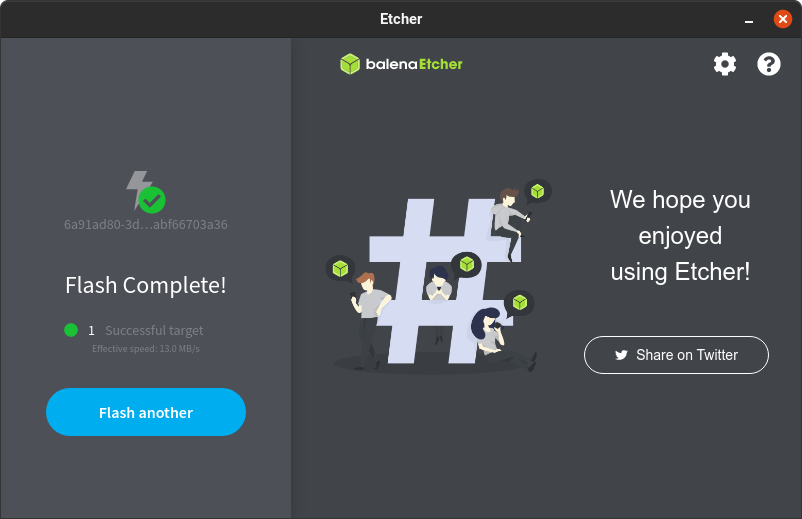
- When Balena Etcher has finished writing the image, you will see a confirmation.
- If the operation fails, decompress the .xz file and try again.
Start up your ODROID
-
Insert the boot medium (eMMC module or SD card) you just created.
-
Plug in an Ethernet cable that is connected to the network and to the internet and power the system on.
- Note: Internet is required because the newly installed Home Assistant OS does not contain all Home Assistant components yet. It downloads the latest version of Home Assistant Core on first start.
-
In the browser of your desktop system, within a few minutes you will be able to reach your new Home Assistant at homeassistant.local:8123.
Note If you are running an older Windows version or have a stricter network configuration, you might need to access Home Assistant at homeassistant:8123 or
http://X.X.X.X:8123(replace X.X.X.X with your ODROID’s IP address).With the Home Assistant Operating System installed and accessible, you can continue with onboarding.
Onboarding Flashing an ODROID-N2+
Home Assistant can be flashed to an ODROID-N2+ by connecting the device directly to your computer via the USB-OTG connection on the front of the board. The device contains the Petitboot bootloader, which allows the ODROID-N2+ storage to show up as it were a USB drive.
All these instructions work the same for the ODROID-N2 (non-plus version).
What you will need
To flash your eMMC using Petitboot and OTG-USB, you will need the following items:
- HDMI cable and monitor
- USB keyboard
- USB 2.0 to micro-USB cable
- If your board came in a Home Assistant Blue: No.2 hex key to open the case
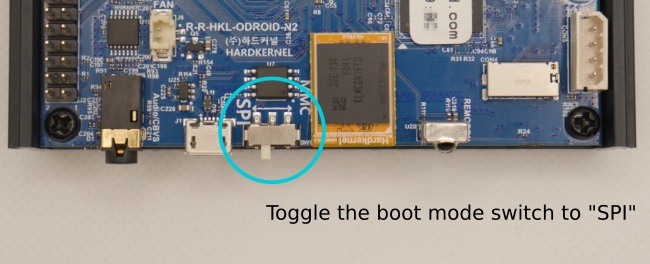
Enabling SPI boot mode
To enable the SPI boot mode:
-
Power off the ODROID-N2+ by unplugging the power cable.
-
Remove the case.
-
Locate the toggle for boot mode and switch it from MMC to SPI.
-
Connect the ODROID-N2+ directly to your computer via the USB-OTG port located on the front of the board.
-
Connect a USB keyboard and a monitor (using HDMI) to your ODROID-N2+.
-
Plug in the power cable to power on the ODROID-N2+.
Enabling USB drive mode
After The ODROID-N2+ is set to SPI boot mode and powered on, it boots into a terminal. To enable the USB drive mode:
-
Select
Exit to shellfrom the menu.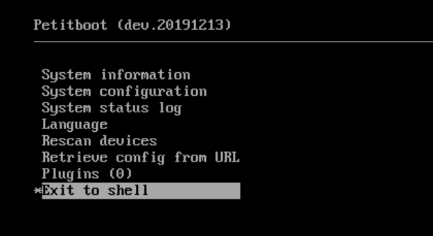
Note When using the command line, it may return the following message:
can't access tty; job control turned off.You can safely ignore this message and proceed with the installation-
Use the following command at the console to confirm the storage device node:
ls /dev/mmc* -
Set the storage device on the ODROID-N2+ as a mass storage device using the
umscommand (USB Mass storage mode). This will configure the ODROID-N2+ and OTG to act as a memory card reader:ums /dev/mmcblk0
Flashing Home Assistant
-
Connect the ODROID-N2+ to your PC via the micro-USB port at the front of the ODROID-N2+.
-
When the ODROID-N2 is recognized as a USB connected storage device, you can flash the eMMC with Etcher.
- Use the latest stable version of Home Assistant OS for the ODROID-N2+ (haos_odroid-n2-17.1.img.xz).
- In Balena, use Flash from file. Flash from URL does not work on all systems.
-
When the flash process is complete, disconnect the ODROID-N2+ from your PC.
- Remove the power cable.
- Remove the USB and HDMI cables.
- Make sure to toggle the boot mode switch back to MMC.
-
Put the ODROID back in its case.
-
Connect your ODROID-N2+ to your network with an Ethernet cable, make sure there is internet access, and plug in power.
-
If your router supports mDNS, you can reach your installation at
http://homeassistant.local:8123.- If your network doesn’t support mDNS, you’ll have to use the IP address of your ODROID-N2+ instead of
homeassistant.local. For example,http://192.168.0.9:8123. - You should be able to find the IP address of your ODROID-N2+ from the admin interface of your router.
- If your network doesn’t support mDNS, you’ll have to use the IP address of your ODROID-N2+ instead of
-
Continue with onboarding.
Flashing an ODROID-M1S
Home Assistant can be flashed to an ODROID-M1S by connecting the device directly to your computer via the USB-OTG connection on the front of the board. Unlike other ODROID boards, the M1S does not have a socket for an optional eMMC module. It also does not have a separate flash chip that holds a dedicated bootloader. Instead, the M1S has a build-in 64GB eMMC soldered directly on the board that holds a bootloader by default. This guide will show you how to install the Home Assistant Operating SystemHome Assistant OS, the Home Assistant Operating System, is an embedded, minimalistic, operating system designed to run the Home Assistant ecosystem on single board computers (like the Raspberry Pi) or Virtual Machines. It includes Home Assistant Core, the Home Assistant Supervisor, and supports apps. Home Assistant Supervisor keeps it up to date, removing the need for you to manage an operating system. Home Assistant Operating System is the recommended installation type for most users. to the built-in eMMC.
Warning: Installing Home Assistant OS replaces the firmware and SPL on the eMMC with the mainline version provided by the Home Assistant OS. As a result, it is not possible to use the SD card with the EMMC2UMS image anymore, because the mainline SPL is not compatible with U-Boot in the EMMC2UMS image at this time (February 2024). This does not pose any problem for standard use, just makes it more complicated in case you want to return to the Hardkernel-provided OS (see HK Recovery).
What you will need
To flash your eMMC using USB-OTG, you will need the following items:
- A small SD card
- Another computer
- USB 2.0 to micro-USB cable
- the special Hardkernel eMMC-to-USB-mass-storage image
Boot into mass-storage mode
(These steps are identical to the official Hardkernel wiki page.)
- Download ODROID-M1S_EMMC2UMS.img.
- Use balena Etcher or another tool to flash the UMS utility onto an SD card.
- Use Flash from file. Flash from URL does not work on all systems. (balena Etcher will complain that something went wrong during flashing. You can ignore this message)
- Plug-in that SD card to your ODROID-M1S and boot it.
Flashing Home Assistant M1S
- Download the latest stable version of Home Assistant OS for the ODROID-M1S.
- Apart from the HAOS image to flash (M1S instead of N2+ version), you can follow the N2+ step-by-step flashing guide HERE.
HK Recovery
If you want to restore your M1S back into Hardkernel’s initial state, you will have to restore the HK’s bootloader. A reliable way of reflashing the eMMC with an operating system of your choice is to use Home Assistant OS to flash the EMMC2UMS image which turns the ODROID-M1S into USB Mass Storage device. Once you have flashed the EMMC2UMS image, you can flash any OS again. You will need a micro USB cable to connect ODROID-M1S to PC.
Note: This commands will render your current Home Assistant OS installation unbootable!
Use the local terminal (HDMI/keyboard) to access the system console. On the Home Assistant CLI (command line), enter
loginto enter the root shell and usecurlto download an image andddit to the eMMC block device:curl -L -A "Mozilla/5.0" https://dn.odroid.com/RK3566/ODROID-M1S/Installer/ODROID-M1S_EMMC2UMS.img | sudo dd of=/dev/mmcblk0 bs=4M status=progress conv=fsyncThis way, the device will start in the UMS mode on the next boot with the SD card removed. Follow the Install over USB from PC to install a different operating system.
Install Home Assistant Container
These below instructions are for an installation of Home Assistant ContainerHome Assistant Container is a standalone container-based installation of Home Assistant Core. Any OCI compatible runtime can be used, but the documentation focus is on Docker. [Learn more] running in your own container environment, which you manage yourself. Any OCI compatible runtime can be used, however this guide will focus on installing it with Docker.
Note This installation type does not have access to apps. If you want to use apps, you need to use another installation type. The recommended type is Home Assistant Operating SystemHome Assistant OS, the Home Assistant Operating System, is an embedded, minimalistic, operating system designed to run the Home Assistant ecosystem on single board computers (like the Raspberry Pi) or Virtual Machines. It includes Home Assistant Core, the Home Assistant Supervisor, and supports apps. Home Assistant Supervisor keeps it up to date, removing the need for you to manage an operating system. Home Assistant Operating System is the recommended installation type for most users.. Checkout the overview table of installation types to see the differences.
Important Prerequisites This guide assumes that you already have an operating system setup and a container runtime installed (like Docker).
If you are using Docker, you need Docker Engine 23.0.0 or later. Docker Desktop will not work; you must use Docker Engine.
Platform installation
Installation with Docker is straightforward. Adjust the following command so that:
-
/PATH_TO_YOUR_CONFIGpoints at the folder where you want to store your configuration and run it. Make sure that you keep the:/configpart. -
MY_TIME_ZONEis a tz database name, likeTZ=America/Los_Angeles. -
D-Bus is optional but required if you plan to use the Bluetooth integration.
docker run -d \
  --name homeassistant \
  --privileged \
  --restart=unless-stopped \
  -e TZ=MY_TIME_ZONE \
  -v /PATH_TO_YOUR_CONFIG:/config \
  -v /run/dbus:/run/dbus:ro \
  --network=host \
  ghcr.io/home-assistant/home-assistant:stable
# if this returns "Image is up to date" then you can stop here docker pull ghcr.io/home-assistant/home-assistant:stable# stop the running container docker stop homeassistant# remove it from Docker's list of containers docker rm homeassistant# finally, start a new one docker run -d \ --name homeassistant \ --restart=unless-stopped \ --privileged \ -e TZ=MY_TIME_ZONE \ -v /PATH_TO_YOUR_CONFIG:/config \ -v /run/dbus:/run/dbus:ro \ --network=host \ ghcr.io/home-assistant/home-assistant:stableOnce the Home Assistant Container is running Home Assistant should be accessible using
http://<host>:8123(replacewith the hostname or IP of the system). You can continue with onboarding. Onboarding Restart Home Assistant
If you change the configuration, you have to restart the server. To do that you have 3 options.
- In your Home Assistant UI, go to Settings > System and in the top-right corner, select the three dots
menu. Then, select Restart Home Assistant. - Go to Settings > Developer tools > Actions, select
homeassistant.restartand select Perform action. - Restart it from a terminal.
docker restart homeassistantdocker compose restartDocker compose
Tip docker composeshould already be installed on your system. If not, you can manually install it.As the Docker command becomes more complex, switching to
docker composecan be preferable and support automatically restarting on failure or system restart. Create acompose.yamlfile:services: homeassistant: container_name: homeassistant image: "ghcr.io/home-assistant/home-assistant:stable" volumes: - /PATH_TO_YOUR_CONFIG:/config - /etc/localtime:/etc/localtime:ro - /run/dbus:/run/dbus:ro restart: unless-stopped privileged: true network_mode: host environment: TZ: Europe/AmsterdamStart it by running:
docker compose up -dOnce the Home Assistant Container is running, Home Assistant should be accessible using
http://<host>:8123(replacewith the hostname or IP of the system). You can continue with onboarding. Onboarding Exposing devices
In order to use Zigbee or other integrations that require access to devices, you need to map the appropriate device into the container. Ensure the user that is running the container has the correct privileges to access the
/dev/tty*file, then add the device mapping to your container instructions:docker run ... --device /dev/ttyUSB0:/dev/ttyUSB0 ...services: homeassistant: ... devices: - /dev/ttyUSB0:/dev/ttyUSB0Optimizations
The Home Assistant Container is using an alternative memory allocation library jemalloc for better memory management and Python runtime speedup.
As the jemalloc configuration used can cause issues on certain hardware featuring a page size larger than 4K (like some specific ARM64-based SoCs), it can be disabled by passing the environment variable
DISABLE_JEMALLOCwith any value, for example:docker run ... -e "DISABLE_JEMALLOC=true" ...services: homeassistant: ... environment: DISABLE_JEMALLOC: trueThe error message
<jemalloc>: Unsupported system page sizeis one known indicator.We get commissions for purchases made through links in this post.
- In your Home Assistant UI, go to Settings > System and in the top-right corner, select the three dots