Common tasks - Operating System
This section will provide guides to some common tasks and information which you will need in order to run, maintain, and edit your Home Assistant OS system. For further details on any particular subject, make sure to refer to the documentation for specific add-ons or topics listed here.
Updating Home Assistant
If you have the Home Assistant Operating SystemHome Assistant OS, the Home Assistant Operating System, is an embedded, minimalistic, operating system designed to run the Home Assistant ecosystem. It is the recommended installation method for most users.
[Learn more] installed, you receive update notifications from different components:
- Home Assistant Operating SystemHome Assistant OS, the Home Assistant Operating System, is an embedded, minimalistic, operating system designed to run the Home Assistant ecosystem. It is the recommended installation method for most users.
[Learn more] - Home Assistant SupervisorThe Home Assistant Supervisor is a program that manages a Home Assistant installation, taking care of installing and updating Home Assistant, add-ons, itself, and, if used, updating the Home Assistant Operating System.
[Learn more] - Home Assistant CoreHome Assistant Core is the heart of Home Assistant itself. It is a Python program that powers every installation type, but can be installed standalone.
[Learn more] - Add-ons, if you have any installed
Updating the Home Assistant Operating System
Updates of the Home Assistant Operating SystemHome Assistant OS, the Home Assistant Operating System, is an embedded, minimalistic, operating system designed to run the Home Assistant ecosystem. It is the recommended installation method for most users.
[Learn more] are independent of other updates. They do not trigger repair issues and are usually backward-compatible.
Prerequisites
-
Backup your installation.
- Make sure the backup is downloaded and stored outside of the system.
- So that you can restore from that backup in case there is an issue with the system.
To update the Home Assistant Operating System
- Open the Settings panel.
- On the top you will be presented with an update notification.
If you do not see that notification, in the top right, select the three dots menu and select Check for updates”.
ha os update
This updates to the latest version. If you want to update to a specific version instead, use ha os update --version 12.0.
About boot slots used during the update
The Home Assistant Operating SystemHome Assistant OS, the Home Assistant Operating System, is an embedded, minimalistic, operating system designed to run the Home Assistant ecosystem. It is the recommended installation method for most users.
[Learn more] uses two boot slots. On first installation, boot slot A is used. After that, on each Operating System update, the other boot slot is updated and reboot is triggered. On that reboot, the system boots from the other boot slot (A ➝ B ➝ A,…). When booting fails, the system automatically uses the previous boot slot, so that it boots from the last working operating system.
Changing the boot slot used
You can manually define that the previous boot slot is used. This can be useful in cases where the system boots but something still seems wrong. For example, when the device is no longer correctly detected or you see another issue that might be related to the latest update of the operating system.
-
To check which boot slot is currently in use and what OS versions are installed in the individual slots, in the Home Assistant command line, enter the following command:
ha os info -
To change the boot slot, enter the following command:
- This will boot into the other (previous) OS version.
ha os boot-slot other
Updating Home Assistant Core
Best practice for updating Home Assistant Core:
-
Backup your installation, using the backup functionality Home Assistant offers.
-
Check the release notes for backward-incompatible changes on Home Assistant release notes. Be sure to check all release notes between the version you are running and the one you are upgrading to. Use the search function in your browser (
CTRL + f/CMD + f) and search for Backward-incompatible changes. -
Select Create backup before updating in case you encounter an issue that requires a rollback.
-
Update Home Assistant.
-
Review persistent notifications and log to see if there are any issues with your configuration that need to be addressed.
To update Home Assistant Core when you run Home Assistant Operating System you have 2 options.
- Open your Home Assistant UI.
- Navigate to the Settings panel.
- On the top you will be presented with an update notification.
If you do not see that notification you can click the overflow menu in the top right and select “Check for updates”.
ha core update --backup
The --backup flag here ensures that you have a partial backup of your current setup incase you need to downgrade.
Run a specific version
You can use the CLI to upgrade to a specific version (2024.4.3 in this example), to downgrade your installation you should do a partial restore of a backup instead.
ha core update --version 2024.4.3 --backup
The --backup flag here ensures that you have a partial backup of your current setup incase you need to downgrade.
Run a beta version
If you would like to test next release before anyone else, you can install the beta version.
- In your Home Assistant UI navigate to System > Updates
- Click the overflow menu in the top right corner
- Click “Join beta”
- Navigate to Configuration panel
- Install the update that is presented to you
-
Join the beta channel
ha supervisor options --channel beta -
Reload the supervisor
ha supervisor reload -
Update Home Assistant core to the latest beta version
ha core update --backupThe
--backupflag here ensures that you have a partial backup of your current setup incase you need to downgrade.
Run a development version
If you want to stay on the bleeding-edge Home Assistant Core development branch, you can upgrade to dev.
The dev branch is likely to be unstable. Potential consequences include loss of data and instance corruption.
-
Join the dev channel
ha supervisor options --channel dev -
Reload the supervisor
ha supervisor reload -
Update Home Assistant core to the latest dev version
ha core update --backupThe
--backupflag here ensures that you have a partial backup of your current setup incase you need to downgrade.
Configuration check
ha core check
Configuring access to files
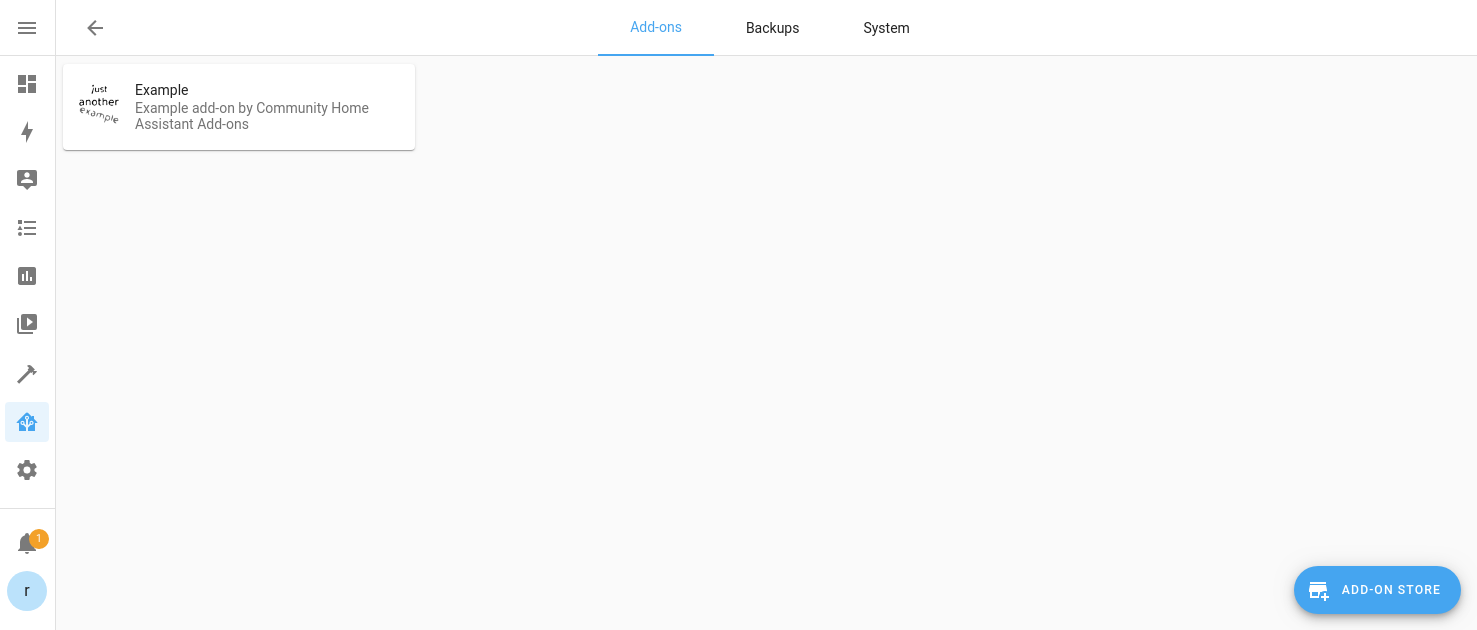
Your Home Assistant Operating server includes two repositories by default: The official core add-on repository, and the community add-on repository. All of the add-ons mentioned here can be installed by navigating to the add-on store using Settings > Add-ons > Add-on Store in the UI.
One of the first things to take care of after installing Home Assistant OS is to provide yourself access to files. There are several add-ons commonly used for this, and most users employ a mix of various add-ons. Default directories on the host are mapped to the add-ons so that they can be accessed by the services any particular add-on might provide. On the host system these directories exist on the /data partition at /mnt/data/supervisor/.
Using any of the add-ons listed below,the following directories are made available for access:
addonsbackupconfigmediasharessl
Installing and using the Samba add-on
The Samba add-on creates smb shares which can be accessed from another computer. You can also edit files using the editor of your preference from your client computer. This add-on can be installed from the add-on store’s official repository.
To configure the Samba add-on, you only need to set a user and password of your choice on the configuration page, save, and then start the add-on. The add-on will not start without setting a password!
To connect to the Samba server from another device, you will use the IP address or hostname of your server. Either of these can be found on the Settings > System > Network page of your UI.
For connecting from Windows 10, you can enter the IP address or hostname in File Explorer’s address bar with two backslashes, as shown in the example screenshot.
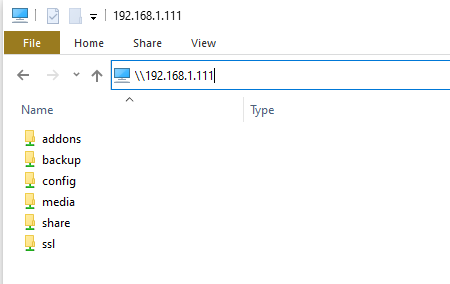
You should then be prompted for the credentials you entered in the Samba add-on configuration. You also have the option of having the credentials stored so that you do not need to enter them again. After that, you’ll have access to the directories which you can then mount as a drive or pin to Quick Access.
For OS X, connecting to the shares is a matter of using the Finder menu > Go > Connect to Server…
You would then enter the IP address or hostname of your Home Assistant OS instance as smb://your.ha.ip.address or smb://homeassistant and enter your credentials when prompted.
Installing and using the SSH add-on (requires enabling advanced mode for the HA user)
The Terminal & SSH add-on provides access over an SSH connection, and also includes nano and vi editors. It can be installed from the add-on store’s Official add-on repository after enabling advanced mode for your Home Assistant user’s profile. Additionally, this add-on provides access to the Home Assistant Command Line Interface (CLI) which provides custom commands for checking logs, stopping and starting Home Assistant and add-ons, creating/restoring backups, and more. (See Home Assistant via Command Line for further info). The Terminal & SSH add-on does not provide access to the underlying host file system.
To use the add-on, enter a password or public key on its configuration page, then save and start the add-on.
The Terminal & SSH add-on also provides a web terminal which allows you to access a terminal via the Home Assistant user interface. In order to access from an ssh client, a port needs to be entered in the network section of the add-on’s configuration page.
Installing and using the Visual Studio Code (VSC) add-on
The Visual Studio Code add-on provides access through a feature packed web-based version of the Visual Studio Code editor and currently only supports AMD64 and aarch64/ARM64 machines. This add-on can be installed in the add-on store from the Community add-on repository. The add-on also provides access to the Home Assistant Command Line Interface (CLI) using VSC’s built in terminal, which allows for checking logs, stopping and starting Home Assistant and add-ons, creating/restoring backups, and more. (See Home Assistant via Command Line for further info).
There is no configuration required for editing files within your /config directory. In order to enable access to other directories, it is necessary to edit the add-on’s configuration from its configuration tab. See the add-on documentation for details.
Installing and using the File Editor add-on
The File Editor add-on is a web-based file system browser and text editor. It is a more basic and light weight alternative to Visual Studio Code. YAML files are automatically checked for syntax errors while editing. To install and use the File Editor in Home Assistant, follow these steps:
- To install the add-on, go to Settings > Add-ons > File editor.
- Once you have the add-on installed, you can edit files within your
/configdirectory.
- Once you have the add-on installed, you can edit files within your
- If you want to be able to access directories outside the
/configdirectory, in the add-on, open the Configuration tab and disable the Enforce basepath option.- Note: The Enforce basepath option is intended to protect you from inadvertently making changes to settings files.
- For information on other configuration settings, open the Documentation tab.
- To confirm your changes, select Save.
- To start browsing, on the Info tab, select Open Web UI.
Backups
Backup of your Home Assistant, add-on data, and configuration. Backups are used to restore a system or parts of it if a rollback is needed or to migrate your Home Assistant to new hardware. It is good practice to create a backup before updating.
Backups are made from the backups panel under Settings > System > Backups. There is also a service available that allows you to trigger the creation of a backup from an automation. Backups are stored in a compressed archive file (.tar) and by default, stored locally in the /backup directory.
A full backup includes the following directories:
configshare-
addons(only manually installed or created add-ons, not those installed from the store) sslmedia
A partial backup consists of any number of the above default directories and installed add-ons.
Preparing for a backup
- Before creating a backup, check if you can reduce the size of the backup.
- Check if your configuration directory contains a large database file. Go to Settings > System > Repairs. From the three dot menu, select System information and under the Recorder section, look for the Estimated Database Size (MiB).
- By default, the data is kept for 10 days. If you have modified that to a longer period, check the
recorderintegration page for options to keep your database data down to a size that won’t cause issues. - Note the keep days, purge interval, and include/exclude options.
- If you have add-ons installed that you no longer use, uninstall those add-ons. Some add-ons require quite a bit of space.
- Old backups are not included in the backup. However, while you are here, you could delete all old and unneeded backups.
Making a backup from the UI
- Go to Settings > System > Backups in the UI.
- Select the Create backup button in the lower right.
- Provide a name for the backup.
- Choose Full backup or Partial backup.
- If you choose Partial backup, make sure to select Home Assistant and all the folders and add-ons you want to backup or migrate.
- Note that the number of add-ons increases the size of the backup as well as the time it takes to restore from that backup.
- Optionally, enable password protection.
- Select Create to begin the backup.
Alternative: Creating a backup using the Home Assistant Command Line Interface
-
ha backups list- lists backups and their slugnames -
ha backups restore slugname- restores a specific backup -
ha backups new --name nameofbackup- create a backup
Use ha help to get more information about the command line usage.
Copying your backups to another location
You might need a backup in case your system has crashed. If you only store them on the device itself, you won’t be able to access them easily. We recommend that you copy them from /backup to another machine on occasion.
There are multiple ways to store the backup on another device:
-
Option 1: Under Settings > System > Backups, on the list, single-click or tap the backup of interest.
- Result: The backup dialog opens.
- In the dialog, select the three dots menu and select Download backup.
- Result: The selected backup is stored in the Downloads folder of your computer.
-
Option 2: If you haven’t already done so, configure access to files on Home Assistant, using one of the methods listed there.
- For example, use the samba add-on.
- In your file explorer, access Home Assistant, open the
backupfolder and copy the file to your computer.
-
Option 3: You can also change the default location for backups:
- Add a network storage location for backups.
- Change the default location for backups.
-
Option 4: Or even better, create an automation to handle that.
-
Option 5: Make use of a third-party add-on:
Restoring a backup
There are two ways to use a backup:
- On your current system to recover your settings.
- During onboarding, to migrate your setup to a new device or a to device on which you performed a factory reset and a new installation.
Estimated duration
The time it takes to restore a backup depends on your installation. Home Assistant Core and all add-ons are being reinstalled. For a larger installation, this process can take about 45 minutes.
Restoring a backup during onboarding
You can use a backup during the onboarding process to restore your configuration.
Migration: This procedure also works if you want to migrate from one device to another. In that case, use the backup of the old device on the new device. The target device can be a different device type. For example, you can migrate from a Raspberry Pi to another device.
Prerequisites
- This procedure assumes you have already completed the installation procedure on your target device and are now viewing the welcome screen as part of the onboarding.
- The login credentials of the device from which you made the backup.
-
Required storage capacity: If you migrate the installation to a new device, make sure the new device has more storage capacity than the existing device.
- Before migrating, on the old system, check how much storage you used.
- Go to Settings > System > Repairs -> … -> System Information, and under Home Assistant Supervisor, look at the Disk used value.
- The target device must have more free space than the source device.
- If your target device is a Home Assistant Yellow, note that it is the size of the eMMC that is relevant.
- The restore process mainly uses the eMMC, not the NVMe.
- The size of the backup file is no indication of the size of your installation. To know the size of your installation, you need to check the Disk used value mentioned above.
- Before migrating, on the old system, check how much storage you used.
- If you are migrating to a new device:
- You do not need to transfer the backup to a USB or SD card to bring it to your device.
- You will be able to upload the backup file from the device you are accessing the onboarding from.
To restore a backup during onboarding
- If you are migrating to a new device and you had controllers or radios connected (such as a Z-Wave stick or SkyConnect):
- make sure to plug them into the new device.
- After Home Assistant has been installed, on the welcome screen, select Restore from backup.
- Then, select Upload backup.
- The file explorer opens on the device on which you are viewing the Home Assistant User interface.
- You can access any connected network drive from there.
- Select the backup file, then, in the dialog, select Full backup and Restore.
- The restore may take a while, depending on the amount of data.
- To see if the restore is complete, reload the page from time to time.
- If your previous installation had certificates enabled directly for the
httpintegration, when the restore is complete, it will no longer respond tohttp://requests. In this case, usehttps://(addeds) instead.
- On the login screen, enter the credentials of the system from which you took the backup.
- Your dashboard should show all the elements as they were when you created the backup.
- If some devices are shown as unavailable, you may need to wake the battery powered devices.
- If you had network storage connected on the previous system, you may need to reconnect those.
- If you had Zigbee devices, and you migrated to a new device with its own Zigbee radio built-in:
- Because this is now a different Zigbee radio, you need to migrate Zigbee.
To restore a backup on your current system
- Go to Settings > System > Backups.
- From the list of backups, select the backup from which you want to restore.
- If you want to restore the complete configuration with all directories and add-ons, select Full backup.
- If you only want to restore specific elements, select Partial backup.
- From the list, select the installation, folders, and add-ons you want to restore.
- Select Restore.
- This may take a while, depending on how much you have to compress or decompress.
- Once the restore is complete, Home Assistant restarts to apply the new settings.
- You will lose the connection to the UI and it will return once the restart is completed.
Network storage
You can configure both Network File Share (NFS) and Windows samba (CIFS) targets to be used within Home Assistant and add-ons. To list all your currently connected network storages, go to Settings > System > Storage in the UI.

Add a new network storage
- Go to Settings > System > Storage in the UI.
- Select Add network storage.
- Fill out all the information for your network storage.
- Select Connect.

Network storage configuration
Here, you select how the target should be used. See usage types below
1 Options prefixed with [NFS] are only available for NFS targets.
2 Options prefixed with [CIFS] are only available for CIFS targets.
3 For the CIFS option, only version 2.1+ is supported.
Usage types
This will become a target. You can use it in service calls or when manually creating a backup. The first storage you add of this type becomes your new default target. If you want to change the default target, check out the documentation below.
A new directory with the name you gave your network storage will be created under /media. This directory can be accessed by Home Assistant and add-ons.
Change default backup location
By default, the first network storage of type Backup that you add will be set as your default backup target.
If you want to change the default backup target, you can do the following:
- Go to Settings > System > Backups in the UI.
- Select the menu in the top right of the screen and select the Change default backup location option.
- In the dialog, there is a single option to set the default backup target.
- Choose the one you want from the list.
- Select Save.
This list will contain all the network storage targets you have added of usage type Backup. It also contains another option to set it back to use /backup again.

Home Assistant via the command line
On the SSH command line, you can use the ha command to retrieve logs, check the details of connected hardware, and more.
Home Assistant
ha core check
ha core info
ha core logs
ha core options
ha core rebuild
ha core restart
ha core start
ha core stats
ha core stop
ha core update
Supervisor
ha supervisor info
ha supervisor logs
ha supervisor reload
ha supervisor update
Host
ha host reboot
ha host shutdown
ha host update
Hardware
ha hardware info
ha hardware audio
Usage examples
To update Home Assistant to a specific version, use the command:
ha core update --version x.y.z
Replace x.y.z with the desired version like --version 2024.4.3
You can get a better description of the CLI capabilities by typing ha help:
The Home Assistant CLI is a small and simple command line utility that allows
you to control and configure different aspects of Home Assistant

Usage:
  ha [command]

Available Commands:
  addons         Install, update, remove and configure Home Assistant add-ons
  audio          Audio device handling.
  authentication Authentication for Home Assistant users.
  backups        Create, restore and remove backups
  banner         Prints the CLI Home Assistant banner along with some useful information
  cli            Get information, update or configure the Home Assistant cli backend
  core           Provides control of the Home Assistant Core
  dns            Get information, update or configure the Home Assistant DNS server
  docker         Docker backend specific for info and OCI configuration
  hardware       Provides hardware information about your system
  help           Help about any command
  host           Control the host/system that Home Assistant is running on
  info           Provides a general Home Assistant information overview
  jobs           Get information and manage running jobs
  multicast      Get information, update or configure the Home Assistant Multicast
  network        Network specific for updating, info and configuration imports
  observer       Get information, update or configure the Home Assistant observer
  os             Operating System specific for updating, info and configuration imports
  resolution     Resolution center of Supervisor, show issues and suggest solutions
  supervisor     Monitor, control and configure the Home Assistant Supervisor

Flags:
      --api-token string   Home Assistant Supervisor API token
      --config string      Optional config file (default is $HOME/.homeassistant.yaml)
      --endpoint string    Endpoint for Home Assistant Supervisor (default is 'supervisor')
  -h, --help               help for ha
      --log-level string   Log level (defaults to Warn)
      --no-progress        Disable the progress spinner
      --raw-json           Output raw JSON from the API

Use "ha [command] --help" for more information about a command.
Console access
You can also access the Home Assistant Operating SystemHome Assistant OS, the Home Assistant Operating System, is an embedded, minimalistic, operating system designed to run the Home Assistant ecosystem. It is the recommended installation method for most users.
[Learn more] via a directly connected keyboard and monitor, the console.
Wiping the data disk wipe from the command line
In Home Assistant Operating SystemHome Assistant OS, the Home Assistant Operating System, is an embedded, minimalistic, operating system designed to run the Home Assistant ecosystem. It is the recommended installation method for most users.
[Learn more], the ha os datadisk wipe command wipes the data disk. The command deletes all user data as well as Home Assistant Core, Supervisor, and any installed add-ons.
The command ha os datadisk wipe marks the data partition (either internal on the eMMC or the SD card, or on an external attached data disk) as to be cleared on the next reboot. The command automatically reboots the system. Upon reboot, the data is cleared. Then the system continues to boot and reinstalls the latest version of all Home Assistant components.
The ha os datadisk wipe command can only be run from the local terminal. Connect a display and keyboard and use the terminal.
Note, if you have a Home Assistant Yellow, there is a red hardware button to wipe the data disk. Follow the procedure on resetting the device.
Listing all users from the command line
In Home Assistant Operating SystemHome Assistant OS, the Home Assistant Operating System, is an embedded, minimalistic, operating system designed to run the Home Assistant ecosystem. It is the recommended installation method for most users.
[Learn more], the ha auth list command lists all users that are registered on your Home Assistant.
The ha auth list command can only be run from the local terminal. Connect a display and keyboard and use the terminal.
Lost Password and password reset
Please refer to the I’m locked out! documentation page.
Installing third-party add-ons
Home Assistant allows anyone to create add-on repositories to share their add-ons easily. To try this locally, you can use our example add-on repository at
https://github.com/home-assistant/hassio-addons-example
 From Settings > Add-ons open the add-on store.
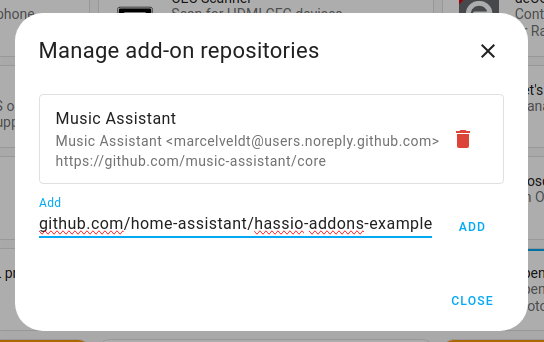 Add the URL of the repository and then press "Add". A new card for the repository will appear.
Help: Repository is not showing up
If you have added a repository, but it’s not showing up, it means that the repository contains invalid configuration. Go to Settings > System > Logs to find the System log. It should tell you what went wrong. Report this information to the repository author.
Using external data disk
Home Assistant Operating SystemHome Assistant OS, the Home Assistant Operating System, is an embedded, minimalistic, operating system designed to run the Home Assistant ecosystem. It is the recommended installation method for most users.
[Learn more] supports storing most data on an external storage medium, such as an USB attached SSD or HDD. This data disk contains not only user data but also most of the Home Assistant software as well (Core, Supervisor, etc.). This means a fast data disk will make the system overall much faster.

The data disk feature can be used on an existing installation without losing data: The system will move existing data to the external data disk automatically. However, it is recommended to create and download a full Backup before proceeding!
All data on the target disk will be overwritten!
The storage capacity of the external data disk must be larger than the storage capacity of the existing (boot) disk.
If you have been using a data disk previously with Home Assistant Operating SystemHome Assistant OS, the Home Assistant Operating System, is an embedded, minimalistic, operating system designed to run the Home Assistant ecosystem. It is the recommended installation method for most users.
[Learn more], you need to use your host computer to delete all partitions before using it as a data disk again.
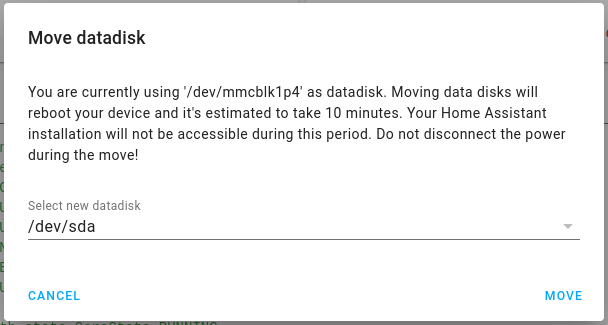
Using UI to move the data partition
- Connect the data disk to your system.
- Go to Settings > System > Storage in the UI.
- Select Move data disk.
- Select the data disk from the list of available devices.
- Select Move.
Using CLI to move the data partition
To see the current data disk use:
$ ha os info
...
data_disk: /dev/mmcblk1p4
...
To get a list of potential targets which can be used by datadisk:
ha os datadisk list
To initiate the move to the new data disk use the move command:
ha os datadisk move /dev/sdx
The system will prepare the data disk and immediately reboot. The reboot will take 10 minutes or more depending on the speed of the new data disk; please be patient!
Using an USB attached SSD can draw quite some power. For instance on Raspberry Pi 3 the official Raspberry Pi power supply (PSU) only provides 2.5A which can be too tight. Use a more powerful power supply if you experience issues. Alternatively use a powered USB hub. Connect the Hub to one of the USB slots of your Raspberry Pi, and connect the SSD to the Hub. In this setup the power supply of the Hub will power the attached device(s).