Scripts
A scriptA script is a saved list of steps that runs when you start it, for example, from a dashboard, with Assist, or from an automation. Unlike an automation, a script has no triggers, so it doesn’t start by itself. [Learn more] is a saved list of steps that Home Assistant runs when you start it. For example, a “Good morning” script can turn on the lights, start the coffee machine, and read out the weather. Unlike an automationAutomations in Home Assistant allow you to automatically respond to things that happen in and around your home. [Learn more], a script has no triggers, and no conditions that are checked before it starts. It runs its steps as soon as you start it: from a dashboard, with Assist, from an automation, or from another script. If a script should only continue in certain situations, it can check a condition as one of its steps, with the Condition building block.
The steps of a script are the same actions and building blocks you use in automations. For all steps you can use, refer to Building blocks and actions. For the script entity, scripts in YAML, and the actions that start or stop scripts, refer to the Scripts integration.
When to use a script
A script is useful when you want to use the same steps more than once, or control them separately:
- Starting the same steps from several places
- For example, an automation at 7:00, a button on a dashboard, and Assist can all start the same morning routine. You only maintain the steps in one place.
- Using different values each time
- With fields, one script covers several cases, for example, waiting 5 minutes on weekdays and 20 minutes on weekends.
- Stopping the steps separately
- You can stop a running script with Turn off script, without changing the automation that started it.
- Getting a result back
- A script can return a response that the automation then uses, for example, in a notification.
If the steps are only needed in one automation, you can add them to the automation directly. You don’t need a script for that.
Creating a script
You create and edit scripts in the script editor. You add the steps of the script, save it, and give it a name.
- Go to Settings > Automations & scenes > Scripts.
- Select Create script, then select Create new script.
- To start from a blueprintA blueprint is a script, automation, or template entity configuration with certain parts marked as configurable. This allows you to create multiple scripts, automations, or template entities based on the same blueprint, with each having its own configuration-specific settings. Blueprints are shared by the community on the blueprints exchange in the forum. [Learn more] instead, select Create from blueprint.
- Under Sequence, select Add action, and add the steps of the script.
- Select Save.
- Enter a Name for the script.
- Optional: Select Add icon or Add description, or add an area, a category, or labels.
- Select Save.
Changing the name, icon, or description
You can change the name, icon, and description of a script without changing its steps.
- Go to Settings > Automations & scenes > Scripts, and open the script.
- Select Menu
> Rename. - Change the name, icon, or description, and select Rename.
Changing the entity ID
The entity ID is how templates, YAML, and other automations refer to the script, for example, script.wake_up. After you rename a script, you might want its entity ID to match the new name, so it’s easier to recognize.
Changing the entity ID doesn’t change the name of the script’s action. The action keeps the key the script had when you first saved it. For example, if you change script.wake_up to script.good_morning, the action is still script.wake_up.
- Go to Settings > Automations & scenes > Scripts, and open the script.
- Select Menu
> Settings. - Change the Entity ID, and select Update.
Running a script
When you run a script, Home Assistant performs its steps one after the other. You can start a script in several ways:
- From the script editor
- Select Menu
> Run script. If the script has fields, a dialog asks for their values first.
- Select Menu
- From a dashboard
- Add the script to a card, for example, an Entities card, and select Run.
- With Assist
- Expose the script to Assist, and ask Assist to run it by its name.
- From an automation or another script
- Add the script as an action. For details, refer to Starting a script from an automation or another script.
About fields in scripts
Fields let a script ask for input when it starts, for example, how many minutes to wait or which light to turn on. When you run the script, or add it as an action in an automation, the editor shows an input for each field. In the steps of the script, you use the value of a field in a template, with its field key, for example, {{ minutes }}.
Adding fields to a script
- Open the script, and select Menu
> Add fields. - Under Fields, select Add field.
- Enter a Name for the field.
- The Field key is filled in from the name. This is the name of the variable you use in templates.
- Optional: Turn on Required.
- Under Selector, choose what kind of input the field asks for, for example, a number or an entity.
- Optional: Enter a Default value, which the input shows when it opens.
- Select Save.
Good to know about fields
-
Required and Default are used by the editor. Home Assistant doesn’t check them when the script runs.
- If an automation in YAML starts the script without a value for a field, the variable isn’t defined.
- To handle that, give the template a fallback value, for example,
{{ minutes | default(5) }}.
- Values that are passed to the script without a field are also available as variables.
- Templates in the script can also use the
thisvariable, which holds the current state of the script entity.
About script modes
The mode controls what happens when a script is started while it’s still running. To change it, open the script, and select Menu
-
Single (default)
- Do not start a new run. Issue a warning.
-
Restart
- Start a new run after first stopping the previous run.
-
Queued
- Start a new run after all previous runs complete. The runs happen in the order they were started.
- Use Queue length to set how many runs can be running or waiting at the same time.
-
Parallel
- Start a new, independent run in parallel with previous runs.
- Use Max number of parallel runs to set how many runs can happen at the same time.
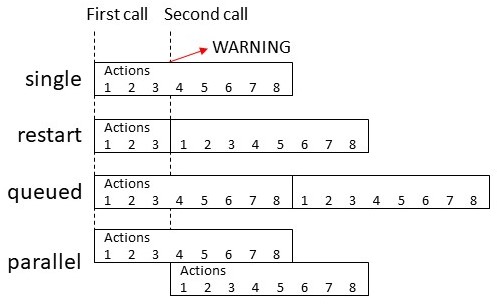
Automations use the same modes. For more details, refer to Automation modes.
Starting a script from an automation or another script
There are two ways to start a script from an automation or another script. They differ in whether the automation waits for the script, and in how you pass values to it.
- You can run the script itself.
- In the editor, select Add action, and search for the name of the script. The script’s fields appear as inputs.
- In YAML, use the script as the action, for example,
action: script.wake_up. - The automation waits until the script has finished, and can receive a response.
- You can use the Turn on script action.
- It starts the script in the background, and the automation continues right away.
- It doesn’t return a response.
- In YAML, you pass values to the script with
variables.
Passing values to a script
If a script has fields, or uses variables in its templates, you give it the values when you start it. In the editor, fill in the script’s fields in the action. Nothing is passed automatically: the script doesn’t see the variables or the trigger data of the automation that started it. If the script needs them, pass them as values.
For how to pass values in YAML, refer to Passing values to a script in YAML.
Waiting for a script to finish
When you run the script itself, the automation or script that started it waits for it to finish. If the script stops because of an error, the automation or script that started it stops too.
With Turn on script, the automation or script that started it doesn’t wait. If you start several scripts, they start in the order you list them, and the automation continues as soon as the last one has started. Errors in those scripts don’t affect the automation.
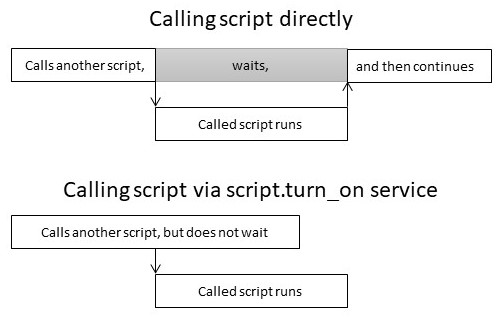
To do other steps while a script runs, and still wait for it later, start it with Turn on script, and wait until its entity is off again. This way, the first script also isn’t stopped if the second one fails. For an example, refer to Waiting for a script to finish in YAML.
Returning a response
A script can return data to the automation or script that started it. In the script, add a Stop building block, and enter the name of the variable to return in The name of the variable to use as response. In the automation, run the script itself, and enter a name in Response variable. The automation can then use the data in templates.
The variable that the script returns must contain keys and values. For an example, refer to Examples of Stop.