Z-Wave Controllers
Supported Z-Wave USB Sticks & Hardware Modules
You need to have a compatible Z-Wave stick or module installed. The following devices have been confirmed to work with Z-Wave JS:
The firmwares of 700 and 800 series Z-Wave controllers have several bugs which impact the stability of the mesh and can cause the controller to become unresponsive. Because there is no known firmware version that is completely fixed, it is recommended to choose a firmware based on the following criteria:
-
700 series:
- prefer SDK versions 7.17.2 to 7.18.x
- SDK versions 7.19.x are okay
- avoid SDK versions before 7.17.2
- avoid SDK versions 7.20 to 7.21.3
-
800 series
- prefer SDK versions 7.22.x
- SDK versions 7.17.2 to 7.19.x are okay
- avoid SDK versions before 7.17.2
- avoid SDK versions 7.20 to 7.21.3
The SDK version does not have to match the firmware version. If you are unsure which SDK versions a firmware is based on, contact the manufacturer of your device.
You should upgrade the firmware on all 700 and 800 series controllers to a recommended version.
Firmware can be upgraded using the below directions:
-
800 series controllers (with some caveats, see notes)
- HomeSeer SmartStick G8
- Zooz 800 Series Z-Wave Long Range S2 Stick (ZST39 LR)
-
700 series controllers
- Aeotec Z-Stick 7 USB stick (ZWA010) (the EU version is not recommended due to RF performance issues)
- HomeSeer SmartStick+ G3
- HomeSeer Z-NET G3
- Silicon Labs UZB-7 USB Stick (Silabs SLUSB7000A / SLUSB001A)
- Zooz S2 Stick 700 (ZST10 700)
- Z-Wave.Me Z-Station
-
500 series controllers
- Aeotec Z-Stick Gen5 (see note below)
- Everspring USB stick - Gen 5
- GoControl HUSBZB-1 stick
- Sigma Designs UZB stick
- Vision USB stick - Gen5
- Z-Wave.Me UZB1 stick
- HomeSeer SmartStick+ G2
- HomeSeer Z-NET G2
-
Raspberry Pi modules
- Aeotec Z-Pi 7 Raspberry Pi HAT/Shield (ZWA025, 700 series)
- Z-Wave.Me RaZberry 7 (ZME_RAZBERRY7, 700 series)
- Z-Wave.Me RaZberry 7 Pro (ZMEERAZBERRY7_PRO or ZMEURAZBERRY7_PRO, 700 series)
- Z-Wave.Me Razberry 2 (500 series)
- Z-Wave.Me Razberry 1 (300 series)
If you are just starting out, we recommend that you purchase a 700 series controller or a Raspberry Pi module. The 700 series controllers are the more recent version (when compared to the 500 series). The 700 series controllers support SmartStart, which allows you to add a device by scanning a QR code.
If you’re using Home Assistant OS, Supervised, or Container, it’s recommended to use a USB stick, not a module. Passing a module through Docker is more complicated than passing a USB stick through.
Stick alternatives
The alternative to a stick is a hub that supports Z-Wave. Home Assistant supports the following hubs with Z-Wave support:
Controller notes
800 Series Controllers
Z-Wave JS does not support Z-Wave Long Range yet.
Aeotec Z-Stick
There are known compatibility issues
It’s totally normal for your Z-Wave stick to cycle through its LEDs (Yellow, Blue and Red) while plugged into your system.
Razberry Board
On Raspberry Pi 3 and 4, you need to disable the on-board Bluetooth since the board requires the use of the hardware UART (whose pins are shared with the Bluetooth). You do this by adjusting the /boot/config.txt.
For both processes below you will need to insert your SD card into your PC and open the configuration file with your favorite text editor.
- If you are using Home Assistant Operating SystemHome Assistant OS, the Home Assistant Operating System, is an embedded, minimalistic, operating system designed to run the Home Assistant ecosystem. It is the recommended installation method for most users. [Learn more], once you mounted the disk, you will see the
config.txtdirectly in the root directory. - If you are using Home Assistant SupervisedHome Assistant Supervised is the full Home Assistant ecosystem, without the Home Assistant Operating System. [Learn more], the config file is stored in the boot folder:
/boot/config.txt.
Raspberry Pi 5 procedure
Add the following parameters to the bottom of the config.txt file.
dtoverlay=uart0
Raspberry Pi 4 procedure
Add the following parameters to the bottom of the /boot/config.txt file.
dtoverlay=disable-bt
enable_uart=1
Reboot your Pi 4 without the Razberry Z-Wave hat first. Then shutdown, add the hat back, and boot again.
Raspberry Pi 3 procedure
Add the following parameters to the bottom of the /boot/config.txt file.
dtoverlay=disable-bt
Reboot your Pi 3.
For Home Assistant OS this should be everything you need to do. You should now be able to use Razberry Z-Wave from /dev/ttyAMA0.
For other operating systems such as Raspberry Pi OS you will also have to run the following command:
sudo systemctl disable hciuart
You should also check the README for details on the overlays. You might find it in /boot/overlays/README on your SD-card. If it is not there you can find the official version here
It is possible to keep a limited Bluetooth functionality while using Razberry Z-Wave. Check boot/overlays/README on miniuart-bt.
disable-bt was previously known as pi3-disable-bt. If your OS is old, you might need to use this instead.
If you’ve installed the Z-Wave.Me Z-Way software. In order to use Z-Wave JS instead of Z-Way, you’ll need to ensure you disable it before you install Home Assistant, or you won’t be able to access the board. Do this with sudo /etc/init.d/z-way-server stop; sudo update-rc.d z-way-server disable. Alternatively, you could use the Z-Wave.Me integration.
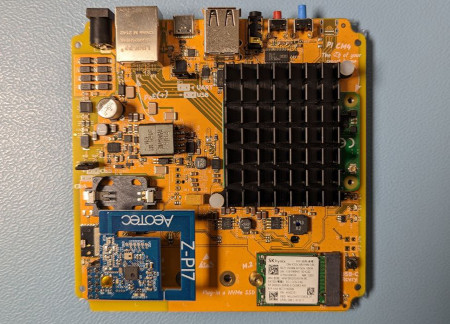
Setting up a Raspberry Pi Z-Wave module on Home Assistant Yellow
This procedure has been tested with the following modules:
- Aeotec Z-Pi 7 Raspberry Pi HAT/Shield
- Z-Wave.Me RaZberry 7
- Z-Wave.Me RaZberry 7 Pro
- Make sure the module is properly seated on the Home Assistant Yellow.
 .
. - Carefully close the case and power up Home Assistant Yellow.
- Follow the procedure on setting up a Z-Wave JS server.
- In step 2, follow the manual setup steps to install the Z-Wave integration.
- in Step 4, you will be prompted to choose a Device path. Choose ttyAMA0.