Amazon Alexa Smart Home Skill
Amazon Alexa provides a Smart Home API for richer home automation control without requiring the user to say the skill name, such as:
- “Alexa, turn off the light.”
- “Alexa, set the thermostat to cool.”
- “Alexa, is the garage door open?”
It takes considerable effort to configure. Your Home Assistant instance must be accessible from the Internet, and you need to create an Amazon Developer account and an Amazon Web Services (AWS) account. An easier solution is to use Home Assistant Cloud.
The Emulated Hue integration provides a simpler alternative to use utterances such as “Alexa, turn on the kitchen light”. However, it has some limitations since everything looks like a light bulb.
With Home Assistant Cloud, you can connect your Home Assistant instance in a few simple clicks to Amazon Alexa. With Home Assistant Cloud you don’t have to deal with dynamic DNS, SSL certificates or opening ports on your router. Just log in via the user interface and a secure connection with the cloud will be established. Home Assistant Cloud requires a paid subscription after a 30-day free trial.
For Home Assistant Cloud Users, documentation can be found here.
Steps to Integrate an Amazon Alexa Smart Home Skill with Home Assistant:
- Requirements
- Create an Amazon Alexa Smart Home Skill
- Create an AWS Lambda Function
- Configure the Smart Home Service Endpoint
- Account linking
- Alexa Smart Home Integration Configuration
- Supported platforms
- Troubleshooting
- Debugging
Requirements
- The Alexa Smart Home API requires your Home Assistant instance to be accessible from the internet via HTTPS on port 443 using an SSL/TLS certificate. A self-signed certificate will not work, but a public trusted certificate or a certificate signed by an Amazon approved certificate authority should work. Read more on our blog about how to set up encryption for Home Assistant. When running Home Assistant, using the Duck DNS add-on is the easiest method.
- An Amazon Developer Account. Sign up here.
- An Amazon Web Services (AWS) account is required to host the Lambda function for your Alexa Smart Home Skill. AWS Lambda is free to use for up to 1-million requests and 1GB outbound data transfer per month.
Create an Amazon Alexa Smart Home Skill
- Sign into the Alexa Developer Console, you can create your free account on the sign-in page. Note this must be created with the same Amazon account you use on your Alexa devices and app.
- Go to
Alexa Skillspage if you are not, then click theCreate Skillbutton to start the process. - Input
Skill nameas you like, then select your skill’sDefault language. - Select
Smart HomeandProvision your own, then clickCreate skillbutton at top right corner.
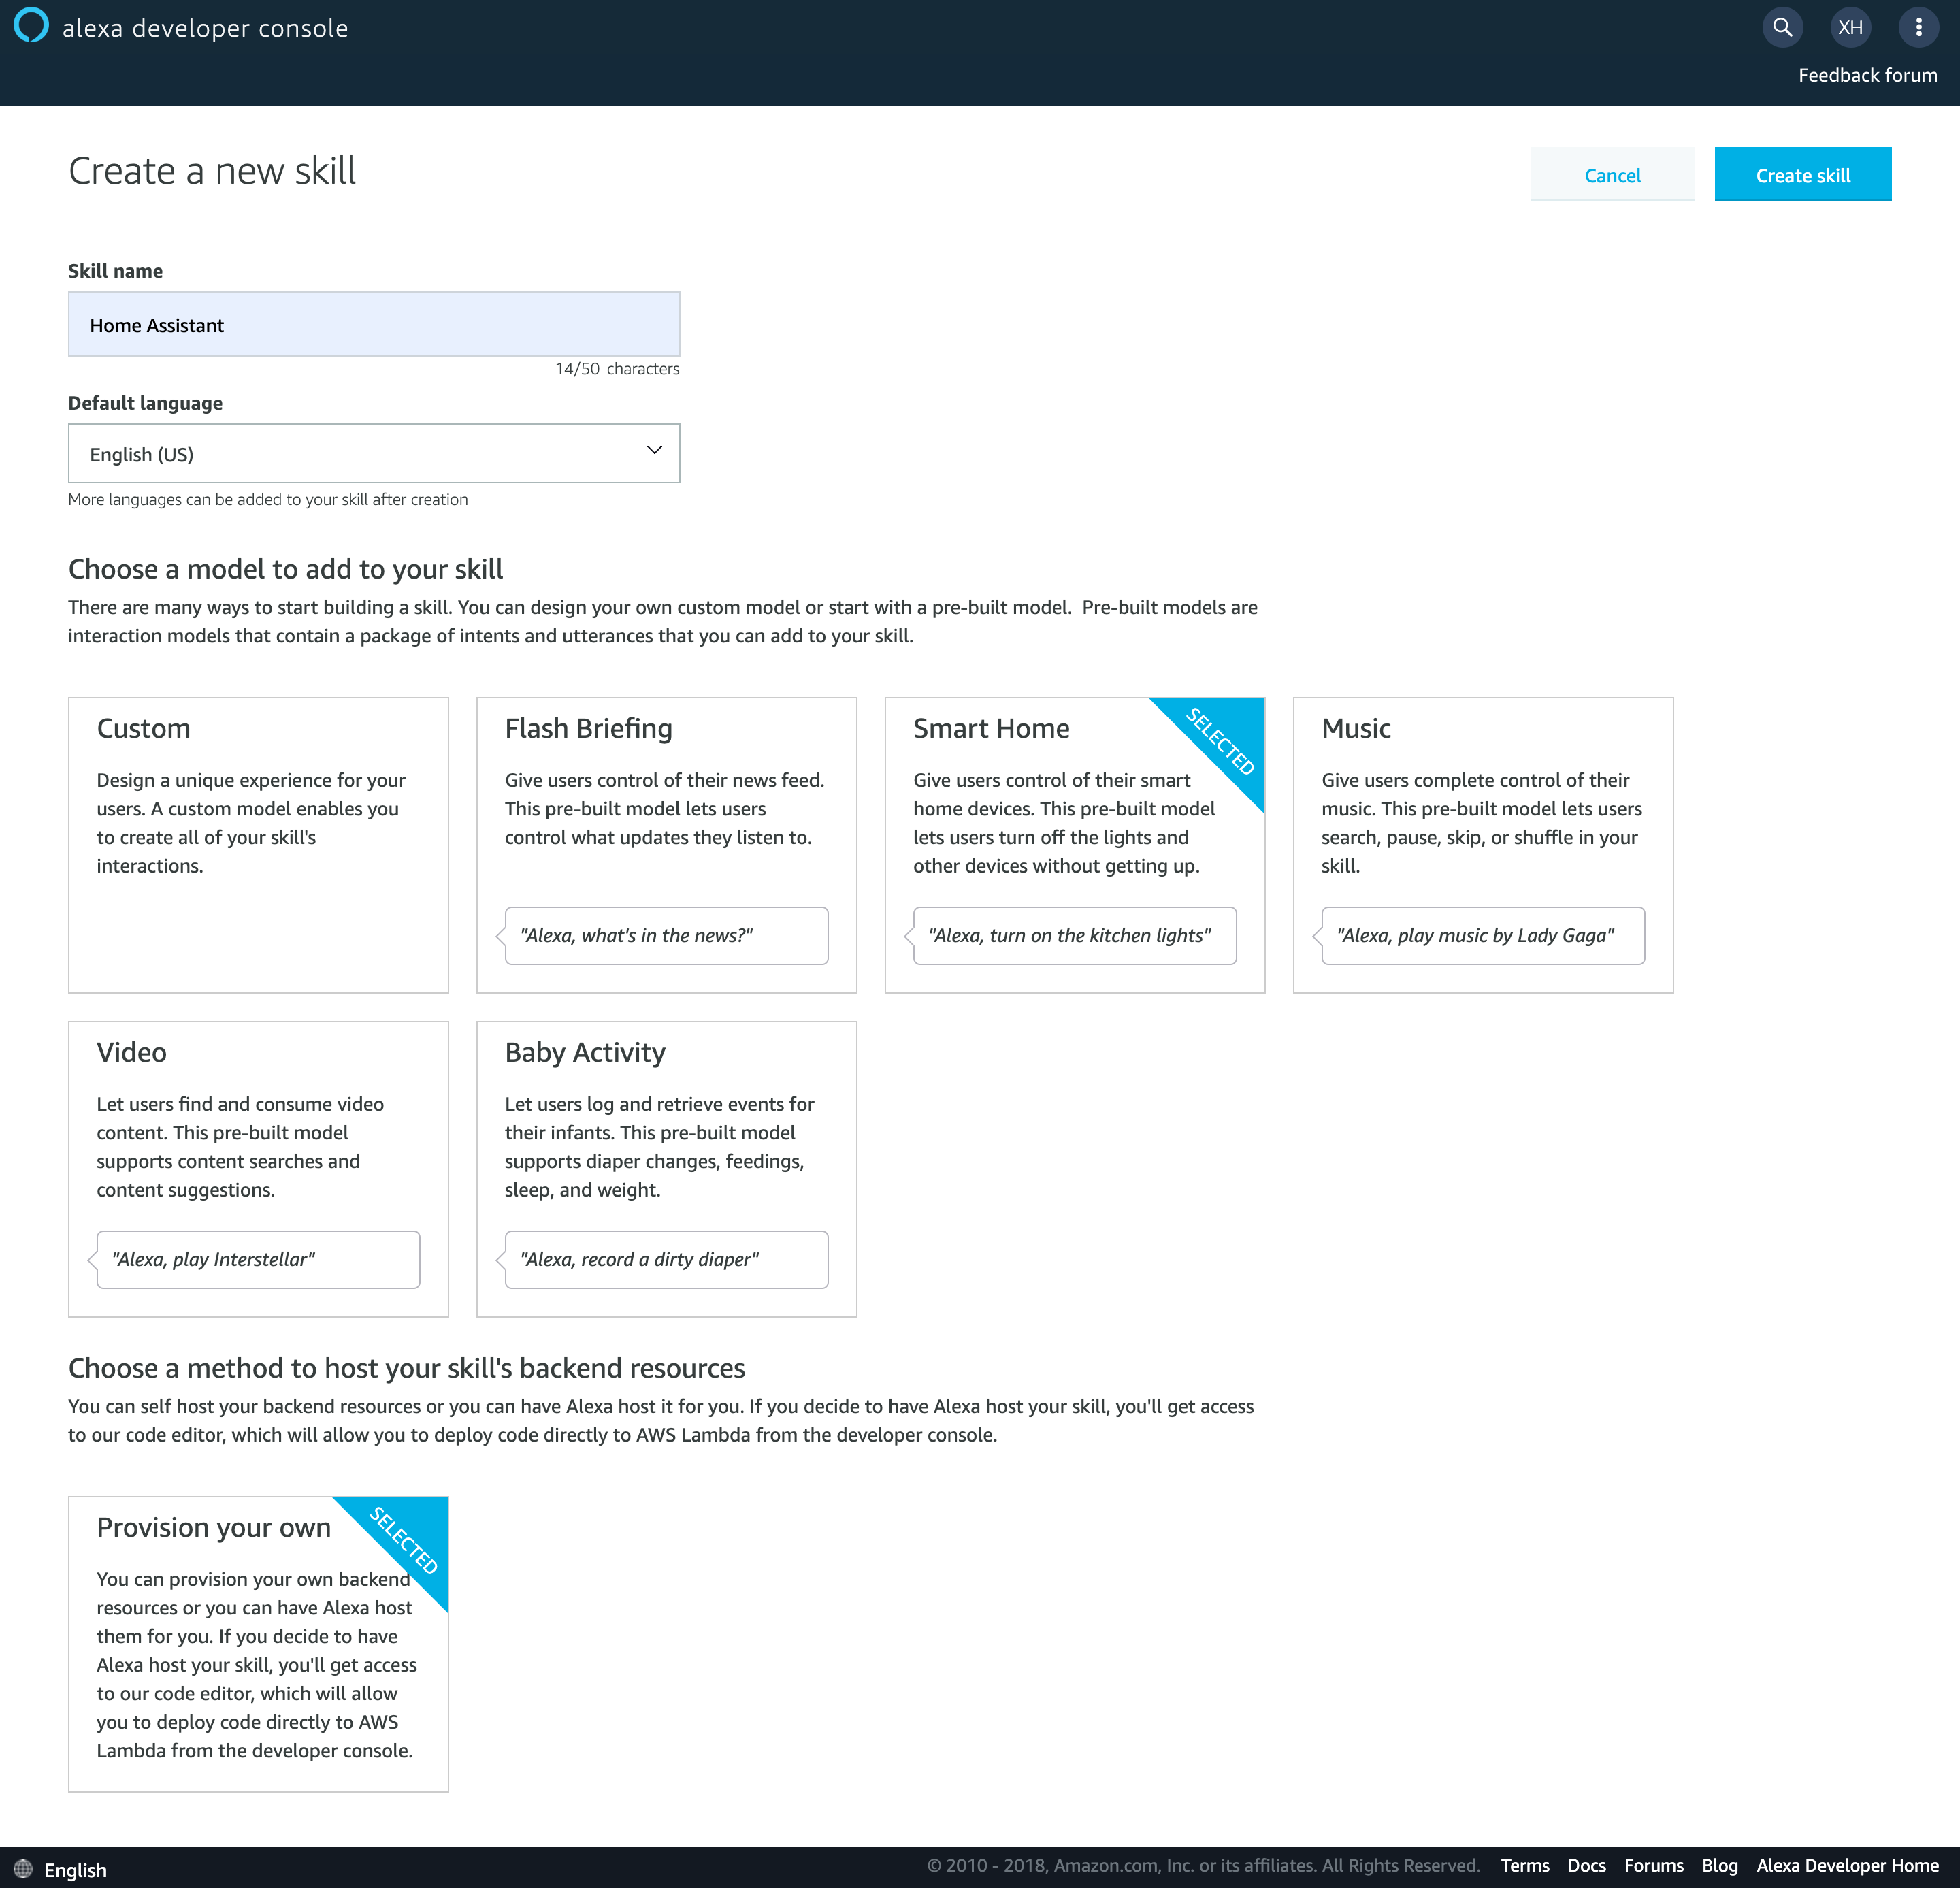
- In next screen, make sure v3 is selected in
Payload versionand take note of yourSkill ID - Now, you have created a skeleton of Smart Home skill. In the next step we will do some “real” developer work. Keep Alexa Developer Console open, we will need to change the skill configuration later.
Create an AWS Lambda Function
We will write a small piece of code hosted as an AWS Lambda function that will redirect requests from the Alexa Smart Home skill to your Home Assistant instance, then the Alexa integration in Home Assistant will process the request and send back the response. The Lambda function will then deliver the response back to the Alexa Smart Home skill.
OK, let’s go. You first need to sign in to your AWS console, if you don’t have an AWS account yet, you can create a new user here with 12-month free tier benefit. You don’t need to worry about the cost if your account has already passed the first 12 months, as AWS provides up to 1 million Lambda requests, 1GB of outbound data and all inbound data for free, every month, for all users. See Lambda pricing for more details.
Create an IAM Role for Lambda
The first thing you need to do after signing into the AWS console is to create an IAM Role for Lambda execution. AWS has very strict access control, so you have to specifically define and assign the required permissions.
- Click
Servicesin the top navigation bar, expand the menu to display all AWS services, then under theSecurity, Identity, & Compliancesection clickIAMto navigate to the IAM console. Or you may use this link - Click
Rolesin the left panel, then clickCreate role, selectAWS Service->Lambdain the first page of the wizard, then clickNext: Permissions - Select
AWSLambdaBasicExecutionRolepolicy, then clickNext: Tags. (Tips: you can use the search box to filter the policy)
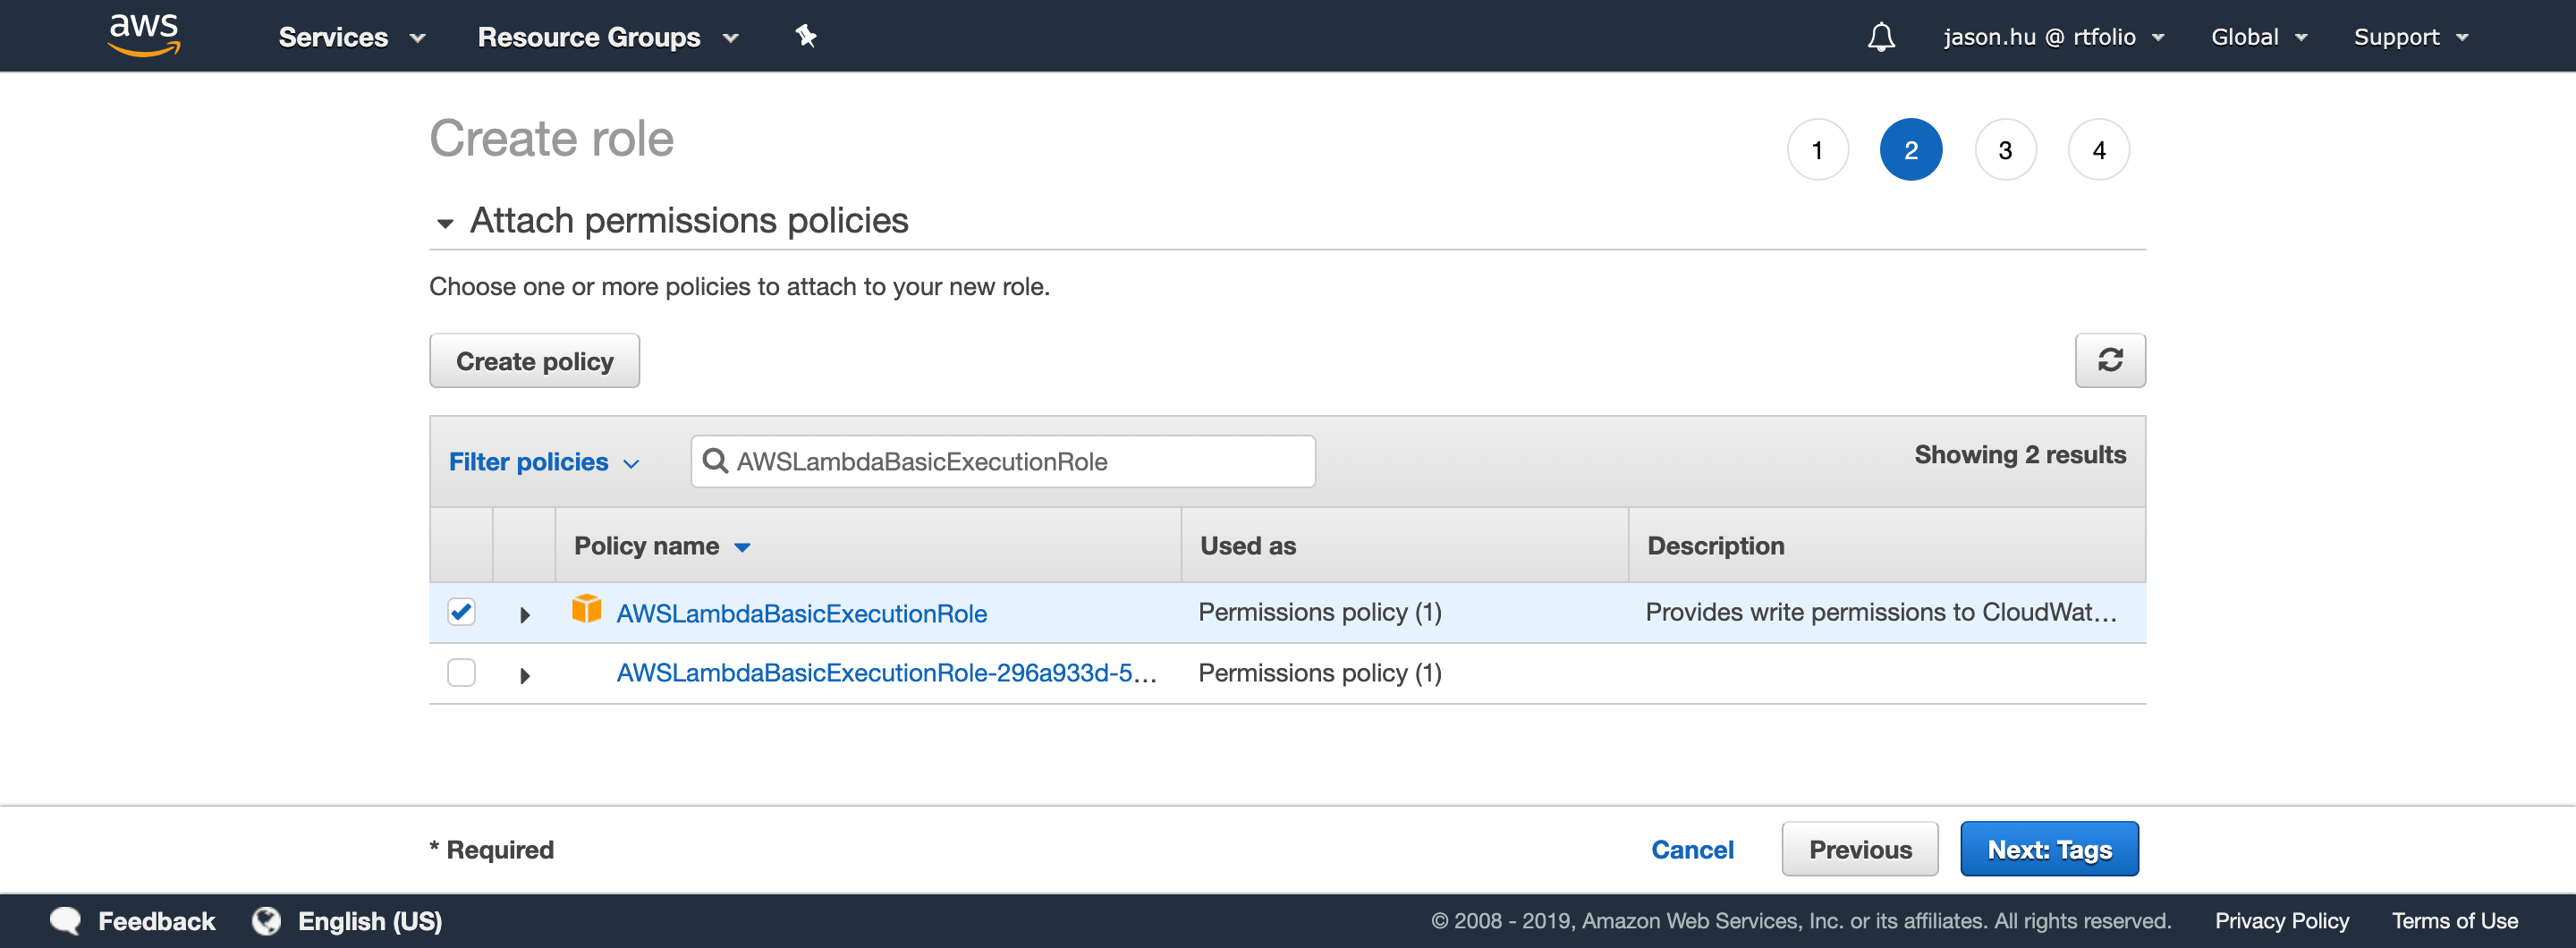
- Give your new role a name, such as
AWSLambdaBasicExecutionRole-SmartHome, then click theCreate rolebutton at the bottom of the page. You should be able to find your new role in the roles list now.
Add Code to the Lambda Function
Next you need create a Lambda function.
-
Click
Servicesin top navigation bar, expand the menu to display all AWS services, then underComputesection clickLambdato navigate to Lambda console. Or you may use this link IMPORTANT - Alexa Skills are only supported in specific AWS regions. Your current server location will be displayed in the top-right corner (for example, Ohio). Select an available server from the list below (reference) based on your Amazon account’s locale, not your physical location. Alexa Lambda functions created in other regions will not work properly and may prevent account linking! For example, if your locale is set to English (US) and you live in California, you must use US East (N.Virginia), not US West (Oregon). While the setup process will complete with an incorrect region, the skill will not function, and there will be no clear error messages indicating the cause.- US East (N.Virginia) region for English (US), English (CA) or Portuguese (BR) skills
- EU (Ireland) region for English (UK), English (IN), German (DE), Spanish (ES) or French (FR) skills
- US West (Oregon) region for Japanese and English (AU) skills.
-
Click
Functionsin the left navigation bar, to display the list of your Lambda functions. -
Click
Create function, selectAuthor from scratch, then input aFunction name. -
Select
Python 3.xas theRuntime(choose the latest available Python 3 version). -
Optional: Choose
arm64asArchitecture(slightly better performance). -
Expand the
Change default execution roledropdown and make sure to select Use an existing role asExecution role, then select the role you just created fromExisting rolelist. -
Click
Create function, then you can configure the details of Lambda function. -
Expand the
Function overview(if it isn’t already expanded), then click+ Add triggerin the left part of the panel, then clickAlexa Smart Homefrom the drop down list to add an Alexa Smart Home trigger to your Lambda function. -
You will then be prompted to input the
Skill IDfrom the skill you created in previous step. (Tip: you may need switch back to Alexa Developer Console to copy theSkill ID.) Then clickAdd. -
Scroll down to
Code source, then, if it isn’t already open thelambda_function.py. -
Clear the example code, and copy the Python script from: https://gist.github.com/matt2005/744b5ef548cc13d88d0569eea65f5e5b (modified code to support Alexa’s proactive mode, see details below)
-
Click the
Deploybutton to publish updated code. -
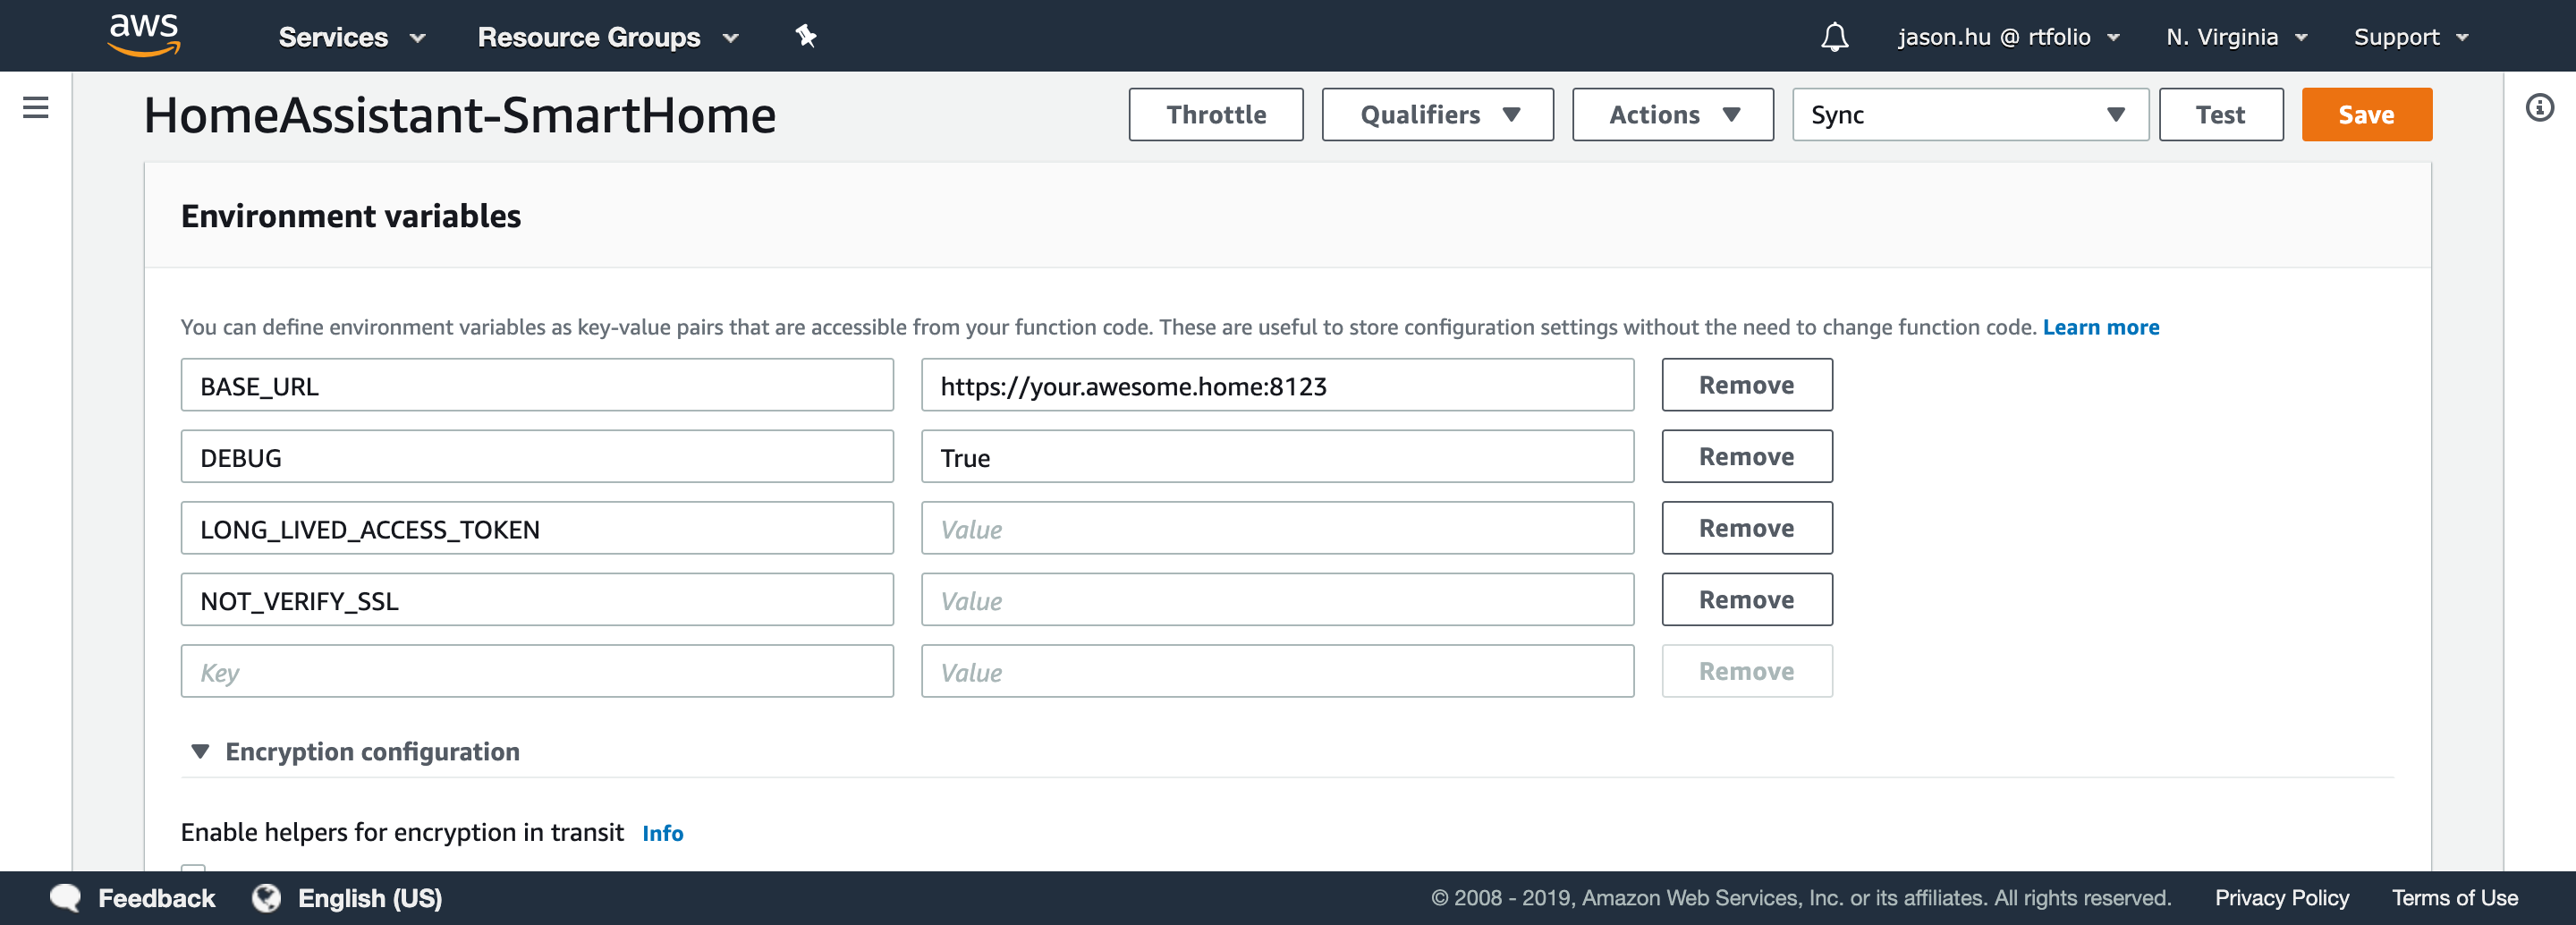
Navigate to the
Configurationtab, then selectEnvironment variables. You need to add 1 environment variable and, if needed, 3 optional variables. This is done by selectingEditthen adding the following:-
(required) Key = BASE_URL, Value = your Home Assistant instance’s Internet accessible URL. Do not include the trailing
/. - (optional) Key = NOT_VERIFY_SSL, Value = True. You can set this to True to ignore SSL issues, for example if you don’t have a valid SSL certificate or you are using a self-signed certificate.
- (optional) Key = DEBUG, Value = True. Set this variable to log the debug message and to allow the LONG_LIVED_ACCESS_TOKEN
- (optional, not recommend) Key = LONG_LIVED_ACCESS_TOKEN, Value = your Home Assistant Long-Lived Access Token. To avoid the use of a long-lived access token you will connect your Alexa Smart Home skill with your Home Assistant user account in the later steps, meaning you don’t need to add it here. However, the access token you got from login flow is only valid for 30 minutes. It will be hard for you to test lambda function with the access token in test data. So for your convenience, you can remove the access token from the test data, generate a long-lived access token put here, then the function will fall back to read token from environment variables. (tips: You did not enable the security storage for your environment variables, so your token saved here is not that safe. You should only use it for debugging and testing purpose. You should remove and delete the long-lived access token after you finish the debugging.)
-
(required) Key = BASE_URL, Value = your Home Assistant instance’s Internet accessible URL. Do not include the trailing
- Now click the
Savebutton in the bottom right hand corner. - Next you need to copy the ARN displayed in the top of the page, which is the identity of this Lambda function. You will need this ARN to continue Alexa Smart Home skill configuration later.
Test the Lambda Function
Now, you have created the Lambda function, but before you can test it, you have to set up the necessary aspects of your Home Assistant configuration. Put the following minimal configuration into your configuration.yamlThe configuration.yaml file is the main configuration file for Home Assistant. It lists the integrations to be loaded and their specific configurations. In some cases, the configuration needs to be edited manually directly in the configuration.yaml file. Most integrations can be configured in the UI. [Learn more] file. It will expose all of your supported devices and automations to Alexa. It is strongly recommended to check the configuration section and setup control of which devices and entities are exposed.
alexa:
  smart_home:
After your Home Assistant has restarted, go back to the AWS Lambda Console, you are going to do some tests.
- Navigate to the
Testtab, then selectCreate new event - Name your event, for example
Discovery - Enter the following data into the code box named
Event JSON:
{
  "directive": {
    "header": {
      "namespace": "Alexa.Discovery",
      "name": "Discover",
      "payloadVersion": "3",
      "messageId": "1bd5d003-31b9-476f-ad03-71d471922820"
    },
    "payload": {
      "scope": {
        "type": "BearerToken"
      }
    }
  }
}
- Click
Createin the top right hand corner.
This test event is a Discovery directive, your Home Assistant instance will respond with a list of devices Alexa can interact with. Since this test data is lacking a token in payload.scope, and your Lambda function will read the LONG_LIVED_ACCESS_TOKEN from environment variable.
Click the Test button. If you don’t have LONG_LIVED_ACCESS_TOKEN set, or you haven’t enabled DEBUG you will get a INVALID_AUTHORIZATION_CREDENTIAL response as the execution result.
You can log in to your Home Assistant and generate a long-lived access token. After you have entered your long-lived access token into the environment variable LONG_LIVED_ACCESS_TOKEN and set the DEBUG environment variable to True, do not forget to click the Save button before you Test again.
This time, you will get a list of your devices in the response. 🎉
Configure the Smart Home Service Endpoint
Now remove the long-lived access token (if you want), copy the ARN of your Lambda function, then navigate back to the Alexa Developer Console. You will finish the configuration of the Smart Home skill.
- Return to the Alexa Developer Console, and go to
Alexa Skillspage if you are not. - Find the skill you just created, click
Editlink in theActionscolumn. - Click
SMART HOMEin the left navigation bar of build page. - Fill in
Default endpointunder2. Smart Home service endpointusing theARNyou copied from your Lambda function configuration.
Account linking
Alexa needs to link your Amazon account to your Home Assistant account. Therefore Home Assistant can make sure only authenticated Alexa requests can access your home’s devices. To link the account, you have to make sure your Home Assistant can be accessed from Internet.
-
Return to the Alexa Developer Console, go to
Alexa Skillspage if you are not. -
Find the skill you just created, click
Editlink in theActionscolumn. -
Click
ACCOUNT LINKINGin the left navigation bar of build page -
Do not turn on the “Allow users to link their account to your skill from within your application or website” switch. This will require a Redirect URI, which won’t work.
-
Input all information required. Assuming your Home Assistant can be accessed by
https://[YOUR HOME ASSISTANT URL][:PORT], wherePORTis the TCP port. The port can be omitted if it is443. For Alexa account linking, by default, the standard port 443 is used by default. Use your firewall to forward this, if needed:-
Authorization URI:https://[YOUR HOME ASSISTANT URL][:PORT]/auth/authorize -
Access Token URI:https://[YOUR HOME ASSISTANT URL][:PORT]/auth/tokenAlthough it is possible to assign a different port, it is preferable to use port 443, so in that case make sure your firewall/proxy is forwarding via port 443.
Read more from the Alexa developer documentation about requirements for account linking.
Note Despite the Alexa documentation’s disclaimer, however, Let’s Encrypt certificates are still accepted.
Important You must use a valid/trusted SSL certificate for account linking to work. Self signed certificates will not work, but you can use a free Let’s Encrypt certificate.
-
Client ID:-
https://pitangui.amazon.com/if you are in US or BR -
https://layla.amazon.com/if you are in EU -
https://alexa.amazon.co.jp/if you are in JP and AU (not verified yet)The trailing slash is important here.
-
-
Client Secret: input anything you like, Home Assistant does not check this field -
Your Authentication Scheme: make sure you selected Credentials in request body. Home Assistant does not support HTTP Basic. -
Scope: Click+ Add scopeand inputsmart_home, Home Assistant is not using it yet, we may use it in the future when we allow more fine-grained access control. -
You can leave
Domain ListandDefault Access Token Expiration Timeas empty.

- Click
Savebutton in the top right corner. - Next, you will use the Alexa Mobile App to link your account.
- In the Alexa app, navigate to
More->Skills & Games->Your Skills->Dev - Click the Smart Home skill you just created.
- Click
Enable to use. - A new window will open to direct you to your Home Assistant’s login screen.
- After you successfully login, you will be redirected back to the Alexa app.
- Alexa should automatically start discovering your devices now! This is indicated by a blue ring on your physical devices
- If not, ask Alexa to
Discover Devices
- In the Alexa app, navigate to
- Now, you can ask Alexa from your Echo or the Alexa App, “Alexa, turn on bedroom light” 🎉
Alexa Smart Home Integration Configuration
Example configuration:
alexa:
  smart_home:
    locale: en-US
    endpoint: https://api.amazonalexa.com/v3/events
    client_id: YOUR_SKILL_CLIENT_ID
    client_secret: YOUR_SKILL_CLIENT_SECRET
    filter:
      include_entities:
        - light.kitchen
        - light.kitchen_left
      include_entity_globs:
        - binary_sensor.*_motion
      include_domains:
        - switch
      exclude_entities:
        - switch.outside
    entity_config:
      light.kitchen:
        name: "Custom Name for Alexa"
        description: "The light in the kitchen"
      switch.stairs:
        display_categories: LIGHT
Configuration Variables
Alexa configuration
Alexa Smart Home configuration
The locale of your Alexa devices. Supported locales are
de-DE,en-AU,en-CA,en-GB,en-IN,en-US,es-ES,es-MX,es-US,fr-CA,fr-FR,hi-IN,it-IT,ja-JP,nl-NL, andpt-BR. See Alexa Locale for additional information.To enable proactive events, you send a message to the Alexa event gateway, send it to the event endpoint that aligns with the geographic availability of your smart home skill. Following is the list of endpoints and the regions they cover. See Proactive Events for more information.
- North America:
https://api.amazonalexa.com/v3/events - Europe:
https://api.eu.amazonalexa.com/v3/events - Far East:
https://api.fe.amazonalexa.com/v3/events
See Proactive Events for more information.
See Proactive Events for more information.
Filter domains and entities for Alexa. (Configure Filter)
Include all entities matching a listed pattern (e.g.,
binary_sensor.*_motion).Exclude all entities matching a listed pattern (e.g.,
binary_sensor.*_motion).Configuration for specific entities. All subordinate keys are the corresponding entity ids or the domains, e.g.,
alarm_control_panel.woowoo.Additional options for specific entities.
Display category and iconography each entity is shown in the Alexa app. Separate each category with a comma. First category is primary. e.g.,
MUSIC_SYSTEM,STREAMING_DEVICE,SPEAKER. See Alexa Display Categories for a list of available categories.Alexa locale
The
localeshould match the location and language used for your Amazon echo devices.The supported locales are:
de-DEen-AUen-CAen-GBen-INen-USes-ESes-MXes-USfr-CAfr-FRhi-INit-ITja-JPnl-NLpt-BR
See List of Capability Interfaces and Supported Locales.
Proactive events
The
endpoint,client_idandclient_secretare optional, and are only required if you want to enable Alexa’s proactive mode (that is, “Send Alexa Events” enabled). Note the following if you want to enable proactive mode:- There are different endpoint URLs, depending on the region of your skill. Please check the available endpoints at https://developer.amazon.com/docs/smarthome/send-events.html#endpoints
- The
client_idandclient_secretare not the ones used by the skill that have been set up using “Login with Amazon” (in the Alexa Developer Console: Build > Account Linking), but rather from the “Alexa Skill Messaging” (in the Alexa Developer Console: Build > Permissions > Alexa Skill Messaging). To get them, you need to enable the “Send Alexa Events” permission. - If the “Send Alexa Events” permission was not enabled previously, you need to unlink and relink the skill using the Alexa App, or else Home Assistant will show the following error: “Token invalid and no refresh token available. Also, you need to restart your Home Assistant after each disabling/enabling the skill in Alexa.”
Configure filter
By default, no entity will be excluded. To limit which entities are being exposed to Alexa, you can use the
filterparameter. Keep in mind that only supported platforms can be added.# Example filter to include specified domains and exclude specified entities alexa: smart_home: filter: include_domains: - alarm_control_panel - light include_entity_globs: - binary_sensor.*_occupancy exclude_entities: - light.kitchen_lightFilters are applied as follows:
- No filter
- All entities included
- Only includes
- Entity listed in entities include: include
- Otherwise, entity matches domain include: include
- Otherwise, entity matches glob include: include
- Otherwise: exclude
- Only excludes
- Entity listed in exclude: exclude
- Otherwise, entity matches domain exclude: exclude
- Otherwise, entity matches glob exclude: exclude
- Otherwise: include
- Domain and/or glob includes (may also have excludes)
- Entity listed in entities include: include
- Otherwise, entity listed in entities exclude: exclude
- Otherwise, entity matches glob include: include
- Otherwise, entity matches glob exclude: exclude
- Otherwise, entity matches domain include: include
- Otherwise: exclude
- Domain and/or glob excludes (no domain and/or glob includes)
- Entity listed in entities include: include
- Otherwise, entity listed in exclude: exclude
- Otherwise, entity matches glob exclude: exclude
- Otherwise, entity matches domain exclude: exclude
- Otherwise: include
- No Domain and/or glob includes or excludes
- Entity listed in entities include: include
- Otherwise: exclude
The following characters can be used in entity globs:
*- The asterisk represents zero, one, or multiple characters?- The question mark represents zero or one characterSee the troubleshooting if you’re experiencing issues setting up the integration.
Alexa Display Categories
Configure a display category to override the display category and iconography each entity is shown in the Alexa app. This makes it easier to find and monitor devices.
light.kitchen_light:
  display_categories: LIGHT,SWITCH
Note Devices such as cameras, garage doors, and alarm control panels require specific display categories to provide all available features from Amazon Alexa. Overriding the default display category will limit features provided by Amazon Alexa.
See Alexa Display Categories for a complete list
Supported platforms
Home Assistant supports the following integrations through Alexa using a Smart Home Skill. For Home Assistant Cloud Users, documentation can be found here.
The following paragraphs explain the features of the platforms that are currently supported.
Alarm control panel
Arm and disarm Alarm control panel entities. Ask Alexa for the state of the alarm control panel entity.
- “Alexa, arm my home in away mode.”
- “Alexa, arm my home.”
- “Alexa, disarm my home.”
- “Alexa, is my home armed?”
Arming
The alarm control panel state must be in the
disarmedstate before arming. Alexa does not support switching from an armed state without first disarming, e.g., switching fromarmed_hometoarmed_night.The alarm control panel state
armed_custom_bypassisn’t supported by Alexa and is treated asarmed_home.Note Alexa does not support arming with voice PIN. Therefore if the alarm control panel requires a
codefor arming or thecode_arm_requiredattribute istrue, the entity will not be exposed during discovery. The alarm control panel may default thecode_arm_requiredattribute totrueeven if the platform does not support or require it. Use the entity customization tool to overridecode_arm_requiredtofalseand expose the alarm control panel during discovery.Disarming
Users must opt-in to the disarm by voice feature in the Alexa App. Alexa will require a 4 digit voice personal identification number (PIN) for disarming. Configure a 4 digit PIN in the Alexa app, or use an existing 4 digit PIN code configured for the alarm control panel.
To use the existing code configured for the alarm control panel the
codemust be 4 digits and thecode_formatattribute must benumber. After discovery, the Alexa app will offer the ability to use the existingcode, or create an additional 4 digit PIN to use with Alexa.The existing code is never communicated to Alexa from Home Assistant. During disarming, Alexa will ask for a PIN. The PIN spoken to Alexa is relayed to Home Assistant and passed to the
alarm_control_panel.alarm_disarmaction. If thealarm_control_panel.alarm_disarmaction fails for any reason, it is assumed the PIN was incorrect and reported to Alexa as an invalid PIN.Alert, Automation, Group
Turn on and off Alert, Automation, and Group entities as switches.
- “Alexa, turn on the front door alert.”
- “Alexa, turn off energy saving automations.”
- “Alexa, Downstairs to on.”
Binary sensor
Requires Proactive Events enabled.
Binary Sensors with a
device_classattribute ofdoorgarage_dooropeningwindowmotionpresenseare supported.device_classAlexa Sensor Type doorContact garage_doorContact openingContact windowContact motionMotion presenseMotion Ask Alexa for the state of a contact sensor.
- “Alexa, is the bedroom window open?”
Routines
Requires Proactive Events enabled.
Alexa Routines can be triggered with Binary Sensors exposed as contact or motion sensors.
Use the Entity Customization Tool to override the
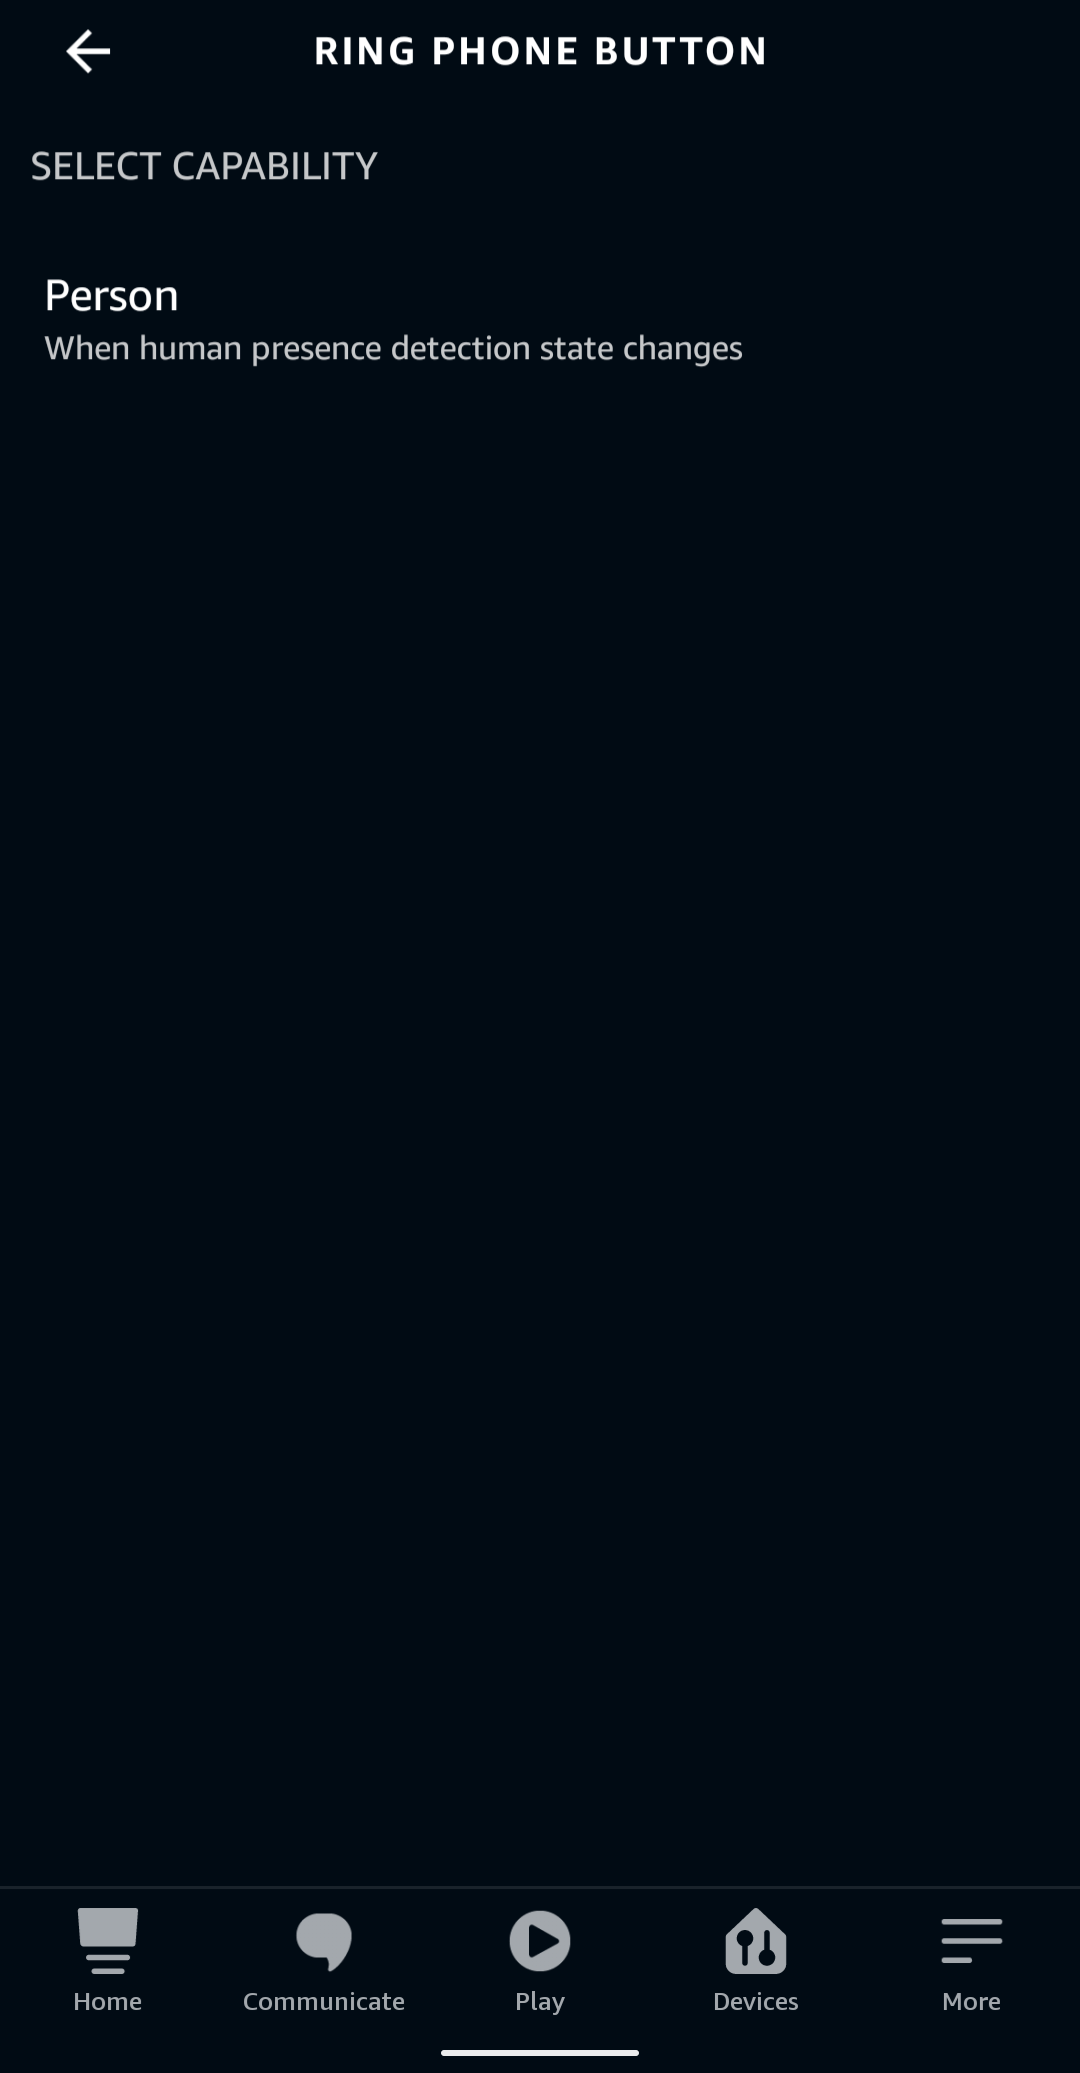
device_classattribute to expose abinary_sensorto Alexa.Button, Input Button
Activate Buttons and Input Buttons with the button name, or “turn on” utterance. They will appear in the Alexa app as scenes.
- “Alexa, Ring Phone.”
- “Alexa, turn on Ring Phone.”
Routines
Requires Proactive Events enabled.
Alexa Routines can be triggered when Buttons and Input Buttons are pressed.
To enable this, buttons will appear to have “presence detection” capability. This is what allows this functionality since Alexa does not support button type devices. To trigger a routine when a button is pressed, select the button in the when menu and then select the “Person” capability.
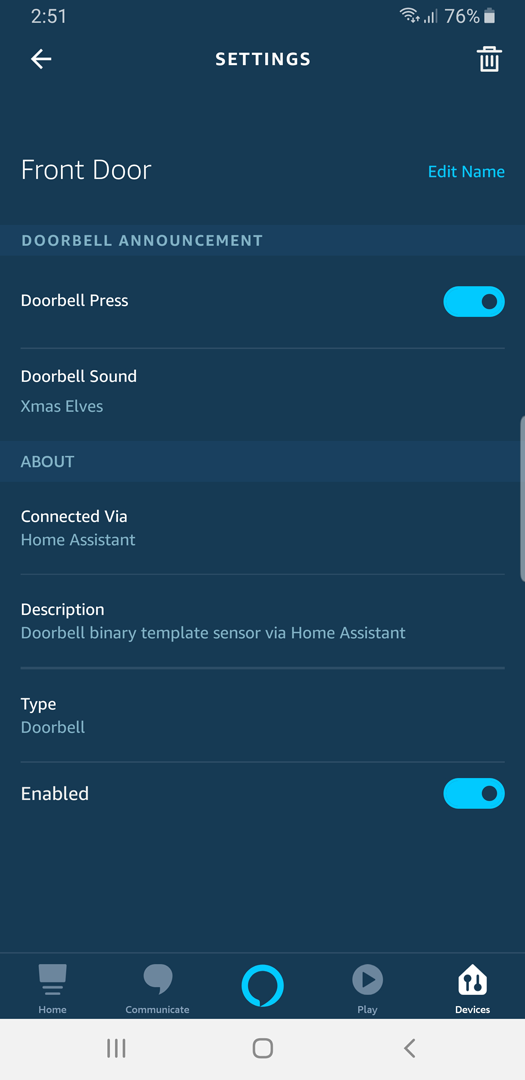
Doorbell announcement with binary_sensor
Requires Proactive Events enabled.
Note that Home Assistant can support a doorbell natively with an
evententity withdevice_classtodoorbellConfigure a
binary_sensorwithdisplay_categoryofDOORBELLin theentity_configto gain access to the doorbell notification settings in the Alexa App. Note that Home Assistant can support this natively with anevententity.alexa: smart_home: entity_config: binary_sensor.alexa_doorbell: name: "Front Door" description: "Doorbell Binary Sensor" display_categories: DOORBELLAlexa will announce on all echo devices “Someone is at the [entity name]” when a
binary_sensorstate changes fromofftoon.See also Event entities.
Presence Detection with Binary Sensor
Requires Proactive Events enabled.
Configure a
binary_sensorthat has adevice_classattribute ofmotionorpresenceand configuredisplay_categorytoCAMERAin theentity_configto gain access the presence detected notification settings in the Alexa App.alexa: smart_home: entity_config: binary_sensor.driveway_presence: name: "Driveway" description: "Driveway Presence Sensor" display_categories: CAMERAAlexa will announce on all echo devices “Person detected at [entity name]”.
Important Each Echo device will need the communication and Announcements setting enabled, and the Do Not Disturb feature turned off.
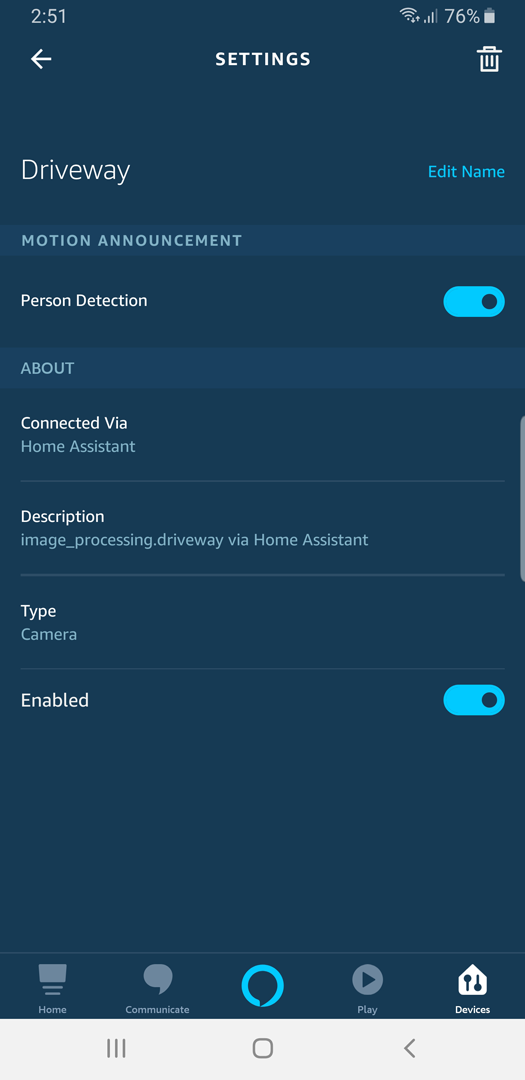
Image Processing entities also support this notification.
Camera
View a camera stream on an Amazon echo device.
- “Alexa, show the front door camera.”
The
streamintegration is required to stream cameras to Amazon echo devices.The Amazon echo device will request the camera stream from Home Assistant. The Home Assistant URL must be accessible from the network the Amazon echo device is connected to and must support HTTPS on port 443 with a certificate signed by an Amazon approved certificate authority. These requirements can be satisfied with Home Assistant Cloud, or LetsEncrypt/DuckDNS.
Enable preload stream option for cameras used with echo devices to reduce response time, and prevent timing out before the 6 second limit.
Climate
Single, double, and triple set-point thermostats are supported. The temperature value from the thermostat will also be exposed at a separate temperature sensor.
Set Thermostat Temperature
- “Alexa, set thermostat to 20.”
- “Alexa, set the AC to 75.”
- “Alexa, make it warmer in here.”
- “Alexa, make it cooler in here.”
Thermostat Mode
-
“Alexa, set living room thermostat to automatic.”
-
DRYis shown in Alexa app asDEHUMIDIFY -
ECOis handled as apresetin Home Assistant, and will not display in the Alexa app. -
FAN_ONLYis not supported by the Alexa voice model and is shown asOFFin the Alexa App.
To change the thermostat mode, the exact utterance must be used:
- “Alexa, set [entity name] to [mode utterance].”
If the climate entity supports on/off, use “turn on” and “turn off” utterances with the entity name or the mode utterance.
- “Alexa, turn on the [mode utterance].”
- “Alexa, turn off the [entity name].”
Alexa supports the following utterances value for climate thermostat mode:
HA Climate Mode Alexa Mode Utterances AUTO“auto”, “automatic” COOL“cool”, “cooling” HEAT“heat”, “heating” ECO“eco”, “economical” DRY“dry”, “dehumidify” OFF“off” Cover
Covers should be configured with the appropriate
device_class.Covers with a
device_classofblind,shade,curtinare shown as an Interior Blind in the Alexa App and Covers with awindow,awning, orshutterwill show as an Exterior Blind.Covers with the
device_classofgarageare shown as a Garage Door and support the Open by Voice PIN feature.Use the Entity Customization Tool to override the
device_classattribute to correctly expose acoverto Alexa.Open/Close/Raise/Lower
Home Assistant configures covers with semantics that provide “raise”, “lower”, “open”, “close” utterances for covers. In addition to semantics “turn on” / “turn off” utterances will also work.
- “Alexa, open the garage door.”
- “Alexa, close the curtain.”
- “Alexa, lower the shades.”
- “Alexa, raise the roof!”
Semantics are assigned based on the features supported by the cover. If the cover supports tilt functionality, the semantics “open” and “close” are assigned to the tilt functionality, and the semantics “raise” and “lower” are assigned to the position functionality.
If the cover does not support tilt, all semantics “raise”, “lower”, “open”, “close” are assigned to the position functionality.
Set Cover Position
Covers that support a set position can be controlled using percentages.
- “Alexa, set the [entity name] position to thirty percent.”
- “Alexa, increase [entity name] position by ten percent.”
- “Alexa, decrease [entity name] position by twenty percent.”
Locale Friendly Name Synonyms en-US“position”, “opening” Currently, Alexa only supports friendly name synonyms for the
en-USlocale.Set Cover Tilt
Covers that support tilt position can be controlled using percentages.
- “Alexa, set the [entity name] tilt to thirty percent.”
- “Alexa, increase [entity name] tilt by ten percent.”
- “Alexa, decrease [entity name] tilt by twenty percent.”
Locale Friendly Name Synonyms en-US“tilt”, “angle”, “direction” Currently, Alexa only supports friendly name synonyms for the
en-USlocale.Stop the Covers operation
To stop the covers operation, say:
- “Alexa, stop [entity name].”
If your cover supports the
STOPfeature, this will stop the cover operation. If your cover supports theSTOP_TILTfeature, this will stop the cover tilt operation. If both features are enabled, both the cover and the cover tilt will be stopped.Garage doors
Covers with a
device_classofgaragesupport the Open by Voice PIN feature in the Alexa app. Configure a 4 digit PIN code to open the garage door in the Alexa app.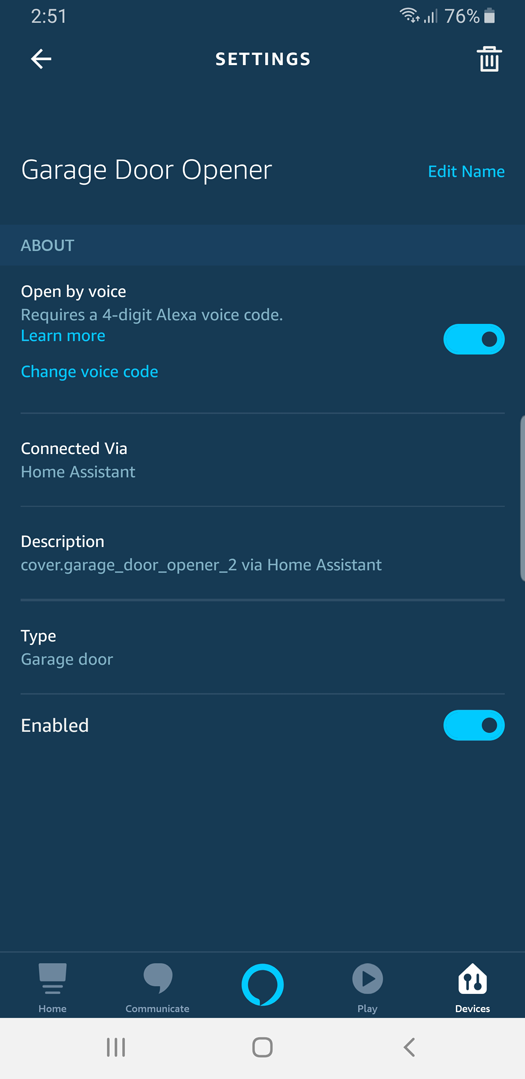
Event entities
Requires Proactive Events enabled.
Doorbell events
Home Assistant
evententities can trigger a doorbell announcement in Alexa if thedevice_classof theevententity is set todoorbell. Alexa will announce on all echo devices “Someone is at the [entity name]” when anevententity has received an updated.Note Each Amazon Echo device will need the communication and announcements setting enabled and the Do Not Disturb feature turned off.
Fan
Control fan speed, direction, and oscillation.
Fan speed
The fan device must support percentage based speeds with the
percentageattribute.- “Alexa, set the fan speed to three.”
- “Alexa, set the fan speed to fifty percent.”
- “Alexa, set the fan power level to fifty percent.”
- “Alexa, turn up the speed on the tower fan.”
- “Alexa, set the air speed on the tower fan to maximum.”
Fan Preset Mode
The fan device must support the
preset_modeattribute.- “Alexa, set the fan preset to eco.”
- “Alexa, set the fan preset to smart.”
- “Alexa, set the fan preset to auto.”
Currently, Alexa only supports
en-USlocale for preset modes.Fan Direction
The fan device must support the
directionattribute.- “Alexa, set the fan direction to forward.”
- “Alexa, set the fan direction to reverse.”
Fan Oscillation
The fan device must support the
oscillatingattribute.- “Alexa, is oscillate on for the tower fan?”
- “Alexa, turn on swivel for the tower fan.”
- “Alexa, turn on oscillation mode for the table fan.”
Locale Friendly Name Synonyms en-US“oscillate”, “swivel”, “oscillation”, “spin”, “back and forth” Currently, Alexa only supports friendly name synonyms for the
en-USlocale.Humidifier
Control power, target humidity and mode.
Humidifier target humidity
- “Alexa, set the [entity name] humidity to fifty percent.”
Humidifier Mode
The humidifier device must support the
modeattribute.- “Alexa, set the [entity name] mode to eco.”
Image Processing
Requires Proactive Events enabled.
Presence Detection Notification
All
image_processingentities support the presence detected notification settings in the Alexa App. Any state change will trigger the notification.Alexa will announce on all echo devices “Person detected at [entity name]”.
Note Display category will default to
CAMERAto enable presence detected notification settings in the Alexa App. Each Echo device will need the communication and Announcements setting enabled, and the Do Not Disturbed feature turned off.Input Number and Number
Control an
input_numberornumberentity with Alexa. Configures Alexa with themin,max,step, andunit_of_measurementattributes for the entity.- “Alexa, set [entity name] to forty five [unit of measurement].”
- “Alexa, increase the [entity name] by two.”
- “Alexa, set the [entity name] to maximum.”
The following table lists the possible friendly name synonyms available for a Input Number or Number with
min: -90, max: 90, step: 45, unit_of_measurement: degrees.Fan Range Friendly Name Synonyms -90 “negative ninety”, “minimum”, “min” -45 “negative forty five” 0 “zero” 45 “forty five” 90 “ninety”, “maximum”, “max” The
unit_of_measurementwill be used to select a supported unit label from the Global Alexa catalog. If there is no match it will be assigned a preset controller.The following units are supported: °C, °F, K, m, km, mi, yd, in, kg, g, oz, lb, L, ft³, m³, gal and %
Light
Control lights with “turn on” and “turn off” utterances, adjust brightness, color, and temperature.
- “Alexa, turn on the bathroom light.”
- “Alexa, turn off the patio light.”
Brightness
Lights that support brightness can be adjusted with percentages ranging from 0 to 100 percent.
- “Alexa, set the bedroom light to fifty percent.”
- “Alexa, living room lights to one hundred percent.”
The “dim” utterance will decrease the brightness of a light 25 percentage points.
- “Alexa, dim the bathroom light.”
Color Temperature
Adjust lights that support color temperature using the following friendly names:
- “Alexa, set the dining room softer.”
- “Alexa, make the living room warmer.”
- “Alexa, set the dining room cooler.”
- “Alexa, make the living room light whiter.”
- “Alexa, make the living room warm white.”
- “Alexa, set the kitchen to daylight.”
The following table lists the possible friendly name synonyms available to lights that support color temperature.
Color Temperature in Kelvin Friendly Name Synonyms 2200 “warm”, “warm white” 2700 “incandescent”, “soft white” 4000 “white” 5500 “daylight”, “daylight white” 7000 “cool”, “cool white” Use “warmer”, “softer”, “cooler, “whiter” utterances to adjust color temperature by 50
mired(approximately 300-500 degree kelvin change).- “Alexa, set the dining room softer.”
- “Alexa, make the living room warmer.”
- “Alexa, set the dining room cooler.”
- “Alexa, make the living room light whiter.”
Color
Set the light color using the CSS basic color keywords or extended color keywords as the friendly color name.
- “Alexa, set the front porch light to blue.”
- “Alexa, set the bedroom light to red.”
- “Alexa, change the kitchen to the color crimson.”
Lock
- “Alexa, lock my front door.”
- “Alexa, unlock the dungeon.”
Unlocking
To unlock, Alexa will require a 4 digit voice personal identification number (PIN) for unlocking. Configure a 4 digit PIN in the Alexa app to unlock locks.
Media Player
Change Channel
- “Alexa, change the channel to 200 on the Living Room TV.”
- “Alexa, change the channel to PBS on the TV.”
- “Alexa, next channel on the Living Room TV.”
- “Alexa, channel up on the TV.”
- “Alexa, channel down on the TV.”
Speaker Volume
- “Alexa, set the volume of the speakers to 50.”
- “Alexa, turn the volume down on the stereo by 20.”
- “Alexa, turn the volume down on Living Room TV.”
- “Alexa, mute speakers.”
- “Alexa, unmute speakers.”
- “Alexa, lower the volume on the stereo.”
- “Alexa, volume up 20 on the speakers.”
Equalizer Mode
Supports changing the Media Player
sound_modefrom the presetsound_mode_list.- “Alexa, set mode to movie on the TV.”
Alexa only supports the following modes:
movie,music,night,sport,tv.Inputs
Supports changing the Media Player
sourcefrom the presetsource_list.- “Alexa, change the input to DVD on the Living Room TV.”
Home Assistant will attempt to translate the
media_playersource_listinto a validsourcename for Alexa. Alexa only supports the following input names:AUX 1,AUX 2,AUX 3,AUX 4,AUX 5,AUX 6,AUX 7,BLURAY,CABLE,CD,COAX 1,COAX 2,COMPOSITE 1,DVD,GAME,HD RADIO,HDMI 1,HDMI 2,HDMI 3,HDMI 4,HDMI 5,HDMI 6,HDMI 7,HDMI 8,HDMI 9,HDMI 10,HDMI ARC,INPUT 1,INPUT 2,INPUT 3,INPUT 4,INPUT 5,INPUT 6,INPUT 7,INPUT 8,INPUT 9,INPUT 10,IPOD,LINE 1,LINE 2,LINE 3,LINE 4,LINE 5,LINE 6,LINE 7,MEDIA PLAYER,OPTICAL 1,OPTICAL 2,PHONO,PLAYSTATION,PLAYSTATION 3,PLAYSTATION 4,SATELLITE,SMARTCAST,TUNER,TV,USB DAC,VIDEO 1,VIDEO 2,VIDEO 3,XBOXPlayback State
Requires Proactive Events enabled.
Note Intents to seek forwards (skip) or to rewind (go back) are not supported at the moment.
Remote
Supports changing the Remote
activityfrom the givenactivity_list- “Alexa, change the TV to PlayStation.”
- “Alexa, change the input on the TV to PlayStation.”
Note Alexa does not allow the following words to be used as activity names:
alarm,alarms,all alarms,away mode,bass,camera,date,date today,day,do not disturb,drop in,music,night light,notification,playing,sleep sounds,time,timer,today in music,treble,volume,way f. m.Scene
Activate scenes with scene name, or “turn on” utterance. Home Assistant does not support deactivate or “turn off” for scenes.
- “Alexa, Party Time.”
- “Alexa, turn on Party Time.”
Script
Run script with script name, or “turn on” utterance. Deactivate a running script with “turn off” utterance.
- “Alexa, Party Time.”
- “Alexa, turn on Party Time.”
- “Alexa, turn off Party Time.”
Sensor
Requires Proactive Events enabled.
Only temperature sensors are configured.
- “Alexa, what’s the temperature in the kitchen?”
- “Alexa, what’s the upstairs temperature?”
Switch, Input Boolean
Support “turn on” and “turn off” utterances.
- “Alexa, turn on the vacuum.”
- “Alexa, turn off the lights.”
Routines
Requires Proactive Events enabled.
Alexa Routines can be triggered when Switches and Input Booleans change state.
To enable this, Switches and Input Booleans will appear as contact sensors in the when menu of Alexa Routines. This is because Alexa does not support triggering routines from switch-type devices, only from contact and motion sensors. In this menu when you select a switch,
Opencorresponds toonandClosecorresponds tooff.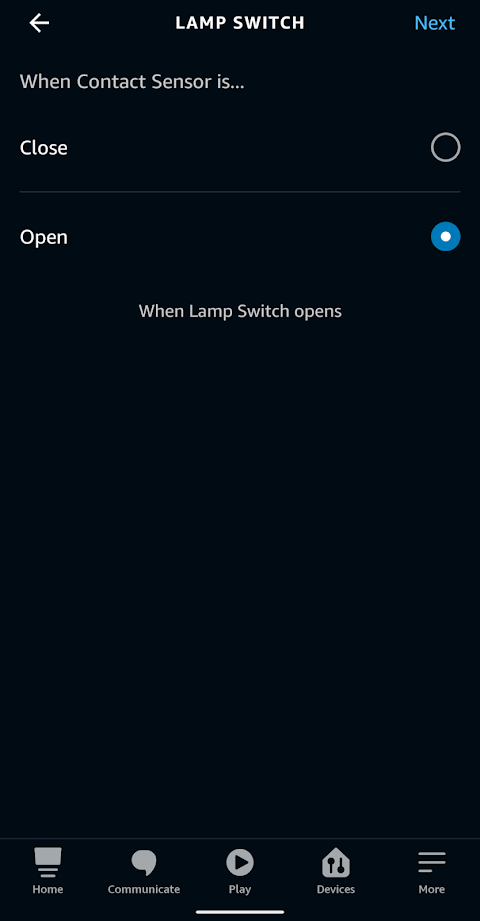
Timer
Start a timer with using the “turn on” utterance.
- “Alexa, turn on the laundry.”
Cancel a timer using the “turn off” utterance.
- “Alexa, turn off the laundry.”
Pause and Restart Timer entities in Home Assistant.
- “Alexa, pause the microwave.”
- “Alexa, hold the sous vide.”
- “Alexa, restart the microwave.”
Important To avoid issues with Alexa’s built-in timer functionality, the timer entity should not include the word “timer” in its friendly name.
Vacuum
Support “turn on” and “turn off” utterances. Pause and Resume
- “Alexa, turn on the vacuum.”
- “Alexa, pause the vacuum.”
- “Alexa, restart the vacuum.”
Valve
Valves are not supported natively within Alexa. So within Alexa, they are represented as a device of an unknown type.
Open/close
Home Assistant configures valves with semantics that provide “open” and “close” utterances.
- “Alexa, open the water valve.”
- “Alexa, close the gas valve.”
Set valve position
Valves that support a set position can be controlled using percentages.
- “Alexa, set the [entity name] position to thirty percent.”
- “Alexa, increase [entity name] position by ten percent.”
- “Alexa, decrease [entity name] position by twenty percent.”
Locale Friendly Name Synonyms en-US“position”, “opening” Currently, Alexa only supports friendly name synonyms for the
en-USlocale.Stop the valve
Valves that support
stopclosing or opening will have an extra toggle control that allows you to stop the valve closing or opening operation.Water heater
Single, double, and triple set-point thermostats are supported. The temperature value from the thermostat will also be exposed at a separate temperature sensor.
Set target temperature
- “Alexa, set the boiler’s target temperature to 50.”
You can ask Alexa about the current temperature and current target temperature.
- “Alexa, what is the boiler’s target temperature?”
- “Alexa, what is the boiler’s current temperature?”
Operation Mode
The operation mode can be set from the UI. All Home Assistant operation modes can be set (English only).
- “Alexa, set main boiler to eco.”
To change the water heater’s mode, the exact utterance must be used:
- “Alexa, set [entity name] to [mode utterance].”
If the water heater entity supports on/off, use “turn on” and “turn off” utterances with the entity name or the mode utterance.
- “Alexa, turn on the [mode utterance].”
- “Alexa, turn off the [entity name].”
Troubleshooting
Binary Sensor not available in Routine Trigger
Binary Sensors with a
device_classattribute ofdoorgarage_dooropeningwindowmotionpresenseare supported.Use the Entity Customization Tool to override the
device_classattribute to expose abinary_sensorto Alexa.Token Invalid and no Refresh Token Available
Disable and re-enable the skill using the Alexa App; then restart Home Assistant.
Debugging
The Alexa integration will log additional information about state updates and other messages when the log level is set to
debug. Add the relevant line below to theconfiguration.yamlThe configuration.yaml file is the main configuration file for Home Assistant. It lists the integrations to be loaded and their specific configurations. In some cases, the configuration needs to be edited manually directly in the configuration.yaml file. Most integrations can be configured in the UI. [Learn more]:If using Alexa with an Alexa Smart Home Skill and Lambda function such as haaska:
logger:
  default: info
  logs:
    homeassistant.components.alexa: debug
If using Home Assistant Cloud you also need to debug
hass_nubucasa.iot:logger: default: info logs: homeassistant.components.alexa: debug hass_nabucasa.iot: debug -
-