Set up encryption using Let's Encrypt
 Paulus Schoutsen
The instructions in this blog post are outdated. Please have a look at the new instructions.
Exposing your Home Assistant instance outside of your network always has been tricky. You have to set up port forwarding on your router and most likely add a dynamic DNS service to work around your ISP changing your IP. After this you would be able to use Home Assistant from anywhere but there is one big red flag: no encryption.
This tutorial will take you through the steps to setup a dynamic DNS for your IP and allow trusted encrypted connection to it - for free using DuckDNS and Let’s Encrypt.
Updated 2016-06-18
Requirements
The DuckDNS part of this tutorial has no requirements but there are a few requirements as of now to run the Let’s Encrypt client.
- Direct connection to the internet or admin access to your router to set up port forwarding.
- A machine running a Unix-ish OS that include Python 2.6 or 2.7 (Docker can be used).
- Root access, to write to default config, log and library directories and bind port 80.

DuckDNS
The first step is to set up DuckDNS. This is a free dynamic DNS service that you can use to get a DuckDNS.org subdomain to point at your house. A dynamic DNS service works by having your home computer tell DuckDNS.org every 5 minutes what its IP is so that DuckDNS can make sure your domain name is set up correctly.
For this example we will assume our domain is hass-example.duckdns.org.
First step is to acquire and set up our domain name. For this, go to DuckDNS, log in with any of the supported login providers and add a domain. After this check out their installation instructions to finish your installation of DuckDNS. If you’re on a Raspberry Pi, see ‘Pi’ in the category ‘Operating Systems’.
Let’s Encrypt
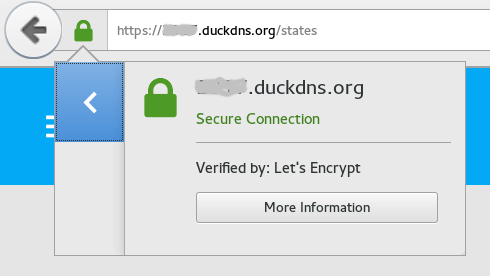
Let’s Encrypt is a free, automated, and open certificate authority (CA). We will use this to acquire a certificate that can be used to encrypted our connection with Home Assistant.
Let’s Encrypt will give you a free 90-day certificate if you pass their domain validation challenge. Domains are validated by having certain data be accessible on your domain for Let’s Encrypt (they describe it better themselves).
Assuming that your home is behind a router, the first thing to do is to set up port forwarding from your router to your computer that will run Let’s Encrypt. For the Let’s Encrypt set up we need to forward external port 80 to internal port 80 (http connections). This can be set up by accessing your router admin interface (Site with port forwarding instructions per router). This port forward must be active whenever you want to request a new certificate from Let’s Encrypt, typically every three months. If you normally don’t use or have an app that listens to port 80, it should be safe to leave the port open. This will make renewing certificates easier.
Now you’re ready to install and run the client that requests certificates from Let’s Encrypt. The following example will use the platform independent script to install and run the certbot client from Let’s Encrypt. If there is a certbot package for your OS, it’s recommended to install the package instead of the platform independent script. Read the docs for more information. There are also other clients that might offer more customization and options. See the client options page at Let’s Encrypt.
$ mkdir certbot
$ cd certbot/
$ wget https://dl.eff.org/certbot-auto
$ chmod a+x certbot-auto
$ ./certbot-auto certonly --standalone \
                          --standalone-supported-challenges http-01 \
                          --email [email protected] \
                          -d hass-example.duckdns.org
If you’re using Docker, run the following command to generate the required keys:
sudo mkdir /etc/letsencrypt /var/lib/letsencrypt
sudo docker run -it --rm -p 80:80 --name certbot \
                -v "/etc/letsencrypt:/etc/letsencrypt" \
                -v "/var/lib/letsencrypt:/var/lib/letsencrypt" \
                quay.io/letsencrypt/letsencrypt:latest certonly \
                --standalone --standalone-supported-challenges http-01 \
                --email [email protected] -d hass-example.duckdns.org
With either method your certificate will be generated and put in the directory /etc/letsencrypt/live/hass-example.duckdns.org. As the lifetime is only 90 days, you will have to repeat this every 90 days. There’s a special command to simplify renewing certificates:
./certbot-auto renew --quiet --no-self-upgrade --standalone \
                     --standalone-supported-challenges http-01

Home Assistant
Before updating the Home Assistant configuration, we have to forward port 443 (https connections) to port 8123 on the computer that will run Home Assistant. Do this in your router configuration as previously done for port 80.
The final step is to point Home Assistant at the generated certificates. Before you do this, make sure that the user running Home Assistant has read access to the folder that holds the certificates.
http:
  api_password: YOUR_SECRET_PASSWORD
  ssl_certificate: /etc/letsencrypt/live/hass-example.duckdns.org/fullchain.pem
  ssl_key: /etc/letsencrypt/live/hass-example.duckdns.org/privkey.pem
You can now navigate to https://hass-example.duckdns.org and enjoy encryption!
Big thanks to Fabian Affolter for his help and feedback on this article.