Enphase Envoy
The Enphase Envoy integrationIntegrations connect and integrate Home Assistant with your devices, services, and more. [Learn more] is used to integrate with the Enphase IQ GatewayEnvoy, a name from the conception times of this integration and retained for its compact format.
Supported devices
This integration works with:
- Older and newer Envoy models that only have production metrics (such as Envoy-R (LCD), Envoy-S (not metered))
- Newer Envoy models that offer both production and consumption metrics (such as Envoy-S Metered equipped with CT).
- Various Enphase IQ Combiner products that have an embedded Envoy, it will show-up in the same way as the stand-alone one.
Unsupported devices
This integration does not work with:
- Older Envoy models running firmware before 3.9 which lack a REST API.
Prerequisites
- The Envoy must be configured and commissioned.
- The Envoy must be on your local network with IPV4 connectivity from Home Assistant. (Also See troubleshooting, single network)
- Envoy firmware version 3.9 or newer.
- With Envoy firmware 7 and greater:
- an Enlighten cloud username and password.
- Home Assistant 2023.9 or newer.
Configuration
To add the Enphase Envoy integration to your Home Assistant instance, use this My button:
Enphase Envoy can be auto-discovered by Home Assistant. If an instance was found, it will be shown as Discovered. You can then set it up right away.
If it wasn’t discovered automatically, don’t worry! You can set up a manual integration entry:
-
Browse to your Home Assistant instance.
-
In the bottom right corner, select the
Add Integration button. -
From the list, select Enphase Envoy.
-
Follow the instructions on screen to complete the setup.
Required Manual input
The configuration of an individual Envoy requires you to enter the following information:
The name or IP address of the Envoy to configure.
Will be pre-filled if the Envoy was auto-discovered
For firmware version 7.0 and later, enter your Enlighten cloud username. The Enlighten cloud username (and password) will be used to obtain a 1-year-valid token from the enphase web-site when first configured or upon expiry.
For firmware before 7.0, enter username installer without a password.
Options
Options for Enphase Envoy can be set via the user interface, by taking the following steps:
- Browse to your Home Assistant instance.
- Go to Settings > Devices & Services.
- If multiple instances of Enphase Envoy are configured, choose the instance you want to configure.
- Select the integration, then select Configure.
Options to enable/disable are listed below. Neither of these are set by default nor need to be set for proper functioning of the integration. Setting these options is only required in described circumstances.
No/Yes
When new features are requested or firmware is upgraded, it can happen that existing test fixtures no longer cover all test cases and new ones are needed. You may be requested to provide data for such test fixtures. If so, and you are willing to provide the data, setting this option enables the collection of test data as part of the diagnostics report.
No/Yes
Some older Envoy firmware may exhibit connection issues when using the default keep-alive connection and report failures. When set, this option disables the use of keep-alive and builds a new connection at each data request. This makes the communication more reliable for these firmware versions. Reported for the Envoy-R, but may apply to other older firmware versions as well.
Reconfigure
This integration supports updating the Envoy configuration through a reconfigure menu option. The reconfiguration allows for changing the Envoy IP address, username, and/or password. Use this menu option if your Enlighten credentials or the device’s IP address has changed and needs to be manually updated. The latter is typically automatically detected and updated.
Use this menu option also when an Envoy firmware upgrade requires a switch from local Envoy username/password to token-based authentication with Enlighten username/password (refer to required manual input).
Removing the integration
This integration follows standard integration removal. No extra steps are required.
To remove an integration instance from Home Assistant
- Go to Settings > Devices & services and select the integration card.
- From the list of devices, select the integration instance you want to remove.
- Next to the entry, select the three-dot
menu. Then, select Delete.
Capabilities
This integration offers various entities depending on the configuration of your Enphase system. The Envoy can communicate with Enphase IQ micro-inverters, Enphase ACB and IQ batteries, Enphase Ensemble Enpower switch and load shedding relays and Enphase compatible generators.
-
You may know referred product names under other names from the past or future.
-
In this documentation, the term SN is used for a device serial-number placeholder. Entities will contain the actual serial-number of the device.
Solar production data
All Envoy models with solar inverters, with or without installed production CT, for all firmware versions, report solar current and historical production data.
Aggregated production data
The Envoy device reports aggregated data for all connected micro-inverters.
Production sensor entities
- Envoy SN Current power production: Current aggregated inverter power production in W.
- Envoy SN Energy production last seven days: Energy produced in previous 7 days, not including today’s, in Wh, display scaled to kWh. (See known limitations Energy Incorrect). This entity is not logged in statistics.
- Envoy SN Energy production today: Energy produced since midnight in Wh, default display scaled to kWh. (See known limitations Late reset, Energy Incorrect).
- Envoy SN Lifetime energy production: Lifetime energy production in Wh, default display scaled to MWh. (See known limitations Lifetime reset).
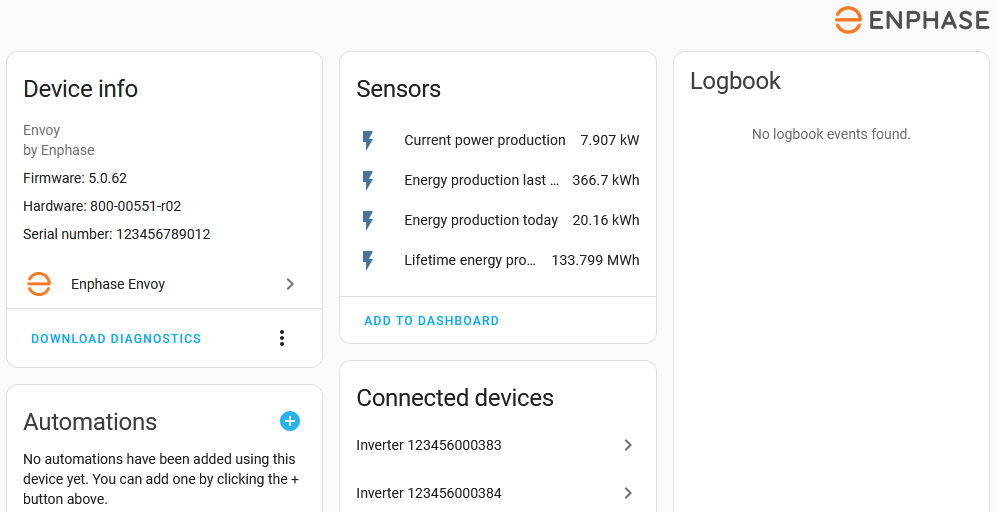
When used with multiphase CT phase data, disabled phase entities are available as well.
Individual micro-inverter production data
The Envoy reports individual micro-inverter device production data. SN is the micro-inverter serial-number.
Sensor entities
- Inverter SN: Current power generated by the inverter in W.
- Inverter SN last reported: Time when Envoy last received a data update from the inverter. Typical update rate for an inverter to the Envoy is every 5 minutes. This entity is disabled by default for all inverters.

House consumption data
House consumption data requires an Envoy Metered equipped and configured with at least 1 consumption CT.
Consumption Sensor Entities
- Envoy SN Current power consumption: Current power consumption in W.
- Envoy SN Lifetime energy consumption: Lifetime energy consumption in Wh, default display scaled to MWh.
- Envoy SN Energy production last seven days: Energy consumption in previous 7 days, not including today’s, in Wh, display scaled to kWh. This entity is not logged in statistics.
- Envoy SN Energy consumption today: Energy consumption since midnight in Wh, default display scaled to kWh.
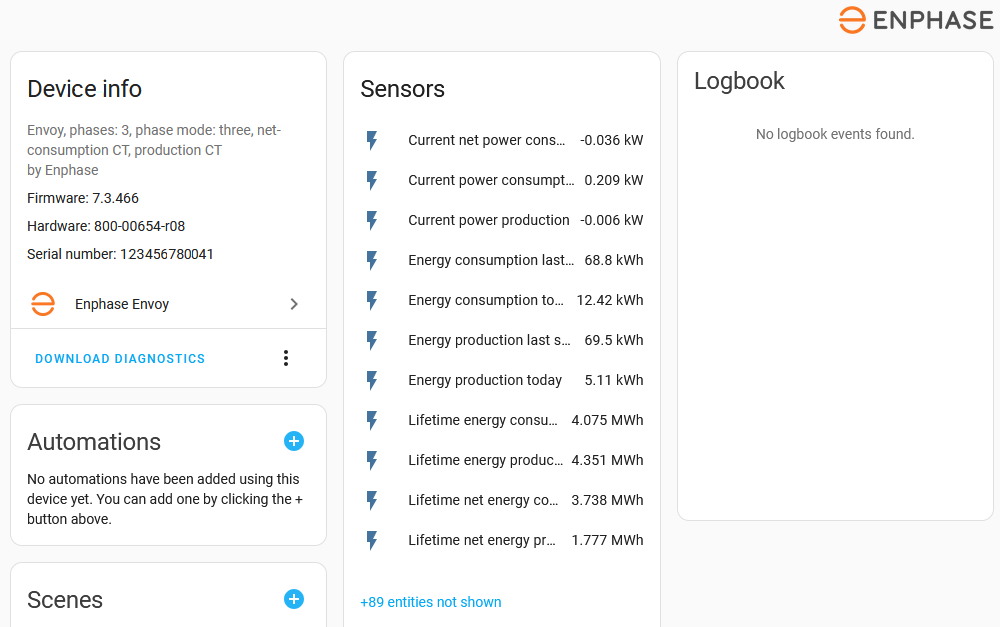
When used with multiphase CT phase data, disabled phase entities are available but not shown. Enable as needed.
Current Transformers
The Envoy Metered can be equipped with up-to 6 CT. These can be assigned to production, consumption and/or storage measurements in single or multiple phase setups.
The below diagram shows CT installation positions and how they are referred to.
- The production CT measures the energy exchange between Solar production and the switchboard.
- If the consumption CT is installed as Load only a.k.a. total-consumption it measures energy exchange from the switchboard to the loads/house.
- If the consumption CT is installed as Load with Solar a.k.a. net-consumption, it measures energy exchange between the switchboard and the grid.
- The storage CT measures the energy exchange between the battery storage and the switchboard.
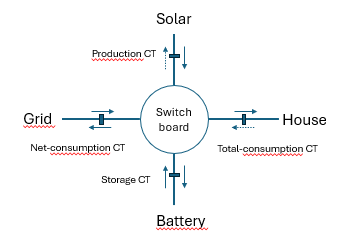
This in no way represents a configuration direction, as actual configuration is driven by local rules, installer designs and Enphase installation guidelines. Variations may exist, based on specific needs or rules. This merely describes a simplified view and naming conventions used in this documentation to clarify integration operation. Refer to Enphase documentation
When an Envoy Metered is equipped with a production CT, the CT data will be used to provide the aggregated solar production data. Likewise, the installed consumption CT will be the source for the house consumption data.
Either a net-consumption or a total-consumption CT is installed. The Envoy will calculate the data for the other one.
CT Aggregate and phase data
When using CT in multiphase enabled configurations, both aggregated and individual phase data is available. If only 1 phase is configured, phase data is the same as the aggregated data and no phase entities are created. If more than 1 phase is configured, disabled phase entities for each phase are created, enable them as needed.
Phase entity names are the names used for the aggregated entities, with the phase name in the post-fix. Phase names are L1, L2, L3. For example, once enabled, lifetime energy production on phase 3 is available as Envoy SN Lifetime energy production L3.
Current transformer entities
CT measure multiple properties of the energy exchange which are available as Envoy device entities. These are all disabled by default, enable them as desired.
Production CT sensor entities
- Envoy SN Frequency production CT: Frequency in Hz.
- Envoy SN Voltage production CT: Voltage in V. (see limitations Summed voltage)
- Envoy SN Production CT current: Current in A.
- Envoy SN Powerfactor production CT: Powerfactor, ratio of active to apparent power.
-
Envoy SN Metering status production CT: Status of the metering process:
normal,not-metering,check-wiring. - Envoy SN Meter status flags active production CT: Count of CT status flags active. See troubleshooting CT Active flag count when non-zero.
Net-consumption CT sensor entities
- Envoy SN Frequency net consumption CT: Frequency in Hz .
- Envoy SN Voltage net consumption CT: Voltage in V. (see limitations Summed voltage
- Envoy SN net consumption CT current: Current in A.
- Envoy SN Powerfactor net consumption CT: Power factor, ratio of active to apparent power.
-
Envoy SN Metering status net consumption CT: Status of the metering process:
normal,not-metering,check-wiring. - Envoy SN Meter status flags active net consumption CT: Count of CT status flags active. See troubleshooting CT Active flag count when non-zero.
Storage CT sensor entities
- Envoy SN Frequency storage CT: Frequency in Hz.
- Envoy SN Voltage storage CT: Voltage in V. (see limitations Summed voltage
- Envoy SN storage CT current: Current in A.
- Envoy SN Powerfactor storage CT: Power factor, ratio of active to apparent power.
-
Envoy SN Metering status storage CT: Status of the metering process:
normal,not-metering,check-wiring. - Envoy SN Meter status flags active storage CT: Count of CT status flags active. See troubleshooting CT Active flag count when non-zero.
For storage CT energy entities refer to battery sensor description.
Grid sensor entities
When the Envoy Metered is equipped with a net-consumption CT, entities for Grid import and export are available.
- Envoy SN Current net power consumption: Current power exchange from (positive) / to (negative) the grid in W, default display in kW.
- Envoy SN Lifetime net energy consumption: Lifetime energy consumed / imported from the grid in Wh, default display in MWh.
- Envoy SN Lifetime net energy production: Lifetime energy produced / exported to the grid in Wh, default display in MWh.
When used with multiphase CT phase data, disabled phase entities are available as well.
Grid Balanced import/export sensor entities
When the Envoy Metered is equipped with a total-consumption CT instead of a net-consumption CT, no individual entities for Grid import and export are available, as these are not measured. Instead, the balance (difference) of grid import and export is available in a single entity, disabled by default, enable as desired.
- Envoy SN balanced net power consumption: Current power exchange from (positive) / to (negative) the grid in W, default display in kW. (This is the same value as Envoy SN Current net power consumption when using a net-consumption CT.)
- Envoy SN Lifetime balanced net energy consumption: Lifetime energy balance (difference) of imported and exported grid energy in Wh, default display in kWh.
When used with multiphase CT phase data, disabled phase entities are available as well.
Battery Storage data
Enphase battery systems of multiple generations and configurations can provide integration entity data.
- AC-Batteries: first generation battery setup, no longer in production.
- IQ Batteries: current Enphase battery models.
The batteries can be implemented in stand-alone configuration or as part of Enphase Ensemble systems with the Enpower/IQ System Controller.
IQ battery data
Aggregated IQ battery sensor entities
Aggregated IQ battery data includes all installed IQ Batteries.
- Envoy SN Battery: Current aggregated state of charge in %
- Envoy SN Available battery energy: Current aggregated IQ battery energy content in Wh
- Envoy SN Battery capacity: Aggregated maximum IQ battery energy content in Wh
- Envoy SN Reserve battery level: Configured aggregated IQ Battery backup state of charge in %
- Envoy SN Reserve battery energy: Configured aggregated IQ battery backup energy content in Wh
If a storage CT is installed:
- Envoy SN Current battery discharge: Current power in/out of the battery in W.
- Envoy SN Lifetime battery energy discharged: Lifetime energy discharged from the battery in Wh, default display format MWh.
- Envoy SN Lifetime battery energy charged: Lifetime energy charged in the battery in Wh, default display format MWh.
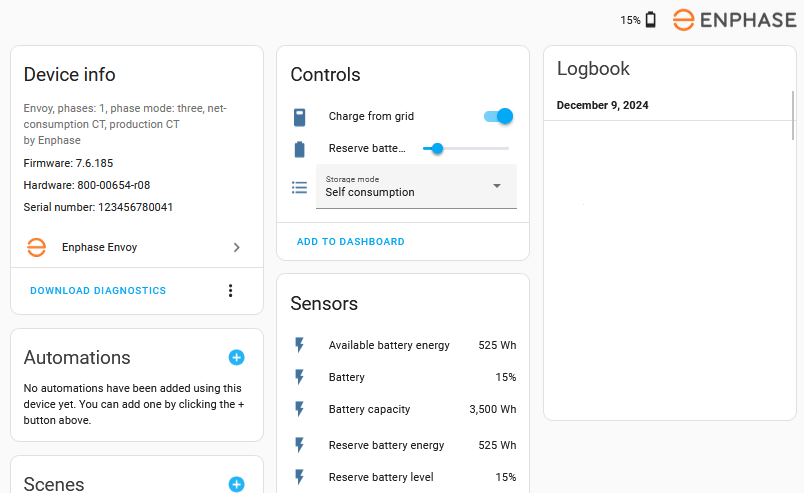
If an Enpower device is installed, then Charge from grid, Reserve battery level, and Storage mode are available as Enpower device entities instead of Envoy device entities.
Individual IQ battery data
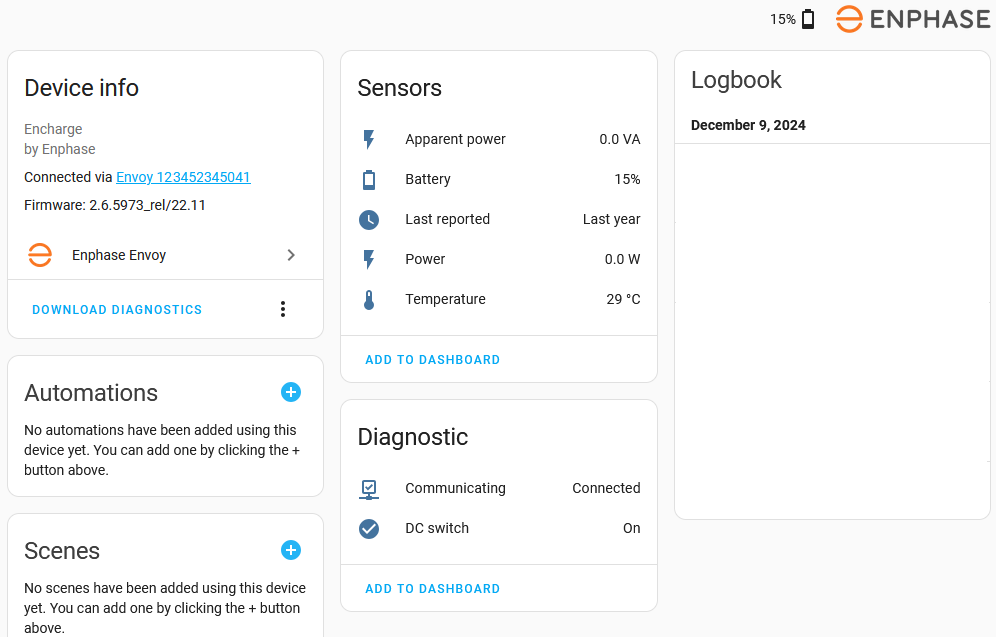
For each IQ Battery, an Encharge device is created, linked to the Envoy parent device. Each encharge devices offers individual battery sensors.
Individual IQ battery sensor entities
- Encharge SN Battery: Current state of charge of the battery in %
- Encharge SN Power: Current power in W
- Encharge SN Apparent Power: Current apparent power in VA
- Encharge SN Temperature: Current temperature in degrees C or F, based on your localization.
- Encharge SN Last reported: Time when Envoy received last update from the battery.
Individual IQ battery binary sensor entities
- Encharge SN Communicating: Communication status of encharge battery, Connected / Disconnected. This is a diagnostics entity.
- Encharge SN DC Switch: DC Switched off status of encharge battery, On / Off. This is a diagnostics entity.
AC-battery data
No individual AC-battery data is available, only aggregated AC-battery data for all AC-batteries.
AC-battery sensor entities
- ACB SN Battery: Current AC-battery state of charge in %
- ACB SN Battery state: AC-battery state: charging, idle, discharging
- ACB SN Power: Current AC-battery power in W
- Envoy SN Available ACB battery energy: Current AC-battery energy content in Wh

Aggregated IQ and AC battery sensor entities
If both IQ and AC batteries are used, aggregated battery data for all installed IQ batteries and AC batteries is available.
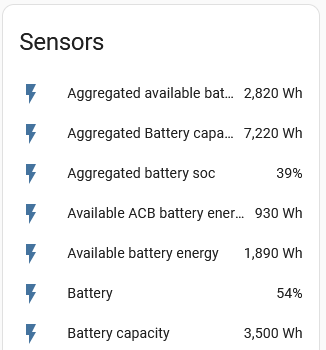
- Envoy SN Aggregated Battery SOC: Overall aggregated battery state of charge in %
- Envoy SN Aggregated Available battery energy: Overall aggregated battery energy content in Wh
- Envoy SN Aggregated Battery capacity: Overall aggregated maximum battery energy content in Wh
The below figure shows the 3 aggregated entities along with the AC-battery energy and 3 of the IQ Battery aggregate values.
Enpower data
Data for an installed Enphase Enpower off-grid enabling switch is available in various entities for an Enpower device.
Enpower binary sensor entities
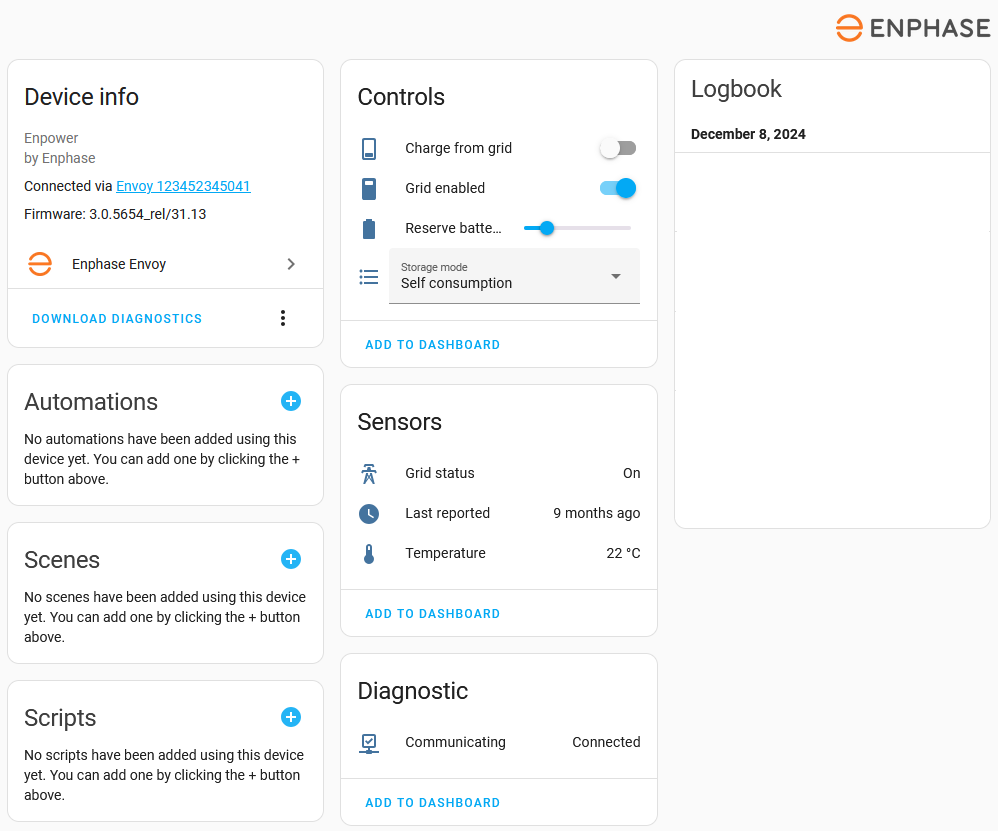
- Enpower SN Grid status: status of the grid.
Enpower number entities
- Enpower SN Reserve battery level: reserve battery level to maintain for outages in %. Changing the value, on the UI or in an action, will update the setting in the Envoy. Also see limitations, No battery controls.
Enpower select entities
-
Enpower SN Storage mode: Current configured storage mode,
Full backup,Self consumption,Savings mode. Changing the selection, in the UI or in an action, will update the setting in the Envoy. Also see limitations, No battery controls.
Enpower sensor entities
- Enpower SN Temperature: Current temperature in degrees C or F, based on your localization.
- Enpower SN Last reported: Time when Envoy received last update from the enpower device.
- Enpower SN Communicating: Communication status of enpower switch, Connected / Disconnected. This is a diagnostics entity.
Enpower switch entities
- Enpower SN Charge from grid: Allow or disallow charging Encharge/IQ batteries from grid when a charge schedule is active. Changing the switch, in the UI or in an action, will update the setting in the Envoy. If no charge schedule is active, changing the setting will not have an immediate effect. Also see limitations, No battery controls.
- Enpower SN Grid enabled: Enable or disable grid connection. Note that the Enpower has a slight delay built-in between receiving these commands and actually switching the system on or off grid.
If no Enpower is installed, then Charge from grid, Reserve battery level, and Storage mode are available as Envoy device entities instead of Enpower device entities.
Enpower load shedding relays
With the Enpower/IQ System Controller installed, entities for the state and control of the Enpower’s four load-shedding relays are available. In battery installations without load-shedding and off-grid functionality, used in many EU countries, these sensors and switches are not available.
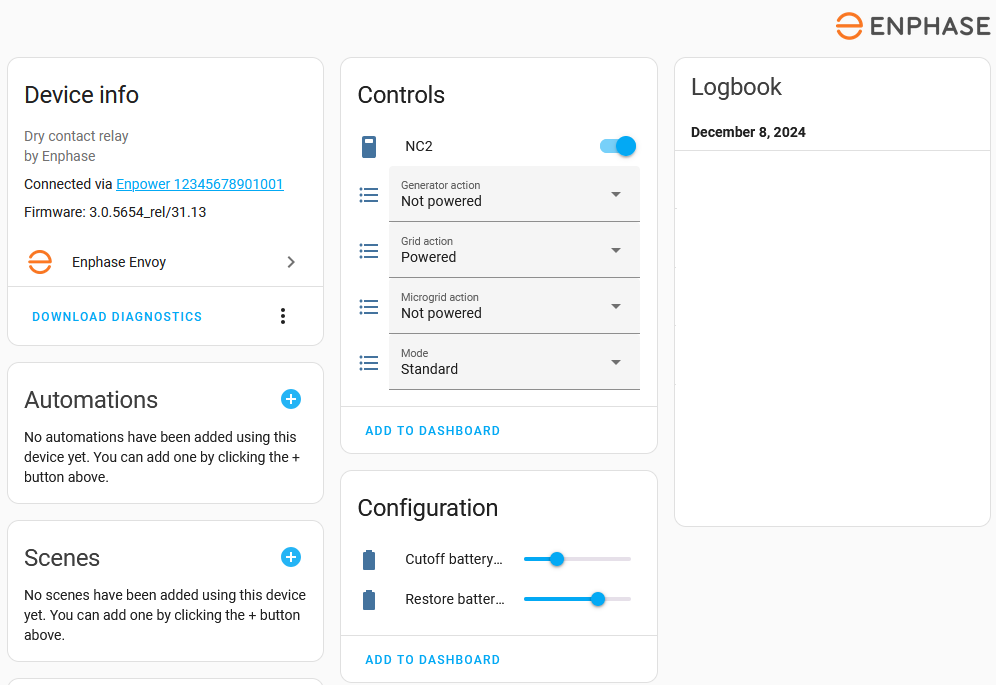
The Enphase Enpower has 4 load shedding relays (volt-free contacts, often referred to as dry-contacts) that can be used to control non-essential loads in your home. These have two main modes of operation:
-
Standard: When the mode entity is set to standard, you can simply set the state of the relay to be powered or not powered for each mode of operation: on grid, off grid, and on generator.
-
Battery level: When the relay mode is set to battery level, the relays will turn on and off based on the remaining battery level of your Encharge IQ batteries. Two number entities are available to control the cutoff and restore levels for the relays. When the battery level drops below the cutoff level, the relays will turn off, removing power from attached loads. When the battery level rises above the restore level, the relays will turn back on and restore power to attached loads.
The names of entities and devices are derived from the load_name configured in the Enpower device.
Dry-contact number entities
-
LOAD_NAME cutoff battery level: battery level below which relay will turn off when in
Battery levelmode. -
LOAD_NAME restore battery level: battery level above which the relay will turn back on when in
Battery levelmode.
Dry-contact select entities
-
LOAD_NAME mode: dry-contact operational mode:
standardorbattery -
LOAD_NAME Grid action: dry-contact on grid action:
Powered,Not powered,Follow schedule,None -
LOAD_NAME Micro-grid action: dry-contact on micro-grid action:
Powered,Not powered,Follow schedule,None -
LOAD_NAME Generator action: dry-contact on generator action:
Powered,Not powered,Follow schedule,None
Data polling interval
All data is collected in one coordinated collection cycle and sourced from a limited set of endpoints on the Envoy. For example, three different values sourced from the same endpoint are not pulled in three different requests but provided from the same single request. This method minimizes the number of requests to the Envoy. The local REST API of the Envoy is used. Only when the 1-year valid token is to expire, 1 month before due data, a new token is requested from the Enphase Enlighten website.
The integration collects data for all entities by default every 60 seconds. To customize the collection interval, refer to defining a custom polling interval. Specify one single entity from the envoy device as target of the action using the + choose entity button. Updating one entity will update all entities of the Envoy and the related devices like the inverters; there is no need to specify multiple or all entities or add (all) inverter entities. When using multiple Envoys, add one entity for each envoy as targets or create separate custom polling intervals with a single entity as needed.
Envoy installations without installed CT, collect individual solar inverter data every 5 minutes. This collection does not occur for each inverter at the same time in the 5-minute period. Shortening the collection interval will at best show updates for individual inverters quicker, but not yield more granular data.
With installed CT, data granularity increases and shortening the collection interval can provide more details. The Envoy, however, has no unlimited resources and shortening the collection interval may result in dropped connections, Envoy freeze or restarts. It will require some step-wise tuning for each individual situation.
Credentials or device IP address update
This integration supports updating the Envoy configuration through a reconfigure menu option. The reconfiguration allows for changing the Envoy IP address, username, and/or password. Use this menu option if your Enlighten credentials or the device’s IP address has changed and needs to be manually updated. The latter is typically automatically detected and updated.
Use this menu option also when an Envoy firmware upgrade requires a switch from local Envoy username/password to token-based authentication with Enlighten username/password (refer to authentication requirements).
Firmware updates
The firmware version is read from the envoy when the configuration entry is loaded. The firmware version is then used in the process of determining capabilities and required authorization methods. The firmware version is available as the sw_version attribute of the configuration entry and shown on the device view of the envoy.
Every 4 hours, the actual firmware version in the Envoy is compared to the known one. If the actual version differs, the configuration entry is reloaded to effect any needed configuration changes. If the moment of the firmware update is known, a manual reload on the envoy configuration entry can be done to achieve the same.
The firmware version is not available as an entity, but rather as an attribute of the envoy. To use the firmware in automation, scripts or templates, use below example with any envoy entity.
{{device_attr(device_id('sensor.envoy_SN_current_power_production'),'sw_version')}}
Energy dashboard
This integration provides several entities suitable for the energy dashboard.
Solar panels
For Solar production, use the Envoy SN Lifetime energy production entity. Overall this has proven to be more stable as the daily value reported by the Envoy. (See known limitations Late reset, Energy Incorrect).
Electricity grid
Whether there is data available to use with the electricity grid depends on the installed CT, if any. Also, see Limitations, Balancing grid meter.
Electricity grid with net-consumption CT
With a net-consumption CT installed, both grid consumption and return to grid data is available.
- For Grid consumption, use the Envoy SN Lifetime net energy consumption entity.
- For Return to grid, use the Envoy SN Lifetime net energy production entity.
Electricity grid with total-consumption CT
With a total-consumption CT installed, only the balanced grid import-export value is available. This value is not suited for direct use with the energy dashboard. It will require some templating to split the value into an import and export value.
Concept to split balanced Grid value into individual import-export values
The concept is to track value changes of the Envoy SN Lifetime balanced net energy consumption entity, add positive changes to a grid_import entity and add negative changes to a grid_export entity.
- trigger:
    - platform: state
      entity_id: sensor.envoy_sn_lifetime_balanced_net_energy_consumption

  sensor:
    - name: "Grid import"
      unique_id: calculated_envoy_grid_import
      unit_of_measurement: "Wh"
      state: "{{ this.state | int(0) + ([0, (trigger.to_state.state | int(0) - trigger.from_state.state | int(0))] | max }}"
      device_class: energy
      state_class: total_increasing
    - name: "Grid export"
      unique_id: calculated_envoy_grid_export
      unit_of_measurement: "Wh"
      state: "{{ this.state | int(0) - ([0, (trigger.to_state.state | int(0) - trigger.from_state.state | int(0))] | min }}"
      device_class: energy
      state_class: total_increasing
The above example does not address handling unavailable or unknown states, value changes over Home Assistant outages nor changing UOM to a preferred one. Examples for these exist in various community topics.
Alternatively, this can be done by splitting the Envoy SN balanced net power consumption into power import and export and two Riemann sum integral helpers to calculate energy from the power values.
Home battery storage
Whether there is data available to use with the electricity grid depends on the installed storage CT, if any.
Home battery storage with storage CT
With a storage CT installed, data for both Energy coming out and going into the battery is available.
- For Energy going into the battery, use the Envoy SN Lifetime battery energy charged entity.
- For Energy coming out of the battery, use the Envoy SN Lifetime battery energy discharged entity.
Home battery storage without storage CT
Without a storage CT installed, only the current Power in and out of individual batteries, or the current aggregated battery energy content is available. These values are not suited for direct use with the energy dashboard. It will require some templating to split the value into an import and export values.
Home battery storage data using battery power
Battery power is the current power flow in or out of an individual battery. Using the summed Power values of all batteries, the result needs to be split in 2 entities, representing total power in and power out. Next, each entity needs to be integrated into energy, using two Riemann sum integral helpers. The resulting data can be used for Energy going into the battery and Energy coming out of the battery.
Concept to split Battery power value into individual import-export power values
The concept is to first sum all battery Power values using a combine state helper. Then track value changes of the summed value entity, add positive changes to a battery_charge power entity and add negative changes to a battery_discharge power entity.
- trigger:
    - platform: state
      entity_id: sensor.envoy_sn_summed_battery_power_entity

  sensor:
    - name: "Battery charge power"
      unique_id: calculated_envoy_battery_charge_power
      unit_of_measurement: "W"
      state: "{{ this.state | int(0) + ([0, (trigger.to_state.state | int(0) - trigger.from_state.state | int(0))] | max }}"
      device_class: power
      state_class: measurement
    - name: "Battery discharge power"
      unique_id: calculated_envoy_battery_discharge_power
      unit_of_measurement: "W"
      state: "{{ this.state | int(0) - ([0, (trigger.to_state.state | int(0) - trigger.from_state.state | int(0))] | min }}"
      device_class: power
      state_class: measurement
The above example does not address handling unavailable or unknown states, value changes over Home Assistant outages nor conversion losses.
Home battery storage data on the available battery energy
Changes in the Available battery energy are a result from Energy going in or out of the battery. Splitting these energy changes into 2 entities, one tracking positive changes, one the negative changes, results in data that can be used for Energy going into the battery and Energy coming out off the battery. This method does not account for conversion losses as Energy content changes do not exactly match actual energy flow in and out of the battery.
Concept to split Available battery energy value into individual import-export values
The concept is to track value changes of the Envoy SN Available battery energy entity, add positive changes to a battery_charge entity and add negative changes to a battery_discharge entity.
- trigger:
    - platform: state
      entity_id: sensor.envoy_sn_available_battery_energy

  sensor:
    - name: "Battery charge"
      unique_id: calculated_envoy_battery_charge
      unit_of_measurement: "Wh"
      state: "{{ this.state | int(0) + ([0, (trigger.to_state.state | int(0) - trigger.from_state.state | int(0))] | max }}"
      device_class: energy
      state_class: total_increasing
    - name: "Battery discharge"
      unique_id: calculated_envoy_battery_discharge
      unit_of_measurement: "Wh"
      state: "{{ this.state | int(0) - ([0, (trigger.to_state.state | int(0) - trigger.from_state.state | int(0))] | min }}"
      device_class: energy
      state_class: total_increasing
The above example does not address handling unavailable or unknown states, value changes over Home Assistant outages nor conversion losses.
Individual devices
Although not a replacement for individual energy or power measurement devices, with multiphase CT installed, energy consumption for phases is available. These can be used for individual devices, if of interest.
Actions
Available actions are: switch.turn_on, switch.turn_off, switch.toggle, number.set_value, select.select
Action switch.turn_on/switch.turn_off/switch.toggle
These actions turn on, off or toggle
- the Enpower device switches
grid_enabled,charge_from_grid - the Enpower load shedding relays switch.
| Data attribute | Optional | Description |
|---|---|---|
entity_id |
no | Name(s) of entities. For example, switch.enpower_12345678901001_grid_enabled. |
Example:
action: switch.toggle
target:
  entity_id:
    - switch.enpower_12345678901001_grid_enabled
data: {}

action: switch.turn_on
data: {}
target:
  entity_id:
    - switch.no2
    - switch.nc2
Action number.set_value
This action changes the setting for the Enpower Reserve battery level.
| Data attribute | Optional | Description |
|---|---|---|
entity_id |
no | Name(s) of entities. For example, number.enpower_12345678901001_reserve_battery_level. |
value |
no | The target value between 0 and 100 to set Enpower reserve battery level to. |
Example:
action: number.set_value
target:
  entity_id: number.enpower_12345678901001_reserve_battery_level
data:
  value: "25"
Action select.select
This action changes the:
- Relays relay_mode, grid_action, micro_grid_action or generator_action
- Battery storage mode
| Data attribute | Optional | Description |
|---|---|---|
entity_id |
no | Name(s) of entities. For example, select.nc2_generator_action. |
option |
no | For relay modes: powered, not_powered, schedule, none. For storage modes: backup, self_consumption, savings
|
Example:
action: select.select_option
target:
  entity_id:
    - select.nc2_generator_action
data:
  option: not_powered

action: select.select_option
target:
  entity_id:
    - select.enpower_12345678901001_storage_mode
data:
  option: backup
Technically select.first, select.last, select.previous, select.next are available as well, but as there’s no logical sequence in the values to select, their use is not advocated.
Know issues and limitations
Firmware changes
Envoy firmware
No battery controls
As of Envoy firmware 8.2.4225, the Envoy no longer supports the following operations through the local REST API used by Home Assistant:
- Setting battery modes
- Enabling/disabling charging from the grid
- Changing reserve battery level
Until a resolution is found, you must use the Enphase App to control these features.
Late reset
When using Envoy Metered with CT, not all firmware versions reset ‘Energy production today’ at midnight. Delays of up to 15 minutes have been reported. In this case, best use a utility meter with the Lifetime energy production entity for daily reporting.
Energy incorrect
When using Envoy Metered with CT
- not all firmware versions report
Energy production todaycorrectly. Zero data and unexpected spikes have been reported. In this case, best use a utility meter with theLifetime energy productionentity for daily reporting. - not all firmware versions report
Energy production last seven dayscorrectly. Zero and unexpected values have been reported.
Lifetime reset
Envoy Metered without installed CT, running older firmware versions, reportedly resets Lifetime energy production to 0 when reaching 1.2 MWh. For use with the energy dashboard, the reset is not an issue. In a recent firmware version 8.x.x the reset is solved, but results in a one-time step change to the full lifetime value. This has impact on the energy dashboard, it can be solved by setting the statistics value for that moment to 0 in Developer Tools: Statistics
History example for Envoy Lifetime energy production value reset

Summed Voltage
The Envoy Metered in multiphase setup, sums the voltages of the phases measured on the CT for the aggregated data. This may be valid for split-phase, but for 3-phase systems, use the individual phases rather than the summed value.
Balancing grid meter
In multiphase installations with batteries, in countries with phase-balancing grid meters, the battery will export to the grid on one phase the amount it lacks on another phase. This other phase pulls the missing amount from the grid, as if it is using the grid as a ‘transport’ between phases. Since the grid meter will balance the amount imported and exported on the two phases, the net result is zero. The Envoy multiphase net-consumption CTs, however, will report the amounts on both phases, resulting in too high export on one and too high import on the other. One may consider using the lifetime balanced net energy consumption which is the sum of grid import and export to eliminate this effect. This would require some templating to split these values into import and export values. Alternatively, use the current net power consumption or balanced net power consumption with a Riemann integral sum helper.
Troubleshooting
Periodic network connection issues
If you experience periodic connection issues, ensure the Envoy is connected to only one interface (either Ethernet OR Wi-Fi, not both). The Envoy should not be both on your local LAN (Ethernet) and local Wi-Fi simultaneously. Having both connections active can cause auto-discovery to alternate between interfaces, resulting in connection interruptions approximately every 30 minutes.
CT Active flag count is non-zero
The CT active flag count value shows the number of CT status flags that are raised. In a normal state, the value of CT active flag count is zero. If the value is non-zero, consult the diagnostic report of the Envoy and look for raw_data - /ivp/meters - statusFlags for set flags, one or more from (production-imbalance | negative-production | power-on-unused-phase | negative-total-consumption). Their somewhat descriptive names may be an indication of installation issues.
Debug logs and diagnostics
This integration provides debug log and diagnosticsThe diagnostics integration provides a way to download diagnostic data from a device or integration for sharing in issue reports. Sharing diagnostics data when reporting an issue allows developers to diagnose and fix your reported problem quicker. [Learn more] report as described in the Home Assistant troubleshooting pages.
Debug log
When experiencing issues during the use of the integration, enable the debug log for the Envoy. Then restart the integration. This will add details on the data collection to the Home Assistant log file. Leave the debug log enabled long enough to capture the occurrence of the issue. If the issue is intermittent, this may take a while and it may grow the log file quite a bit.
If you’re expecting features to show but they are not shown, make sure to reload the integration while debug logging is enabled. When this integration is loaded, it will scan the Envoy for available features and configure these as needed. Following this initial scan, only data for the found features is collected. Performing a reload with debug enabled results in the debug log containing the initial full scan to assist with analyzing any missing features. Some features are disabled by default, and you need to enable them if you want them to show. Verify this before starting a debug session.
Once the issue occurred, stop the debug logging again (download of debug log file will start automatically). When reporting the issue, include the debug log file as well as a diagnosticsThe diagnostics integration provides a way to download diagnostic data from a device or integration for sharing in issue reports. Sharing diagnostics data when reporting an issue allows developers to diagnose and fix your reported problem quicker. [Learn more] file.
The debug log will show all communication with the Envoy / IQ Gateway. Lines starting with below examples are log entries for the integration:
2024-03-07 11:20:11.897 DEBUG (MainThread) [homeassistant.components.enphase_envoy
2024-03-07 11:20:11.898 DEBUG (MainThread) [pyenphase
Below a typical data request / reply sequence in the log file. These lines will contain the data details received from the Envoy.
... [pyenphase.envoy] Requesting https://192.168.1.2/ivp/meters with timeout ...
... [pyenphase.envoy] Request reply from https://192.168.1.2/ivp/meters status 200:...
The end of a collection cycle is marked by:
... [homeassistant.components.enphase_envoy.coordinator] Finished fetching Envoy 123456 data in 1.234 seconds (success: True)
Diagnostics
The diagnosticsThe diagnostics integration provides a way to download diagnostic data from a device or integration for sharing in issue reports. Sharing diagnostics data when reporting an issue allows developers to diagnose and fix your reported problem quicker. [Learn more] data file is a JSON file and includes a data section with the details for this integration. The file can be viewed with any text editor. The data section has up to 6 major subsections which reflect how the integration is set up and data is used. Include the file when reporting issues.
Below the 6 subsections, each collapsed.
  "data": {
    "config_entry": { ...
    },
    "envoy_properties": { ...
    },
    "raw_data": { ...
    },
    "envoy_model_data": { ...
    },
    "envoy_entities_by_device": [ ...
    ],
    "fixtures" : { ...
    }
  }
}
Config entry
Shows the integration configuration created when the integration was added.
Envoy properties
Shows the conclusions of the initial data scan and what features were identified, including the detected firmware version in the Envoy.
Raw data
Shows the data collected from the Envoy during the last data scan when the diagnostic report was created. If in doubt about data shown in the dashboards, consult this section to find the raw data sent by the Envoy. The integration is not modifying this data, it’s just providing the data to the entities.
Envoy model data
Shows the data of the Envoy extracted from the raw_data into Envoy class data used by the Home Assistant integration. This is a subset of the full raw dataset.
Envoy entities by device
Shows all entities created by the integration based on the findings of the initial scan, grouped by device. Entity state based on the last data collection cycle is included. State values here come from the Envoy model data and are the values visible in the dashboards.
Fixtures
The data to build test fixtures from. This section is only available when the option to Collect test fixture data is enabled in the integration options.