Scenes
The Scenes integrationIntegrations connect and integrate Home Assistant with your devices, services, and more. [Learn more] lets you use scenesScenes capture the states you want certain entities to be. For example, a scene can specify that light A should be turned on and light B should be bright red. [Learn more] in Home Assistant. A scene stores the states that you want for a group of entitiesAn entity represents a sensor, actor, or function in Home Assistant. Entities are used to monitor physical properties or to control other entities. An entity is usually part of a device or a service. [Learn more], and sets them again in one step when you activate it. For example, a “Movie night” scene can dim the TV backlight, turn off the ceiling light, and switch the TV to the right input.
Each scene is an entityAn entity represents a sensor, actor, or function in Home Assistant. Entities are used to monitor physical properties or to control other entities. An entity is usually part of a device or a service. [Learn more], for example, scene.movie_night. You can activate it from a dashboard, an automation, or a script, and start an automation when it’s activated.
To create a scene, use the scene editor. To learn what scenes are and when to use them, refer to Scenes.

Scenes from other integrations
Some integrations, such as Philips Hue, MQTT, and KNX, provide their own scenes. These scenes are also scene entities, and you activate them in the same way. When you activate one, Home Assistant tells the integration to activate it, and the integration or the device decides what changes. That’s why you can’t change these scenes in the scene editor. You manage them where the integration manages its scenes. For example, you create Hue scenes in the Hue app, KNX scenes in the KNX panel or in YAML, and MQTT scenes in YAML or with MQTT discovery.
The state of a scene
A scene doesn’t have an on or off state. Activating a scene sets the states of its entities, but there is nothing to turn off afterwards. To go back to the earlier states, activate another scene, or save the current states first with Create scene.
The state of a scene entity is the date and time when the scene was last activated. Home Assistant keeps it after a restart.
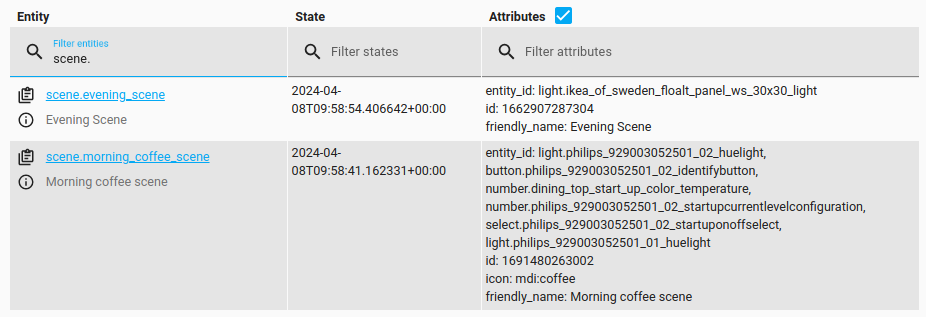 Screenshot showing the state of a scene entity in **Settings** > **Tools** > **States**
In addition, the entity can have the following states:
- Unavailable: The entity is currently unavailable.
- Unknown: The state is not yet known.
Scenes from the scene editor, from YAML, or from the Create scene action have these attributes:
-
entity_id: The entities in the scene. -
id: The unique ID of the scene, if it has one.
Defining scenes in YAML
Scenes that you create in the scene editor are stored in the scenes.yaml file. You can also write scenes in YAML yourself, for example, directly in your configuration.yamlThe configuration.yaml file is the main configuration file for Home Assistant. It lists the integrations to be loaded and their specific configurations. In some cases, the configuration needs to be edited manually directly in the configuration.yaml file. Most integrations can be configured in the UI. [Learn more] file. Only the scenes in scenes.yaml can be edited in the scene editor.
Under entities, you list the states that the entities should have, not the actions to get there:
# Example configuration.yaml entry
scene:
  - name: "Romantic"
    icon: "mdi:flower-tulip"
    entities:
      light.tv_back_light: "on"
      light.ceiling:
        state: "on"
        brightness: 200
        color_mode: "xy"
        xy_color:
          - 0.33
          - 0.66
  - name: "Movies"
    entities:
      light.tv_back_light:
        state: "on"
        brightness: 125
      light.ceiling: "off"
      media_player.sony_bravia_tv:
        state: "on"
        source: "HDMI 1"
  - name: "Standard"
    entities:
      light.tv_back_light:
        state: "off"
      light.ceiling:
        state: "on"
        brightness: 125
        color_mode: "white"
Configuration Variables
A unique ID for the scene. Scenes that you create in the scene editor get one automatically. Without an ID, you can’t edit the scene in the scene editor, or change the settings of the scene entity in the UI, for example, its area or category.
There are two ways to define the state of an entity:
- Only the state
- For example,
light.tv_back_light: "on".
- For example,
- The state with attributes
- For example, the brightness and color of a light. Add
stateand the attributes below the entity. To find the attributes of an entity, go to Settings > Tools > States.
- For example, the brightness and color of a light. Add
Editing a YAML scene in the scene editor
If you wrote a scene in another YAML file, for example, directly in your configuration.yamlThe configuration.yaml file is the main configuration file for Home Assistant. It lists the integrations to be loaded and their specific configurations. In some cases, the configuration needs to be edited manually directly in the configuration.yaml file. Most integrations can be configured in the UI. [Learn more] file, you can move it to scenes.yaml, so you can edit it in the scene editor. Your configuration.yaml file loads scenes.yaml with scene: !include scenes.yaml. This line is there by default. Check that your configuration.yaml file has it, and if it’s missing, add it. If your configuration.yaml file already has a scene: section for other scenes, give that section a label, for example, scene manual:, because each key can only be used once.
-
Copy the scene from its old file to
scenes.yaml.-
scenes.yamlis a list, so each scene starts with-.
-
-
Give the scene an
id. Theidcan be any text, as long as no other scene uses it:# Example scenes.yaml entry - id: "romantic" name: "Romantic" entities: light.tv_back_light: "on" light.ceiling: state: "on" brightness: 200 color_mode: "xy" xy_color: - 0.33 - 0.66 -
Remove the scene from its old file.
- If you leave it there, Home Assistant loads both copies, and you have the scene twice.
-
- Result: The scene shows up in the scene editor, and you can edit it there.
When you save a scene in the editor, the comments in scenes.yaml are lost.
Reloading scenes
After you change scenes in YAML, you can apply the changes without restarting Home Assistant:
- Go to Settings > Tools > YAML, and under YAML configuration reloading, select Scenes.
- In an automation or a script, use the Reload scenes action.
Reloading also removes the scenes that you created with the Create scene action.
List of triggers
The Scenes integrationIntegrations connect and integrate Home Assistant with your devices, services, and more. [Learn more] provides the following triggers. Each link below opens a dedicated page with examples, fields, and a step-by-step UI walkthrough.
-
Scene activated (
scene.activated) Triggers when one or more scenes are activated.
For an overview of every trigger across all integrations, see the triggers reference.
List of actions
The Scenes integrationIntegrations connect and integrate Home Assistant with your devices, services, and more. [Learn more] provides the following actions. Each link below opens a dedicated page with examples, parameters, and a step-by-step UI walkthrough.
-
Apply scene (
scene.apply) Activates a set of entity states without defining a scene first. -
Create scene (
scene.create) Creates a new scene on the fly. -
Delete scene (
scene.delete) Deletes a scene that was created on the fly. -
Reload scenes (
scene.reload) Reloads the scenes from the YAML configuration. -
Activate scene (
scene.turn_on) Activates a scene.
For an overview of every action across all integrations, see the actions reference.
Scene automation examples
The following examples show how you can use scenes in automations.
You don’t need to edit YAML to use these examples. Copy a YAML snippet from this page, open the visual automation editor in Home Assistant, and press Ctrl+V (or Cmd+V on Mac). Home Assistant automatically converts the pasted YAML into the visual editor format, whether it’s a full automation, a single trigger, a condition, or an action.
Automation: activate a scene slowly when someone comes home
When Sweetheart comes home, this automation activates the Romantic scene. The lights change to their new states over 2.5 seconds, instead of all at once. Transitions only work for lights that support them. Other entities in the scene change right away.
-
Trigger: Zone entered
- Target: Sweetheart
- Zone: Home
-
Action: Activate scene
- Target: Romantic
- Transition: 2.5
YAML example for activating a scene with a transition
- alias: "Activate the romantic scene when Sweetheart comes home"
  triggers:
    - trigger: zone.entered
      target:
        entity_id: device_tracker.sweetheart
      options:
        zone: zone.home
  actions:
    - action: scene.turn_on
      target:
        entity_id: scene.romantic
      data:
        transition: 2.5
Automation: turn things off while a window is open, and restore them afterwards
These two automations work together. When the window opens, the first one saves the current states of the thermostat and the ceiling lights in a new scene, and then turns them off. When the window closes, the second one activates that scene, so everything goes back to how it was.
- Automation 1
-
Trigger: Window opened
- Target: Window
-
Action: Create scene
-
Scene entity ID:
before - Entities snapshot: Thermostat and ceiling lights
-
Scene entity ID:
-
Action: Turn off light
- Target: Ceiling lights
-
Action: Set thermostat HVAC mode
- Target: Thermostat
- HVAC mode: Off
-
Trigger: Window opened
- Automation 2
-
Trigger: Window closed
- Target: Window
-
Action: Activate scene
-
Target:
scene.before
-
Target:
-
Trigger: Window closed
YAML example for saving and restoring states with a window
- alias: "Window opened"
  triggers:
    - trigger: window.opened
      target:
        entity_id: binary_sensor.window
  actions:
    - action: scene.create
      data:
        scene_id: "before"
        snapshot_entities:
          - climate.ecobee
          - light.ceiling_lights
    - action: light.turn_off
      target:
        entity_id: light.ceiling_lights
    - action: climate.set_hvac_mode
      target:
        entity_id: climate.ecobee
      data:
        hvac_mode: "off"
- alias: "Window closed"
  triggers:
    - trigger: window.closed
      target:
        entity_id: binary_sensor.window
  actions:
    - action: scene.turn_on
      target:
        entity_id: scene.before
Troubleshooting
Scene doesn’t open in the scene editor
Symptom: Selecting the scene does nothing
In Settings > Automations & scenes > Scenes, selecting the scene does nothing. The row shows
Description
The scene has no id, so the scene editor can’t open it. This is the case for scenes in YAML without an id, scenes from another integration, and temporary scenes from the Create scene action.
Resolution
- For a scene in YAML, move it to
scenes.yaml, and give it anid. For the steps, refer to Editing a YAML scene in the scene editor. - For a scene from another integration, change it where that integration manages its scenes, for example, in the Hue app or the KNX panel. For details, refer to Scenes from other integrations.
- A temporary scene from Create scene can’t be edited. To change it, run Create scene again with the same Scene entity ID.
Scene can’t be edited in the scene editor
Symptom: “Only scenes in scenes.yaml are editable”
When you open the scene, the scene editor shows Only scenes in scenes.yaml are editable.
Description
The scene has an id, but it’s not in the scenes.yaml file, for example, because it’s written directly in your configuration.yaml file. The scene editor can only edit scenes in scenes.yaml.
Resolution
- To edit the scene in the scene editor, move it to
scenes.yaml. For the steps, refer to Editing a YAML scene in the scene editor. - To keep the scene in its file, change it there, and then reload the scenes.
Changes to a scene in YAML don’t take effect
Symptom: Activating the scene still sets the old states
You changed a scene in YAML, but activating the scene still sets the old states.
Description
Home Assistant reads the scenes from YAML when it starts or when you reload the scenes.
Resolution
Reload the scenes, or restart Home Assistant.
Create scene does nothing: the scene would be empty
Symptom: No scene is created, and there is no error
You run the Create scene action, but no scene is created. There is no error. The logs show Empty scenes are not allowed, often after one or more warnings like Entity light.ceiling_lights does not exist and therefore cannot be snapshotted.
Description
Create scene skips each entity in Entities snapshot that doesn’t exist, for example, because of a typo in the entity ID, or because the entity was renamed or removed. If no entities are left, and Entity states is empty, the scene would be empty, so the action doesn’t create it.
If only some of the entities don’t exist, the scene is created without them.
Resolution
- Check the entity IDs in Entities snapshot. To find the current entity IDs, go to Settings > Devices & services > Entities.
- Fix the entity IDs in the action, and run it again.
Create scene does nothing: the scene already exists
Symptom: The scene isn’t created or changed
You run the Create scene action, but the scene isn’t created or changed. The logs show The scene scene.my_scene already exists.
Description
A scene with that ID already exists in the scene editor or in YAML. Create scene only replaces scenes that it created itself.
Resolution
Use a different Scene entity ID.
Create scene fails: entities and snapshot_entities must not overlap
Symptom: “entities and snapshot_entities must not overlap”
The Create scene action fails, and the error message says entities and snapshot_entities must not overlap.
Description
The same entity is in both Entity states and Entities snapshot. A scene can only store one state for each entity.
Resolution
Remove the entity from one of the two fields.
Delete scene fails: the scene wasn’t created with Create scene
Symptom: “The scene scene.my_scene is not created with action scene.create”
The Delete scene action fails with The scene scene.my_scene is not created with action scene.create.
Description
Delete scene only removes scenes that were created with the Create scene action. This scene comes from the scene editor or from YAML.
Resolution
- For a scene from the scene editor, delete it in the scene editor.
- For a scene in YAML, remove it from the YAML file, and then reload the scenes.
Delete scene fails: the scene is from another integration
Symptom: “scene.my_scene is not a valid entity ID of a scene”
The Delete scene action fails with scene.my_scene is not a valid entity ID of a scene.
Description
The scene comes from another integration, such as Hue, KNX, or MQTT. Delete scene only removes scenes that were created with the Create scene action.
Resolution
Delete the scene where that integration manages its scenes, for example, in the Hue app. For details, refer to Scenes from other integrations.