Scripts
The Scripts integrationIntegrations connect and integrate Home Assistant with your devices, services, and more. [Learn more] allows you to specify a sequence of actions for Home Assistant to execute. They run when you turn the script on. The script integration creates an entity for each script so you can control it via actions.
You can create scripts via YAML configuration or via the UI.

Configuration
You specify the sequence of actions using the Home Assistant Script Syntax.
# Example configuration.yaml entry
script:
  message_temperature:
    sequence:
      # This is Home Assistant Script Syntax
      - action: notify.notify
        data:
          message: "Current temperature is {{ states('sensor.temperature') }}"
Script names (such as message_temperature in the example above) cannot contain capital letters or dashes (-). Use underscores (_) to separate words for better readability.
Configuration Variables
A description of the script, displayed in the Actions tab under Developer tools.
Variables that are available inside your templates.
Information about the script field parameters; see the Passing variables to scripts section below.
A parameter field used by this script. All sub-options are only used for creating a representation of this script in the UI.
An example value. This is only shown in the table of options available in the Actions tab of the Developer tools.
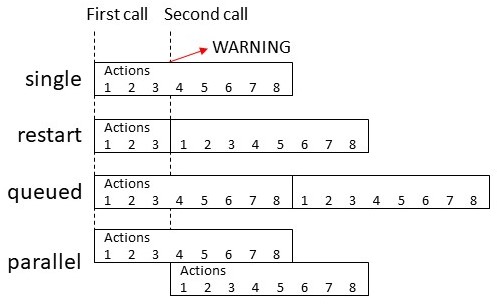
Controls what happens when the script is invoked while it is still running from one or more previous invocations. See Script modes.
Controls the maximum number of runs executing or queued up to run at a time. Only valid with modes queued and parallel.
When max is exceeded (which is effectively 1 for single mode), Home Assistant emits a log message to indicate this has happened. This option controls the severity level of that log message. See log levels for a list of valid options. You can also set this to silent to suppress the message.
Script modes
| Mode | Description |
|---|---|
single |
Do not start a new run. Issue a warning. |
restart |
Start a new run after first stopping previous run. |
queued |
Start a new run after all previous runs complete. Runs are guaranteed to execute in the order they were queued. |
parallel |
Start a new, independent run in parallel with previous runs. |
Passing variables to scripts
As part of the action, you can pass variables to a script so they become available within templates in that script.
To configure a script to accept variables using the UI, add the variables as fields in the script editor.
- In the script editor, in the three dots
menu, select Add fields. - A new Fields section appears between the basic information and the Sequence section.
- Enter a name and choose the type and options for each field.
- Depending on the field type, fields set up here are shown in other UI editors, such as in an automation that calls the script.
- To use the field data, reference it as a template using the Field key name you set when adding the field.
Use templates to access the variables in the script:
# Example configuration.yaml entry
script:
  notify_pushover:
    description: "Send a pushover notification"
    fields:
      title:
        description: "The title of the notification"
        example: "State change"
      message:
        description: "The message content"
        example: "The light is on!"
    sequence:
      - condition: state
        entity_id: switch.pushover_notifications
        state: "on"
      - action: notify.pushover
        data:
          title: "{{ title }}"
          message: "{{ message }}"
Aside from the automation editor UI, you can pass variables to scripts within the action data. You can do this by calling the script directly or by calling the generic script.turn_on action. The difference is described in Waiting for a script to complete. All action data is available as variables in templates, even if not specified as fields in the script. This example shows how to call the script directly:
# Example configuration.yaml entry
automation:
  triggers:
    - trigger: state
      entity_id: light.bedroom
      from: "off"
      to: "on"
  actions:
    - action: script.notify_pushover
      data:
        title: "State change"
        message: "The light is on!"
This example shows how to use the script.turn_on action:
# Example configuration.yaml entry
automation:
  triggers:
    - trigger: state
      entity_id: light.bedroom
      from: "off"
      to: "on"
  actions:
    - action: script.turn_on
      target:
        entity_id: script.notify_pushover
      data:
        variables:
          title: "State change"
          message: "The light is on!"
Templates may use the following script variables:
-
Variables provided from the configuration as fields.
-
Variables passed as data when the script is started from an action.
-
The
thisvariable, which holds the current script’s state as a dictionary.
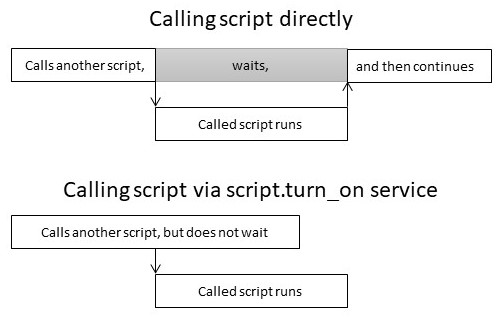
Waiting for a script to complete
When calling a script “directly” (for example, script.NAME), the calling script will wait for the called script to finish.
If any errors occur that cause the called script to abort, the calling script will be aborted as well.
When calling a script (or multiple scripts) via the script.turn_on action, the calling script does not wait. It starts the scripts, in the order listed, and continues as soon as the last script is started.
Any errors that occur in the called scripts that cause them to abort will not affect the calling script.
Here’s an example of the calling script not waiting. It performs some other operations while the called script runs in the background, then waits for the called script to complete via a wait_template.
You can also use this technique for the calling script to wait for the called script, but not be aborted if the called script aborts due to errors.
script:
  script_1:
    sequence:
      - action: script.turn_on
        target:
          entity_id: script.script_2
      # Perform some other steps here while second script runs...
      # Now wait for called script to complete.
      - wait_template: "{{ is_state('script.script_2', 'off') }}"
      # Now do some other things...
  script_2:
    sequence:
      # Do some things at the same time as the first script...
Full configuration
script:
  wakeup:
    alias: "Wake Up"
    icon: "mdi:party-popper"
    description: "Turns on the bedroom lights and then the living room lights after a delay"
    variables:
      turn_on_entity: group.living_room
    fields:
      minutes:
        name: Minutes
        description: "The amount of time to wait before turning on the living room lights"
        selector:
          number:
            min: 0
            max: 60
            step: 1
            unit_of_measurement: minutes
            mode: slider
    # If called again while still running (probably in delay step), start over.
    mode: restart
    sequence:
      # This is Home Assistant Script Syntax
      - event: LOGBOOK_ENTRY
        event_data:
          name: Paulus
          message: is waking up
          entity_id: device_tracker.paulus
          domain: light
      - alias: "Bedroom lights on"
        action: light.turn_on
        target:
          entity_id: group.bedroom
        data:
          brightness: 100
      - delay:
          # Supports seconds, milliseconds, minutes, and hours
          minutes: "{{ minutes }}"
      - alias: "Living room lights on"
        action: light.turn_on
        target:
          entity_id: "{{ turn_on_entity }}"
Video tutorial
This video tutorial explains how scripts work, how to use fields in scripts, and how to use response variables in scripts.