Google Assistant SDK
The Google Assistant SDK integrationIntegrations connect and integrate Home Assistant with your devices, services, and more. [Learn more] allows Home Assistant to interact with Google Assistant. If you want to use Google Assistant (for example, from your phone or Google Home device) to interact with your Home Assistant managed devices, then you want the Google Assistant integration.
This integration allows:
- Sending text commands to Google Assistant to control devices supported by Google Assistant but not by Home Assistant. Examples:
- Start vacuuming
- Stream front door on living room TV
- Turn off kitchen TV
- Play rain sounds on bedroom speaker
- Broadcast messages to Google Assistant speakers and displays without interrupting music/video playback. Examples:
- Coffee is ready
- Someone is at the front door
- Smoke detected in the master bedroom
- Water leak detected in the master bathroom
- Playback Google Assistant audio response for any query on any media player. Examples:
- Tell me a joke
- Say the ABC
- Sing happy birthday
- What does the elephant say?
- Having a conversation with Google Assistant using the conversation integration via text or voice.
Prerequisites
You need to configure developer credentials to allow Home Assistant to access your Google Account. These credentials are the same as the ones for Nest or Google Sheets, YouTube, and Google Mail.
Scenario 1: You already have credentials
In this case, all you need to do is enable the API:
- Go the Google Developers Console Google Assistant API .
- Confirm the project and Enable the API.
- Continue with the steps described in the Configuration section.
Scenario 2: You do not have credentials set up yet
In this case, you need to generate a client secret first:
To generate client ID and client secret
This section explains how to generate a client ID and client secret on Google Developers Console.
- First, go to the Google Developers Console to enable Google Assistant API .
- Select Create project, enter a project name and select Create.
- Enable the Google Assistant API.
- Navigate to APIs & Services (left sidebar) > Credentials.
- In the left sidebar, select OAuth consent screen.
- It will take you to the Overview page and ask for Project Configuration:
- Complete the App Information:
- Set the App name (the name of the application asking for consent) to anything you want, for example, Home Assistant.
- For a Support email, choose your email address from the dropdown menu.
- Select Next.
- For Audience, select External then select Next.
- Under Contact Information, enter your email address (the same as above is fine). Select Next.
- Read the policy and check the box if you agree. Select Continue.
- Select Create.
- Complete the App Information:
- In the left sidebar, select Audience:
- Under Publishing status > Testing, select Publish app.
Otherwise, your credentials will expire every 7 days.
- Under Publishing status > Testing, select Publish app.
- In the left sidebar, select Clients:
- Select + Create Client.
- For Application type, choose Web Application and give this client ID a name (like “Home Assistant Client”).
- Add
https://my.home-assistant.io/redirect/oauthto Authorized redirect URIs then select Create.Note: This is not a placeholder. It is the URI that must be used.
- From the resulting dialog take a note of Client ID and Client Secret you can not retrieve it again after closing the dialog.
- Once you have noted these strings, select Close.
- Congratulations! You are now the keeper of a client secret. Guard it in your treasure box. In most cases, your new credentials will be active within a few minutes. However, Google states that activation may take up to five hours in some circumstances.
Configuration
To add the Google Assistant SDK service to your Home Assistant instance, use this My button:

If the above My button doesn’t work, you can also perform the following steps manually:
-
Browse to your Home Assistant instance.
-
In the bottom right corner, select the
Add Integration button. -
From the list, select Google Assistant SDK.
-
Follow the instructions on screen to complete the setup.
The integration setup will next give you instructions to enter the Application Credentials (OAuth Client ID and Client Secret) and authorize Home Assistant to access your Google Assistant API.
Authorization steps
-
Continue through the steps of selecting the account you want to authorize.
-
If your Google account settings are set to a language not supported by the SDK – which can be noticed by the authentication screen of Google being localized in that language – the authorization will fail without a clear error. Changing the language at the bottom of the error page to one that is supported by the SDK will allow you to continue to the link page of Home Assistant.
You may get a message telling you that the app has not been verified and you will need to acknowledge that in order to proceed.
-
You can now see the details of what you are authorizing Home Assistant to access with two options at the bottom. Select Continue.
-
The page will now display Link account to Home Assistant?, note Your instance URL. If this is not correct, refer to My Home Assistant. If everything looks good, select Link Account.
-
You may close the window, and return back to Home Assistant where you should see a Success! message from Home Assistant.
Enable personal results (for advanced users)
This guide shows you how to enable personal commands such as “remind me tomorrow at 9 pm to take out the trash”.
This guide is for advanced users only. It requires creating an OAuth client ID of the Desktop app, running a Python program on your desktop or laptop, copying the resulting credentials to your Home Assistant config files, and likely running an Android emulator.
Prerequisites
- Successfully installed the Google Assistant integration.
Create credentials
- Navigate to Google Developers Console > Credentials.
- Select the project you created earlier from the dropdown menu in the upper left corner.
- Select Create credentials (at the top of the screen), then select OAuth client ID.
- Set the Application type to Desktop app and give this credential set a name (like “Home Assistant Desktop Credentials”).
- Select Create.
- In the OAuth client-created screen, select Download JSON.
- Rename the downloaded file to
client_secret.json. - On your Windows, Linux, or Mac machine, download Python if you don’t have it already.
- Open the terminal (on Windows, select Start and then type
cmd). - In the terminal, run the following commands (preferably in a Python virtual environment):
python -m pip install --upgrade google-auth-oauthlib[tool]
- Under Windows:
google-oauthlib-tool --scope https://www.googleapis.com/auth/assistant-sdk-prototype --scope https://www.googleapis.com/auth/gcm --save --client-secrets %userprofile%\Downloads\client_secret.json - Under Linux:
google-oauthlib-tool --scope https://www.googleapis.com/auth/assistant-sdk-prototype --scope https://www.googleapis.com/auth/gcm --save --client-secrets ~/Downloads/client_secret.json - Result: A browser window will open, asking you to select the account to continue to the cloud project you created earlier.
- Once you select the correct account, select both checkboxes:
- Use your Google Assistant: broad access to your Google account
- Send information to your Android device
- Select Continue.
- Result: If everything was successful, you will get a The authentication flow has completed. You may close this window message in your browser.
- In your terminal you will see the path where the credentials were saved. For example:
credentials saved: C:\Users\user\AppData\Roaming\google-oauthlib-tool\credentials.json
- Open the
credentials.jsonin a text editor. Keep it open since you will need to copy several values from it. - In the file editor of your Home Assistant, typically http://homeassistant.local:8123/core_configurator, open
/homeassistant/.storage/application_credentials.
- Locate the entry for
google_assistant_sdkand modifyclient_idandclient_secretto match the ones fromcredentials.json. - Save the file.
- Open
/homeassistant/.storage/core.config_entries.
- Locate the entry for
google_assistant_sdkand modifyrefresh_tokento match the one fromcredentials.json. - Save the file.
- Restart Home Assistant.
Enable personal results
- Go to Settings > Developer tools > Actions and issue a query that requires personal results, for example call
google_assistant_sdk.send_text_commandwithcommand: "what is my name". - On your phone, you should receive a notification Allow personal answers Allow Google Assistant to answer your questions about your calendar, trips, and more.
- DO NOT tap on ALLOW (it won’t work until you enter a device name). Instead, tap on the notification text.
- If the app doesn’t open, you need to retry on a device running Android 12. If you don’t have such a device, you can use an Android emulator.
- Tap on Device Name, enter any device name (like Home Assistant), and tap on OK.
- Only after having a non-empty device name, enable the checkbox next to Personal results.
Troubleshooting
If you have an error with your credentials you can delete them in the Application Credentials user interface.
If commands don’t work, try removing superfluous words such as “the”. For example, “play rain sounds on bedroom speaker” instead of “play rain sounds on the bedroom speaker”.
If commands to a specific device (like streaming a camera to a Google TV) fail, you may need to enable “Personal Results” on that device itself. For example, on a Google TV or Chromecast with Google TV, this setting may be located under Settings > Privacy > Google Assistant > Personal Results. This may be required in addition to enabling it in the Google Home app.
If broadcasting doesn’t work, make sure: the speakers aren’t in do not disturb mode, the Home Assistant server is in the same network as the speakers.
The easiest way to check if the integration is working is to check My Google Activity for the issued commands and their responses.
Limitations/known issues
- Multiple Google accounts are not supported.
- If you see the issued commands in My Google Activity, the integration is working fine. If the commands don’t have the expected outcome, don’t open an issue in the Home Assistant Core project or the underlying library. You should instead report the issue directly to Google here. Examples of known Google Assistant API issues:
- Media playback commands (other than play news, play podcast, play white noise, or play rain sounds) don’t work.
- Routines don’t work.
- Google Assistant automations that use
assistant.event.OkGoogleas a starter cannot be triggered. - Broadcast to specific rooms often doesn’t work for non-English languages.
- Commands that need to verify your identity through voice match do not work.
Configuration
On the configure page, you can set the language code of the interactions with Google Assistant. If not configured, the integration picks one based on Home Assistant’s configured language and country. Supported languages are listed here.
Actions
Send text command
You can use the google_assistant_sdk.send_text_command action to send commands to Google Assistant.
| Data attribute | Optional | Description |
|---|---|---|
command |
no | Command(s) to send to Google Assistant. |
media_player |
yes | Name(s) of media player entities to play the Google Assistant’s audio response on. This does not target the device for the command itself. |
Examples:
action: google_assistant_sdk.send_text_command
data:
  command: "turn off kitchen TV"
# Say a joke on the living room speaker. The `media_player` entity receives the audio response.
action: google_assistant_sdk.send_text_command
data:
  command: "tell me a joke"
  media_player: media_player.living_room_speaker
# Stream a camera to a Chromecast-enabled TV or display.
# The target device ("living room tv") must be part of the command itself.
action: google_assistant_sdk.send_text_command
data:
  command: "show the front door camera on the living room tv"
Note: To control a specific device, like streaming a camera to a TV, you must include the device’s name (as known by Google Assistant) in the text command. The media_player parameter is only used for playing back Google Assistant’s audio response and will not direct the video stream.
You can send multiple commands in the same conversation context which is useful to unlock doors or open covers that need a PIN. Example:
action: google_assistant_sdk.send_text_command
data:
  command:
    - "open the garage door"
    - "1234"
You can get responses. Example:
action: google_assistant_sdk.send_text_command
data:
  command:
    - "tell me a joke"
    - "tell me another one"
returns:
responses:
  - text: |-
      What do you call a belt made of watches?
      A waist of time 👖 🕝
  - text: |-
      What's the most musical part of the turkey?
      The drumsticks 🍗
Action: Broadcast message
The notify.google_assistant_sdk action allows you to broadcast messages to Google Assistant speakers and displays without interrupting music/video playback.
| Data attribute | Optional | Description | Example |
|---|---|---|---|
message |
no | Message to broadcast. | someone is at the front door |
target |
yes | Rooms (in Google Assistant) | bedroom |
Example to broadcast to all speakers:
action: notify.google_assistant_sdk
data:
  message: time for dinner
Example to broadcast to speakers in selected rooms:
action: notify.google_assistant_sdk
data:
  message: time for dinner
  target:
    - bedroom
    - basement
Conversation agent
You can add an assistant with the conversation agent set to “Google Assistant SDK”. See setup your assistant section here. Then you can converse with Google Assistant by tapping the Assist icon at the top right of your dashboard:
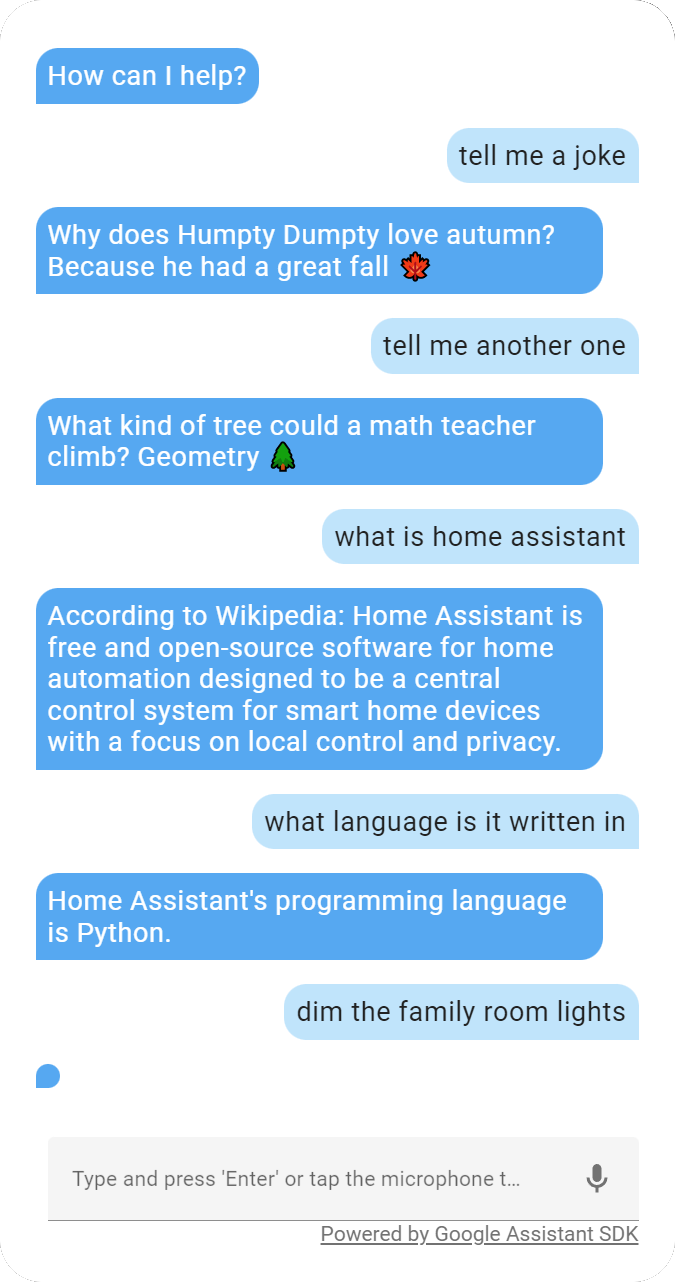
Or by calling the conversation.process action.
Note: due to a bug in the Google Assistant API, not all responses contain text, especially for home control commands, like turn on the lights. These will be shown as <empty response>. For those, Google Assistant responds with HTML and Home Assistant integrations are not allowed to parse HTML.
Removing the integration
To remove an integration instance from Home Assistant
- Go to Settings > Devices & services and select the integration card.
- From the list of devices, select the integration instance you want to remove.
- Next to the entry, select the three dots
menu. Then, select Delete.