Fressnapf Tracker
The Fressnapf Tracker integrationIntegrations connect and integrate Home Assistant with your devices, services, and more. [Learn more] allows you to integrate Fressnapf GPS Trackers into Home Assistant.
You can use this integration to track the location of your pets and monitor their activity in Home Assistant.
Supported functionality
Entities
The Fressnapf Tracker integration provides the following entities.
-
Device tracker
- Description: Shows the current location of your pet.
-
Battery
- Description: Shows the current battery level of your tracker.
-
Charging status
- Description: Indicates whether the tracker is currently charging.
-
Flashlight
- Description: Allows you to turn on the flashlight of the tracker to help locate your pet in the dark.
-
Sleep mode
- Description: Allows you to control the sleep mode of the tracker to conserve battery.
Prerequisites
You have to use the mobile app to add the trackers to your Fressnapf Tracker account. The phone number you used to register can then be used to set up the integration.
During the setup, you will receive a verification code via SMS to confirm your identity.
Configuration
To add the Fressnapf Tracker hub to your Home Assistant instance, use this My button:

If the above My button doesn’t work, you can also perform the following steps manually:
-
Browse to your Home Assistant instance.
-
In the bottom right corner, select the
Add Integration button. -
From the list, select Fressnapf Tracker.
-
Follow the instructions on screen to complete the setup.
Defining a custom polling interval
The Fressnapf Tracker pollsData polling is the process of querying a device or service at regular intervals to check for updates or retrieve data. By defining a custom polling interval, you can control how frequently your system checks for new data, which can help optimize performance and reduce unnecessary network traffic. [Learn more] data from the cloud every 15 minutes.
If you want to define a specific interval at which your device is being polled for data, you can disable the default polling interval and create your own polling automation.
To add the automation:
- Go to Settings > Devices & services, and select your integration.
- On the integration entry, select the
. - Then, select System options and toggle the button to disable polling.
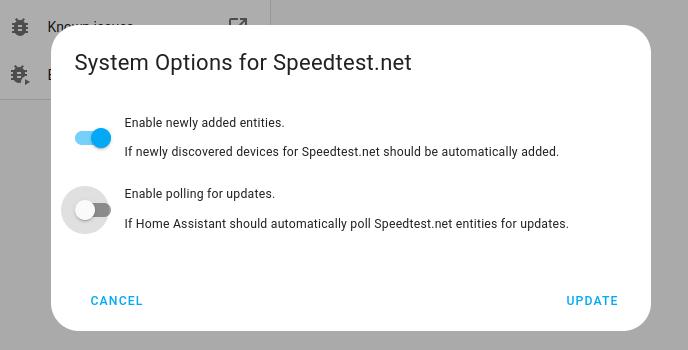
- Then, select System options and toggle the button to disable polling.
- To define your custom polling interval, create an automation.
- Go to Settings > Automations & scenes and create a new automation.
- Define any trigger and condition you like.
- Select Add action, then select Other actions.
- Select Perform action, and from the list, select the
homeassistant.update_entityaction. - Add the entities you want to poll to the Entity field. The
homeassistant.update_entityaction only supports targeting by entity. Selecting an area, device, or label is not supported.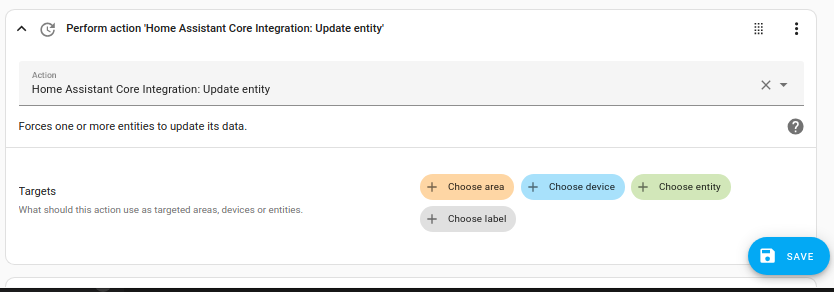
- Save your new automation to poll for data.
Removing the integration
This integration follows standard integration removal. No extra steps are required.
To remove an integration instance from Home Assistant
- Go to Settings > Devices & services and select the integration card.
- From the list of devices, select the integration instance you want to remove.
- Next to the entry, select the three dots
menu. Then, select Delete.