Scenes
A scene entity is an entity that can restore the state of a group of entities. Scenes can be user-defined or can be provided through an integration.
Building block integration
This scenes is a building block integration that cannot be added to your Home Assistant directly but is used and provided by other integrations.
A building block integration differs from the typical integration that connects to a device or service. Instead, other integrations that do integrate a device or service into Home Assistant use this scenes building block to provide entities, services, and other functionality that you can use in your automations or dashboards.
If one of your integrations features this building block, this page documents the functionality the scenes building block offers.
The state of a scene
The scene entity is stateless, as in, it cannot have a state like the on or
off state that, for example, a normal switch entity has.
Every scene entity does keep track of the timestamp of when the last time the scene entity was called via the Home Assistant UI or called via an action.
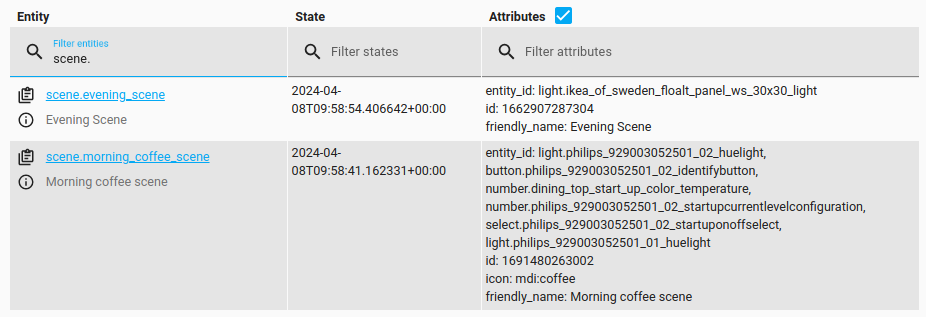 Screenshot showing the state of a scene entity in the developer tools.
In addition, the entity can have the following states:
- Unavailable: The entity is currently unavailable.
- Unknown: The state is not yet known.
Scenes created by integrations
Some integrations like Philips Hue, MQTT, and KNX provide scenes. You can activate them from the Home Assistant UI or via as an action. In this case, the integration provides the preferred states to restore.
Creating a scene
You can create scenes that capture the states you want certain entities to be. For example, a scene can specify that light A should be turned on and light B should be bright red.
Scenes can be created and managed via the user interface using the Scene Editor. They can also be manually configured via configuration.yamlThe configuration.yaml file is the main configuration file for Home Assistant. It lists the integrations to be loaded and their specific configurations. In some cases, the configuration needs to be edited manually directly in the configuration.yaml file. Most integrations can be configured in the UI. [Learn more]. Note that entity data is not an action parameter; it’s a representation of the wanted state:
# Example configuration.yaml entry
scene:
  - name: Romantic
    icon: "mdi:flower-tulip"
    entities:
      light.tv_back_light: "on"
      light.ceiling:
        state: "on"
        brightness: 200
        color_mode: "xy"
        xy_color: [0.33, 0.66]
  - name: Movies
    entities:
      light.tv_back_light:
        state: "on"
        brightness: 125
      light.ceiling: "off"
      media_player.sony_bravia_tv:
        state: "on"
        source: HDMI 1
  - name: Standard
    entities:
      light.tv_back_light:
        state: "off"
      light.ceiling:
        state: "on"
        brightness: 125
        color_mode: "white"
As you can see, there are two ways to define the states of each entity_id:
- Define the
statedirectly with the entity. Be aware, thatstateneeds to be defined. - Define a complex state with its attributes. You can see all attributes available for a particular entity under
developer-tools -> state.
Scenes can be activated using the scene.turn_on action (there is no scene.turn_off action).
# Example automation
automation:
  triggers:
    - trigger: state
      entity_id: device_tracker.sweetheart
      from: "not_home"
      to: "home"
  actions:
    - action: scene.turn_on
      target:
        entity_id: scene.romantic
Applying a scene without defining it
With the scene.apply action you are able to apply a scene without first defining it via configuration. Instead, you pass the states as part of the action data. The format of the data is the same as the entities field in a configuration.
# Example automation
automation:
  triggers:
    - trigger: state
      entity_id: device_tracker.sweetheart
      from: "not_home"
      to: "home"
  actions:
    - action: scene.apply
      data:
        entities:
          light.tv_back_light:
            state: "on"
            brightness: 100
          light.ceiling: off
          media_player.sony_bravia_tv:
            state: "on"
            source: HDMI 1
Using scene transitions
Both the scene.apply and scene.turn_on actions support setting a transition,
which enables you to smoothen the transition to the scene.
This is an example of an automation that sets a romantic scene, in which the light will transition to the scene in 2.5 seconds.
# Example automation
automation:
  triggers:
    - trigger: state
      entity_id: device_tracker.sweetheart
      from: "not_home"
      to: "home"
  actions:
    - action: scene.turn_on
      target:
        entity_id: scene.romantic
      data:
        transition: 2.5
Transitions are currently only support by lights, which in their turn, have to support it as well. However, the scene itself does not have to consist of only lights to have a transition set.
Reloading scenes
Whenever you make a change to your scene configuration, you can call the scene.reload action to reload the scenes.
Creating scenes on the fly
Create a new scene without having to configure it by calling the scene.create action. This scene will be discarded after reloading the configuration.
You need to pass a scene_id in lowercase and with underscores instead of spaces. You also may want to specify the entities in the same format as when configuring the scene. You can also take a snapshot of the current state by using the snapshot_entities parameter. In this case, you have to specify the entity_id of all entities you want to take a snapshot of. entities and snapshot_entities can be combined but you have to use at least one of them.
If the scene was previously created by scene.create, it will be overwritten. If the scene was created by YAML, nothing happens but a warning in your log files.
Video tutorial
This video tutorial explains how scenes work and how you can utilize scenes on the fly.
# Example automation using entities
automation:
  triggers:
    - trigger: homeassistant
      event: start
  actions:
    - action: scene.create
      data:
        scene_id: my_scene
        entities:
          light.tv_back_light:
            state: "on"
            brightness: 100
          light.ceiling: off
          media_player.sony_bravia_tv:
            state: "on"
            source: HDMI 1
Deleting dynamically created scenes
Any scene that you have created with the scene.create action can also be deleted on demand with the scene.delete action.
You will need to pass in the entity_id of such a scene. As opposed to the scene_id used for creation, the entity_id must also include the scene domain.
If the scene was not previously created by scene.create, the action will fail and an error will appear in the logs.
# Example automation
automation:
  triggers:
    - trigger: state
      entity_id: sun.sun
      to: "below_horizon"
  actions:
    - action: scene.delete
      data:
        entity_id: scene.my_scene
The following example turns off some entities as soon as a window opens. The states of the entities are restored after the window is closed again.
# Example automation using snapshot
- alias: "Window opened"
  triggers:
  - trigger: state
    entity_id: binary_sensor.window
    from: "off"
    to: "on"
  conditions: []
  actions:
  - action: scene.create
    data:
      scene_id: before
      snapshot_entities:
      - climate.ecobee
      - light.ceiling_lights
  - action: light.turn_off
    target:
      entity_id: light.ceiling_lights
  - action: climate.set_hvac_mode
    target:
      entity_id: climate.ecobee
    data:
      hvac_mode: "off"
- alias: "Window closed"
  triggers:
  - trigger: state
    entity_id: binary_sensor.window
    from: "on"
    to: "off"
  conditions: []
  actions:
  - action: scene.turn_on
    target:
      entity_id: scene.before