Greencell
The Greencell integrationIntegrations connect and integrate Home Assistant with your devices, services, and more. [Learn more] lets you connect Greencell EV charging devices to Home Assistant via MQTT. It monitors device status and measures electrical parameters such as voltage, current, and power, exposing real-time telemetry and charging-session data for use in dashboards and automations.
Supported devices
Currently, the integration supports only HabuDen devices.
Prerequisites
- Greencell GC App
- Greencell GC account
- Have the device added to the Greencell App
- Have the device configured in the Greencell App
Adding a device to the Greencell GC App
Prerequisites
- The app connects over Bluetooth Low Energy (BLE), so keep your phone close to the device during setup.
To add a device to the Greencell GC App
Instructions on adding the device are available in the official installation guide (PDF). Refer to Chapter 8, starting on page 24.
Configure your device using the GC App
Prerequisites
- The device must be added to the Greencell GC App before you can add it to the Greencell integration in Home Assistant
- The app connects over Bluetooth Low Energy (BLE), so keep your phone close to the device during setup.
- After the device has been configured and added, the app is no longer required for day-to-day use.
To configure a device using the Greencell GC App
-
Open the GC App and make sure the device is added to your account.
-
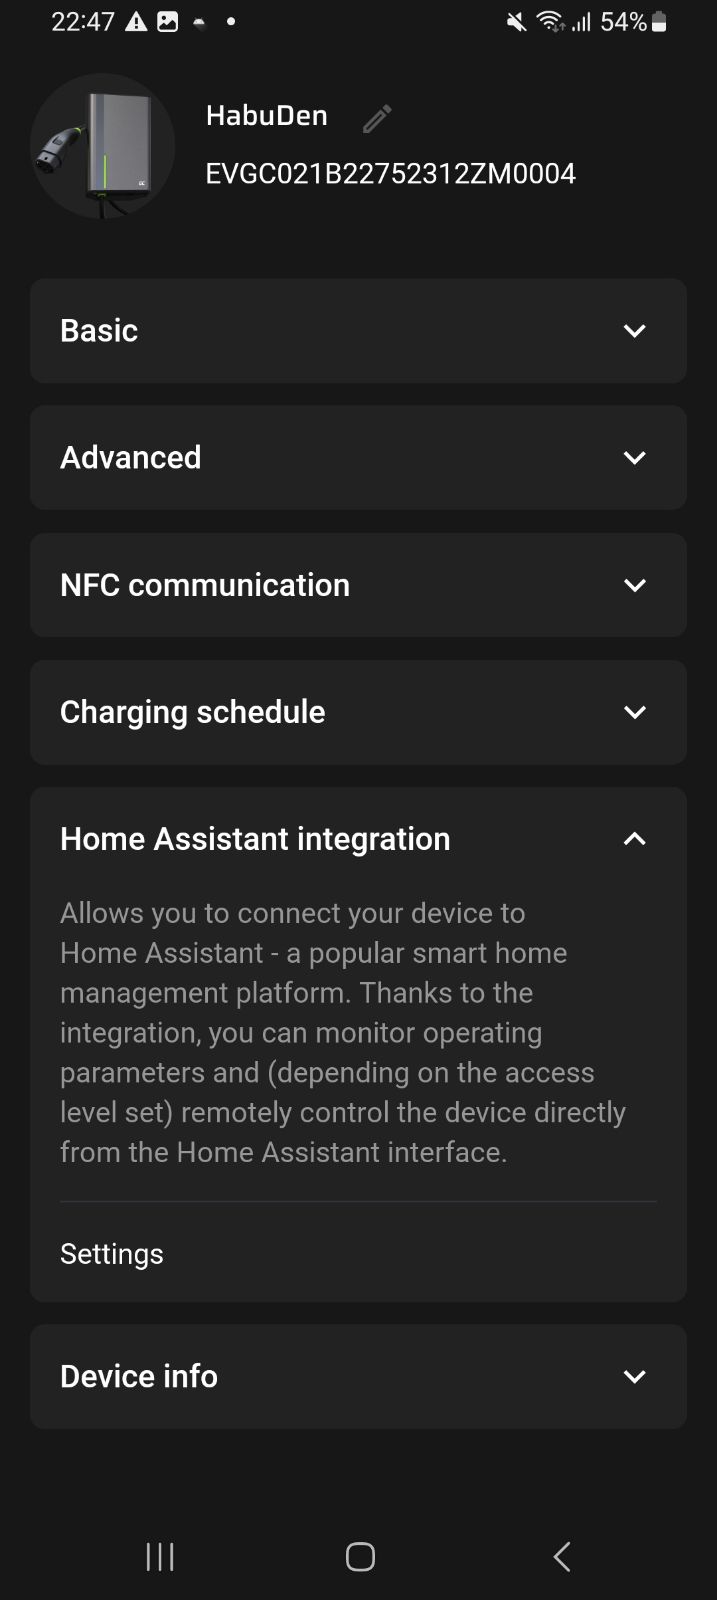
Go to the device Settings (tap the cogwheel in the top-right corner of the device tile). The app shows the Settings screen:
-
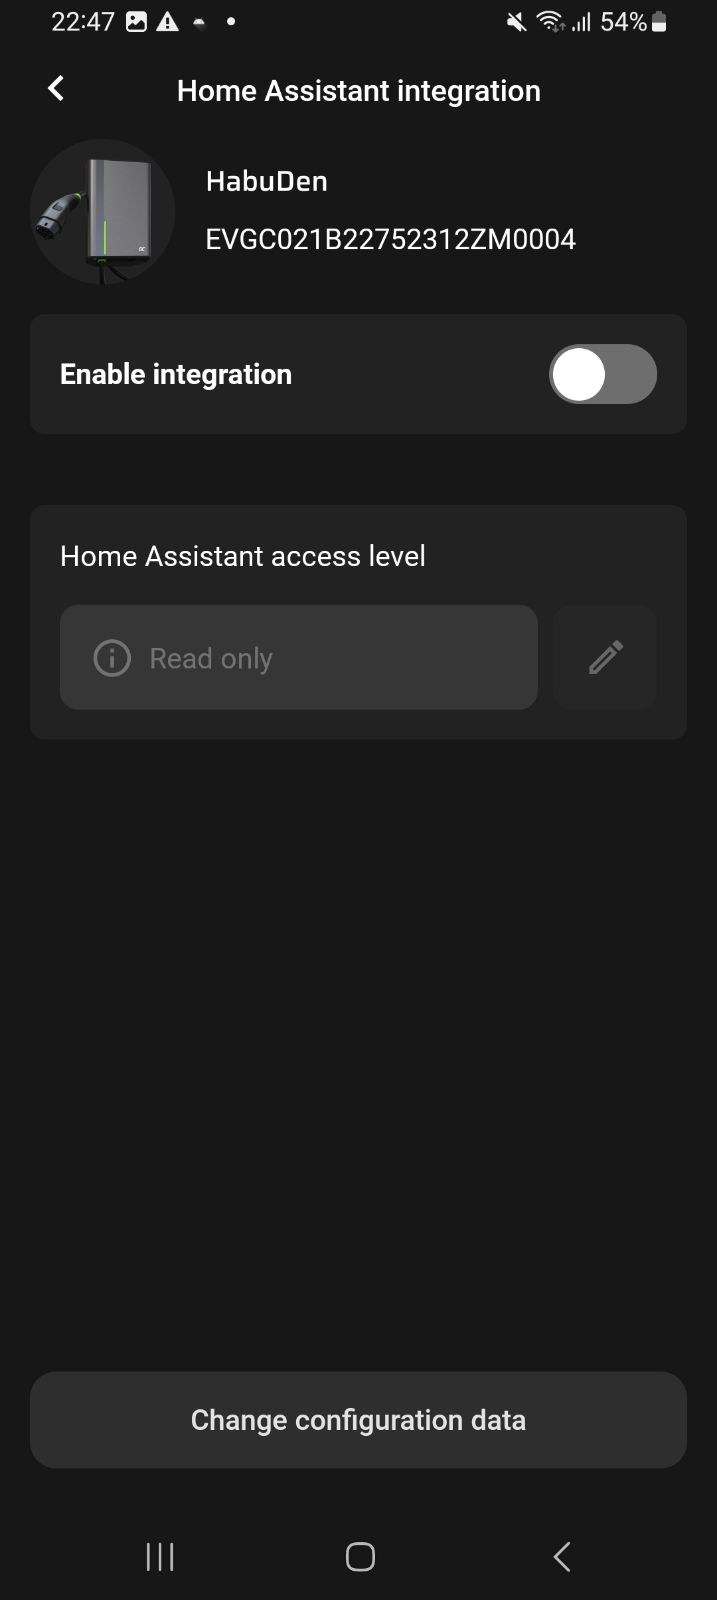
In Settings, open Home Assistant. If the device has never been added to Home Assistant or the integration was disabled earlier, you will see the default screen:
-
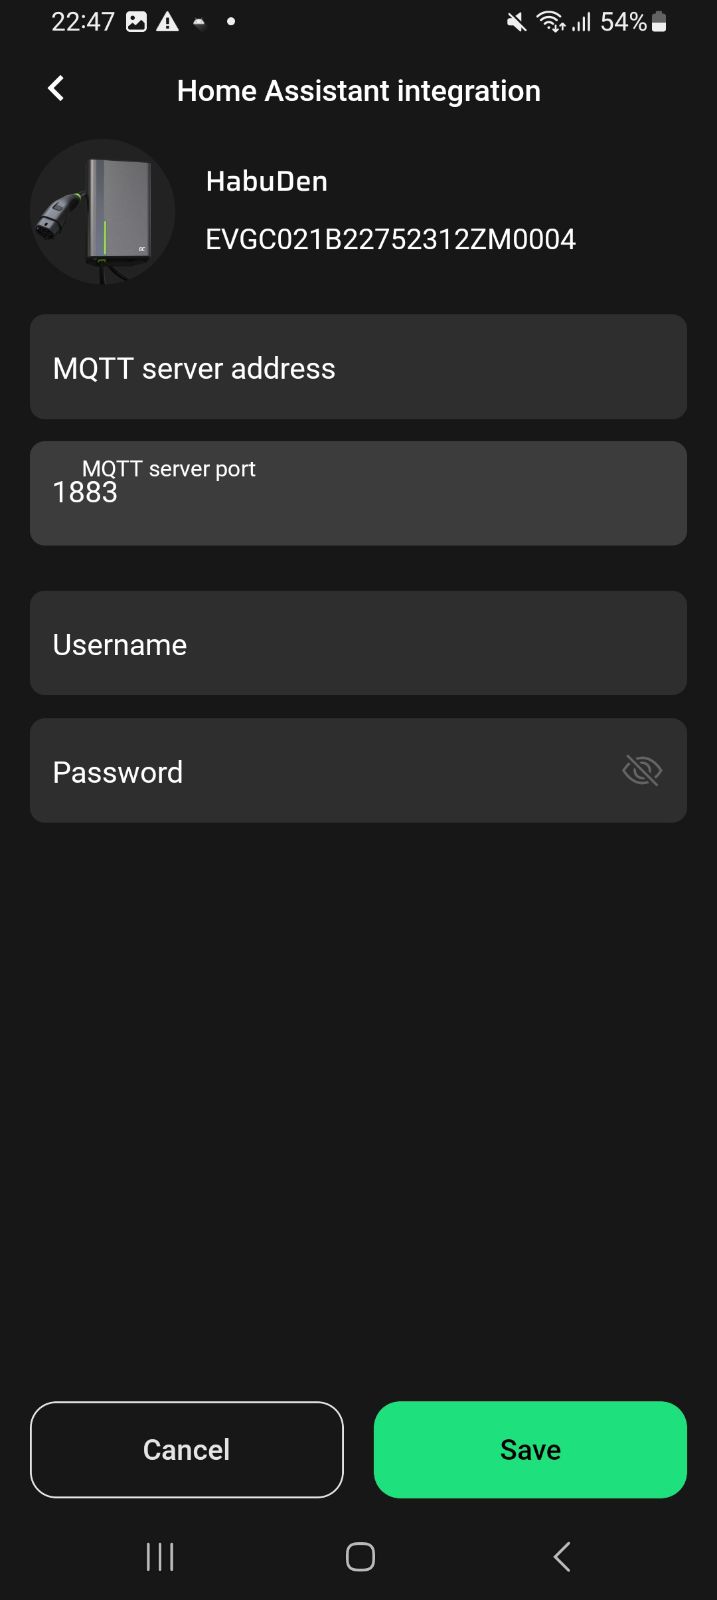
Enable the integration by toggling the switch. Then tap Change configuration data to open the MQTT settings screen:
-
Fill in the MQTT connection details:
-
MQTT server address – Hostname or IP of your MQTT broker (for example,
mqtt.localor192.168.1.10). -
MQTT broker port – TCP port of the broker (for example
1883). - Username (optional) – MQTT username if your broker requires authentication.
- Password (optional) – MQTT password for the above user.
-
MQTT server address – Hostname or IP of your MQTT broker (for example,
-
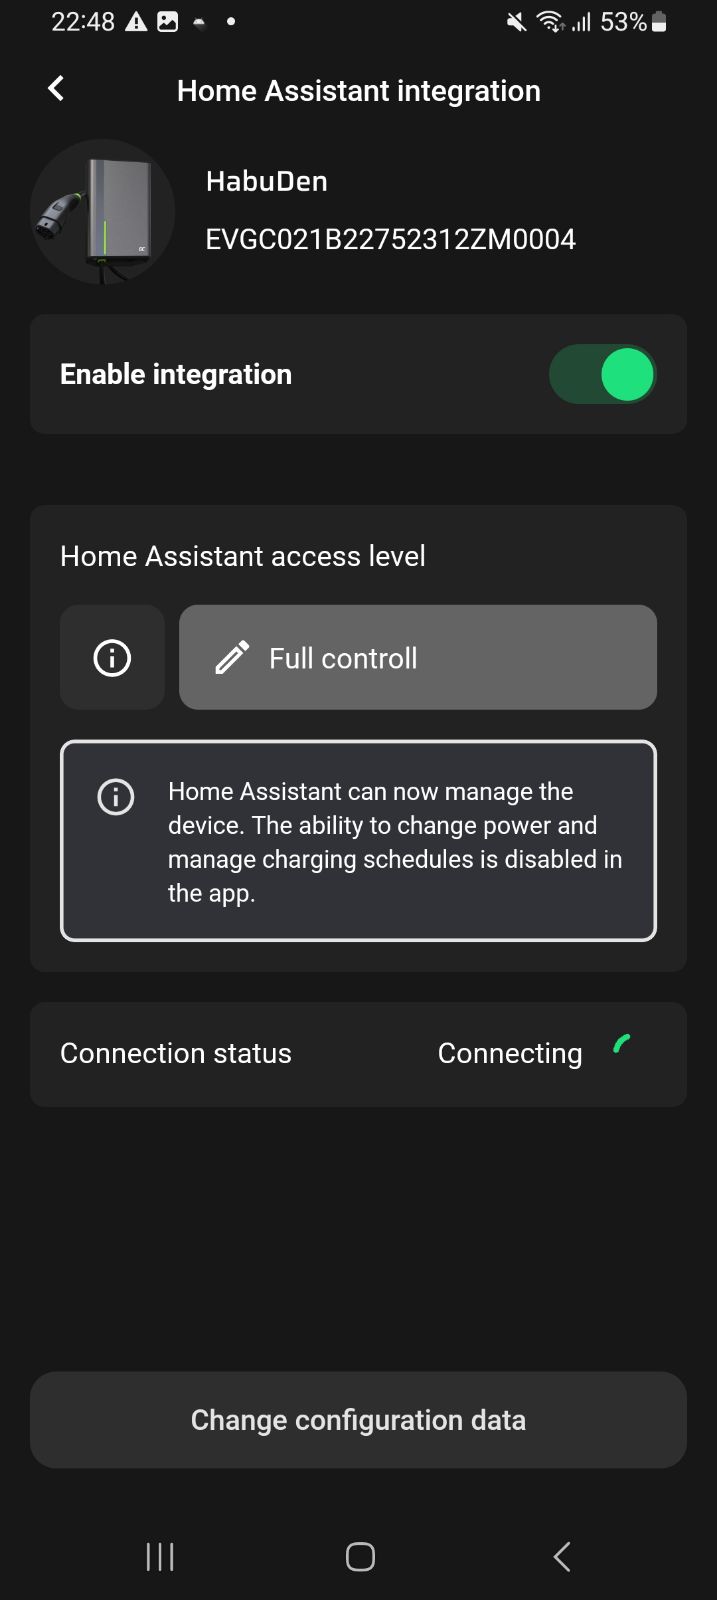
Tap Save. The device stores the settings and attempts to connect to the MQTT broker. The app displays a progress view:
-
Connection result
- Connected – The device successfully connected to the MQTT broker.
- Connecting → error after ~30 s – One of the following is shown:
- Network error – The device can’t reach the MQTT broker (wrong address/port, broker down, or network/firewall issue).
- Authentication error – The device reached the server but failed authentication (wrong username/password).
Configuration
To add the Greencell device to your Home Assistant instance, use this My button:

Greencell can be auto-discovered by Home Assistant. If an instance was found, it will be shown as Discovered. You can then set it up right away.
If it wasn’t discovered automatically, don’t worry! You can set up a manual integration entry:
-
Browse to your Home Assistant instance.
-
In the bottom right corner, select the
Add Integration button. -
From the list, select Greencell.
-
Follow the instructions on screen to complete the setup.
Integration modes
Greencell offers three levels of integration with Home Assistant to suit different user needs. To change the integration mode, in the Greencell GC App, open the Home Assistant settings. See the configuration chapter for how to find this setting in the app.
- DISABLE: Integration disabled – the device does not connect to the MQTT broker, and all entities are disabled.
-
READ: Read only – the device sends measurement data (voltage, current, power), states and ignores commands received on the relevant topic except for the
QUERYcommand. Buttons and Number entities are disabled. -
EXECUTE: Full access – the device sends measurement data and responds to commands (
START,STOP,SET_CURRENT,QUERY) received on the relevant topic. All supported entities are enabled.
Supported functionality
The Greencell integrationIntegrations connect and integrate Home Assistant with your devices, services, and more. [Learn more] provides the following entities.
Sensors
- Charging power: Instantaneous charging power of the EVSE (W).
- Current phase L1: Current measurement for phase L1 (A).
- Current phase L2: Current measurement for phase L2 (A).
- Current phase L3: Current measurement for phase L3 (A).
- Voltage phase L1: Voltage measurement for phase L1 (V).
- Voltage phase L2: Voltage measurement for phase L2 (V).
- Voltage phase L3: Voltage measurement for phase L3 (V).
-
EVSE state: Current state of the EVSE. Possible values:
UNAVAILABLEIDLECONNECTEDWAITING_FOR_CARCHARGINGFINISHEDERROR_CARERROR_EVSE
Adding a new device to Home Assistant
To add a new device to Home Assistant, follow these steps:
- Add the Greencell device to the Greencell GC App and configure device in a mode other than DISABLE.
- Add the MQTT broker to Home Assistant via the MQTT integration.
- The device should automatically be discovered, and all available entities created.
Known limitations
In the initial release, the integration does not support device control (START/STOP and current setting). This is due to the initial submission including a single platform. Control options will be added in subsequent releases.
Troubleshooting
Can’t set up the device
Symptom: “No device responded to the discovery request”
When trying to set up the integration, the form shows the message “No device responded to the discovery request”.
Description
No device responded within 30 s to the broadcast discovery message sent by the Greencell integration.
Resolution
To resolve this issue, try the following steps:
- Ensure the device is connected to a Wi-Fi network.
- Verify the device has been configured in the GC App and that Home Assistant integration is enabled.
- Check MQTT broker settings:
- Address/hostname and port are correct.
- Credentials (username/password) are correct (if required).
- Confirm the broker is reachable from your HA host (firewall, Docker network, VLANs).
- Make sure no software (firewall/IPS) is blocking access to the broker.
My device is unavailable
Description
After successful configuration, the device stops reporting and becomes unavailable.
Resolution
To resolve this issue, try the following steps:
- Check that the device is powered.
- Ensure it remains connected to Wi-Fi (signal strength, AP roaming).
- Verify in the GC App that the device shows Connected and HA integration is enabled.
- Inspect MQTT broker logs for disconnects/auth failures and confirm the device is publishing topics.
- If the above does not help, contact Greencell Support.
My device shows “car error” or “EVSE error” state
Description
The device state sensor indicates a car error or EVSE error.
Resolution
To resolve this issue, try the following steps:
- Check your car for reported charging errors or notifications.
- In the GC App, review the specific error reported by the device.
- Contact Greencell Support and include the error details gathered above.
Removing the integration
This integration follows standard integration removal.
To remove an integration instance from Home Assistant
- Go to Settings > Devices & services and select the integration card.
- From the list of devices, select the integration instance you want to remove.
- Next to the entry, select the three dots
menu. Then, select Delete.
After deleting the integration, go to the app of the manufacturer and remove the Home Assistant integration from there as well.