Spotify
The Spotify integrationIntegrations connect and integrate Home Assistant with your devices, services, and more. [Learn more] lets you control your Spotify account playback and browse the Spotify media library from Home Assistant.
Prerequisites
- An active Spotify Premium account. As of February 2026, Spotify requires a Premium account to access the Developer Portal and create an application. This means the integration only works with a Spotify Premium account.
- A Spotify-compatible playback source device.
- A Spotify Developer application. Instructions for that are in the next step.
Create a Spotify application
For Home Assistant to communicate with Spotify, we need to create an application at Spotify using the Spotify Developer website. This will provide you with the Spotify application credentials Home Assistant needs to allow you to log in with your Spotify account.
-
If Spotify was previously integrated with your Home Assistant with outdated credentials, it might be required to remove these old Spotify account credentials using the Home Assistant Application Credentials dashboard.
-
Log in to the Spotify Developer Dashboard.
-
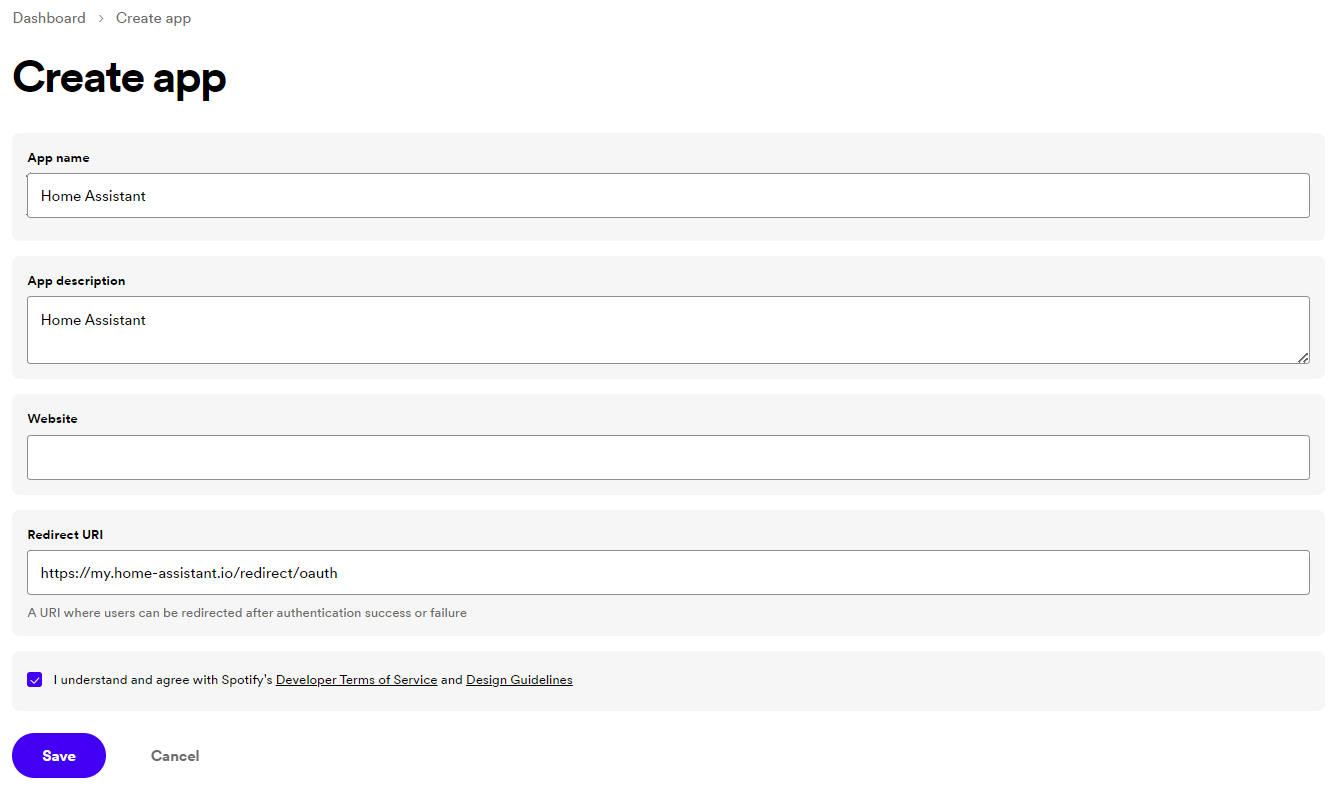
Select the Create app button in the top right.
-
Enter a name and description; feel free to use any name and description you like.
- Set the “Redirect URI” to the following:
https://my.home-assistant.io/redirect/oauth- Please copy and paste the exact URL above. You do not have to change it.
-
Select Web API.
-
Check the box to agree with the requirements and click the Save button to confirm the application creation.
-
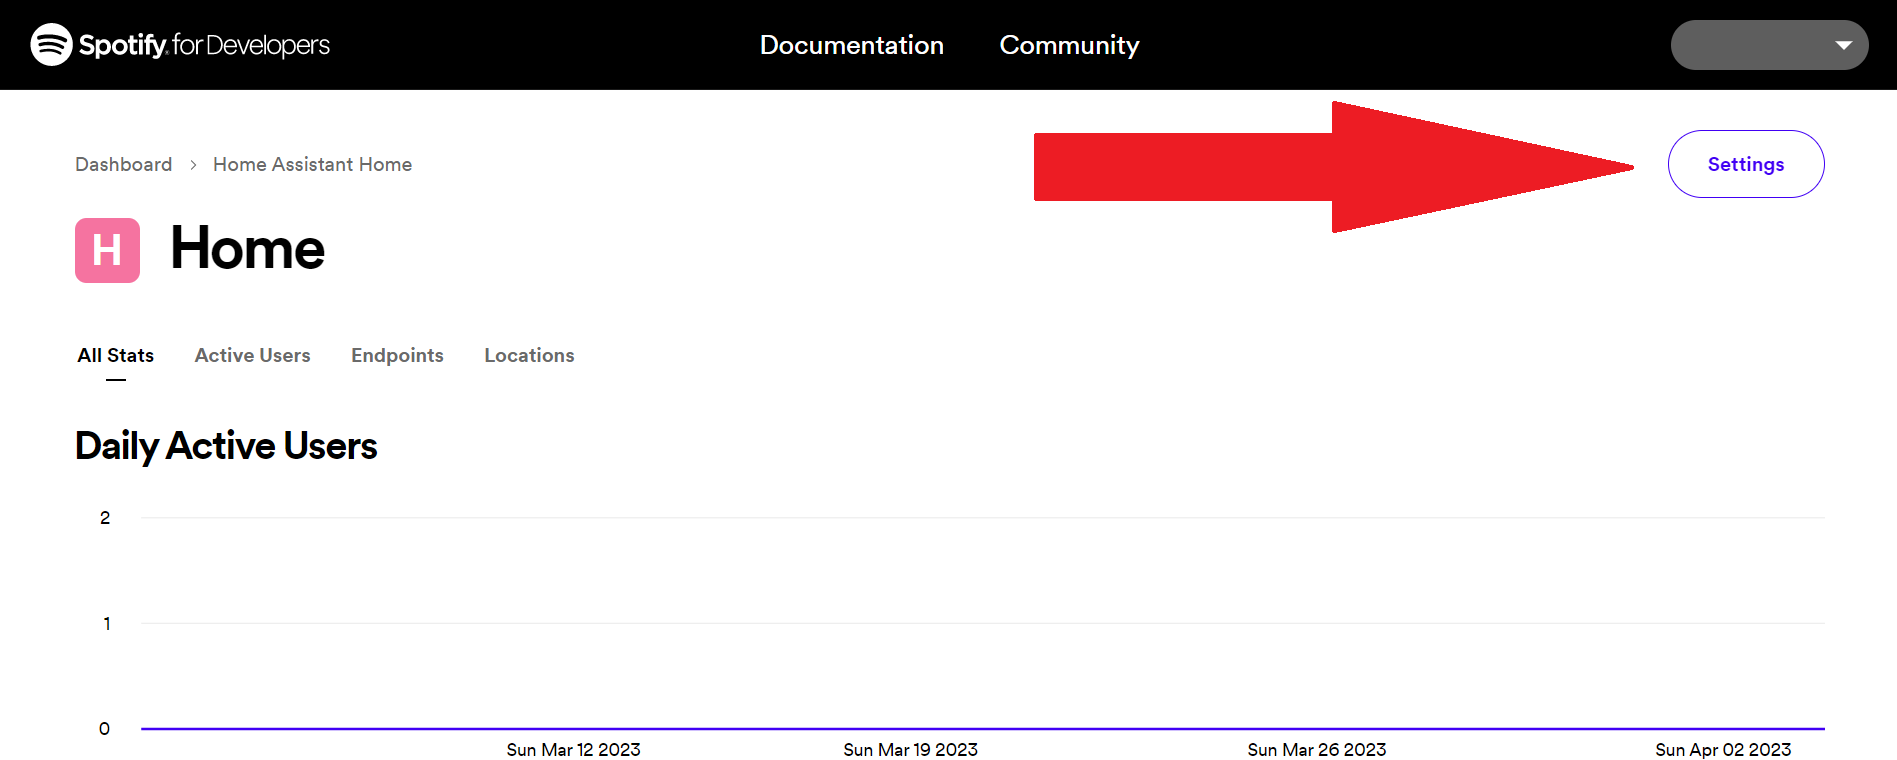
Spotify will now show the new application you have just created. Select the Settings button in the top right to configure it.
-
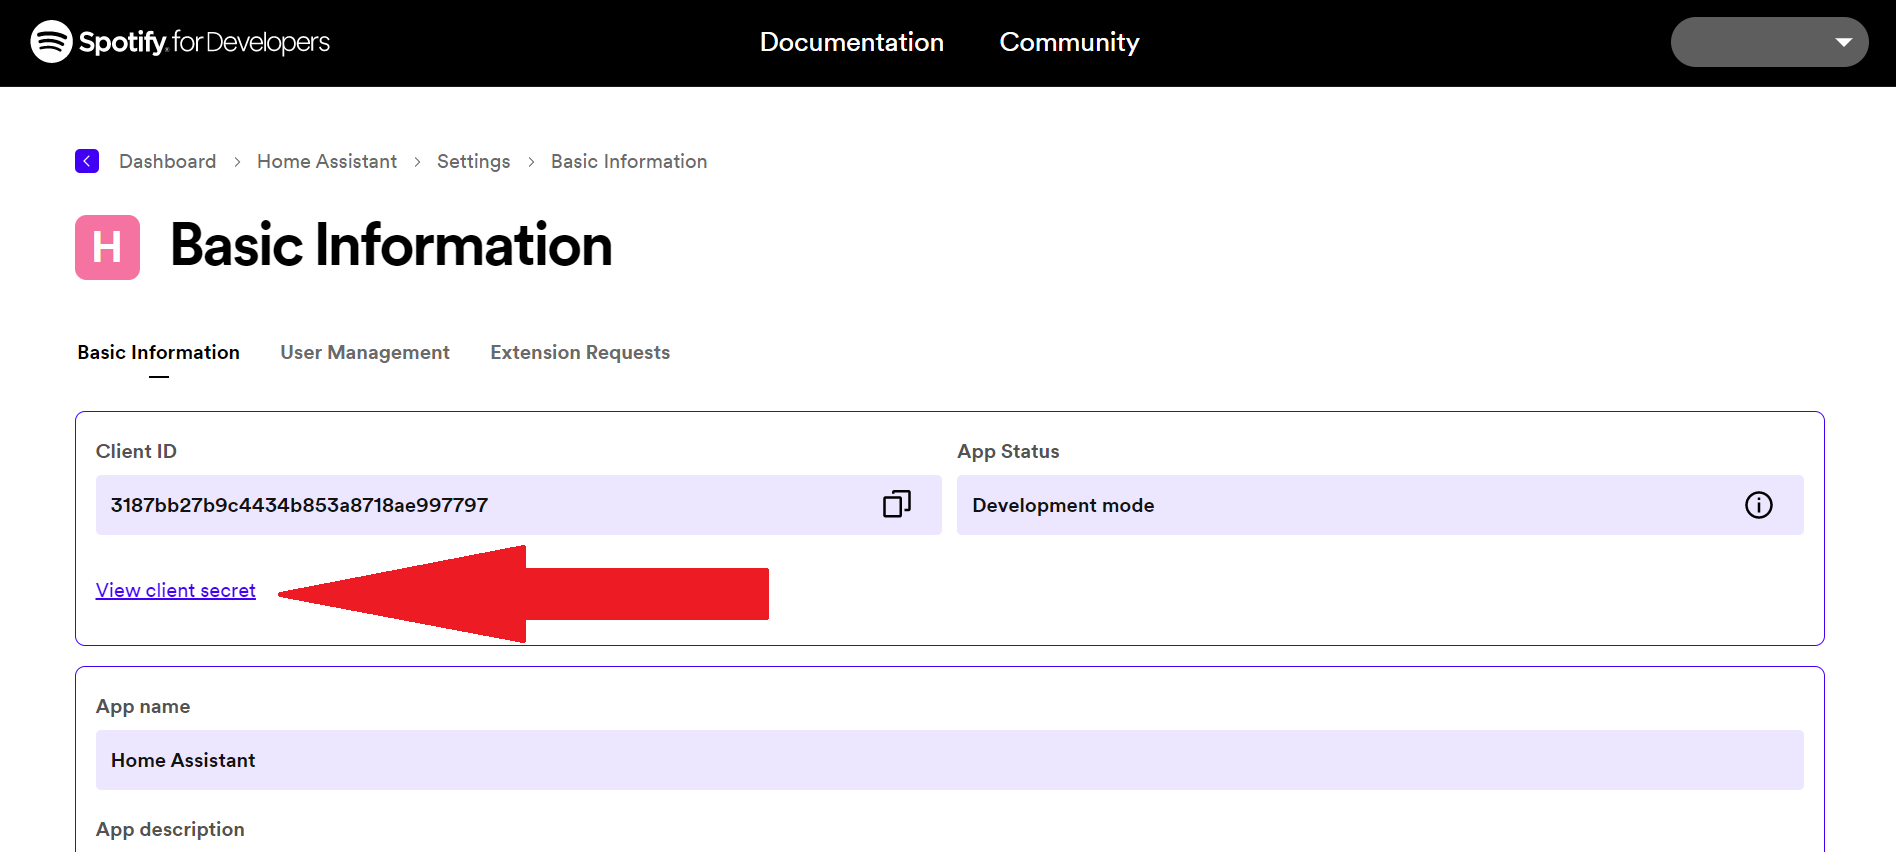
Before we can start configuring Home Assistant, we need to grab the application credentials Home Assistant needs.
- Select on the View client secret button to reveal the client secret.
-
The “Client ID” and “Client secret” are the two pieces of information that Home Assistant needs to communicate with Spotify and is what we call: Application credentials.
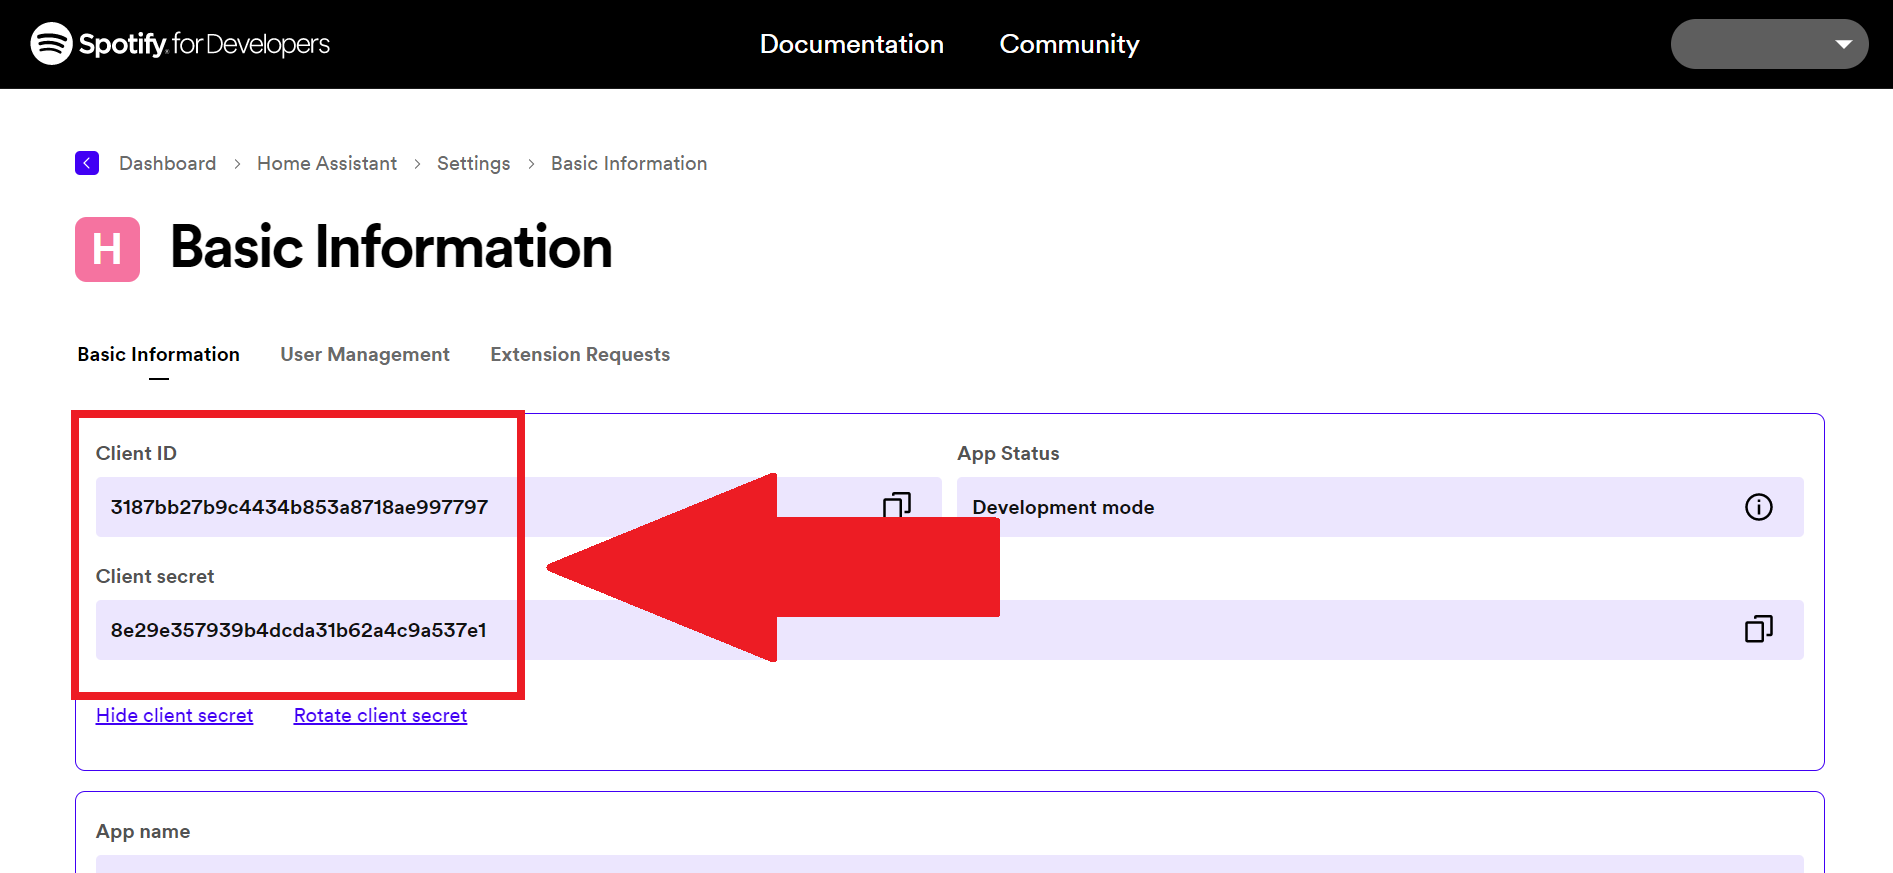
- You will need the “Client ID” and “Client secret” during the Spotify integration setup process in Home Assistant.
You can now continue with the next chapter to configure the Spotify integration in Home Assistant.
I have manually disabled My Home Assistant
If you don’t have My Home Assistant on your installation,
you can use <HOME_ASSISTANT_URL>/auth/external/callback as the redirect URI
instead.
The <HOME_ASSISTANT_URL> must be the same as used during the configuration/
authentication process.
Internal examples: http://192.168.0.2:8123/auth/external/callback, http://homeassistant.local:8123/auth/external/callback.”
Configuration
To add the Spotify service to your Home Assistant instance, use this My button:

If the above My button doesn’t work, you can also perform the following steps manually:
-
Browse to your Home Assistant instance.
-
In the bottom right corner, select the
Add Integration button. -
From the list, select Spotify.
-
Follow the instructions on screen to complete the setup.
Data updates
The integration pollsData polling is the process of querying a device or service at regular intervals to check for updates or retrieve data. By defining a custom polling interval, you can control how frequently your system checks for new data, which can help optimize performance and reduce unnecessary network traffic. [Learn more] at least every 30 seconds. If the track that is playing ends in less than 30 seconds, the integration will poll again after the track has ended to update the state again.
Using multiple Spotify accounts
This integration supports multiple Spotify accounts at once. You don’t need to create another Spotify application in the Spotify Developer Portal. Multiple Spotify accounts can be linked to a single Spotify application.
You will have to add those accounts into the User Management section of your application in the Spotify Developer Portal.
To add an additional Spotify account to Home Assistant, go to the Spotify website, log out, and then repeat only the steps in the Configuration section.
Selecting output source
To play media Spotify first needs a device selected for audio output known as the source.
# Example code to select an AV receiver as the output device
action: media_player.select_source
target:
  entity_id: media_player.spotify
data:
  source: "Denon AVR-X2000"
The Spotify API cannot initiate playback to a device not already known to the Spotify API. The source list of available devices can be found in the Details section of the Spotify Media Player Control and the source_list attribute in the Settings > Developer tools > States.
Playing Spotify playlists
You can send playlists to Spotify using the "media_content_type": "playlist", which is part of the
media_player.play_media action, for example:
# Example script to play playlist
script:
  play_jazz_guitar:
    sequence:
      - action: media_player.play_media
        target:
          entity_id: media_player.spotify
        data:
          media_content_id: "https://open.spotify.com/playlist/5xddIVAtLrZKtt4YGLM1SQ?si=YcvRqaKNTxOi043Qn4LYkg"
          media_content_type: playlist
The media_content_id value can be obtained from the Spotify desktop app by clicking on the more options (”…”) next to the album art picture, selecting “Share” and then “Copy Spotify URI” or “Copy Playlist Link” (also available in the Spotify phone and web app). Alternatively a Spotify URI string (e.g. spotify:playlist:5xddIVAtLrZKtt4YGLM1SQ) can be supplied for the media_content_id.
Unsupported devices
-
Sonos: Although Sonos is a Spotify Connect device, it is not supported by the official Spotify API. One workaround to use Sonos players with Spotify is through Music Assistant using the action
music_assistant.play_media. Music Assistant creates another media_player entity named after the original media_player, which you can use to play from Spotify.
Removing the integration
This integration follows standard integration removal, no extra steps are required.
To remove an integration instance from Home Assistant
- Go to Settings > Devices & services and select the integration card.
- From the list of devices, select the integration instance you want to remove.
- Next to the entry, select the three dots
menu. Then, select Delete.