LCN
The LCN integrationIntegrations connect and integrate Home Assistant with your devices, services, and more. [Learn more] for Home Assistant allows you to connect to LCN hardware devices.
Prerequisites
- The integration requires one unused license of the coupling software LCN-PCHK (version >2.8) and an LCN hardware coupler.
- Alternatively, an LCN-VISU or LCN-PKE coupler can be used which offers at least two PCHK licenses. With this setup, sending and receiving commands to and from LCN modules is possible.
The lcn integration allows connections to more than one hardware coupler. For each coupler, a new integration entry needs to be created.
Configuration
To add the LCN hub to your Home Assistant instance, use this My button:

If the above My button doesn’t work, you can also perform the following steps manually:
-
Browse to your Home Assistant instance.
-
In the bottom right corner, select the
Add Integration button. -
From the list, select LCN.
-
Follow the instructions on screen to complete the setup.
To set up the integration, you need to provide the following information:
Number of attempts to find a segment coupler in your installation. Increase this number, if not all segment couplers are identified correctly. If no segment coupler is in your installation, leave this number at 0.
The number of steps used for dimming outputs of all LCN modules. This setting is system-specific and depends on the capabilities of the installed LCN modules.
LCN modules can transmit a confirmation message for received commands. Commands are resent if this confirmation is not received. However, the activation of acknowledgements increases the bus traffic, which can lead to message losses if there are many modules in the installation.
Supported device types
There is currently support for the following device types within Home Assistant:
The implemented platforms do not cover the whole functionality of the LCN system.
Therefore the lcn integration offers a variety of events, device triggers and actions.
They are ideal to be used in automation scripts or for the template platforms.
Setting up devices and entities
The lcn hardware modules and groups are represented by Home Assistant devices. The periphery of each lcn module is represented by Home Assistant entities. Peripheries are, for example, the output ports, relays, and variables of a module. Refer to the description of each platform to learn about which entity should be used for which periphery.
The configuration of the lcn devices and entities is completely done using a web user interface (configuration panel).
Once the integration is added to Home Assistant, you can access the lcn configuration panel by selecting the Configure button next to the respective integration entry on the LCN integration page.
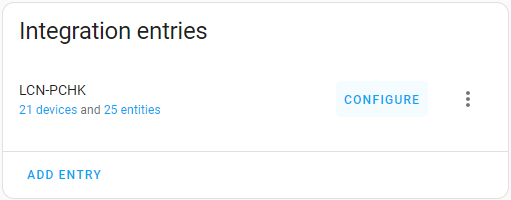
Configuration panel
From the LCN Configuration Panel, you can configure your LCN modules, groups, and entities within Home Assistant.
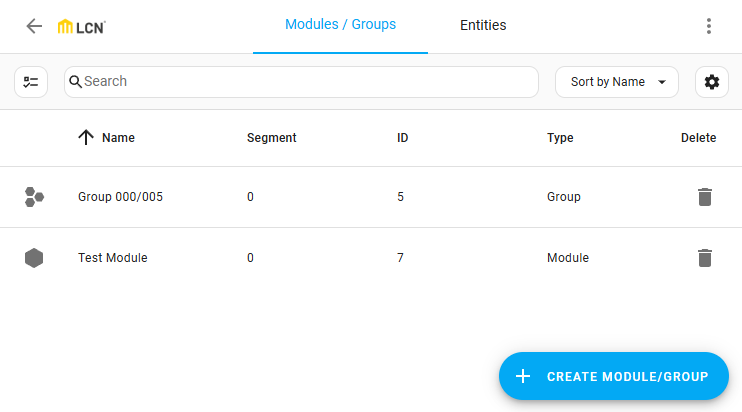
Configuring devices
You can add and remove modules and groups directly from the configuration panel. Once added, they will appear in Home Assistant as devices, which can be used to trigger specific actions within scripts or automations. For examples, refer to the Performing actions page.
The Modules / Groups tab provides an overview of your configured LCN modules and groups, showing their name, ID, and segment ID. The LCN Configuration Panel attempts to derive names from the LCN modules; if a module has no name or is part of a group, a standard name is assigned.
Scanning modules
To initiate a scan for LCN modules on the bus, in the top-right corner, select the three dots
- Result: This process polls each module for its name and serial number.
- When all module responses have been received, they will be listed in the device list.
- Scanning modules may take several seconds. The pop-up dialog will close automatically once the process is complete.
Adding devices
If module scanning fails or a module is unavailable on the bus, you can manually add it. Groups can also be created manually.
-
To add a module or group manually, select the Create Module/Group button.
-
Select whether you want to add a module or group and enter the desired
segment idand module/groupid.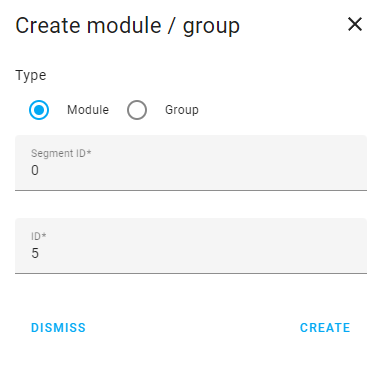
-
To add the new device, select Create.
Deleting devices
To delete a single device, select the trash can icon next to it.
- Result: This will remove the device from the device list and from Home Assistant, including any associated entities.
To delete multiple devices at once, enable selection mode. Select the desired entries, then, in the top-right corner, select Delete Selected.
Configuring entities
Entities configured for all devices are listed on the Entities tab.
To view entities for a specific device (module or group), in the Modules / Groups tab, select the device entry.
- Result: The Entities tab opens, showing entities of the selected device.
- To apply custom filters, enable the filter option.
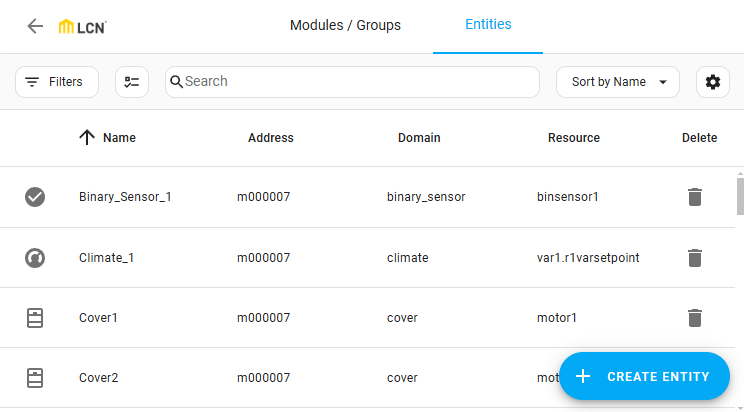
Adding entities
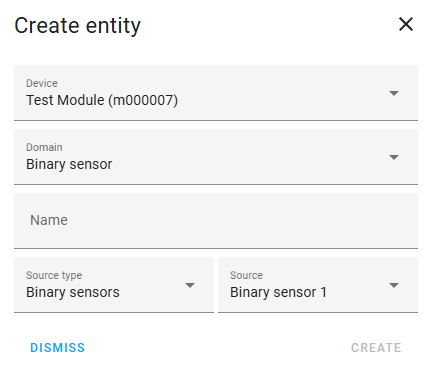
- To create a new entity, select Create Entity.
- From the dropdown menu, select the module or group for which to create the entity.
-
If a single module or group filter is applied, it will be pre-selected.
-
- Choose the domain (platform) for the entity and enter a name.
- You can change this name later within the Home Assistant entity settings.
- Depending on the selected domain, additional options will be shown. To add the entity to the list and to Home Assistant, enter the required information and select Create .
Deleting entities
To delete a single entity, select the trash can icon next to it.
- Result: This removes the entity from the list and from Home Assistant.
To delete multiple entities, enable selection mode, select the desired entries, and select Delete Selected in the upper right.
Displaying entity properties
Once an entity is created, you can view and configure its properties.
Select the entity in the entity list.
- This opens the Home Assistant dialog for entity properties, allowing you to configure the entity as you would from the general Home Assistant entity configuration panel.
Platforms
Binary sensor
The lcn binary sensor platform allows the monitoring of the following LCN binary data sources:
- Binary hardware sensors
The binary sensor can be used in automation scripts or in conjunction with template platforms.
Climate
The lcn climate platform allows the control of the LCN climate regulators.
This platform depends on the correct configuration of the module’s regulators, which has to be done in the LCN-PRO programming software.
You need to specify at least the variable for the current temperature and a setpoint variable for the target temperature.
If the control is set lockable, the regulator can be turned on/off.
If you intend to leave the regulation to Home Assistant, you should consider using the Generic Thermostat in conjunction with LCN Sensor and LCN Switch.
Cover
The lcn cover platform allows the control of LCN relays and output ports which have been configured as motor controllers.
Refer to the motors table to learn about which motor uses which module periphery.
Only for the module with firmware earlier than 190C:
The configuration allows the optional definition of reverse time. This is the time which is waited during the switching of the motor currents.
The reverse time should only be defined when using the module’s output ports for driving the cover. For all other configuration, the reverse time has to be defined in the LCN Pro software.
For the reverse time, you may choose one of the following constants: RT70 (70ms), RT600 (600ms), RT1200 (1,2s).
If you are using the module’s output ports for motor control, ensure that you have configured the output ports as motor controllers in the LCN Pro software! Otherwise, the output ports are not mutually interlocked and you run the risk of destroying the motor.
Light
The lcn light platform allows the control of the following LCN ports:
- (Dimmable) output ports
- Relays
Scene
The lcn scene platform allows the activation of previously programmed LCN scenes.
Sensor
The lcn sensor platform allows the monitoring of the following LCN data sources:
- Variables
- Regulator setpoints
- Thresholds
- S0 inputs
- LED states
- Logic operation states
The sensor can be used in automation scripts or in conjunction with template platforms.
Ensure that the LCN module is configured properly to provide the requested value. Otherwise, the module might show unexpected behavior or return error messages.
Switch
The lcn switch platform allows the control of the following LCN ports:
- Output ports
- Relays
- Lock state of regulators
- Lock state of keys
Additional features
Transponder, fingerprint sensor and code lock
To use LCN transponders, fingerprint sensors or code locks ensure that the corresponding module’s I-port property is enabled in the LCN-PRO software and properly configured. LCN transponders, fingerprints and code locks are identified by a six value hexadecimal code (e.g. 123abc). If a code is received a corresponding event (transponder event, fingerprint event, codelock event) is fired and can be used to trigger an automation. Alternatively, you can use the corresponding device triggers.
Example:
This example shows how the event_data can be extracted and used in a condition using Home Assistant’s templating engine.
Trigger on a transponder event and ensure that the received code is in the given list:
automation:
  triggers:
    - trigger: event
      event_type: lcn_transponder
  conditions: "{{ trigger.event.data.code in ['aabbcc', 'ddeeff', '112233'] }}"
  actions:
    ...
Further examples can be found in the event section.
Remote control
To use LCN remote controls (e.g., LCN-RT or LCN-RT16) ensure that the corresponding module’s I-port property is enabled in the LCN-PRO software and its behavior is properly configured as “IR access control”. With this configuration each remote control is identified by a six value hexadecimal code (e.g. 123abc). If a command from a remote control is received a corresponding event (transponder event) is fired and can be used to trigger an automation. Along with the transmitted code, the pressed key and the key action are transmitted. Alternatively, you can use the corresponding device triggers.
Examples can be found in the event section.
LCN commands addressed to PCHK host (Home Assistant)
A LCN module can not only be programmed to send commands to other modules/groups but also to the PCHK host configured in the LCN integration. These commands are directly passed to Home Assistant and can be evaluated. Only the send keys (former) command is supported.
Within LCN-PRO program the send keys command (only “A-C former command” is supported) to a key. For the target address manually enter the PCHK host id (default: 4). Select the keys and key actions as desired.
When a send keys command is received, the LCN integration will fire a send keys event for each key configured. These events can be used to trigger an automation. Alternatively, you can use the corresponding device triggers.
Examples can be found in the event section.
Only commands sent from physical buttons of a module are evaluated. The “Test command” button in the LCN-PRO software is not evaluated and therefore cannot be used for testing purposes.
Events
There are several functionalities of the LCN system which are not exposed as regular entities by the integration, but as events. Examples are button presses from remote controls (transmitters), transponder findings, fingerprint sensors and so called send keys events.
If you find it difficult to deal with events in scripted automations, you can also use device triggers which offer automation design via the UI.
All events have some common attributes in their event_data which identify the sending LCN hardware module (e.g., the module the transponder is connected to):
| Event payload | Description | Values |
|---|---|---|
device_id |
Internal device id of LCN module | string |
segment_id |
Module’s segment id | 5..128 |
module_id |
Module id | 5..254 |
In addition, every event has its own special attributes which are described below. All special attributes are optional and can be used as supplementary filters.
Event: lcn_transmitter
The lcn_transmitter event is fired if a LCN remote control command is received.
| Special payload | Description | Values |
|---|---|---|
code |
Transmitter code | string (6 hex values) |
level |
Key level | 0..4 |
key |
Key | 0..4 |
action |
Key action |
hit, make, break
|
Example:
The trigger will fire if any key on the remote control with code 123abc is hit as long as the
receiver hardware is connected to module 7 in segment 0.
automation:
  triggers:
    - trigger: event
      event_type: lcn_transmitter
      event_data:
        segment_id: 0
        module_id: 7
        code: 123abc
        action: hit
Event: lcn_transponder
The lcn_transponder event is fired if a LCN transponder command is received.
| Special payload | Description | Values |
|---|---|---|
code |
Transponder code | string (6 hex values) |
Example:
The trigger will fire if the transponder with code 123abc was detected at any hardware module.
automation:
  triggers:
    - trigger: event
      event_type: lcn_transponder
      event_data:
        code: 123abc
Event: lcn_fingerprint
The lcn_fingerprint event is fired if a LCN fingerprint command is received.
| Special payload | Description | Values |
|---|---|---|
code |
Fingerprint code | string (6 hex values) |
Example:
The trigger will fire if the fingerprint with code 123abc was detected at any hardware module.
automation:
  triggers:
    - trigger: event
      event_type: lcn_fingerprint
      event_data:
        code: 123abc
Event: lcn_codelock
The lcn_codelock event is fired if a LCN code lock command is received.
| Special payload | Description | Values |
|---|---|---|
code |
Code lock code | string (6 hex values) |
Example:
The trigger will fire if the code lock with code 123abc was activated at any hardware module.
automation:
  triggers:
    - trigger: event
      event_type: lcn_codelock
      event_data:
        code: 123abc
Event: lcn_send_keys
The lcn_send_keys event is fired if the PCHK host receives a send keys command.
| Special payload | Description | Values |
|---|---|---|
key |
LCN Key | a1..c8 |
action |
Key action |
hit, make, break
|
Example:
The trigger will fire if the PCHK host receives a command that issues a hit of
key a1.
automation:
  triggers:
    - trigger: event
      event_type: lcn_send_keys
      event_data:
        key: a1
        action: hit
Device triggers
To simplify using events in automations the LCN integration exposes them as device triggers. Those device triggers can be selected from the automation editor within Home Assistant.
After creating a new automation select Device as trigger type and search for the module which is supposed to cause the event in the device list. You may select the trigger type and configure its attributes. If an attribute is optional it is considered as a supplementary filter for the trigger. For an explanation of the attributes refer to the corresponding events.
LCN actions are addressed to a device through its device_id. A simple way to obtain the device_id for an LCN module in automations and scripts is to use a template with the device_id() function. This lets you find the device_id from the module name as shown in the frontend or configured in the LCN-PRO software.
action: lcn.pck
data:
  device_id: "{{ device_id('Module name') }}"
  pck: PIN4
List of actions
The LCN integrationIntegrations connect and integrate Home Assistant with your devices, services, and more. [Learn more] provides the following actions. Each link below opens a dedicated page with examples, parameters, and a step-by-step UI walkthrough.
-
Dynamic text (
lcn.dyn_text) Sends dynamic text to LCN-GTxD displays. -
LED (
lcn.led) Sets the LED state. -
Lock keys (
lcn.lock_keys) Sets the key lock states. -
Lock regulator (
lcn.lock_regulator) Locks a regulator setpoint. -
Output absolute brightness (
lcn.output_abs) Sets absolute brightness of output port in percent. -
Output relative brightness (
lcn.output_rel) Sets relative brightness of output port in percent. -
Toggle output (
lcn.output_toggle) Toggles output port. -
PCK (
lcn.pck) Sends an arbitrary PCK command. -
Relays (
lcn.relays) Sets the relay states. -
Send keys (
lcn.send_keys) Sends keys, which execute bound commands. -
Set absolute variable (
lcn.var_abs) Sets absolute value of a variable or setpoint. -
Shift variable (
lcn.var_rel) Shifts the value of a variable, setpoint, or threshold. -
Reset variable (
lcn.var_reset) Resets the value of a variable or setpoint.
For an overview of every action across all integrations, see the actions reference.
LCN constants
The actions use several predefined constants as parameters.
Ports
| Constant | Values |
|---|---|
| OUTPUT_PORT |
output1, output2, output3, output4
|
Motors
The motor values specify which hardware relay or outputs configuration will be used:
| Motor | Relay on/off | Relay up/down |
|---|---|---|
motor1 |
relay1 |
relay2 |
motor2 |
relay3 |
relay4 |
motor3 |
relay5 |
relay6 |
motor4 |
relay7 |
relay8 |
| Motor | Output up | Output down |
|---|---|---|
outputs |
output1 |
output2 |
Variables and units
| Constant | Values |
|---|---|
| VARIABLE |
var1, var2, var3, var4, var5, var6, var7, var8, var9, var10, var11, var12, tvar, r1var, r2var
|
| SETPOINT |
r1varsetpoint, r2varsetpoint
|
| THRESHOLD |
thrs1, thrs2, thrs3, thrs4, thrs5, thrs2_1, thrs2_2, thrs2_3, thrs2_4, thrs3_1, thrs3_2, thrs3_3, thrs3_4, thrs4_1, thrs4_2, thrs4_3, thrs4_4
|
| VAR_UNIT |
native, °C, °K, °F, lux_t, lux_i, m/s, %, ppm, volt, ampere, degree
|
| TIME_UNIT |
seconds, minutes, hours, days
|
States
| Constant | Values |
|---|---|
| LED_STATE |
on, off, blink, flicker
|
| KEY_STATE |
hit, make, break, dontsend
|
Keys
Whenever a key has to be provided, it is defined by a joint string consisting of the table identifier (a, b, c, d) and the corresponding key number.
Examples: a1, a5, d8.
Removing the integration
This integration follows standard integration removal, no extra steps are required.
To remove an integration instance from Home Assistant
- Go to Settings > Devices & services and select the integration card.
- From the list of devices, select the integration instance you want to remove.
- Next to the entry, select the three dots
menu. Then, select Delete.
Removing the integration will delete all device and entity configuration done via the UI panel.