Discord
The Discord integrationIntegrations connect and integrate Home Assistant with your devices, services, and more. [Learn more] lets you send notifications from Home Assistant to Discord channels and users via a bot. You can send text messages, attach files, like images or videos, from local paths or remote URLs, and use Discord embeds for rich formatting.
This integration is for outgoing messages only. It cannot read incoming Discord messages or use them as triggers for automations.
Prerequisites
Creating a Discord Application
In order to create a bot user a Discord Application is required. Go to the Discord My Apps page and create a new application.
When setting up the application you can use this icon.
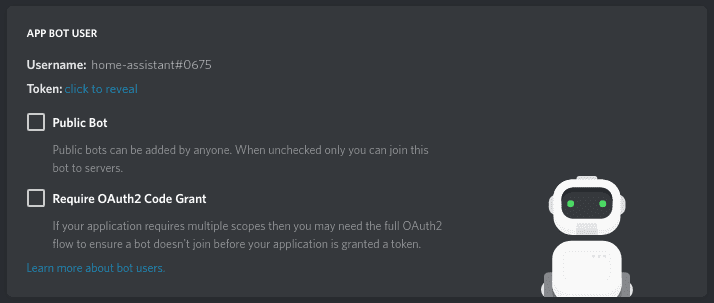
Once the application is ready, create a bot user (Create a Bot User).
Retrieve the Application ID from the ‘General Information’ section and the (hidden) Token of your bot for later.
The name you give your application on the Discord My Apps page will determine the name of the notify action. For example: if you enter “Discord Chat”, the action will be named notify.discord_chat.
Setting up the bot
Bots can send messages to servers and users or attach locally available images. To add the bot to a server you are an admin on, use the Application ID you noted above, found on the Discord My Apps page.
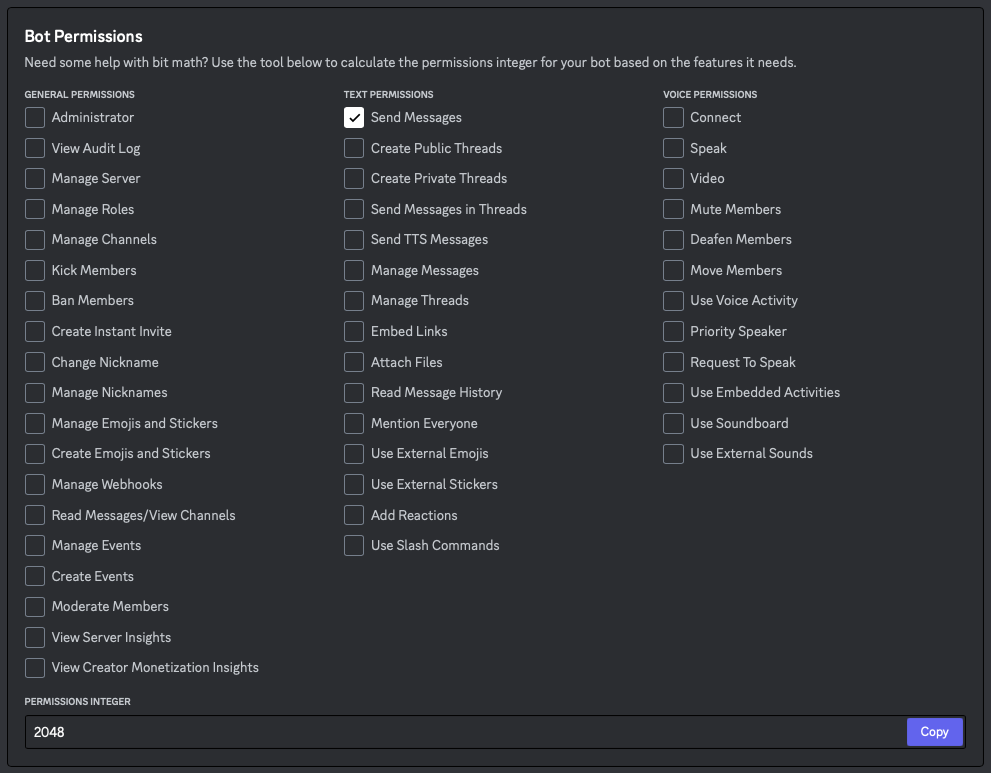
Next, decide what permissions your bot will have within your server. Under the ‘Bot’ section, select the permissions you want to grant and copy the permissions integer from the bottom field.
Now use the Discord Authorization page with the Application ID of your application and the Permissions Integer.
https://discordapp.com/api/oauth2/authorize?client_id=[APPLICATION_ID]&scope=bot&permissions=[PERMISSIONS_INTEGER]
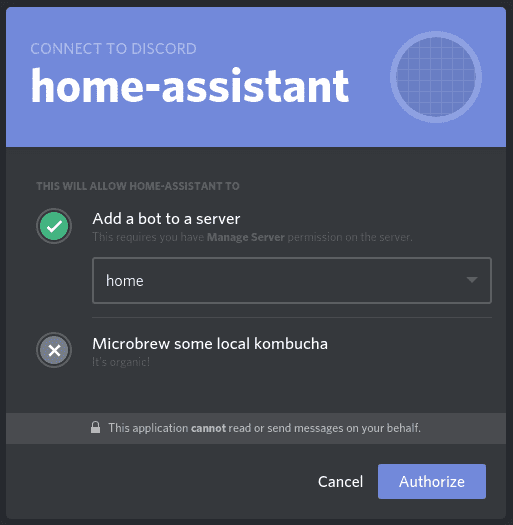
Wait for the confirmation which should say “Authorized”.
Once the bot has been added to your server, get the channel ID of the channel you want the bot to operate in. Open Discord and go to User Settings > Advanced > Enable Developer Mode. User settings can be found next to your username in Discord.

Right click channel name and copy the channel ID (Copy ID).
This channel or a user ID has to be used as the target when calling the notification action. Multiple channel or user IDs can be specified, across multiple servers or direct messages.
Add Discord integration to Home Assistant
Configuration
To add the Discord service to your Home Assistant instance, use this My button:

If the above My button doesn’t work, you can also perform the following steps manually:
-
Browse to your Home Assistant instance.
-
In the bottom right corner, select the
Add Integration button. -
From the list, select Discord.
-
Follow the instructions on screen to complete the setup.
When adding the Discord integration, you will be asked for an API Key. Enter the hidden Token of your bot to link your Discord integration to the bot you created and allow Home Assistant to send messages as that bot.
Set Message entry
The message field treats all input as literal text, including quotation marks.
For example: message: Hello, world! will appear exactly as is, while message: "Hello, world!" will include the quotation marks in the message.
Set Channel IDs as necessary
The target field is for the channel IDs where the message should be sent. Accepted data type is string for a single channel or string[] for multiple channels.
For example: "someChannelID" or ["someChannelID", "anotherChannelID"]
Pinging users, roles, or linking to other channels in the same server
You can use standard Discord methods to ping users, roles, and channels within the server.
| Type | Format |
|---|---|
User |
<@userID> |
Role |
<@&roleID> |
Channel |
<#channelID> |
Discord action data
The following attributes can be placed inside the data key of the action for extended functionality:
| Attribute | Optional | Description |
|---|---|---|
images |
yes | The file(s) to attach to message. |
urls |
yes | The file(s) to download from a remote URL and attach to message. |
verify_ssl |
yes | A boolean to determine if SSL certs should be verified when calling the remote URLs in the url attribute. Defaults to True. |
embed |
yes | Array of Discord embeds. NOTE: if using embed, message is still required. |
To include messages with embedding, use these attributes underneath the embed key:
| Attribute | Optional | Description |
|---|---|---|
title |
yes | Title of the embed. |
description |
yes | Description of the embed. |
color |
yes | Color code of the embed. This value is an int. |
url |
yes | URL of the embed. |
author |
yes | Sets the author for the embed content. |
footer |
yes | Sets the footer for the embed content. |
thumbnail |
yes | Sets the thumbnail for the embed content. |
image |
yes | Sets the image for the embed content. |
fields |
yes | Adds a field to the embed object. name and value are required, inline is true by default. |
Example action
- action: notify.discord
  data:
    message: "A message from Home Assistant"
    target: ["1234567890", "0987654321"]
    data:
      images:
      - "/tmp/garage_cam"
      - "/tmp/garage.jpg"
Example action with attachments sourced from remote URLs
- action: notify.discord
  data:
    message: "A message from Home Assistant"
    target: ["1234567890", "0987654321"]
    data:
      verify_ssl: False
      urls:
      - "https://example.com/image.jpg"
      - "https://example.com/video.mp4"
Note that verify_ssl defaults to True, and that any remote hosts will need to be in your allowlist_external_urls list. Discord limits attachment size to 8MB, so anything exceeding this will be skipped and noted in the error log.
Example embed action
- action: notify.discord
  data:
    message: ""
    target: ["1234567890", "0987654321"]
    data:
      embed:
        title: 'title'
        description: 'description'
        url: 'https://www.home-assistant.io'
        color: 199363
        author:
          name: 'Author Home Assistant'
          url: 'https://www.home-assistant.io'
          icon_url: 'https://www.home-assistant.io/images/favicon-192x192-full.png'
        footer:
          text: 'Footer Text'
          icon_url: 'https://www.home-assistant.io'
        thumbnail:
          url: 'https://www.home-assistant.io/images/favicon-192x192-full.png'
        image:
          url: 'https://www.home-assistant.io/images/favicon-192x192-full.png'
        fields:
          - name: 'fieldname1'
            value: 'valuename1'
            inline: false
          - name: 'fieldname2'
            value: 'valuename2'
          - name: 'fieldname3'
            value: 'valuename3'
          - name: 'fieldname4'
            value: 'valuename4'
            inline: false
Notes
You can tag any user inside a channel by using their user ID in the message like so: <@userid> replacing userid with the ID you copied. To get the user ID right click on the username to copy the ID like you did for the channel ID up above.
For more information about creating and authorizing bots, visit the OAuth2 information page
To use notifications effectively, please see the getting started with automation page.
Images are uploaded to Discord when a message is sent. As such, a local path to the image is required (that is, /config/www/garage.jpg as opposed to /local/garage.jpg), and updating an image after sending it in a message will not update the message in Discord.