RFXCOM RFXtrx
The RFXtrx integration supports RFXtrx devices by RFXCOM, which communicate in the frequency range of 433.92 MHz.
There is currently support for the following device types within Home Assistant:
Configuration
To add the RFXCOM RFXtrx integration to your Home Assistant instance, use this My button:

If the above My button doesn’t work, you can also perform the following steps manually:
-
Browse to your Home Assistant instance.
-
In the bottom right corner, select the Add Integration button.
-
From the list, select RFXCOM RFXtrx.
-
Follow the instructions on screen to complete the setup.
Debug logging
To receive debug logging from the RFXCOM device, add the following lines to configuration.yaml:
logger:
  default: warning
  logs:
    homeassistant.components.rfxtrx: debug
    RFXtrx: debug
Please note: RFXtrx is case-sensitive.
Supported protocols
Not all protocols as advertised are enabled on the initial setup of your transceiver. Enabling all protocols is not recommended either. The RFXcom transceiver loses significant sensitivity when more protocols are enabled. Warning: enabling the “BlindsT0” protocol blocks receiving any other protocol.
If your 433.92 MHz product is not showing in the logs, you may need to enable additional protocols. You can do this by configuring the device itself using RFXmgmr to enable the required protocol, or you can configure the device in Home Assistant by configuring the Protocols.
ser2net
You can host your device on another computer by setting up ser2net and example configuration for ser2net looks like this and then using host/port in your Home Assistant configuration.
Configuration example for ser2net older than 4.x.x (check with command ser2net -v):
50000:raw:0:/dev/ttyUSB0:38400 8DATABITS NONE 1STOPBIT
Configuration example for ser2net 4.x.x:
# Example /etc/ser2net.yaml for proxying USB/serial connections
connection: &rfxtrx
    accepter: tcp,5000
    enable: on
    options:
      kickolduser: true
      telnet-brk-on-sync: true
    connector: serialdev,
              /dev/ttyUSB0,
              38400n81,local
Settings options
To configure options for RFXtrx integration go to Settings -> Devices & Services and press Options on the RFXtrx card.
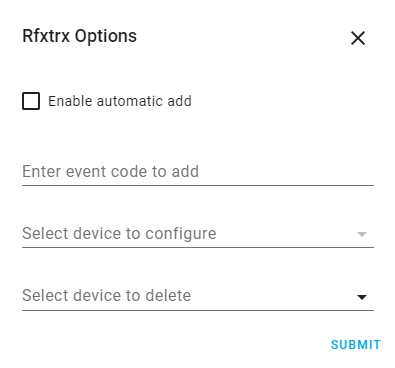
Automatic add
In the options menu, select Enable automatic add to enable automatic addition of detected devices. This is the easiest way to detect binary sensors, sensors or switches from a physical device. Once automatic add is enabled, newly detected devices are automatically added and can be found by clicking devices on the RFXtrx integration card.
Covers
The RFXtrx integration supports Siemens/LightwaveRF and Somfy RTS roller shutters that communicate in the frequency range of 433.92 MHz.
Events
The RFXtrx integration will expose event entities for remotes controlling lights as well as security devices.
Lights
The RFXtrx integration support lights that communicate in the frequency range of 433.92 MHz.
Make sure you trigger a dimming command to get switches detected as lights otherwise, they will show up as switches.
Switches
The RFXtrx integration support switches that communicate in the frequency range of 433.92 MHz.
Sensors
The RFXtrx integration support sensors that communicate in the frequency range of 433.92 MHz.
Also, several switches and other devices will also expose sensor entities with battery status as well as the signal level.
Binary sensors
The RFXtrx integration support binary sensors that communicate in the frequency range of 433.92 MHz. The RFXtrx binary sensor integration provides support for them. Many cheap sensors available on the web today are based on a particular RF chip called PT-2262. Depending on the running firmware on the RFXcom box, some of them may be recognized under the X10 protocol, but most of them are recognized under the Lighting4 protocol. The RFXtrx binary sensor integration provides some special options for them, while other RFXtrx protocols should work too.
Sirens
The RFXtrx integration supports siren entities for a few types of security systems and chimes. This entity allows triggering the chime or siren from Home Assistant as well as monitoring their status. Most of the chimes and security systems need a configured off-delay to work correctly since they only transmit when active.
Add a device by event code
To manually add a device, in the options window, an event code can be added in the field Enter event code to add.
See Generate codes how to generate event codes.
Somfy RTS
The RFXtrx433e or later versions like RFXtrx433XL is required for support, however, it does not support receive for the Somfy RTS protocol - as such devices cannot be automatically added. Instead, configure the device in the rfxmngr tool. Make a note of the assigned ID and Unit Code and then add a device to the configuration with the following id 071a0000[id][unit_code]. E.g., if the id was 0a 00 01, and the unit code was 01 then the fully qualified id would be 071a00000a000101, if you set your id/code to single digit in the rfxmngr, e.g., id: 1 02 03 and unit code: 1 you will need to add 0 before, so 102031 becomes 071a000001020301.
To add the device, enter the value unaltered in the Event Code field, and click Submit.
Convert switch event to dimming event
To convert a standard switch to a light, use the Light Switch integration.
To convert a switch to a dimmable light, make sure the event contains a dimming command. You can usually convert a command by changing one byte.
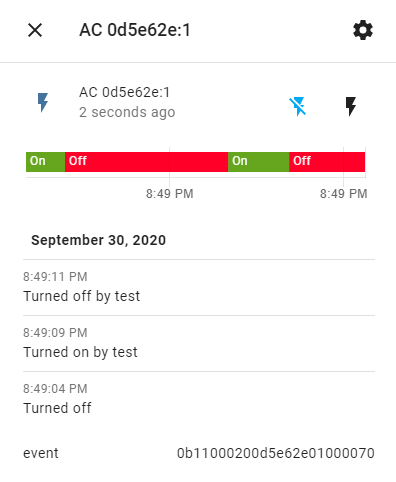
Copy the event code from the state attribute of the switch, which shows up on the bottom of the window when clicking on the switch entity. Examples of byte changes:
ARC:
0b11000248bc0cfe09 01 0f70
0b11000248bc0cfe09 02 0f70
LightwaveRF:
0a14000101f20302 01 0080
0a14000101f20302 10 0080
Waveman:
710030e4102 01 50
710030e4102 02 50
Protocols
When no protocols are selected in the device configuration, the RFXtrx device will use the protocols enabled in its non-volatile memory. You can set these using RFXmgmr.
If you select protocols in the device configuration, these will be enabled each time the device is connected. They will not be stored in the RFXtrx device non-volatile memory.
Some protocols, like undecoded, cannot be enabled in non-volatile memory and must be enabled on each connect. To enable these protocols you must use the device configuration instead of RFXmgr.
Configure device options
To configure device options, select a device from the list under Select device to configure. After pressing Submit a window with device options are presented based on the device type.
Off delay
Binary sensors have only two states - “on” and “off”. Many door or window opening sensors will send a signal each time the door/window is open or closed. However, depending on their hardware or on their purpose, some sensors are only able to signal their “on” state:
- Most motion sensors send a signal each time they detect motion. They stay “on” for a few seconds and go back to sleep, ready to signal other motion events. Usually, they do not send a signal when they go back to sleep.
- Some doorbells may also only send “on” signals when their toggle switch is pressed, but no “off” signal when the switch is released.
For those devices, use the off_delay parameter. It defines a delay after, which a device will go back to an “Off” state. That “Off” state will be fired internally by Home Assistant, just as if the device fired it by itself. If a motion sensor can only send signals once every 5 seconds, sets the off_delay parameter to seconds: 5.
Venetian blind mode
Available only for Somfy RTS cover devices. Enables tilt control of venetian blind slats.
Venetian blind motors that control slats tilt can be configured in one of two modes - US (short press of up/down buttons opens/closes the blind, long-press controls tilt angle), or European (short press of up/down buttons controls tilt angle, long-press opens/closes the blind). You can select one of the following settings depending on your blinds:
- Unknown - default, tilt control is not enabled. Leave if the cover is not a venetian blind.
- US - tilt control enabled for blinds in US tilt mode.
- EU - tilt control enabled for blinds in European tilt mode.
Options for PT-2262 devices under the Lighting4 protocol
When a data packet is transmitted by a PT-2262 device using the Lighting4 protocol, there is no way to automatically extract the device identifier and the command from the packet. Each device has its own id/command length combination and the field lengths are not included in the data. One device that sends 2 different commands will be seen as 2 devices on Home Assistant. For such cases, the following options are available in order to circumvent the problem:
- data_bits
- command_on
- command_off
Let’s try to add a new PT-2262 sensor using the “automatic_add” option and have a look at Home Assistant system log.
Have your sensor trigger the “On” state for the first time. Some messages will appear:
INFO (Thread-6) [homeassistant.components.binary_sensor.rfxtrx] Added binary sensor 0913000022670e013970 (Device_id: 22670e Class: LightingDevice Sub: 0)
Here the sensor has the id 22670e.
Now have your sensor trigger the “Off” state and look for the following message in the Home Assistant log. You should see that your device has been detected as a new device when triggering its “Off” state:
INFO (Thread-6) [homeassistant.components.binary_sensor.rfxtrx] Added binary sensor 09130000226707013d70 (Device_id: 226707 Class: LightingDevice Sub: 0)
Here the device id is 226707, which is almost similar to the 22670e we had on the “On” event a few seconds ago.
From those two values, you can guess that the actual id of your device is 22670, and that e and 7 are commands for “On” and “Off” states respectively. As one hexadecimal digit uses 4 bits, we can conclude that the device is using 4 data bits.
So, here is the actual configuration section for the binary sensor:
data_bits: 4
command_on: 0xe
command_off: 0x7
The automatic_add option makes the RFXtrx binary sensor integration calculate and display the configuration options for you in the Home Assistant logs:
INFO (Thread-6) [homeassistant.components.rfxtrx] rfxtrx: found possible device 226707 for 22670e with the following configuration:
data_bits=4
command_on=0xe
command_off=0x7
INFO (Thread-6) [homeassistant.components.binary_sensor.rfxtrx] Found possible matching deviceid 22670e.
This automatic guess should work most of the time, but there is no guarantee on that. You should activate it only when you want to configure your new devices and leave it off otherwise.
Replace device
Some battery-powered devices send commands or data with a randomly generated id. When batteries are replaced, the id changes. In order to use the device, it needs to be re-added either through automatic add or manually. This will create a new device. To transfer user-configured names and entity ids of the old device, select the old device in the options menu under Select device to configure. In the device options menu, select from the Select device to replace menu the new device and press Submit. The names and ids of the old device will be transferred to the new device and the old device will be automatically deleted.
Delete device
To delete device(s) from the configuration, select the delete button on the device info page.
Events
The RFXtrx integration will signal an event on the reception of messages from and RFXtrx device on the following form. For the signal to be available, the fire_event parameter must be set on the device in configuration.
Signal from a byron doorbell button:
packet_type: 22
sub_type: 0
type_string: "Byron SX"
id_string: "00:90"
data: "0716000100900970"
values:
  Sound: 9
  Battery numeric: 0
  Rssi numeric: 7
Event data from a Nexa wall socket switch:
packet_type: 16
sub_type: 1
type_string: 'ARC'
id_string': 'C3'
data: '0710010143030170'
values':
  Command: "On"
  Rssi numeric': 7
You can set up automations to react to these events. When you do, don’t include more fields than needed. Always include the device identifying fields, packet_type, sub_type and id_string.
So, for example, to trigger an action when somebody presses the doorbell, you would set up an automation with the following trigger:
Automation trigger:
- platform: event
  event_type: rfxtrx_event
  event_data:
    packet_type: 22
    sub_type: 0
    id_string: "00:90"
    values:
      Sound: 9
A more complete example with scene activation:
light:
  platform: demo

scene:
  name: WelcomeScene
  entities:
    light.bed_light: on
    light.ceiling_lights: off

automation:
  - alias: "Use doorbell button to trigger scene"
    trigger:
    - platform: event
      event_type: rfxtrx_event
      event_data:
        packet_type: 22
        sub_type: 0
        id_string: "00:90"
        values:
          Sound: 9
    action:
      service: scene.turn_on
      target:
        entity_id: scene.welcomescene
Services
-
rfxtrx.send: Send a custom event using the RFXtrx device.
Service: Send
Simulate a button being pressed:
...
action:
  service: rfxtrx.send
  data:
    event: 0b1111e003af16aa10000060
Alternatively:
- Go to: Developer tools -> Services
- Select:
RFXCOM RFXtrx: Sendfrom the Service drop-down menu.
service: rfxtrx.send
data:
  event: "0b1111e003af16aa10000060"
Generate codes
If you need to generate codes for switches and lights, you can use a template (useful, for example, COCO switches).
- Go to: Developer tools -> Template
- Use the following codes to generate an event:
Switch: ARC
0b11000{{ range(100,700) | random | int }}bc0cfe0{{ range(0,10) | random | int }}010f70
Light: ARC
0b11000{{ range(100,700) | random | int }}bc0cfe0{{ range(0,10) | random | int }}020f70
Light: Lightwave RF
0a14000{{ range(100,700) | random | int }}bc0cf{{ range(0,10) | random | int }}100f70
- Use this code to add a new switch in the options menu.
- Launch your Home Assistant and go to the website.
- Enable learning mode on your switch (i.e., push learn button or plug it in a wall socket)
- Toggle your new switch in the Home Assistant interface