MQTT
MQTT (aka MQ Telemetry Transport) is a machine-to-machine or “Internet of Things” connectivity protocol on top of TCP/IP. It allows extremely lightweight publish/subscribe messaging transport.
Configuration
To add the MQTT integration to your Home Assistant instance, use this My button:

If the above My button doesn’t work, you can also perform the following steps manually:
-
Browse to your Home Assistant instance.
-
In the bottom right corner, select the Add Integration button.
-
From the list, select MQTT.
-
Follow the instructions on screen to complete the setup.
Your first step to get MQTT and Home Assistant working is to choose a broker.
Choose an MQTT broker
Run your own
The most private option is running your own MQTT broker.
The recommended setup method is to use the Mosquitto MQTT broker add-on.
Neither ActiveMQ MQTT broker nor the RabbitMQ MQTT Plugin are supported, use a known working broker like Mosquitto instead. There are at least two issues with the ActiveMQ MQTT broker which break MQTT message retention.
Use a public broker
The Mosquitto project runs a public broker. This is the easiest to set up, but there is no privacy as all messages are public. Use this only for testing purposes and not for real tracking of your devices or controlling your home. To use the public mosquitto broker, configure the MQTT integration to connect to broker test.mosquitto.org on port 1883 or 8883.
Broker configuration
MQTT broker settings are configured when the MQTT integration is first set up and can be changed later if needed.
Add the MQTT integration, then provide your broker’s hostname (or IP address) and port and (if required) the username and password that Home Assistant should use. To change the settings later, follow these steps:
- Go to Settings > Devices & Services.
- Select the MQTT integration.
- Select Configure, then Re-configure MQTT.
Advanced broker configuration
Advanced broker configuration options include setting a custom client ID, setting a client certificate and key for authentication and enabling TLS validation of the brokers certificate for. To access the advanced settings, open the MQTT broker settings, switch on Advanced options and click Next. The advanced options will be shown by default if there are advanced settings active already.
Advanced broker options are accessible only when advanced mode is enabled (see user settings), or when advanced broker settings are configured already.
Alternative client ID
You can set a custom MQTT client ID, this can help when debugging. Mind that the client ID must be unique. Leave this settings default if you want Home Assistant to generate a unique ID.
Keep alive
The time in seconds between sending keep alive messages for this client. The default is 60 seconds. The keep alive setting should be minimal 15 seconds.
Broker certificate validation
To enable a secure the broker certificate should be validated. If your broker uses a trusted certificate then choose Auto. This will allow validation against certifite CAs bundled certificates. If a self-signed certificate is used, select Custom. A custom PEM encoded CA-certificate can be uploaded. Click NEXT to show the control to upload the CA certificate.
If the server certificate does not match the hostname then validation will fail. To allow a connection without the verification of the hostname, turn the Ignore broker certificate validation switch on.
MQTT Protocol
The MQTT protocol setting defaults to version 3.1.1. If your MQTT broker supports MQTT version 5 you can set the protocol setting to 5.
Securing the connection
With a secure broker connection it is possible to use a client certificate for authentication. To set the client certificate and private key turn on the option Use a client certificate and click “Next” to show the controls to upload the files. Only a PEM encoded client certificates together with a PEM encoded private key can be uploaded. Make sure the private key has no password set.
Using WebSockets as transport
You can select websockets as transport method if your MQTT broker supports it. When you select websockets and click NEXT, you will be able to add a WebSockets path (default = /) and WebSockets headers (optional). The target WebSockets URI: ws://{broker}:{port}{WebSockets path} is built with broker, port and ws_path (WebSocket path) settings.
To configure the WebSocket’s headers supply a valid JSON dictionary string. E.g. { "Authorization": "token" , "x-header": "some header"}. The default transport method is tcp. The WebSockets transport can be secured using TLS and optionally using user credentials or a client certificate.
A configured client certificate will only be active if broker certificate validation is enabled.
Configure MQTT options
To change the settings, follow these steps:
- Go to Settings > Devices & Services.
- Select the MQTT integration.
- Select Configure, then Re-configure MQTT.
- To open the MQTT options page, select Next.
Discovery options
MQTT discovery is enabled by default. Discovery can be turned off. The prefix for the discovery topic (default homeassistant) can be changed here as well.
See also MQTT Discovery section
Birth and last will messages
Home Assistant’s MQTT integration supports so-called Birth and Last Will and Testament (LWT) messages. The former is used to send a message after the service has started, and the latter is used to notify other clients about a disconnected client. Please note that the LWT message will be sent both in case of a clean (e.g. Home Assistant shutting down) and in case of an unclean (e.g. Home Assistant crashing or losing its network connection) disconnect.
By default, Home Assistant sends online and offline to homeassistant/status.
MQTT Birth and Last Will messages can be customized or disabled from the UI. To do this, click on “Configure” in the integration page in the UI, then “Re-configure MQTT” and then “Next”.
Testing your setup
The mosquitto broker package ships commandline tools (often as *-clients package) to send and receive MQTT messages. For sending test messages to a broker running on localhost check the example below:
mosquitto_pub -h 127.0.0.1 -t homeassistant/switch/1/on -m "Switch is ON"
Another way to send MQTT messages manually is to use the MQTT integration in the frontend. Choose “Settings” on the left menu, click “Devices & Services”, and choose “Configure” in the “Mosquitto broker” tile. Enter something similar to the example below into the “topic” field under “Publish a packet” and press “PUBLISH” .
- Go to Settings > Devices & Services.
- Select the Mosquitto broker integration, then select Configure.
- Enter something similar to the example below into the topic field under Publish a packet. Select Publish.
homeassistant/switch/1/power
and in the Payload field
ON
In the “Listen to a topic” field, type # to see everything, or “homeassistant/switch/#” to just follow a published topic, then press “START LISTENING”. The messages should appear similar to the text below:
Message 23 received on homeassistant/switch/1/power/stat/POWER at 12:16 PM:
ON
QoS: 0 - Retain: false
Message 22 received on homeassistant/switch/1/power/stat/RESULT at 12:16 PM:
{
    "POWER": "ON"
}
QoS: 0 - Retain: false
For reading all messages sent on the topic homeassistant to a broker running on localhost:
mosquitto_sub -h 127.0.0.1 -v -t "homeassistant/#"
Sharing of device configuration
MQTT entities can share device configuration, meaning one entity can include the full device configuration and other entities can link to that device by only setting mandatory fields.
The mandatory fields were previously limited to at least one of connection and identifiers, but have now been extended to at least one of connection and identifiers as well as the name.
Naming of MQTT Entities
For every configured MQTT entity Home Assistant automatically assigns a unique entity_id. If the unique_id option is configured, you can change the entity_id after creation, and the changes are stored in the Entity Registry. The entity_id is generated when an item is loaded the first time.
If the object_id option is set, then this will be used to generate the entity_id.
If, for example, we have configured a sensor, and we have set object_id to test, then Home Assistant will try to assign sensor.test as entity_id, but if this entity_id already exits it will append it with a suffix to make it unique, for example, sensor.test_2.
This means any MQTT entity which is part of a device will automatically have its friendly_name attribute prefixed with the device name
Unnamed binary_sensor, button, number and sensor entities will now be named by their device class instead of being named “MQTT binary sensor” etc.
It’s allowed to set an MQTT entity’s name to None (use null in YAML) to mark it as the main feature of a device.
Note that on each MQTT entity, the has_entity_name attribute will be set to True. More details can be found here.
MQTT Discovery
The discovery of MQTT devices will enable one to use MQTT devices with only minimal configuration effort on the side of Home Assistant. The configuration is done on the device itself and the topic used by the device. Similar to the HTTP binary sensor and the HTTP sensor. To prevent multiple identical entries if a device reconnects, a unique identifier is necessary. Two parts are required on the device side: The configuration topic which contains the necessary device type and unique identifier, and the remaining device configuration without the device type.
MQTT discovery is enabled by default, but can be disabled. The prefix for the discovery topic (default homeassistant) can be changed.
See the MQTT Options sections
Documentation on the MQTT components that support MQTT discovery can be found here.
Discovery messages
Discovery topic
The discovery topic needs to follow a specific format:
<discovery_prefix>/<component>/[<node_id>/]<object_id>/config
-
<discovery_prefix>: The Discovery Prefix defaults tohomeassistant. This prefix can be changed. -
<component>: One of the supported MQTT integrations, eg.binary_sensor. -
<node_id>(Optional): ID of the node providing the topic, this is not used by Home Assistant but may be used to structure the MQTT topic. The ID of the node must only consist of characters from the character class[a-zA-Z0-9_-](alphanumerics, underscore and hyphen). -
<object_id>: The ID of the device. This is only to allow for separate topics for each device and is not used for theentity_id. The ID of the device must only consist of characters from the character class[a-zA-Z0-9_-](alphanumerics, underscore and hyphen).
The <node_id> level can be used by clients to only subscribe to their own (command) topics by using one wildcard topic like <discovery_prefix>/+/<node_id>/+/set.
Best practice for entities with a unique_id is to set <object_id> to unique_id and omit the <node_id>.
Discovery payload
The payload must be a serialized JSON dictionary and will be checked like an entry in your configuration.yaml file if a new device is added, with the exception that unknown configuration keys are allowed but ignored. This means that missing variables will be filled with the integration’s default values. All configuration variables which are required must be present in the payload. The reason for allowing unknown documentation keys is allow some backwards compatibility, software generating MQTT discovery messages can then be used with older Home Assistant versions which will simply ignore new features.
Subsequent messages on a topic where a valid payload has been received will be handled as a configuration update, and a configuration update with an empty payload will cause a previously discovered device to be deleted.
A base topic ~ may be defined in the payload to conserve memory when the same topic base is used multiple times.
In the value of configuration variables ending with _topic, ~ will be replaced with the base topic, if the ~ occurs at the beginning or end of the value.
Configuration variable names in the discovery payload may be abbreviated to conserve memory when sending a discovery message from memory constrained devices.
It is encouraged to add additional information about the origin that supplies MQTT entities via MQTT discovery by adding the origin option (can be abbreviated to o) to the discovery payload. Note that these options also support abbreviations. Information of the origin will be logged to the core event log when an item is discovered or updated.
    'act_t':               'action_topic',
    'act_tpl':             'action_template',
    'atype':               'automation_type',
    'aux_cmd_t':           'aux_command_topic',
    'aux_stat_t':          'aux_state_topic',
    'aux_stat_tpl':        'aux_state_template',
    'av_tones':            'available_tones',
    'avty':                'availability',
    'avty_mode':           'availability_mode',
    'avty_t':              'availability_topic',
    'avty_tpl':            'availability_template',
    'away_mode_cmd_t':     'away_mode_command_topic',
    'away_mode_stat_t':    'away_mode_state_topic',
    'away_mode_stat_tpl':  'away_mode_state_template',
    'b_tpl':               'blue_template',
    'bri_cmd_t':           'brightness_command_topic',
    'bri_cmd_tpl':         'brightness_command_template',
    'bri_scl':             'brightness_scale',
    'bri_stat_t':          'brightness_state_topic',
    'bri_tpl':             'brightness_template',
    'bri_val_tpl':         'brightness_value_template',
    'clr_temp_cmd_tpl':    'color_temp_command_template',
    'clr_temp_cmd_t':      'color_temp_command_topic',
    'clr_temp_stat_t':     'color_temp_state_topic',
    'clr_temp_tpl':        'color_temp_template',
    'clr_temp_val_tpl':    'color_temp_value_template',
    'clrm':                'color_mode',
    'clrm_stat_t':         'color_mode_state_topic',
    'clrm_val_tpl':        'color_mode_value_template',
    'cmd_off_tpl':         'command_off_template',
    'cmd_on_tpl':          'command_on_template',
    'cmd_t':               'command_topic',
    'cmd_tpl':             'command_template',
    'cod_arm_req':         'code_arm_required',
    'cod_dis_req':         'code_disarm_required',
    'cod_trig_req':        'code_trigger_required',
    'cont_type':           'content_type',
    'curr_temp_t':         'current_temperature_topic',
    'curr_temp_tpl':       'current_temperature_template',
    'dev':                 'device',
    'dev_cla':             'device_class',
    'dir_cmd_t':           'direction_command_topic',
    'dir_cmd_tpl':         'direction_command_template',
    'dir_stat_t':          'direction_state_topic',
    'dir_val_tpl':         'direction_value_template',
    'e':                   'encoding',
    'en':                  'enabled_by_default',
    'ent_cat':             'entity_category',
    'ent_pic':             'entity_picture',
    'evt_typ':             'event_types',
    'exp_aft':             'expire_after',
    'fanspd_lst':          'fan_speed_list',
    'flsh_tlng':           'flash_time_long',
    'flsh_tsht':           'flash_time_short',
    'fx_cmd_t':            'effect_command_topic',
    'fx_cmd_tpl':          'effect_command_template',
    'fx_list':             'effect_list',
    'fx_stat_t':           'effect_state_topic',
    'fx_tpl':              'effect_template',
    'fx_val_tpl':          'effect_value_template',
    'fan_mode_cmd_t':      'fan_mode_command_topic',
    'fan_mode_cmd_tpl':    'fan_mode_command_template',
    'fan_mode_stat_t':     'fan_mode_state_topic',
    'fan_mode_stat_tpl':   'fan_mode_state_template',
    'frc_upd':             'force_update',
    'g_tpl':               'green_template',
    'hs_cmd_t':            'hs_command_topic',
    'hs_cmd_tpl':          'hs_command_template',
    'hs_stat_t':           'hs_state_topic',
    'hs_val_tpl':          'hs_value_template',
    'ic':                  'icon',
    'img_e':               'image_encoding',
    'img_t':               'image_topic',
    'init':                'initial',
    'hum_cmd_t':           'target_humidity_command_topic',
    'hum_cmd_tpl':         'target_humidity_command_template',
    'hum_stat_t':          'target_humidity_state_topic',
    'hum_state_tpl':       'target_humidity_state_template',
    'json_attr':           'json_attributes',
    'json_attr_t':         'json_attributes_topic',
    'json_attr_tpl':       'json_attributes_template',
    'l_ver_t':             'latest_version_topic',
    'l_ver_tpl':           'latest_version_template',
    'lrst_t':              'last_reset_topic',
    'lrst_val_tpl':        'last_reset_value_template',
    'max':                 'max',
    'max_hum':             'max_humidity',
    'max_mirs':            'max_mireds',
    'max_temp':            'max_temp',
    'min':                 'min',
    'min_hum':             'min_humidity',
    'min_mirs':            'min_mireds',
    'min_temp':            'min_temp',
    'mode':                'mode',
    'mode_cmd_t':          'mode_command_topic',
    'mode_cmd_tpl':        'mode_command_template',
    'mode_stat_t':         'mode_state_topic',
    'mode_stat_tpl':       'mode_state_template',
    'modes':               'modes',
    'name':                'name',
    'o':                   'origin',
    'obj_id':              'object_id',
    'off_dly':             'off_delay',
    'on_cmd_type':         'on_command_type',
    'ops':                 'options',
    'opt':                 'optimistic',
    'osc_cmd_t':           'oscillation_command_topic',
    'osc_cmd_tpl':         'oscillation_command_template',
    'osc_stat_t':          'oscillation_state_topic',
    'osc_val_tpl':         'oscillation_value_template',
    'pct_cmd_t':           'percentage_command_topic',
    'pct_cmd_tpl':         'percentage_command_template',
    'pct_stat_t':          'percentage_state_topic',
    'pct_val_tpl':         'percentage_value_template',
    'pl':                  'payload',
    'pl_arm_away':         'payload_arm_away',
    'pl_arm_custom_b':     'payload_arm_custom_bypass',
    'pl_arm_home':         'payload_arm_home',
    'pl_arm_nite':         'payload_arm_night',
    'pl_arm_vacation':     'payload_arm_vacation',
    'pl_avail':            'payload_available',
    'pl_cln_sp':           'payload_clean_spot',
    'pl_cls':              'payload_close',
    'pl_dir_fwd':          'payload_direction_forward',
    'pl_dir_rev':          'payload_direction_reverse',
    'pl_disarm':           'payload_disarm',
    'pl_home':             'payload_home',
    'pl_inst':             'payload_install',
    'pl_loc':              'payload_locate',
    'pl_lock':             'payload_lock',
    'pl_not_avail':        'payload_not_available',
    'pl_not_home':         'payload_not_home',
    'pl_off':              'payload_off',
    'pl_on':               'payload_on',
    'pl_open':             'payload_open',
    'pl_osc_off':          'payload_oscillation_off',
    'pl_osc_on':           'payload_oscillation_on',
    'pl_paus':             'payload_pause',
    'pl_stop':             'payload_stop',
    'pl_strt':             'payload_start',
    'pl_prs':              'payload_press',
    'pl_ret':              'payload_return_to_base',
    'pl_rst':              'payload_reset',
    'pl_rst_hum':          'payload_reset_humidity',
    'pl_rst_mode':         'payload_reset_mode',
    'pl_rst_pct':          'payload_reset_percentage',
    'pl_rst_pr_mode':      'payload_reset_preset_mode',
    'pl_stop':             'payload_stop',
    'pl_stpa':             'payload_start_pause',
    'pl_strt':             'payload_start',
    'pl_toff':             'payload_turn_off',
    'pl_ton':              'payload_turn_on',
    'pl_trig':             'payload_trigger',
    'pl_unlk':             'payload_unlock',
    'pos':                 'reports_position',
    'pos_clsd':            'position_closed',
    'pos_open':            'position_open',
    'pr_mode_cmd_t':       'preset_mode_command_topic',
    'pr_mode_cmd_tpl':     'preset_mode_command_template',
    'pr_mode_stat_t':      'preset_mode_state_topic',
    'pr_mode_val_tpl':     'preset_mode_value_template',
    'pr_modes':            'preset_modes',
    'ptrn':                'pattern',
    'r_tpl':               'red_template',
    'rel_s':               'release_summary',
    'rel_u':               'release_url',
    'ret':                 'retain',
    'rgb_cmd_t':           'rgb_command_topic',
    'rgb_cmd_tpl':         'rgb_command_template',
    'rgb_stat_t':          'rgb_state_topic',
    'rgb_val_tpl':         'rgb_value_template',
    'rgbw_cmd_t':          'rgbw_command_topic',
    'rgbw_cmd_tpl':        'rgbw_command_template',
    'rgbw_stat_t':         'rgbw_state_topic',
    'rgbw_val_tpl':        'rgbw_value_template',
    'rgbww_cmd_t':         'rgbww_command_topic',
    'rgbww_cmd_tpl':       'rgbww_command_template',
    'rgbww_stat_t':        'rgbww_state_topic',
    'rgbww_val_tpl':       'rgbww_value_template',
    'send_cmd_t':          'send_command_topic',
    'send_if_off':         'send_if_off',
    'set_fan_spd_t':       'set_fan_speed_topic',
    'set_pos_t':           'set_position_topic',
    'set_pos_tpl':         'set_position_template',
    'pos_t':               'position_topic',
    'pos_tpl':             'position_template',
    'spd_rng_min':         'speed_range_min',
    'spd_rng_max':         'speed_range_max',
    'src_type':            'source_type',
    'stat_cla':            'state_class',
    'stat_closing':        'state_closing',
    'stat_clsd':           'state_closed',
    'stat_jam':            'state_jammed',
    'stat_locked':         'state_locked',
    'stat_locking':        'state_locking',
    'stat_off':            'state_off',
    'stat_on':             'state_on',
    'stat_open':           'state_open',
    'stat_opening':        'state_opening',
    'stat_stopped':        'state_stopped',
    'stat_unlocked':       'state_unlocked',
    'stat_unlocking':      'state_unlocking',
    'stat_t':              'state_topic',
    'stat_tpl':            'state_template',
    'stat_val_tpl':        'state_value_template',
    'step':                'step',
    'stype':               'subtype',
    'sug_dsp_prc':         'suggested_display_precision',
    'sup_clrm':            'supported_color_modes',
    'sup_dur':             'support_duration',
    'sup_vol':             'support_volume_set',
    'sup_feat':            'supported_features',
    'swing_mode_cmd_t':    'swing_mode_command_topic',
    'swing_mode_cmd_tpl':  'swing_mode_command_template',
    'swing_mode_stat_t':   'swing_mode_state_topic',
    'swing_mode_stat_tpl': 'swing_mode_state_template',
    't':                   'topic',
    'temp_cmd_t':          'temperature_command_topic',
    'temp_cmd_tpl':        'temperature_command_template',
    'temp_hi_cmd_t':       'temperature_high_command_topic',
    'temp_hi_cmd_tpl':     'temperature_high_command_template',
    'temp_hi_stat_t':      'temperature_high_state_topic',
    'temp_hi_stat_tpl':    'temperature_high_state_template',
    'temp_lo_cmd_t':       'temperature_low_command_topic',
    'temp_lo_cmd_tpl':     'temperature_low_command_template',
    'temp_lo_stat_t':      'temperature_low_state_topic',
    'temp_lo_stat_tpl':    'temperature_low_state_template',
    'temp_stat_t':         'temperature_state_topic',
    'temp_stat_tpl':       'temperature_state_template',
    'temp_unit':           'temperature_unit',
    'tilt_clsd_val':       'tilt_closed_value',
    'tilt_cmd_t':          'tilt_command_topic',
    'tilt_cmd_tpl':        'tilt_command_template',
    'tilt_max':            'tilt_max',
    'tilt_min':            'tilt_min',
    'tilt_opnd_val':       'tilt_opened_value',
    'tilt_opt':            'tilt_optimistic',
    'tilt_status_t':       'tilt_status_topic',
    'tilt_status_tpl':     'tilt_status_template',
    'tit':                 'title',
    'uniq_id':             'unique_id',
    'unit_of_meas':        'unit_of_measurement',
    'url_t':               'url_topic',
    'url_tpl':             'url_template',
    'val_tpl':             'value_template',
    'whit_cmd_t':          'white_command_topic',
    'whit_scl':            'white_scale',
    'xy_cmd_t':            'xy_command_topic',
    'xy_cmd_tpl':          'xy_command_template',
    'xy_stat_t':           'xy_state_topic',
    'xy_val_tpl':          'xy_value_template',
    'cu':                  'configuration_url',
    'cns':                 'connections',
    'ids':                 'identifiers',
    'name':                'name',
    'mf':                  'manufacturer',
    'mdl':                 'model',
    'hw':                  'hw_version',
    'sw':                  'sw_version',
    'sa':                  'suggested_area',
    'sn':                  'serial_number',
    'name':                'name',
    'sw':                  'sw_version',
    'url':                 'support_url',
How to use discovery messages
When MQTT discovery is set up, and a device or service sends a discovery message, an MQTT entity, tag, or device automation will be set up directly after receiving the message. When Home Assistant is restarting, discovered MQTT items with a unique ID will be unavailable until a new discovery message is received. MQTT items without a unique ID will not be added at startup. So a device or service using MQTT discovery must make sure a configuration message is offered after the MQTT integration has been (re)started. There are 2 common approaches to make sure the discovered items are set up at startup:
- Using Birth and Will messages to trigger setup
- Using retained messages
Finally, it is a best practice to publish your device or service availability status.
Use the Birth and Will messages to trigger discovery
When the MQTT integration starts, a birth message is published at homeassistant/status by default.
A device or service connected to the shared mqtt broker can subscribe to this topic and use an online message
to trigger discovery messages. See also the birth and last will messages
section. After the configs have been published, the state topics will need an update, so they need to be republished.
Using retained config messages
An alternative method for a device or service is to publish discovery messages with a retain flag. This will make sure
discovery messages are replayed when the MQTT integration connects to the broker.
After the configs have been published, the state topics will need an update.
Using retained state messages
State updates also need to be re-published after a config as been processed.
This can also be done by publishing retained messages. As soon as a config is received (or replayed from a retained message),
the setup will subscribe any state topics. If a retained message is available at a state topic,
this message will be replayed so that the state can be restored for this topic.
A disadvantage of using retained messages is that these messages retain at the broker,
even when the device or service stops working. They are retained even after the system or broker has been restarted.
Retained messages can create ghost entities that keep coming back.
Especially when you have many entities, (unneeded) discovery messages can cause excessive system load. For this reason, use discovery messages with caution.
Using Availability topics
A device or service can announce its availability by publishing a Birth message and set a Will message at the broker. When the device or service loses connection to the broker, the broker will publish the Will message. This allows the MQTT integration to make an entity unavailable.
Platform specific availability settings are available for mqtt entity platforms only.
Configuration Variables
A list of MQTT topics subscribed to receive availability (online/offline) updates. Must not be used together with availability_topic.
The payload that represents the available state.
The payload that represents the unavailable state.
The MQTT topic subscribed to receive availability (online/offline) updates. Must not be used together with availability.
When availability is configured, this controls the conditions needed to set the entity to available. Valid entries are all, any, and latest. If set to all, payload_available must be received on all configured availability topics before the entity is marked as online. If set to any, payload_available must be received on at least one configured availability topic before the entity is marked as online. If set to latest, the last payload_available or payload_not_available received on any configured availability topic controls the availability.
Support by third-party tools
The following software has built-in support for MQTT discovery:
- ArduinoHA
- Arilux AL-LC0X LED controllers
- ble2mqtt
- digitalstrom-mqtt
- ebusd
- ecowitt2mqtt
- EMS-ESP32 (and EMS-ESP)
- ESPHome
- ESPurna
- go-iotdevice
- HASS.Agent
- IOTLink (starting with 2.0.0)
- MiFlora MQTT Daemon
- MyElectricalData
- Nuki Hub
- Nuki Smart Lock 3.0 Pro, more info
- OpenMQTTGateway
- room-assistant (starting with 1.1.0)
- SmartHome
- SpeedTest-CLI MQTT
- SwitchBot-MQTT-BLE-ESP32
- Tasmota (starting with 5.11.1e, development halted)
- TeddyCloud
- Teleinfo MQTT (starting with 3.0.0)
- Tydom2MQTT
- What’s up Docker? (starting with 3.5.0)
- WyzeSense2MQTT
- Xiaomi DaFang Hacks
- Zehnder Comfoair RS232 MQTT
- Zigbee2MQTT
- OTGateway
Discovery examples
Motion detection (binary sensor)
A motion detection device which can be represented by a binary sensor for your garden would send its configuration as JSON payload to the Configuration topic. After the first message to config, then the MQTT messages sent to the state topic will update the state in Home Assistant.
- Configuration topic:
homeassistant/binary_sensor/garden/config - State topic:
homeassistant/binary_sensor/garden/state - Configuration payload with derived device name:
{
   "name":null,
   "device_class":"motion",
   "state_topic":"homeassistant/binary_sensor/garden/state",
   "unique_id":"motion01ad",
   "device":{
      "identifiers":[
         "01ad"
      ],
      "name":"Garden"
   }
}
- Retain: The -r switch is added to retain the configuration topic in the broker. Without this, the sensor will not be available after Home Assistant restarts.
It is also a good idea to add a unique_id to allow changes to the entity and a device mapping so we can group all sensors of a device together. We can set “name” to null if we want to inherit the device name for the entity. If we set an entity name, the friendly_name will be a combination of the device and entity name. If name is left away and a device_class is set, the entity name part will be derived from the device_class.
- Example configuration payload with no name set and derived
device_classname:
{
   "name":null,
   "device_class":"motion",
   "state_topic":"homeassistant/binary_sensor/garden/state",
   "unique_id":"motion01ad",
   "device":{
      "identifiers":[
         "01ad"
      ],
      "name":"Garden"
   }
}
If no name is set, a default name will be set by MQTT (see the MQTT platform documentation).
To create a new sensor manually and with the name set to null to derive the device name “Garden”:
mosquitto_pub -r -h 127.0.0.1 -p 1883 -t "homeassistant/binary_sensor/garden/config" -m '{"name": null, "device_class": "motion", "state_topic": "homeassistant/binary_sensor/garden/state", "unique_id": "motion01ad", "device": {"identifiers": ["01ad"], "name": "Garden" }}'
Update the state:
mosquitto_pub -h 127.0.0.1 -p 1883 -t "homeassistant/binary_sensor/garden/state" -m ON
Delete the sensor by sending an empty message.
mosquitto_pub -h 127.0.0.1 -p 1883 -t "homeassistant/binary_sensor/garden/config" -m ''
For more details please refer to the MQTT testing section.
Sensors
Setting up a sensor with multiple measurement values requires multiple consecutive configuration topic submissions.
- Configuration topic no1:
homeassistant/sensor/sensorBedroomT/config - Configuration payload no1:
{
   "device_class":"temperature",
   "state_topic":"homeassistant/sensor/sensorBedroom/state",
   "unit_of_measurement":"°C",
   "value_template":"{{ value_json.temperature}}",
   "unique_id":"temp01ae",
   "device":{
      "identifiers":[
          "bedroom01ae"
      ],
      "name":"Bedroom",
      "manufacturer": "Example sensors Ltd.",
      "model": "K9",
      "serial_number": "12AE3010545",
      "hw_version": "1.01a",
      "sw_version": "2024.1.0",
      "configuration_url": "https://example.com/sensor_portal/config"
   }
}
- Configuration topic no2:
homeassistant/sensor/sensorBedroomH/config - Configuration payload no2:
{
   "device_class":"humidity",
   "state_topic":"homeassistant/sensor/sensorBedroom/state",
   "unit_of_measurement":"%",
   "value_template":"{{ value_json.humidity}}",
   "unique_id":"hum01ae",
   "device":{
      "identifiers":[
         "bedroom01ae"
      ]
   }
}
The sensor identifiers or connections option allows to set up multiple entities that share the same device.
If a device configuration is shared, then it is not needed to add all device details to the other entity configs. It is enough to add shared identifiers or connections to the device mapping for the other entity config payloads.
A common state payload that can be parsed with the value_template in the sensor configs:
{
   "temperature":23.20,
   "humidity":43.70
}
Entities with command topics
Setting up a light, switch etc. is similar but requires a command_topic as mentioned in the MQTT switch documentation.
- Configuration topic:
homeassistant/switch/irrigation/config - State topic:
homeassistant/switch/irrigation/state - Command topic:
homeassistant/switch/irrigation/set - Payload:
{
   "name":"Irrigation",
   "command_topic":"homeassistant/switch/irrigation/set",
   "state_topic":"homeassistant/switch/irrigation/state",
   "unique_id":"irr01ad",
   "device":{
      "identifiers":[
         "garden01ad"
      ],
      "name":"Garden"
   }
}
- Retain: The -r switch is added to retain the configuration topic in the broker. Without this, the sensor will not be available after Home Assistant restarts.
mosquitto_pub -r -h 127.0.0.1 -p 1883 -t "homeassistant/switch/irrigation/config" \
  -m '{"name": "Irrigation", "command_topic": "homeassistant/switch/irrigation/set", "state_topic": "homeassistant/switch/irrigation/state", "unique_id": "irr01ad", "device": {"identifiers": ["garden01ad"], "name": "Garden" }}'
Set the state:
mosquitto_pub -h 127.0.0.1 -p 1883 -t "homeassistant/switch/irrigation/set" -m ON
Using abbreviations and base topic
Setting up a switch using topic prefix and abbreviated configuration variable names to reduce payload length.
- Configuration topic:
homeassistant/switch/irrigation/config - Command topic:
homeassistant/switch/irrigation/set - State topic:
homeassistant/switch/irrigation/state - Configuration payload:
{
   "~":"homeassistant/switch/irrigation",
   "name":"garden",
   "cmd_t":"~/set",
   "stat_t":"~/state"
}
Another example using abbreviations topic name and base topic
Setting up a light that takes JSON payloads, with abbreviated configuration variable names:
-
Configuration topic:
homeassistant/light/kitchen/config -
Command topic:
homeassistant/light/kitchen/set -
State topic:
homeassistant/light/kitchen/state -
Example state payload:
{"state": "ON", "brightness": 255} -
Configuration payload:
{
  "~": "homeassistant/light/kitchen",
  "name": "Kitchen",
  "uniq_id": "kitchen_light",
  "cmd_t": "~/set",
  "stat_t": "~/state",
  "schema": "json",
  "brightness": true
}
Example with using abbreviated Device and Origin info in discovery messages
{
  "~": "homeassistant/light/kitchen",
  "name": null,
  "uniq_id": "kitchen_light",
  "cmd_t": "~/set",
  "stat_t": "~/state",
  "schema": "json",
  "dev": {
    "ids": "ea334450945afc",
    "name": "Kitchen",
    "mf": "Bla electronics",
    "mdl": "xya",
    "sw": "1.0",
    "sn": "ea334450945afc",
    "hw": "1.0rev2",
  },
  "o": {
    "name":"bla2mqtt",
    "sw": "2.1",
    "url": "https://bla2mqtt.example.com/support",
  }
}
Use object_id to influence the entity id
The entity id is automatically generated from the entity’s name. All MQTT integrations optionally support providing an object_id which will be used instead if provided.
- Configuration topic:
homeassistant/sensor/device1/config - Example configuration payload:
{
  "name":"My Super Device",
  "object_id":"my_super_device",
  "state_topic": "homeassistant/sensor/device1/state"
 }
In the example above, the entity_id will be sensor.my_super_device instead of sensor.device1.
Manual configured MQTT items
For most integrations, it is also possible to manually set up MQTT items in configuration.yaml. Read more about configuration in YAML.
MQTT supports two styles for configuring items in YAML. All configuration items are placed directly under the mqtt integration key. Note that you cannot mix these styles. Use the YAML configuration listed per item style when in doubt.
YAML configuration listed per item
This method expects all items to be in a YAML list. Each item has a {domain} key and the item config is placed directly under the domain key. This method is considered as best practice. In all the examples we use this format.
mqtt:
  - {domain}:
      name: ""
      ...
  - {domain}:
      name: ""
      ...
YAML configuration keyed and bundled by {domain}
All items are grouped per {domain} and where all configs are listed.
mqtt:
  {domain}:
    - name: ""
      ...
    - name: ""
      ...
If you have a large number of manually configured items, you might want to consider splitting up the configuration.
Documentation on the MQTT components that support YAML can be found here.
Using Templates
The MQTT integration supports templating. Read more about using templates with the MQTT integration.
MQTT Notifications
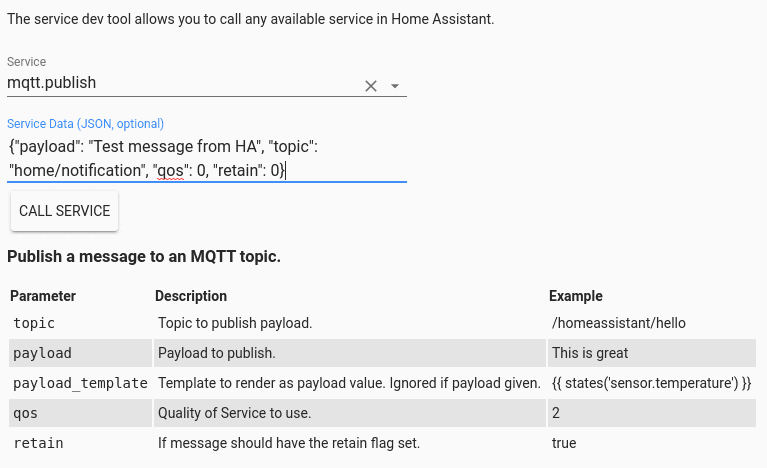
The MQTT notification support is different than for the other notification integrations. It is a service. This means you need to provide more details when calling the service.
Call Service section from Developer Tools -> Services allows you to send MQTT messages. Choose mqtt.publish from the list of Available services: and enter something like the sample below into the Service Data field and hit CALL SERVICE.
{
   "~":"homeassistant/switch/irrigation",
   "name":"garden",
   "cmd_t":"~/set",
   "stat_t":"~/state"
}
The same will work for automations.

Examples
REST API
Using the REST API to send a message to a given topic.
$ curl -X POST \
    -H "Authorization: Bearer ABCDEFGH" \
    -H "Content-Type: application/json" \
    -d '{"payload": "Test message from HA", "topic": "home/notification"}' \
    http://IP_ADDRESS:8123/api/services/mqtt/publish
Automations
Use as script in automations.
automation:
  alias: "Send me a message when I get home"
  trigger:
    platform: state
    entity_id: device_tracker.me
    to: "home"
  action:
    service: script.notify_mqtt
    data:
      target: "me"
      message: "I'm home"

script:
  notify_mqtt:
    sequence:
      - service: mqtt.publish
        data:
          payload: "{{ message }}"
          topic: home/"{{ target }}"
          retain: true
Publish & Dump services
The MQTT integration will register the service mqtt.publish which allows publishing messages to MQTT topics. There are two ways of specifying your payload. You can either use payload to hard-code a payload or use payload_template to specify a template that will be rendered to generate the payload.
Service mqtt.publish
| Service data attribute | Optional | Description |
|---|---|---|
topic |
no | Topic to publish payload to. |
topic_template |
no | Template to render as topic to publish payload to. |
payload |
yes | Payload to publish. |
payload_template |
yes | Template to render as payload value. |
qos |
yes | Quality of Service to use. (default: 0) |
retain |
yes | If message should have the retain flag set. (default: false) |
You must include either `topic` or `topic_template`, but not both. If providing a payload, you need to include either `payload` or `payload_template`, but not both.
topic: homeassistant/light/1/command
payload: on
topic: homeassistant/light/1/state
payload_template: "{{ states('device_tracker.paulus') }}"
topic_template: "homeassistant/light/{{ states('sensor.light_active') }}/state"
payload_template: "{{ states('device_tracker.paulus') }}"
payload must be a string.
If you want to send JSON using the YAML editor then you need to format/escape
it properly. Like:
topic: homeassistant/light/1/state
payload: "{\"Status\":\"off\", \"Data\":\"something\"}"`
When using Home Assistant’s YAML editor for formatting JSON
you should take special care if payload contains template content.
Home Assistant will force you in to the YAML editor and will treat your
definition as a template. Make sure you escape the template blocks as like
in the example below. Home Assistant will convert the result to a string
and will pass it to the MQTT publish service.
The example below shows how to publish a temperature sensor ‘Bathroom Temperature’.
The device_class is set, so it is not needed to set the “name” option. The entity
will inherit the name from the device_class set and also support translations.
If you set “name” in the payload the entity name will start with the device name.
service: mqtt.publish
data:
  topic: homeassistant/sensor/Acurite-986-1R-51778/config
  payload: >-
    {"device_class": "temperature",
    "unit_of_measurement": "\u00b0C",
    "value_template": "{{ value|float }}",
    "state_topic": "rtl_433/rtl433/devices/Acurite-986/1R/51778/temperature_C",
    "unique_id": "Acurite-986-1R-51778-T",
    "device": {
    "identifiers": "Acurite-986-1R-51778",
    "name": "Bathroom",
    "model": "Acurite-986",
    "manufacturer": "rtl_433" }
    }
Example of how to use qos and retain:
topic: homeassistant/light/1/command
payload: on
qos: 2
retain: true
Service mqtt.dump
Listen to the specified topic matcher and dumps all received messages within a specific duration into the file mqtt_dump.txt in your configuration folder. This is useful when debugging a problem.
| Service data attribute | Optional | Description |
|---|---|---|
topic |
no | Topic to dump. Can contain a wildcard (# or +). |
duration |
yes | Duration in seconds that we will listen for messages. Default is 5 seconds. |
topic: zigbee2mqtt/#
Logging
The logger integration allows the logging of received MQTT messages.
# Example configuration.yaml entry
logger:
  default: warning
  logs:
    homeassistant.components.mqtt: debug
Event event_mqtt_reloaded
Event event_mqtt_reloaded is fired when Manually configured MQTT entities have been reloaded and entities thus might have changed.
This event has no additional data.