HomeKit Device
The HomeKit Device integration allows you to connect accessories with the “Works with HomeKit” logo to Home Assistant. This integration should not be confused with the HomeKit Bridge integration, which allows you to control Home Assistant devices via HomeKit.
Adding a HomeKit device
There are different methods to add a HomeKit device to Home Assistant:
Adding a HomeKit device via Ethernet or Wi-Fi
The HomeKit Device integration automatically detects HomeKit compatible devices on your network when they are ready to pair.
Prerequisites
- If you do not have the
default_configintegration, addzeroconfto yourconfiguration.yamlfile. - Find your HomeKit pairing code. The code is on the device itself, or on the packaging. If your device has a screen, it may be shown on screen.
- There is no way to recover this if you do not have it. In this case, you will need to contact the manufacturer to see what options you have.
- Make sure your device is powered up.
- Make sure the device is on your network, but not paired with another HomeKit controller. Depending on the device, you need to follow a different set of steps:
- If your device is not already in your network: Join the device to your network:
- Follow the instructions of the manufacturer on how to join the device to the network
- If the device is HomeKit only (for example the Koogeek LS1 light strip), pair it with the Apple Home app, then follow the next step.
- If your device is in your network but is paired with an Apple device via HomeKit: Remove the device from the Apple Home app.
- Otherwise you won’t be able to pair it with Home Assistant.
-
Explanation: Adding the device to the Home app and then removing it again has two effects:
- It adds the device to your network. It stays in the network even after you removed it from the app.
- Removing the device from the app opens it up for pairing with Home Assistant’s HomeKit Device integration directly. HomeKit devices can only be paired to a single controller at once.
- If your device is not already in your network: Join the device to your network:
To add a HomeKit device via Ethernet or Wi-Fi
-
The device should have been discovered under Settings > Devices & Services.
-
On the HomeKit Device integration, select Configure.

-
Enter your HomeKit pairing code.
- Add the device to a room and select Finish.
- The device should now be added to your Home Assistant instance.
-
Once Home Assistant is configured to work with the device, you can export it back to Siri and Apple Home with the
HomeKit Bridgeintegration.
Adding a HomeKit device through Bluetooth
You can add a HomeKit compatible device to Home Assistant via Bluetooth.
Prerequisites
- Find your HomeKit pairing code. The code is on the device itself, or on the packaging. If your device has a screen, it may be shown on screen.
- There is no way to recover this if you do not have it. In this case, you will need to contact the manufacturer to see what options you have.
- If your Home Assistant instance does not natively support Bluetooth, use an ESPHome Bluetooth proxy.
- A proxy can also be helpful if your Home Assistant device is too far away from the device you are trying to pair.
- If your HomeKit device has been used with ThreadThread is a low-power mesh networking standard that is specifically designed for smart home applications. It is a protocol that defines how devices communicate.
[Learn more] before, or is still paired with iOS, reset the device.- HomeKit devices can only be paired to a single controller at once.
- If it has been in a ThreadThread is a low-power mesh networking standard that is specifically designed for smart home applications. It is a protocol that defines how devices communicate.
[Learn more] network before, the device might remember the ThreadThread is a low-power mesh networking standard that is specifically designed for smart home applications. It is a protocol that defines how devices communicate.
[Learn more] credentials of a different network. A reset makes sure the device is not connected to any ThreadThread is a low-power mesh networking standard that is specifically designed for smart home applications. It is a protocol that defines how devices communicate.
[Learn more] network.
To add a HomeKit device through Bluetooth
-
Power up your HomeKit device.
- If you have Bluetooth enabled, the device should be discovered under Settings > Devices & Services.
-
On the HomeKit Bridge integration, select Configure.
-
To pair the device, enter the HomeKit pairing code.
- To pair a battery-powered device, you may need to press a button on the device to wake it.
- Bluetooth devices may take significantly longer to pair than IP devices.
- Add the device to a room and Finish.
Adding a HomeKit device through Thread
This section shows the ways you can join a HomeKit device to a ThreadThread is a low-power mesh networking standard that is specifically designed for smart home applications. It is a protocol that defines how devices communicate.
[Learn more] network:
- via Home Assistant
- via Apple Thread border router
Adding a HomeKit device to a Thread network via Home Assistant
There are two methods to add a HomeKit compatible device to a ThreadThread is a low-power mesh networking standard that is specifically designed for smart home applications. It is a protocol that defines how devices communicate.
[Learn more] network:
- via Home Assistant’s preferred ThreadThread is a low-power mesh networking standard that is specifically designed for smart home applications. It is a protocol that defines how devices communicate.
[Learn more] network - via Apple Thread border router
This section describes how to add it via Home Assistant’s preferred ThreadThread is a low-power mesh networking standard that is specifically designed for smart home applications. It is a protocol that defines how devices communicate.
[Learn more] network.
Prerequisites
- A HomeKit device which supports ThreadThread is a low-power mesh networking standard that is specifically designed for smart home applications. It is a protocol that defines how devices communicate.
[Learn more]. This is indicated by the Thread label on the packaging. - Make sure the HomeKit device has been joined using Bluetooth.
-
Thread network: In order to use HomeKit over Thread, you need a working border router.
- Make sure your Home Assistant device is on the same network (LAN) as the border router.
- Make sure the ThreadThread is a low-power mesh networking standard that is specifically designed for smart home applications. It is a protocol that defines how devices communicate.
[Learn more] network you’d like to use is known by Home Assistant and marked as Preferred network in the ThreadThread is a low-power mesh networking standard that is specifically designed for smart home applications. It is a protocol that defines how devices communicate.
[Learn more] configuration. - If you have a Home Assistant Yellow or SkyConnect, you can enable multiprotocol to set up an Open Thread border router and with that a ThreadThread is a low-power mesh networking standard that is specifically designed for smart home applications. It is a protocol that defines how devices communicate.
[Learn more] network.- Documentation on enabling multiprotocol on Yellow
- Documentation on enabling multiprotocol on SkyConnect
To add a HomeKit device to a Thread network via Home Assistant
- To open the device configuration page, on the HomeKit integration, select the device.
- Under Diagnostic, you can see the Thread Status as Disabled.
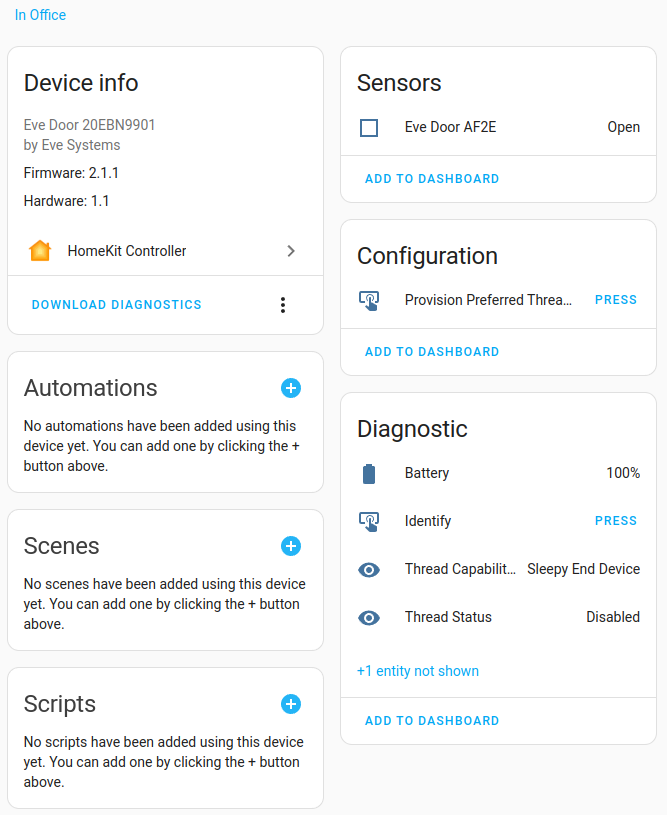
- To enable ThreadThread is a low-power mesh networking standard that is specifically designed for smart home applications. It is a protocol that defines how devices communicate.
[Learn more], under Configuration, select Press. This will provision the preferred Thread credentials.- The status has now changed:
- Depending on the device type, the mesh size and health, the Thread status can be Child, Router, or Leader.
- Depending on the device type, the mesh size and health, the Thread status can be Child, Router, or Leader.
- That’s it. Your HomeKit device now communicates via ThreadThread is a low-power mesh networking standard that is specifically designed for smart home applications. It is a protocol that defines how devices communicate.
[Learn more].
- The status has now changed:
Adding a HomeKit device via Apple Thread border router
There are two methods to add a HomeKit compatible device to a ThreadThread is a low-power mesh networking standard that is specifically designed for smart home applications. It is a protocol that defines how devices communicate.
[Learn more] network:
- via Home Assistant’s preferred Thread network
- via Apple Thread border router
This section describes how to add a HomeKit compatible device using an Apple Thread border router device such as a HomePod mini.
Prerequisites
- An Apple device that can act as a Thread border router, such as a HomePod mini.
- A HomeKit device which supports ThreadThread is a low-power mesh networking standard that is specifically designed for smart home applications. It is a protocol that defines how devices communicate.
[Learn more]. This is indicated by the Thread label on the packaging. - Make sure your Home Assistant instance is on the same network (LAN) as the border router.
- Make sure the HomeKit device has been paired in the Apple Home app (using the iOS Home app).
To add a HomeKit device via Apple Thread border router
-
Remove the HomeKit device from the Apple Home app. Don’t reset the device.
- This leaves the ThreadThread is a low-power mesh networking standard that is specifically designed for smart home applications. It is a protocol that defines how devices communicate.
[Learn more] network details on the HomeKit device. - The device will be automatically discovered by the HomeKit controller integration in Home Assistant.
- It will appear as a discovered device over ThreadThread is a low-power mesh networking standard that is specifically designed for smart home applications. It is a protocol that defines how devices communicate.
[Learn more].
- This leaves the ThreadThread is a low-power mesh networking standard that is specifically designed for smart home applications. It is a protocol that defines how devices communicate.
-
Under Settings > Devices & Services, on the HomeKit integration, select Configure.
-
To pair the device, enter the HomeKit pairing code. The code is on the device itself or the packaging.
- To pair a battery-powered device, you may need to press a button on the device to wake it.
- Bluetooth devices may take significantly longer to pair than IP devices.
- Add the device to a room and Finish.
-
To open the device configuration page, on the HomeKit integration, select the device.
-
Under Diagnostic, check the status:
- Depending on the device type, the mesh size and health, the Thread status can be Child, Router, or Leader.
- That’s it. Your HomeKit device now communicates via ThreadThread is a low-power mesh networking standard that is specifically designed for smart home applications. It is a protocol that defines how devices communicate.
[Learn more].
- Depending on the device type, the mesh size and health, the Thread status can be Child, Router, or Leader.
Supported devices
There is currently support for the following device types (also called domains) within Home Assistant. They are listed with their default types.
- Alarm control panel (HomeKit security system)
- Climate (HomeKit thermostats and air conditioners)
- Cover (HomeKit garage door openers, windows, or window coverings)
- Light (HomeKit lights)
- Lock (HomeKit lock)
- Switch (HomeKit switches, outlets and valves)
- Binary sensor (HomeKit motion, contact, occupancy, carbon monoxide and smoke sensors)
- Sensor (HomeKit humidity, temperature, co2 and light level sensors)
- Fan
- Air quality
- Humidifier (HomeKit humidifiers and dehumidifiers)
- Automation triggers (HomeKit ‘stateless’ accessories like buttons, remotes and doorbells)
If your device is not on this list then you may still be able to pair it, and it will be visible in the Device Registry. But Home Assistant may not create entities for it.
The integration will enable push updates. Devices that connect through Wi-Fi or Ethernet may fall back to only polling if the connection is unstable.
‘Stateless’ switches and sensors
Some HomeKit devices (like buttons, remotes and doorbells) don’t have sensors that can be read like a normal HomeKit device - they only inform Home Assistant when something happens. This means Home Assistant can’t show an entity for them, as they have no state. But they are available for use as device automations.
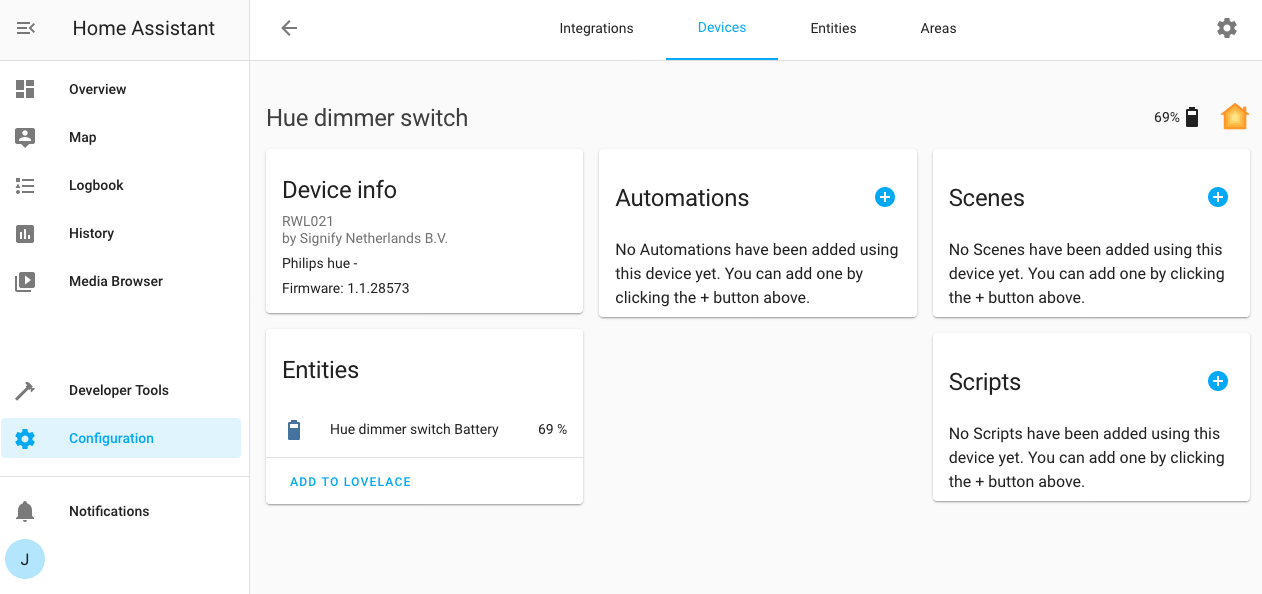
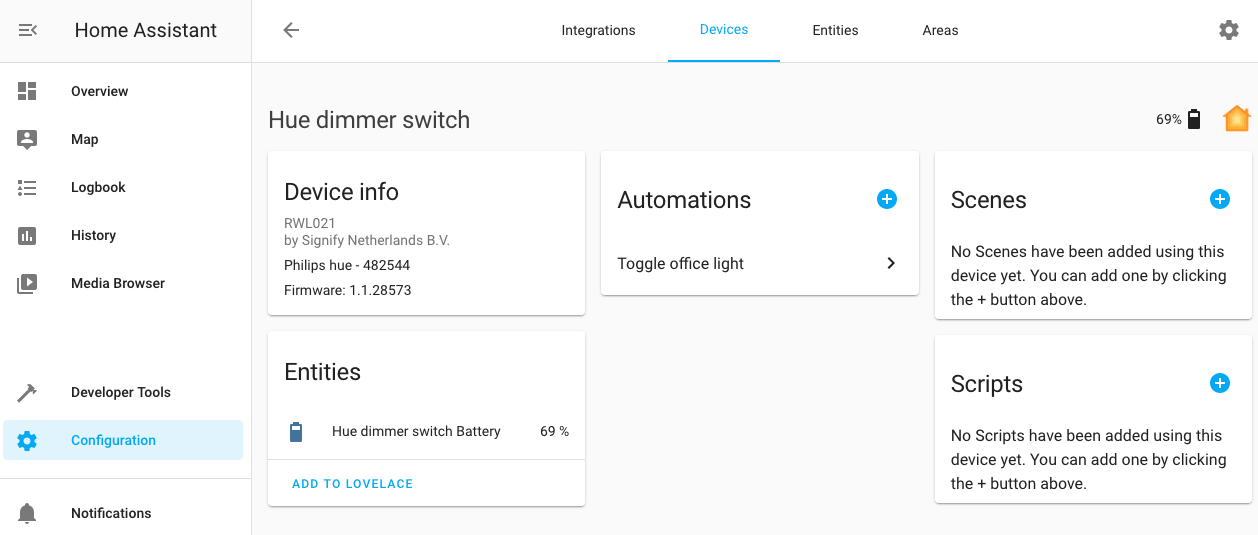
For example, to add a new automation that is triggered by one of these devices go to the device registry UI and find the device you want to use as a trigger. Click on it to reveal the device registry entry for it. You will be able to see the devices model, manufacturer and firmware version. You might see related entities - like a battery sensor.
Click on the button to add an automation. A popup will show you a list of triggers that are available.
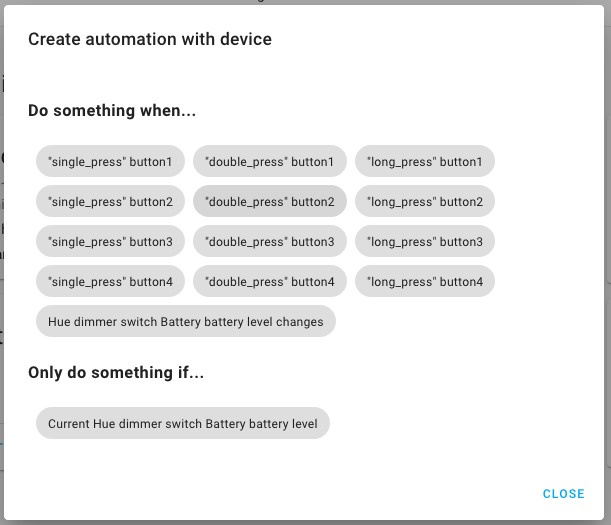
Clicking on one will drop you in to the automation editor with a trigger pre-filled in. If your device supports it you will be able to choose between types of event - like a short press or a long press.
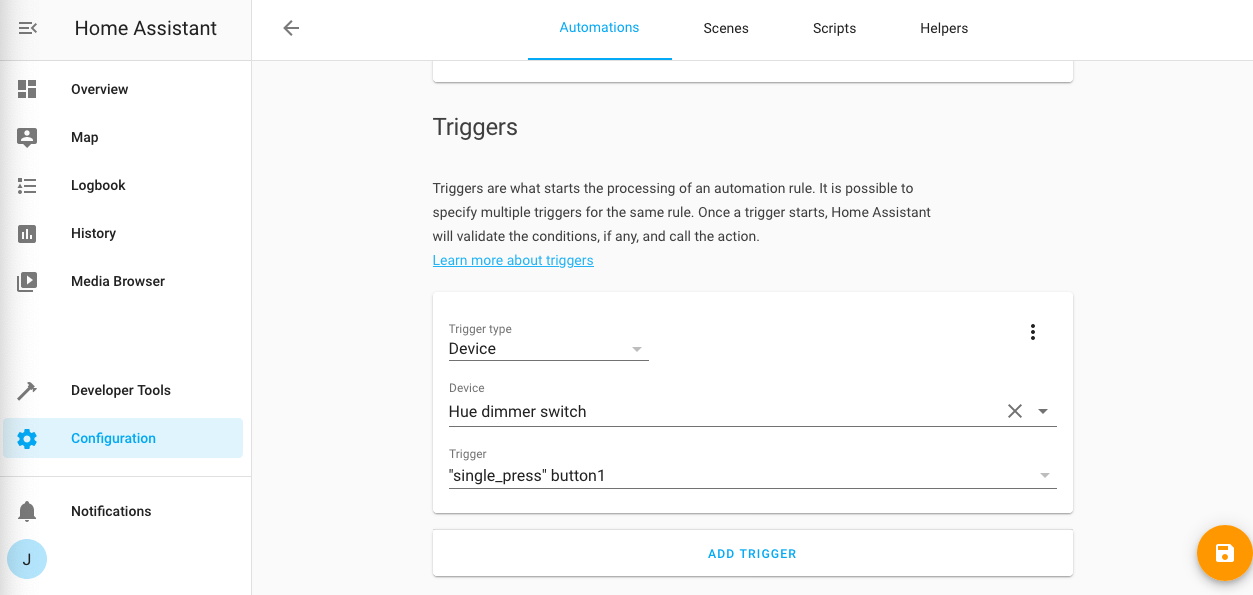
When you have filled in the rest of the form to create your automation it will show up against that device in the device registry.
Pairing with an insecure setup code
Some device manufacturers do not follow the HomeKit spec and will use a fixed code or trivially guessable code such as 123-45-678 for pairing. The integration will warn when pairing about the insecure nature of this configuration and require additional consent before pairing with the accessory. Consider finding a replacement device that implements code randomization.
Troubleshooting
I don’t have a HomeKit PIN
When you buy a certified HomeKit-enabled device, the PIN might be in the instructions or on a sticker on the accessory itself.
Devices with screens like thermostats may not have PIN codes in the packaging at all. Every time you click on “Configure” in the Home Assistant frontend, your accessory will generate a new pairing code and show it on the display.
If your device doesn’t have a display and received HomeKit support after it was released, you may not have a pairing code. Dealing with this is manufacturer specific. Some manufacturers allow you to see the pairing code in their iOS app. Others force you to use their app to configure HomeKit and don’t let you have the pairing pin - right now you won’t be able to use the integration with those devices.
If you have lost your PIN code, then you may not be able to pair your accessory. You should contact the manufacturer to see if there is anything you can do.
Home Assistant cannot discover my device
For IP accessories, Home Assistant can only find devices that are already on the same network as your device. If an accessory is Wi-Fi based and has no user interface for joining it to your Wi-Fi network, you will need an Apple HomeKit controller device (an iPhone or iPad). You should pair it with the controller and then remove the pairing in the UI (but do not reset the accessory itself). This will leave the accessory on your Wi-Fi network but in an unpaired state, and then Home Assistant can find it.
Home Assistant can only find accessories that aren’t already paired. Even if you reset your Home Assistant configuration, the accessory will still think it is paired and you won’t be able to use it with Home Assistant. You should reset the accessory according to the manufacturer’s instructions. Some devices have a “Reset HomeKit” option, and some may require a full reset.
If your devices are on a different VLAN to Home Assistant you must have an mDNS reflector for discovery and pairing to work.
Check that your device is visible with an mDNS tool. If you are comfortable with the command line you can run netdisco from your Home Assistant installation:
python3 -m netdisco
Discovered devices:
homekit:
[ {'host': '192.168.17.5',
  'hostname': 'Philips-hue.local.',
  'name': 'Philips hue - xxxx',
  'port': 8080,
  'properties': {'c#': '21',
                 'ci': '2',
                 'ff': '1',
                 'id': 'AA:BB:CC:DD:EE:FF',
                 'md': 'BSB002',
                 'pv': '1.1',
                 's#': '1',
                 'sf': '0'}},
netdisco is not used by Home Assistant to discover HomeKit devices, so if it can’t see your device the problem is more likely to be environmental than with Home Assistant itself.
Alternatively if you are less comfortable with the command line you could use Discovery for Mac or iOS, Android Service Browser or All My Lan. These are a less useful diagnostic as they aren’t running from the same point on your network as Home Assistant. Even if it is visible in this tool it might still be a networking issue. They can give sometimes give clues.
Where a discovery tool does give an IP, check it is what you expect (compare to DHCP leases in your router for example). Can you ping it? If not, you have a network problem.
Some users have reported that their network configuration has interfered with using HomeKit devices with Home Assistant. The symptoms vary but include discovery not working at all or being unstable (sometimes working, sometimes not). This is very specific not only to the hardware in use but how it is configured and unfortunately we can’t suggest appropriate settings. For example, we have seen IGMP Snooping be blamed as the cause of the problem and also suggested as the fix.
The integration is finding devices on my network even though I don’t have any Apple devices
This is completely normal. Unlike many other commercial IoT offerings, the HomeKit protocol is a local and offline protocol that does not rely on the Apple ecosystem to function. You do not need an Apple online account to use a “Works with HomeKit” device. Some Wi-Fi devices may need an iOS device briefly to get them onto your WiFi, but other than that you do not need any Apple hardware on your network.
Many IoT devices are getting a post-launch HomeKit upgrade. This might mean your device starts showing in Home Assistant as a homekit_controller device even though when you bought it without HomeKit support. This might be a better choice for you than a native integration. For example, many climate devices have an online-only API and a HomeKit API. The HomeKit one might not expose all of the settings and controls you are used to, but it also won’t break if your Internet connection goes down or the cloud service goes away.
I have a warning in my logs about the integration skipping updates
You may say a log entry that looks like this:
HomeKit device update skipped as previous poll still in flight
In these cases it’s unlikely that the integration itself is directly responsible. This is a safety feature to avoid overloading your Home Assistant instance. It means that Home Assistant tried to poll your accessory but the previous poll was still happening. This means it is taking over 1 minute to poll your accessory. This could be caused by a number of things:
- You have too many blocking synchronous integrations for your Home Assistant instance. All synchronous integrations share a thread pool, and if there are lots of tasks to run on it they will queued, which will cause delays. In the worst cases this queue can build up faster than it can be emptied. Faster hardware may help, but you may need to disable some integrations.
- Your network connection to an accessory is poor and the integration is unable to reach the accessory reliably. This will likely require a change to your network setup to improve Wi-Fi coverage or replace damaged cabling.
- There is a problem with the accessory itself which is causing intermittent network issues.
In these cases, the integration will skip polling to avoid a buildup of back pressure in your instance.
I can’t see any events generated for “stateless” accessories
This is expected. The only way to use stateless accessories like some doorbells, buttons or remotes with Home Assistant is through device automations. Home Assistant doesn’t create duplicate events for device automation triggers, so for example you won’t be able to watch them with the events developer tools.
Home Assistant can’t see my Homebridge device(s)
In your Homebridge settings/config, make sure you are using ciao and not Bonjour-HAP. Bonjour-HAP is no longer recommended by homebridge and is considered broken/unsupported.